Showing posts with label tasty. Show all posts

22 March 2017

Red lentil, butternut squash & chilli soup

Red lentil, butternut squash & chilli soup. Get your fix of beta carotene here, orange coloured food for the win. LOL You certainly know you've eaten something by the end of a bowl of this - and all for around 300 calories, which can't be bad. Of course, the crusty bread and butter blows the calories out of the water, but it's good to start low!

When I dreamt this soup up, I was after a main course soup that didn't involve much meat but that tasted like it did. Because of my predilection towards developing gouty painful feet from time to time, it is useful to have a few mainly vegetable recipes to lean on during these periods. Now I know there are those who would tut heavily and announce that lentils are incredible bad for gout - and I know that. However, not with me. They most definitely are not one of my gout triggers, whereas meat very often is - and pork (not bacon, interestingly!) can often be a prime trigger.

Well, I certainly scored with this soup as it is hearty, wholesome and would fill you up on a chilly winter's night. The chilli gives it a nice friskiness that helps to keep your tongue interested, while the butternut squash and lentils give it that heartiness that satisfies. Oh and of course, discovering a piece of bacon every so often will reassure those carnivores amongst us that there is, in fact, some meat in their dinner and they haven't had a vegetarian dish sneaked onto their plate.

Now, where Cook's Tips are concerned, the top one for today is that it is really important to use low sodium stock cubes for this soup. Ordinary, salty, stock cubes will spoil the soup with salt overkill so it is way better to use a low salt stock powder or cube and have to add a little extra salt at the end, rather than the alternative.

As you will see from the recipe, I recommend using a potato masher a few times to break up the vegetables a little and so thicken the soup. Now, you can use a stick blender and whizz the lot, but you will lose a lot of the lovely interest from the texture and of course, you will lose the bacon pieces. However, if that's not important to you and you prefer a more pureed texture to your soup, then whizz away.

For all you vegetarians out there the soup is easily converted to being veggie. Simply leave the bacon out, use all vegetable stock and add half a tsp smoked paprika for the smoky flavour the bacon would have brought and you're home and dry.

Okay, well, I think that's it - so onwards to the recipe!

RED LENTIL, BUTTERNUT SQUASH & CHILLI SOUP (serves 3 as a main meal)

Ingredients :

1 tbsp olive oil
6 rashers streaky bacon, cut into lardons
1 red onion, diced finely
1 clove garlic, chopped finely
1 large red chilli pepper, de-seeded and diced finely
2 carrots, peeled and diced finely
1 celery stick, diced finely
half a butternut squash (I used the stalk end), peeled and diced
3 large juicy tomatoes, cored, diced and as much juice as possible included
8 cherry tomatoes, quartered
1 tbsp tomato puree
1 tsp dried basil
1 tsp low salt chicken stock powder or 1 low salt stock cube
1 tsp low salt vegetable stock powder or 1 low salt stock cube
500ml hot water
150g dried red lentils
sea salt
ground black pepper.

Method :

Use a large sized saucepan and heat the olive oil over a moderate heat. Add the streaky bacon lardons and cook until the fat has rendered and the bacon is golden.

Add the onion, garlic, chilli pepper, carrots and celery and continue to cook, sweating the vegetables down and stirring regularly until they have just begun to soften - around 10-15 minutes.

Add the butternut squash pieces and give them enough time - stirring regularly - to warm up.

Next, add the diced tomatoes, cherry tomatoes and tomato puree and stir to combine. Cook on until the tomatoes have begun to break down.

Add the dried basil, the two stock powders (or stock cubes), hot water and red lentils. Stir through until well combined, then cover the saucepan and bring to a lively simmer.

Remember to stir the contents regularly, as red lentils can sink to the bottom and singe if left unstirred.

Once the lentils are almost cooked and the butternut squash is tender, taste to test for seasoning and add sea salt and ground black pepper as necessary.

Continue to simmer the soup until the lentils, carrots and butternut squash are tender, then taking a potato masher, press it through the soup some three or four times to just break up some of the vegetables which will have the effect of thickening the soup. You can, if you prefer, whizz the soup with a stick blender, but I much prefer to have some chunky texture to it - I think it keeps you interested as you eat it.

Ladle into warmed bowls and serve with warm, buttered chunks of bread for dipping.

Printable version

18 March 2017

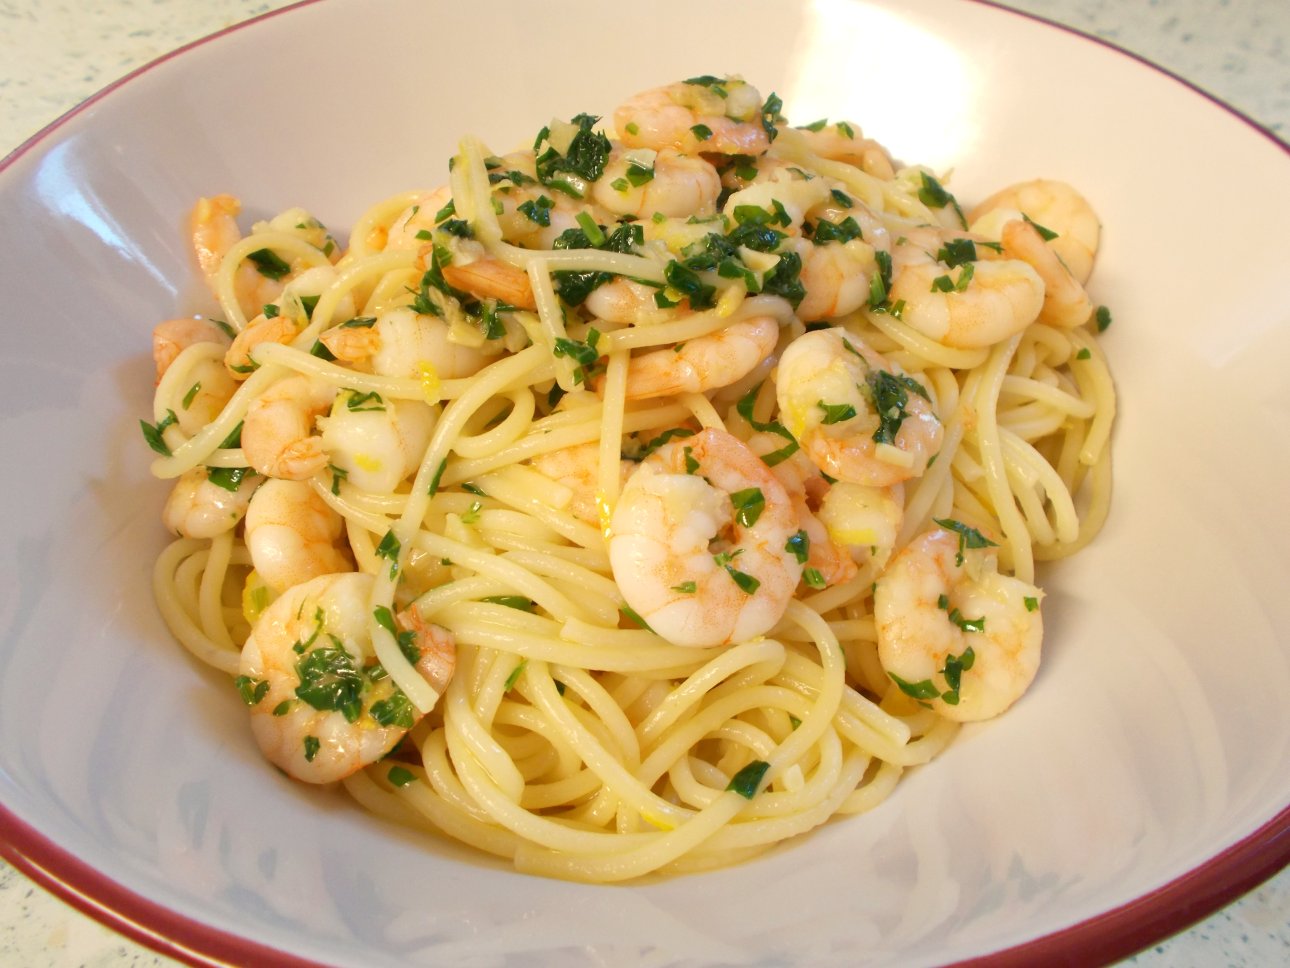
Simple garlic butter prawn spaghetti

Well, this one was a real unexpected surprise.  I wasn't supposed to be cooking this recipe at all and in fact, can't remember why I wasn't cooking the intended one.  Whatever the reasons were - and it could be any number of them! - I decided to go for this because it looked simple and sounded like it could be rather good.

Yes, it's certainly simple - both in number of ingredients, cooking process and method - and as for "rather good", well that's a bit of an understatement.  It turned out to be very good indeed.

The recipe originates with the BBC Good Food website and I could just direct you straight there, however, it occurred to me that if we ever lost that site, I'd lose a very useful and tasty recipe.  So here it is, with thanks to BBC Good Food for the original.

There is only one Cook's Tip for this recipe - and that is, if you are using cooked King prawns (or Tiger prawns), then literally just heat them up in the pan.  Don't cook them, as they are already cooked and will become tough and hard if heated for too long.  They just need to be brought up to a good temperature so as to avoid any risk of encouraging bacteria by half-hearted warming and that's all.


This dish certainly doesn't have big, bold flavours.  However, if you're into garlic butter, lemon and prawns, then you will love it.  The spaghetti gives it that comfort food thing and the lemon prevents the butter from becoming too rich.  I'd have it again tomorrow, I liked it that much!

SIMPLE GARLIC BUTTER PRAWN SPAGHETTI    (serves 2)

Ingredients :

250g dried spaghetti
sea salt
20g salted butter
2 cloves of garlic, chopped finely
a pinch of ground black pepper
250g cooked King prawns
zest of 1 lemon
15g fresh parsley, chopped.

Method :

Firstly, bring a large pan of salted water to the boil.  Add the dried spaghetti and cook to manufacturer's recommendation.

In the meanwhile, melt the butter in a frying pan over a gentle heat and add the chopped garlic.  Sweat, as opposed to fry, the garlic ever so ever so gently until the pieces are softened, adding the black pepper along the way.  Then, add the prawns, the lemon zest and the parsley and increase the temperature just slightly, sufficient to heat the prawns through without cooking them and without frying the pan's contents.

Drain the pasta and add to the prawn & garlic pan.  Toss the pasta in the garlicky butter and serve into warmed bowls, sharing the prawns out evenly.

Printable version

23 February 2017

Chicken Jalfrezi - a lighter but still tasty version!

Over the last few months, my hubby has slowly taken agin the curry pastes that are widely available for home made curries.  He's begun to find them very one-dimensional but more importantly to him, they don't taste of curry. Now this curry flavour is a very definite thing that we have yet to quite pin down, but this Jalfrezi got the closest to it in any curry for a long time.  We're still not quite there, but as I liked this recipe a lot for its flavour and use of fresh vegetables, I thought I'd pass it on to you all.

This recipe doesn't result in a heavy, thickly sauced curry but one that is a lot lighter in texture and without the pools of oil that characterise so many curries these days.  Oh and I'm really not sure how much of a Jalfrezi it really is, but I'm hoping that it is close at least.  As it uses curry powder, my first word of warning is to make sure you are using a good curry powder.  One which has a number of different flavours to it is by far and away the best.  I have yet to find - and yes, I will admit that perhaps there is one somewhere - a supermarket own brand curry powder that would even remotely fit the bill. My favourite curry powders come from our local ethnic shop, where I'm hoping that the curry powders on offer are close to the "real thing", but are certainly a long way from bland.


Secondly, make sure to use tomatoes that have flavour.  Vine ripened are the best of the supermarket choices, but it is worthwhile throwing in a few cherry tomatoes just to boost the profile a bit.

Lastly, make sure to leave yourself enough time.  Once the tomatoes get cooking, you need time for them to cook down, then time for the juice to reduce and intensify the flavour.  If you take the pot off the heat and think it's finished too soon, you'll just have a vaguely spicy tomato stew and not a curry.  So, give yourself and your curry time to chuckle, burp and spit tiny blobs of curry into random spots in your kitchen, you'll be glad you did even if the clean up is tricky.  (Of course, I could have got out the splatter guard which would have made sure no blobs escaped, but I was comfy and would have had to have moved.  What can I tell you?  ~shrug~).

From first putting the coconut oil into the wok, to calling everyone to attention in order to get them sat down and ready for the meal, my curry took around 50 minutes (with a good 30 minutes of chopping beforehand).  So it's not an earth-shattering amount of time, but if you only have half an hour, you're going to be in tomato stew land.  So leave sufficient time.

I really liked this curry.  Hubby wasn't so enthused, but I've already told you about the quest for curryness that we're on there.  When cooking it, I was concerned that it didn't have enough curry character, but as our son came home from college and immediately knew it was curry for dinner, I'm assuming it was just that my nose had got used to the aromas.  It tasted good right from the off and really came together in the last 10 minutes, once the liquid had reduced and the proper curry sauce texture arrived.  It was amazing the difference that reduction made to the overall flavour.

So, enough blathering and on with the recipe!

CHICKEN JALFREZI  (serves 4)

Ingredients :

2 red peppers, one roughly chopped into chunks, the other sliced
1 large onion, half roughly chopped into chunks, the other half sliced
4 large garlic cloves, peeled and roughly chopped
1 tbsp coconut oil
3 boneless, skinless chicken breasts, sliced
a pinch of sea salt
4 heaped teaspoonfuls curry powder
1 heaped teaspoonful garam masala
a quarter of a teaspoonful of ground black pepper
2 very large sweet tomatoes, chopped
6 cherry tomatoes, quartered
1 tsp chicken stock powder (or 1 stock cube)
150ml hot water
1-2 tsp runny honey (optional)
10g butter (optional)
15g fresh coriander, chopped (reserve a little for garnish)
cooked white rice to serve.

Method :

Begin by placing the chunks of red pepper, the chunks of onion and the garlic into a food processor and blitz until a purée is achieved.  Set this aside.

Next, heat the coconut oil in a large saucepan or wok until really quite hot and gently add the sliced chicken breasts and sprinkle with the sea salt.  Spread the pieces across the pan and leave them to achieve a little colour, then turn and do the same again.  The slices do not need to be cooked through at this stage.

Using a slotted spoon, remove the chicken to a bowl and reserve.

Add the sliced red pepper and sliced onion to the wok and cook, covered, for 5-6 minutes stirring half way through, until they have gained a little colour and begun to soften.

Add the puree to the wok, along with the curry powder, garam masala and black pepper.  Stir well to combine and fry, stirring occasionally, until the juices are released and the mix has dried out considerably.  This should take around 10 minutes if your wok heat is high enough.

Add the chopped tomatoes and stir through, along with the chicken stock and the water.  Once combined, add the chicken pieces and stir through.  Now this is where the patience is required.  You need to have the pan hot enough that the tomatoes will cook and release their juices, then the juices (and the chicken stock) will reduce and the full flavour be created.  You will start with a quite considerable quantity in the pan, but once everything has cooked down and reduced, the sauce will thicken and the liquid will evaporate.

Marginally before the sauce reaches its final few minutes, taste for the salt level and add a little more if necessary, but remember that there will be a little salt in the butter that if you're using, should be added now.  Taste also for acidity and add the honey to your preference to correct that.  If you consider there's no sweetening required, then don't use the honey.

Once everything is combined and happy to be there, the sauce is thick and there are no pools of water on the surface of the curry, then you're ready to serve.

Serve with plain white Basmati rice and sprinkle with the reserved chopped fresh coriander as garnish.

Printable version

19 May 2016

Mead - *hic* - yep, it's alcoholic and good for you!

Yes, Mead!  That apparently old style alcoholic drink that used to be sold by Merrydown in this country, but appears to have fallen off the map.  That elixir of life for Norsemen down the ages, who by all accounts had a great liking for the stuff (and who wouldn't!).  I gather, also, that it is a stalwart of many a Renaissance Fayre over the pond in the U.S. and perhaps even Canada.

I can remember my parents, way back in the seventies and one Christmas, producing a bottle of Merrydown Mead and being cock-a-hoop that they'd found some.  As I was knee-high to a grasshopper at the time, I didn't get to taste any but their happiness at having found it was testament to its popularity (at the time).

As time went on, it seems to have fallen by the wayside as so many good things often do. However, there does seem to be something of a resurgence going on - and in home brewing terms.  Now my hubby is a bit keen on dallying about with demijohns and hydrometers, but it was the news that Mead contains a significant number (by which I mean SHEDLOADS) of probiotics, that tipped the balance for us.  We're all into probiotics in this house as my use of Kefir (a fermented milk drink) and liking for Kombucha (have yet to try fermenting this one), along with the use of goat milk (unfermented, this time) seem to have made a significant difference to my irritable bowel syndrome.  Have a read of this piece here, for more information on that happy side of Mead.

Chicken in a Mead and mustard cream sauce
This being, primarily, a food blog, I think it is important to underline the very good work that our Mead has been doing in the cooking department.  My pork with parsnips and Mead was unbelievably good, the chicken in a Mead and mustard cream sauce was just out of this world and hubby has mounted an armed perimeter guard around the freezer since I made my rhubarb & mead semifreddo, with rhubarb & mead compote.  So, you see, Mead is not just for warming your cockles on a chilly night!

So as hubby is the Master Brewer in our house, I shall turn the remainder of this blog post - and the recipe of course - over to him.

There really is no magic involved in Mead, it is quite simply a combination of good quality honey, brewer's yeast and water, left to ferment.  The better the honey you use, the better the mead will be, so take care not to get any of the honey blends, as some will contain a sugar syrup.

You can flavour your Mead by adding raisins, spices such as cinnamon and cloves, or any number of other botanicals such as elderflowers, juniper berries and sweet herbs into the first demijohn. It is also possible to make a fruit Mead (called a melomel) by adding fruit (peaches, pineapple, oranges, rhubarb or whatever you want) into the second demijohn. (We haven't tried this one yet!).

As regards the yeast required, baking yeast just won't do, so put that back in the fridge before we go any further.  Brewers yeast (or wine making yeast) is what you want - as it is better at converting sugar to alcohol.  Champagne yeast is the very best and I found mine on Amazon.  Generally, one sachet of yeast is 5g although they can differ.  However 5g of yeast is the amount I use in this recipe.

You might be wondering what use the lemon juice is put to, but apparently it helps to wake the yeast up and kickstarts the fermentation process.  Sounds likely!

Yes, you do need some specialised equipment for the task, but really, not much of it!  Two 5 litre demijohns are a must, together with a length of silicone tubing, an airlock and bung, a large bottle brush for cleaning everything and a good selection of glass bottles to carry the final product.  I've found that Grolsch bottles - being swing-topped - are great.  It is an easy matter to obtain corks with which to seal wine bottles and these are great when storing the Mead for any length of time.  A hydrometer is useful if you want to check the alcohol content by any other means than "have I got a headache" when you wake up in the morning.

There are lots of ways to sterilise glass, the easiest of which is to use a sterilising solution. I use one called "Bruclense" which is easy to use and leaves no chemical residue once rinsed. There are other solutions which are sold to sterilise babies' bottles that do the same job. If you hate the idea of chemicals though, just wash the glass well, rinse thoroughly and then put into an oven at 110 degrees celcius for ten minutes.

Having assembled your small collection of equipment, you'll be raring to go - so here's the recipe.


MEAD   (makes approx. 4.5 litres)

Ingredients :

1,200 - 1,500g of runny honey (depending on how sweet you want the finished mead)
1 sachet (5g approx.) of brewing or wine yeast (I use champagne yeast)
1 lemon, juice only
5 litres of water.

Method :

In a saucepan, add the honey to 1 litre of the water and warm it up so that the honey dissolves.  Make sure not to let the mixture boil, just get it warm enough to be pourable.

Once dissolved, cover and leave to cool to room temperature before pouring it into a clean, sterilised 5 litre demijohn along with the lemon juice, the brewing yeast and then top the demijohn up with the remaining water, leaving a 5 cm air gap at the top.  An initial hydrometer reading can be taken at this stage if you're into that kind of thing.

Seal the demijohn with an airlock and bung and leave in a dark place for around 30 days to ferment.

Fermentation should, initially, be quite vigorous (more than one bloop per second) but after 30 days or so, the airlock should be bubbling only very slowly (a bloop every ten seconds or so).  This is time to carefully rack the mead into another clean sterilised demijohn, taking care to leave the sediment behind in the original one.  (Racking = decanting).  Racking can be a tricky procedure and I suggest that you visit YouTube to get a good sense of how it is done.   You can take the opportunity to top up with water to the full 5 litres, if you wish. Now is also the time to take a second hydrometer reading, which will give you an idea of the alcohol content at that moment.  Mine was 13.5%.

This is also the stage at which any botanicals or fruits can be added.  For my second batch of mead, I've used half a cinnamon stick and a few juniper berries but there are all manner of extra flavours that would work very well too.  Replace the airlock and bung and leave the whole thing for another 30 days to clear before racking into clean, sterilised bottles.

The mead can be drunk at this stage but the longer it is left in the bottles, the better it becomes. Six months is a good time to wait but it should keep for much longer than that if all of your equipment was sterilised and scrupulously clean.

Cheers!


Related Posts Plugin for WordPress, Blogger...