Showing posts with label butter. Show all posts

1 November 2017

Manchego chicken Alfredo - super quick, two pot supper

This bowl of chickeny, cheesy, garlicky and creamy delight could almost be called a one pot supper, but regrettably the pasta needed to be cooked in its own pan - hence it became a two pot deal.  However, that in no way slows it down, oh no.  The sheer simplicity of the ingredients makes this as speedy a dinner to produce as any you could wish for.

With no onions to chop, no veggies to peel or slice, the only preparation that's required is to peel and chop some garlic, cut some chicken in half, grate some cheese and chop a bit of parsley.  I certainly can't claim that's in any way difficult - and oh boy, does it pay off by way of flavour!  Alfredo de Lelio, you sure knew what you were doing when you put the original dish together, all those years ago in 1892.


However, I suspect Mr de Lelio would be horrified to learn that I have removed the quintessentially Italian Parmesan cheese from the recipe and submitted, instead, a Spanish replacement - the gorgeous Manchego hard cheese.  Being a sheep's cheese, Manchego has a very different flavour to Parmesan, but equally there are similarities in both texture and colour plus they both melt in a similar way.

Son and heir is passionately opposed to Parmesan - he can't bear the after taste it brings with it, so consequently I was committed to finding a replacement for it or not indulging in pasta Alfredo at all.  I was intending on using Grana Padano, but having recently used some Manchego in cheese scones with every success, I decided to give it a go and I'm so glad I did.

So there we are.  A bit of a different spin on pasta Alfredo, but super tasty and super quick to make, too.  If, perchance, you can't find any Manchego but like the sound of the recipe and don't have anyone at home passionately opposed to Parmesan, then by all means use Parmesan.  You won't be harming the recipe at all, you'll simply be returning it back to its roots.

I only have one Cook's Tip for you, which is that when you drain the pasta make sure to keep some of the pasta water close by.  If (as sometimes happens), the sauce becomes too gloopy and thick, simply add a little of the pasta water.  Far better to use that than add more cream, or milk, or have to mix up some chicken stock.

Onwards to the recipe!

MANCHEGO CHICKEN ALFREDO   Serves 2

Ingredients :

250g small, open style pasta such as Conchiglie shells
1 tbsp rapeseed or olive oil
2 tbsp butter
2 boneless, skinless chicken breasts, halved horizontally
sea salt & black pepper, to taste
2 cloves garlic, chopped finely
200ml dry white wine
250ml single cream
50ml double cream
half a tsp good quality chicken stock powder (or half a chicken stock cube)
125g Manchego cheese, grated finely
2 tbsp fresh parsley, chopped.

Method :

Bring a good quantity of salted water to the boil in a large saucepan and cook the Conchiglie shells to manufacturer's recommendation, draining once cooked.

In a large frying pan, heat the rapeseed oil and melt the butter over a high heat.

Season the two halves of each chicken breast with both sea salt & black pepper and carefully place into the frying pan.  Fry the chicken until it is a deep golden brown on both sides and cooked through.

Remove the pan from the heat and decant the chicken onto a warmed plate.  Cut the chicken into even sized slices and reserve to keep warm.

Replace the pan onto a reduced heat and add the garlic.  Stir and cook gently until the garlic is softened and lightly golden.  Add the wine (and a little bit extra for luck is definitely allowed) and allow to bubble and reduce by one third.

Add the single and double creams along with the chicken stock powder and stir gently to combine.  Once the sauce has heated through, is bubbly and slightly thickened, add the grated cheese, most of the parsley, the hot, drained pasta and sliced chicken.  Toss everything in the sauce until all is well combined.  Taste for seasoning and add more pepper if necessary.

Serve into warmed bowls with a sprinkle of the reserved parsley on top as garnish.


17 September 2017

Sherried rhubarb crumble - only for grown ups!

As most of you know, we grow rhubarb in our garden.  It all started with the one plant - called Ruby - who grew so much we had to split her in half and so she spawned her daughter, RubyTwo.  Well, the years have gone past and the pair of them are now busting out of the brick planters they are in and three times a year (or more) threaten world domination unless we harvest them and share them around the neighbours.  So, as you can imagine, obtaining rhubarb isn't exactly a challenge.  In fact, for this recipe, hubby went out and cut the 500g required and it was in the oven half an hour later. Can't get a lot fresher than that!

With this crumble, I wanted very much to just celebrate the joy that is rhubarb.  Not dilute it with apple, or confuse matters by adding blackberries.  No, I wanted it to be simply rhubarb.  Our rhubarb is so tasty - it's a champagne variety - that I always think it's a shame to mask its deliciousness with other flavours.

However, that didn't stop me from having a rush of blood to the head and adding sherry.  *chuckle*  Well, I figured that as we've had a rhubarb trifle with sherry in the past - which was delicious, why not?  I used a medium sherry - Harvey's Bristol Cream, in fact.  It definitely lent the dish a certain something and I'd definitely do that again.

What did it taste like?  Oh, it was beautiful.  Sweet, sharp, deep rich flavours of rhubarb with the slight headiness of sherry, balanced against the buttery, oaty, slightly toffee flavoured crumble that just melted in the mouth. Heavenly. Especially with vanilla custard, which is just the perfect accompaniment.


I have two Cook's Tips for you, which are as follows :

Lots of crumble recipes tell you to pre-cook the fruit, but I didn't want rhubarb slush, I wanted pieces of rhubarb that still had their shape and a little of the crunch.  Cutting the pieces slightly smaller than usual, managed to achieve that very nicely across the 30 minute cooking time.   If however, you prefer your rhubarb to be softer then make sure to cook it on for another 10 minutes or so.

I'm sure we've all made fruit crumbles that wind up being all juice.  For me, too much juice can almost ruin a crumble as it tends to steam the underside of the crumble top and you end up with a yukky sludgy uncooked layer and the fruit swimming in juice.  To offset this, I mixed in some cornflour (or perhaps corn starch where you are) with the raw fruit and sugar, which has the effect of thickening the juice and so preventing both the sludge and the pool.  You don't even notice it's there, so it's a sneaky tip to remember for fruit pies, too!


Maybe the very next time you lay your hands on some rhubarb, you can give this crumble a go.  Your family will thank you!

SHERRIED RHUBARB CRUMBLE    (serves 4-5)

Ingredients :

500g rhubarb, washed, dried and cut into 1cm pieces
100g caster sugar
1 tbsp cornflour
3-4 tbsp of medium sweet sherry.

For the crumble :

130g self raising flour
50g light brown muscovado sugar
30g rolled porridge oats
90g slightly salted, chilled butter.

Method :

Pre-heat your oven to 190degC/375degF/Gas 5.

Place the chopped rhubarb into a deep sided casserole or baking dish. Sprinkle over the caster sugar and cornflour and mix together thoroughly until each piece of rhubarb is coated.

Sprinkle the sherry over the rhubarb and set aside while you make the crumble.

Weigh the self raising flour, muscovado sugar and porridge oats into a large bowl and lightly stir together.

Cut the butter into small pieces and rub it into the dry ingredients until everything is buttery and breadcrumb-like.

Spread the crumble across the top of the fruit mix and level the surface without pressing down or compacting the crumble at all.

Bake in the oven for 30 minutes, or 40 minutes if you like your fruit softer.

Serve with vanilla custard, or double cream if you must.  *wink*

Printable version

18 March 2017

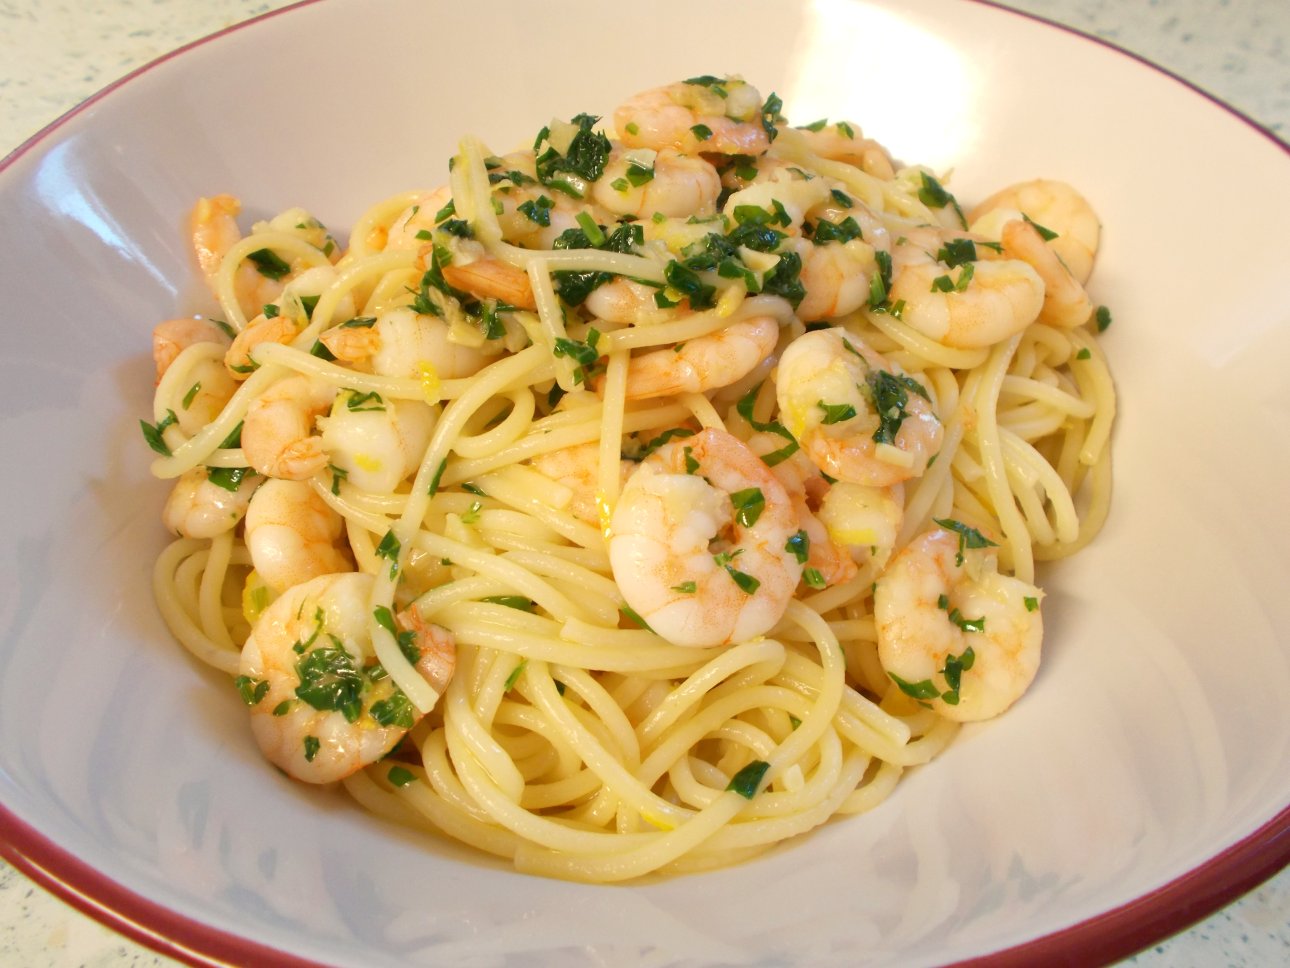
Simple garlic butter prawn spaghetti

Well, this one was a real unexpected surprise.  I wasn't supposed to be cooking this recipe at all and in fact, can't remember why I wasn't cooking the intended one.  Whatever the reasons were - and it could be any number of them! - I decided to go for this because it looked simple and sounded like it could be rather good.

Yes, it's certainly simple - both in number of ingredients, cooking process and method - and as for "rather good", well that's a bit of an understatement.  It turned out to be very good indeed.

The recipe originates with the BBC Good Food website and I could just direct you straight there, however, it occurred to me that if we ever lost that site, I'd lose a very useful and tasty recipe.  So here it is, with thanks to BBC Good Food for the original.

There is only one Cook's Tip for this recipe - and that is, if you are using cooked King prawns (or Tiger prawns), then literally just heat them up in the pan.  Don't cook them, as they are already cooked and will become tough and hard if heated for too long.  They just need to be brought up to a good temperature so as to avoid any risk of encouraging bacteria by half-hearted warming and that's all.


This dish certainly doesn't have big, bold flavours.  However, if you're into garlic butter, lemon and prawns, then you will love it.  The spaghetti gives it that comfort food thing and the lemon prevents the butter from becoming too rich.  I'd have it again tomorrow, I liked it that much!

SIMPLE GARLIC BUTTER PRAWN SPAGHETTI    (serves 2)

Ingredients :

250g dried spaghetti
sea salt
20g salted butter
2 cloves of garlic, chopped finely
a pinch of ground black pepper
250g cooked King prawns
zest of 1 lemon
15g fresh parsley, chopped.

Method :

Firstly, bring a large pan of salted water to the boil.  Add the dried spaghetti and cook to manufacturer's recommendation.

In the meanwhile, melt the butter in a frying pan over a gentle heat and add the chopped garlic.  Sweat, as opposed to fry, the garlic ever so ever so gently until the pieces are softened, adding the black pepper along the way.  Then, add the prawns, the lemon zest and the parsley and increase the temperature just slightly, sufficient to heat the prawns through without cooking them and without frying the pan's contents.

Drain the pasta and add to the prawn & garlic pan.  Toss the pasta in the garlicky butter and serve into warmed bowls, sharing the prawns out evenly.

Printable version

3 May 2011

Rhubarb & Mango Crumble : a Twitter-crumble!

When my parents came over for lunch last weekend, we picked a whole heap of rhubarb for them to take away with them - and, of course, forgot to give it to them.

So, I've had four or five big sticks of rhubarb getting right in the way in my fridge ever since.  My intention has been to find some use for them, be it a crumble, or maybe the fruit layer of a sponge for dessert, or perhaps a fool.

Indecision and lack of time resulted in their still being in the fridge by the following weekend - where they'd been joined by a mango which was rock-hard when it was delivered, but has since ripened on a sunny window ledge and been put in the fridge to chill down.  I hadn't a clue what I was going to do with that, either.

Bank Holiday Monday appeared and they were still glowering at me from the fridge.  I knew that I hadn't got many more days before they both expired, all unloved and apparently unwanted, and couldn't let that happen.


So, while I was trying to concentrate on writing out a shopping list, they were on my mind.  So much so, I paused my shopping list writing to enquire of the Twitterverse whether anyone thought that rhubarb & mango would go well together, particularly in a crumble?


There came back an emphatic "yes" from three Tweeps, @madamding, @willipmrpip and @stovemonster who all pronounced themselves hugely interested in the end result.  So, this crumble is dedicated to them, as without their votes of confidence it might never have been made - which would have been a real pity!


Because of the way that rhubarb disintegrates when it is cooked, I opted not to pre-cook the fruit.  Hence, it was a bit of a juggling act with regard to the sugar content.  However, because the mango was extremely juicy (over-ripe, in fact) and consequently very sweet, I under-estimated the sugar - with perfect results.  The fruit kept it's shape (more or less) and the rhubarb and mango did a kind of sharp/sweet tango on your tongue.  With the lovely oaty, buttery crumble on top (which could have been more crumbly, but the butter was rock hard and my fingers had frozen to death by then, so rubbing it in was difficult), it was a completely delicious thing to make.


RHUBARB & MANGO CRUMBLE (serves 4)


Ingredients :


3-4 large sticks of rhubarb, cut into 1" pieces
a large mango, skinned and diced
2-3 tbsp granulated sugar
2 tbsp plain flour
3 tbsp porridge oats
2 tbsp granulated sugar
30-40g butter, cut into small dice.


Method :


1.  Place the cut rhubarb and mango dice into a baking dish.  Sprinkle with the granulated sugar and mix to combine.


2.  In a separate bowl, add all the crumble ingredients and rub the butter in to the flour and oats, until the whole resembles breadcrumbs.


3.  Sprinkle the crumble mixture onto the fruit, taking care not to pat it down at all.  Let it just rest there, and it will stay light in texture.


4.  Bake in a moderate oven (180deg C) for around 35-45 minutes or until the crumble is toasty brown on top.  I stopped mine a little early, as the juice was threatening to overwhelm the crumble.


Serve with double cream.


.


22 December 2010

Rum-soaked Baked Apples


I only wish you could smell how glorious these are!
I'd had two Bramley Apples roosting in the fridge, looking for something to do, for far too long.

So, in the face of hubby's dislike of Baked Apples, I thought I'd give myself a treat and see whether our son was going to come down on his father's side, or on mine, as regards the loveliness that is the baked apple.

I find it very difficult to understand hubby's dislike of the humble baked apple, although I do recognise that some people just don't like certain textures, or flavours, or looks of food.  Personally, there's little I don't like sufficiently to make me avoid it, so understanding someone else's dislikes is particularly difficult.

For me, the sight of a couple of lovely Bramley Apples just out of the oven, brimming with mixed fruit, covered with brown sugar, trickles of butter running down their foamy sides, glistening with juice and just asking to be paired with a dollop of cream, is one of life's joys.

For hubby, he sees nothing appealing in this picture at all.  He prefers his apples to be crisp and sharp rather than cooked and foamy, the sugar to be cooked (as in melted) rather than crunchy and just can't relate to the pairing of butter with apple.

So, with instructions not to say anything that will put son off trying them, we sallied forth into dessert.  Son had seen the apples just out of the oven and by the size of his eyeballs and the watering of his mouth, the signs were good.  Not only did he clear his bowlful, but he came back for seconds and ate the remainder for dessert the following day.

I have to admit, it was good to have him follow his Mum in something - for once!

RUM-SOAKED BAKED APPLES (feeds 3-4)

Ingredients :

2 large Bramley Apples
4-6 tsp soft brown sugar
4 tbsp dried mixed fruit
1 lemon, zested
half a tsp cinnamon
2 tbsp spiced rum
butter

Method :

1.  Place the mixed fruit, cinnamon and lemon zest into a small bowl and pour the rum over.  Leave it to soak for 2-3 hours.

2.  Remove the cores from the apples, without cutting them in half.

3.  Score around the middle of the apple, so that when it cooks, the peel can rise.

4.  Score two lines from the top to the first score line.  This will help when it comes to serving half an apple.

5.  Place the apples into a baking dish.

6.  Fill the cavities with the soaked fruit & divide any liquid between them.

7.  Place a knob of butter on top of the fruit, and press down.

8.  Fill the remaining cavity (to overflowing) with the brown sugar.  Sprinkle the remainder around the apples.

9.  Add a tbsp or two of water (the amount depends on the size of your dish and the amount of rum you've included) to ensure the apples don't dry out.

10.  Bake at 180deg for 35-40 minutes or until a knife runs through the apple (via the centre split) easily.

Serve with cream, creme fraiche, or greek yoghurt.

.

12 October 2010

Doughballs!

That hubby of mine is a sneaky baker!  We had frozen supermarket pizza for dinner tonight (special offer, so cheap as chips) and to cheer the whole thing up, he went and made us some garlic & parsley doughballs.  :-)


DoughBalls!  Makes 18

For the dough :

    * 250g strong white flour
    * 1 teaspoons of dried yeast (or 1 sachet)
    * 1 teaspoons of salt
    * 1 tablespoons of olive oil
    * 1 teaspoons of honey
    * 150mls of warm water

Place the flour and salt in a large bowl and mix roughly with your hand.   Put the yeast and honey in to a jug and pour in warm water to bring it to 150mls.  Leave until yeast froths (5-10mins).   Make a well in the flour and pour in the oil and the water.  Using your hand mix the dough until it forms a soft rough ball.

Sprinkle some flour on a clean surface and then knead the ball of dough for at least 10 minutes until the dough becomes elastic and smooth.  Place the dough back in the bowl, cover with oiled clingfilm and leave in a draught free place for a couple of hours to rise.

For the garlic butter

    * 2 cloves of fresh garlic
    * 60g soft unsalted butter
    * 2 tablespoons of chopped fresh parsley
    * pinch of salt

Preheat the oven to 220ºC. Shape the dough in to small round balls – approximately the size of a large marble.  Place them in a lightly buttered tray, spaced evenly apart with enough room to rise.

Leave the dough to rest for approx. 15 minutes.

Using a pestle and mortar crush the garlic together with a pinch of salt to make a paste. Add in the butter and parsley and mix well.

Place the dough balls in the oven and bake for 10 minutes until lightly golden.  Remove them from the oven and use a knife to plaster the garlic butter over the tops of the dough balls.  It is a good idea at this stage to use a baking tray or tin foil under the doughball tray to avoid garlic butter seeping on to the bottom of your oven as it melts. Place the tin back the oven and after 3 minutes remove the tray from the oven, seperate the dough balls from each other and roll them around in the garlic butter on the bottom of the tray.  Empty on to a warmed bowl or plate and allow to cool only slightly before eating.


Fattening as all heck - but delicious!

2 October 2010

Fruit Scones

As we're a bit limited on culinary options at the moment, my mind - in the shape of a large question mark - wanders into the storecupboard, to see if anything in there strikes me as a possibility.

Couple that with a Tweet from Dan Lepard regarding scones, and there you are.

After exhaustive research, a.k.a. around half an hour or so of looking at various recipes, I chose a recipe which intrigued me for it's use of yoghurt in the scone dough.

Everything went rather well, apart from a moment when I paused to yell at son for climbing all over my head whilst trying to get his lunch instead of just waiting *sigh*, but once I got going it all came together fairly easily.

FRUIT SCONES

Ingredients

350g self-raising flour
quarter of a teaspoon of salt
1 tsp baking powder
90g cold butter, cut into cubes
4 tbsp demerara sugar
100g sultanas
150g natural full-fat yoghurt
4 tbsp full-fat milk
1 tsp vanilla extract
milk to glaze

Method

1.  Cut a piece of baking paper to fit your baking sheet, then place just the sheet in the oven to heat up at 200deg C fan/220deg C/gas7.

2.  Put the flour, salt, butter and baking powder into a food processor and whizz until the butter disappears.  Add the sugar and give it a second's whizz to combine, then tip into a large bowl, stir in the fruit and make a well in the middle.

3.  In the microwave or a saucepan, warm the yoghurt, milk and vanilla together.  It should be hot and may well go slightly lumpy but tip into the bowl anyway and mix well (first with a knife, then with fingers) to combine with the flour/fruit mixture.


4.  Once the dough has all come together, give it a couple of folds to make sure it's smooth, then tip onto a sheet of cling film, flatten to around 1.5cm and begin cutting the scones out.  Repeat by pressing the dough together and cutting again, until you are left with a scrap which can be formed by hand.

5.  Quickly, remove the baking sheet from the oven, place the baking paper on board, then the scones on top of that.

5.  Glaze the tops of each scone with some milk and place in the oven to bake for 12 minutes or so, until risen and golden.


Then, it's just a matter of keeping the children at bay until you want to eat them!

22 September 2010

I am no longer a Creamed Corn virgin ...

.... because, owing to the lovely recipe I found on Hollow Legs' blog, I have now not only sampled the dish, but made it from scratch.

Making it from fresh sweetcorn, in season, is just the best thing.  It is simple to make and goes fabulously with chicken, or gammon, or sausages, or a piece of smoked haddock - in lots of situations where you'd use baked beans, creamed corn will happily go.

I repeat the recipe here, not in any way to claim ownership of it, but just because it is so flipping gorgeous, it deserves a greater audience - and I know my audience is also going to love it.

Someone hand me a spoon!
CREAMED CORN (serves 3-4)

Ingredients :

3-4 cobs of corn (I used 3 because they were torpedo sized)
2 shallots (I used 1 large banana shallot), diced fine
2 rashers of lean streaky bacon, diced fine
2 sprigs of rosemary, finely minced
knob of butter (original recipe states vegetable oil)
150ml double cream (I used slightly less)
Water.

Method :

1.  Using a sharp knife, remove the kernels from the cobs, reserving any of the milky liquid.

2.  In a pan, soften the shallots in the butter and add the bacon to cook.  Make sure not to brown either bacon or shallots.

3.  Add the rosemary and corn kernels, then add water to just under the level of the corn.

4.  Bring to a simmer, then cook for some 10-15 minutes and add the cream.

5.  Take a couple of ladlefuls out and blitz until pureed, then return to the pan and season to taste.

6.  Bring back up to a simmer and serve.

NOTES :

It is really entirely up to you how much you remove for blitzing, it depends on how pureed you want your creamed corn to be.

I recommend allowing the liquid to reduce somewhat before adding the cream - it all depends on how creamy you want your creamed corn to be.

11 September 2010

Rich Biscuits

We're having a high tea for our evening meal tonight, for two reasons.  Firstly, because it's our son's favourite style of meal and secondly, so that we can celebrate the chutney I made earlier in the week.  Although we're pretty well catered for with things to eat, to pad out the provisions a little, I thought I'd make some biscuits.

Photograph c/o my inhouse photographer, Chillibob.
Rose is a Blue Moon, grown by Chillibob.
We don't have much in the way of biscuit making ammunition in the cupboard, but I had an idea in mind of some crisp, thin biscuits that would go well with a cup of tea.  Inevitably, my first port of call for recipes such as these is the Be-Ro website, where I found their recipe for "Rich Biscuits".

However, needless to say, I adapted it a bit.  Well, it wouldn't be "mine" unless I changed it here and there, now would it?  *chuckle*


RICH BISCUITS

Ingredients :

125g self raising flour
100g gram flour
100g sugar (caster or granulated)
Half a teaspoon of baking powder
100g butter or margarine
A clementine orange, zested and half of it juiced
1 small or medium egg, beaten.


Method :

1.  Heat oven to 180deg C (fan) and prepare two baking trays by either greasing them or laying baking parchment on them.

2.  Mix the flours, baking powder and sugar together, rub in the fat.  (I put them all together in a food processor and combined them that way).

3.  Add the zest, juice and sufficient egg to make a stiff dough.

4.  Lightly flour your worksurface and roll out the dough thinly, cutting into 3 inch rounds.

5.  Place on baking trays and bake for around 15 minutes.

Do the clearing up and then put the kettle on!  :)

10 September 2010

Lemon Potted Crab

It's been a while since I've made this one, but it is delicious and made a lovely light weekend meal when matched up with some fresh crusty baguette and a leafy mixed salad.  Of course, it has the added bonus of taking around 10 minutes to make - allowing a bit of extra time for the butter to set, naturally.

The crabmeat is always best if you can get fresh - and it is required to be cooked, of course.  Alternatively, if you're out of crab season or just can't get crab for reasons of economics or geography, then do try to get the best quality tinned crab meat you can.  It's worth it!

Photo c/o BBC Good Food : the original source of the recipe

LEMON POTTED CRAB

Ingredients :

400g cooked crabmeat
Large pinch cayenne pepper
Zest and juice of ½ lemon
300g butter
Fresh parsley or celery leaves, to decorate.

Method :

1.  In a bowl, combine crab meat, cayenne, lemon juice and zest, and season well.

2.  Pack into 8 small or 1 large ramekin.

3.  Melt the butter, then pour over until the crab is covered with a thin film. Top with a leaf if you like, then cool in the fridge.

It will keep for up to 2 days in the fridge.  To prevent the butter melting, transport to your picnic in a chiller bag.

I'm seeing a tartan picnic rug, green grass, a bottle of white wine frosted with condensation, sunshine, a few strawberries, a riverbank and a partner who is almost as delicious as the crab .... maybe next summer, eh?  :)
Related Posts Plugin for WordPress, Blogger...