What a very pleasant surprise this meal turned out to be. I really wasn't expecting much from it and hence only took a couple of pictures. You'd have thought I'd know better by now and would take more pictures just in case, but no. The recipe is incredibly simple - just pan fried chicken breast in a sauce made with slices of lemon, crushed fresh garlic, some chicken stock, lemon juice, runny honey and a whole heap of black pepper. How often it is that the most simple recipes turn out to be the best!
I particularly enjoyed the lemony sauce with the Jersey Royals and the Sweetheart (or Hispi) cabbage. Mmmnnn, but that was sooo good. I'd been craving cabbage, so that might be why, but son & heir agreed the combination was very tasty and a second opinion is always helpful. Feel free to pair the recipe up with whatever accompaniments you fancy - after all, it's your dinner so why not please yourself.
Uncharacteristically, let's head on directly to the recipe and gird your loins for a zingy, fresh tasting chicken sensation.
LEMON & BLACK PEPPER CHICKEN (serves 2)
Ingredients :
1 tbsp olive oil 2 individual skinless, boneless chicken breasts a pinch of sea salt half a lemon, sliced thinly half a lemon, juiced one clove of garlic, crushed as much fresh ground black pepper as you want - I used a teaspoonful 1 tbsp runny honey 200ml chicken stock - I used a combination of Knorr stock granules (half tsp) and chicken Bovril (half tsp) 2 tsp approx finely chopped fresh parsley 2 tsp Bisto best chicken gravy granules.
Method :
Heat the olive oil in a good sized frying pan until sizzling hot. Gently add the chicken breasts and sprinkle with a little sea salt. Leave the chicken to brown - you're aiming for it to have an all over golden tan, so don't keep fidgeting it about or it won't sear. Turn the chicken to sear the other side and add the lemon slices to the pan.
In a small bowl, combine the lemon juice, crushed garlic, black pepper, runny honey and chicken stock. When both sides of the chicken are golden, pour the mixture over the chicken into the pan. Allow the sauce to heat through and bubble, reduce slightly and thicken. Turn the chicken from time to time, to keep it basted in the sauce and ensure it is cooked through.
Reduce the heat to medium and include the parsley. Allow a moment or two for the parsley to heat through and add the gravy granules if necessary, to thicken the sauce to your personal taste. Serve with the lemon slices on top, with a little chopped parsley as garnish and vegetable accompaniments of your choice. Printable version
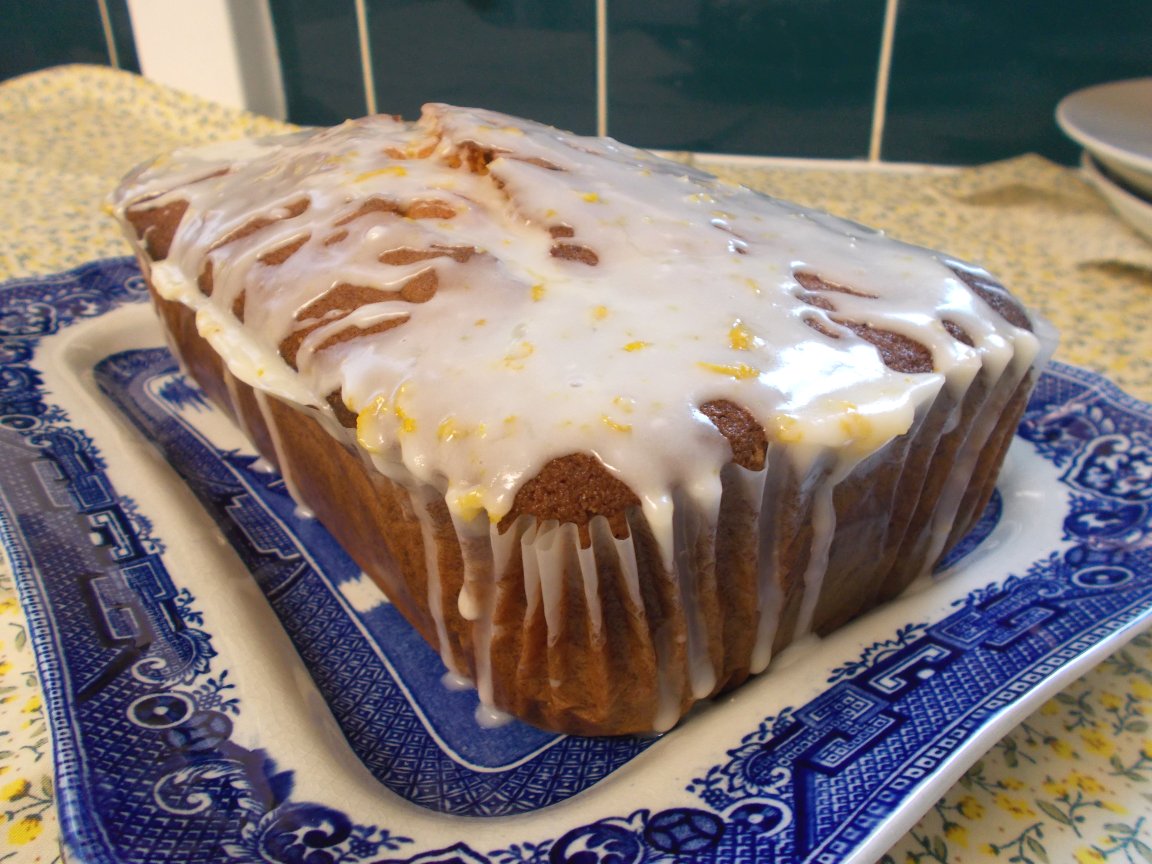
If you are anything like me and enjoy a good ramble through recipe websites and magazines, you can't help but have noticed the trend towards including vegetables in sweet cakes and loaves. I think it has largely come over from the States, but I also can't help thinking that perhaps this is what used to go on during the war when sugar was rationed and cake ingredients were at a premium. Anyway, this was my first go with including courgette - and it's very good! With the lemon in there too, you don't notice the courgette flavour but it has a distinct effect upon the texture of the cake/loaf. (I can't help but call it a cake, because it looks so much like one and tastes so much like one! However, the original recipe touts it as an American breakfast bread. Well, considering cornbread, I suppose it fits!). This is a very robust cake in that the texture of the cake crumb is almost bouncy. Not rubbery, it just has a degree of resistance to the tooth, without being dry or crumbly. I like it a lot.
My lovely Facebook friend Ann recommended the loaf to me - for which thank you very much, Ann! The original recipe came from the Lemon Tree Dwelling blog (see here) - where, incidentally, it is referred to as a "bread".
Now, along with trying to reduce our consumption of carbohydrates (Conscience : "Oh yes? Why are you making cake then, Jenny, eh?", me : "Shut up and get back in your bed!"), we have also been trying to reduce our consumption of processed sugar. That's a real tricky one where sweet baking is concerned. I won't entertain the use of lots of the sweeteners that are out there today - and particularly not anything with aspartame or acesulfame in it. However, we have found that Truvia (a stevia based sweetener) is acceptable. Hence, you will find that the ingredients include a quantity of Truvia along with a much reduced quantity of caster sugar. The original quantity of sugar is 0.75 of a cup, so if you want to make a full sugar version - there you go. :) That may also help you in calculating how much of another sweetener of your choice, you are likely to need. Oh and yes, because this is an American recipe (originally), the ingredients are in cups. All I can suggest is that if you haven't already, you get yourself a set of cup measures. SO much easier than trying to convert from cups to grams!
One other thing - the original recipe says to use vegetable oil. Because I'm me and butter tastes SO much nicer, I just melted the right amount of butter in the microwave and used that instead. ~proud face~ What? It was low calorie enough, alright? Right then, excuses over, I thoroughly recommend you give this recipe a try. Make sure to have it baked and iced before cup of tea time in the afternoon, right? You'll be glad you did. REDUCED SUGAR LEMON & COURGETTE LOAF (makes around 12 slices) Ingredients :
One and a half cups of plain flour A half tsp bicarbonate of soda A quarter tsp baking powder A quarter tsp salt A third cup of Truvia
A quarter cup of caster sugar 1 cup of finely grated, unpeeled courgette A quarter cup of melted butter 1 egg 2 tbsp lemon juice 2 tbsp finely grated lemon zest
For the drizzle icing :
Half a cup of icing sugar 1 tbsp lemon juice 1 tsp lemon zest
Method :
Prepare a 1lb loaf tin by either greasing and lining with baking parchment, or by use of a ready made loaf tin liner. Pre-heat your oven to 180degC/350degF/Gas 4.
In a medium mixing bowl, combine the flour, bicarbonate of soda, baking powder, and salt. Stir them together thoroughly and set aside.
In a separate, large, mixing bowl combine the Truvia, sugar, grated courgette, melted butter, egg, lemon juice, and lemon zest. Stir to combine.
Add the contents of the dry ingredients bowl to the courgette mixture and stir just until combined. You may need to add a wee drop of warm water, if the mix appears too stiff.
Spoon the mixture into your prepared loaf tin and level the surface.
Bake for 50-55 minutes or until golden brown and a skewer comes out clean.
Cool in the pan on a wire rack for a few minutes, then remove the loaf from the pan and cool completely.
Once cool, combine the ingredients for the icing and drizzle over the loaf. Allow a little time for the drizzle to dry - while you're making a cup of tea is about perfect.
Well, this one was a real unexpected surprise. I wasn't supposed to be cooking this recipe at all and in fact, can't remember why I wasn't cooking the intended one. Whatever the reasons were - and it could be any number of them! - I decided to go for this because it looked simple and sounded like it could be rather good.
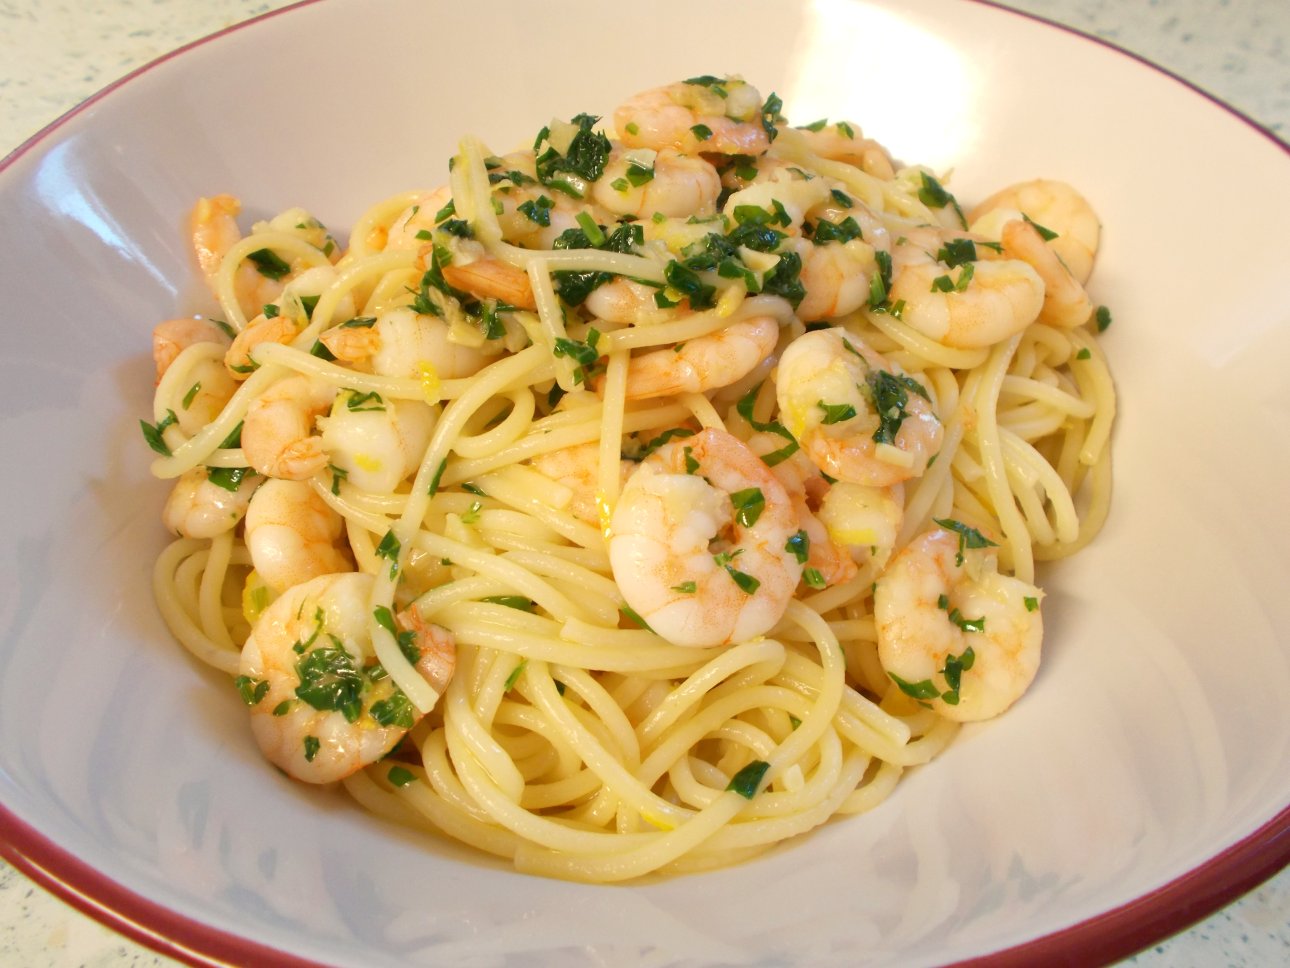
Yes, it's certainly simple - both in number of ingredients, cooking process and method - and as for "rather good", well that's a bit of an understatement. It turned out to be very good indeed. The recipe originates with the BBC Good Food website and I could just direct you straight there, however, it occurred to me that if we ever lost that site, I'd lose a very useful and tasty recipe. So here it is, with thanks to BBC Good Food for the original. There is only one Cook's Tip for this recipe - and that is, if you are using cooked King prawns (or Tiger prawns), then literally just heat them up in the pan. Don't cook them, as they are already cooked and will become tough and hard if heated for too long. They just need to be brought up to a good temperature so as to avoid any risk of encouraging bacteria by half-hearted warming and that's all.
This dish certainly doesn't have big, bold flavours. However, if you're into garlic butter, lemon and prawns, then you will love it. The spaghetti gives it that comfort food thing and the lemon prevents the butter from becoming too rich. I'd have it again tomorrow, I liked it that much!
SIMPLE GARLIC BUTTER PRAWN SPAGHETTI (serves 2) Ingredients : 250g dried spaghetti sea salt 20g salted butter 2 cloves of garlic, chopped finely a pinch of ground black pepper 250g cooked King prawns zest of 1 lemon 15g fresh parsley, chopped. Method : Firstly, bring a large pan of salted water to the boil. Add the dried spaghetti and cook to manufacturer's recommendation. In the meanwhile, melt the butter in a frying pan over a gentle heat and add the chopped garlic. Sweat, as opposed to fry, the garlic ever so ever so gently until the pieces are softened, adding the black pepper along the way. Then, add the prawns, the lemon zest and the parsley and increase the temperature just slightly, sufficient to heat the prawns through without cooking them and without frying the pan's contents. Drain the pasta and add to the prawn & garlic pan. Toss the pasta in the garlicky butter and serve into warmed bowls, sharing the prawns out evenly. Printable version
It has been a while, but way back some four or five months ago, I made some preserved lemons. Of course, it has taken until now to blog about them as it would have been useless to just write about making them without being able to write about the end result! Let me tell you, the end result is impressive. So impressive. Lemons on steroids. Oh yes. Now before I go any further, if you're new to preserved lemons let me explain that these aren't for use in a sweet capacity. No, they're for use in fish dishes, or Moroccan tagines, with lamb or pretty much anywhere you want the full power of lemon zest, but without the sharp tang of lemon juice. I had been dallying around the edges of using preserved lemons in dishes for years. I even bought a jar of commercially prepared preserved lemons, used two and threw the rest away months later, having never gone back to them. However, they always stayed on the edges of my culinary consciousness and I always intended to get back to using them with some seriousness.
Then I began reading about people having made their own. About how easy it was and what a great result they got from being home made. Well, they weren't kidding on both counts. Making them is as easy as cutting and squeezing lemons - if you can do that, you're home and hosed. As for using them, well, I've only used them in one dish as of yet but I don't need anything more than that, they're phenomenal. If you're one of the enlightened who use preserved lemons a lot but assumed they would be tricky to make - read on. Likewise read on if you're even just a tiny bit curious about them, as you really don't need to make a whole shedload of them. Your only restriction is the size of the jar you preserve them in! So, here we go : PRESERVED LEMONS Ingredients : Lemons - more unwaxed lemons than will fit into the amount of jars you have available Sea or Rock salt - expensive or economical, it's up to you, but for approximately 5/6 lemons you will need at least 200g. Just make sure that it's salt with no additives. Method : Begin by sterilising your jar(s).
Heat your oven to 140degC/225degF/gas 1. Wash the jars in hot, soapy water, then rinse well. Place the jars on a baking sheet and put them in the oven to dry completely. Allow them to cool and you're good to go.
The first step is to drop a small handful of salt into the bottom of the jar.
Next, taking your first lemon, cut a cross into each lemon so that it divides the fruit into four sections that are still attached at one end.
Sprinkle salt into the cuts, forcing it right into the deepest part of the fruit. Don't be mean about this - really cover each lemon in salt.
Then, push the lemon into the jar and, taking a wooden spoon, use the handle end to push, squeeze and flatten the lemon so that a) it takes up as little room as possible and b) a degree of its juice comes out.
Repeat with further lemons until the jar is full. I used a half and two quarters, along the line, to fill up the inevitable small gaps. Once your jar is full of lemons, check how much juice you have released. If the juice is up over the top of the uppermost lemon then that's what you want. If not, squeeze sufficient lemon juice into the jar until the uppermost lemon is covered.
Lastly, add another handful of salt and encourage it into all the little gaps.
Give the neck of the jar a good wipe clean and seal it up. Place it into a dark, cool cupboard and wait some four to five months. Every so often, visit your lemons and turn the jars over, just to ensure the juice is getting to everywhere.
At the end of the preserving time, open your jar with reverence and anticipation. You will find the juice has turned syrupy and the smell is just incredible.
To use your lemons, take as much as you will require for the dish and scrape away the flesh. Rinse the rind under a cold tap briefly to wash off the worst of the salt and chop, or slice your lemon how the recipe dictates. A good inaugural recipe is my Lemon & Caper Butter Cod, which enables you to enjoy the special flavour of your lemony efforts whilst resulting in a bit of a special dinner.
Just make sure to get a second batch on to preserve before you finish this batch. I reckon that once you've got them, you're not going to want to run out!
Yes, Mead! That apparently old style alcoholic drink that used to be sold by Merrydown in this country, but appears to have fallen off the map. That elixir of life for Norsemen down the ages, who by all accounts had a great liking for the stuff (and who wouldn't!). I gather, also, that it is a stalwart of many a Renaissance Fayre over the pond in the U.S. and perhaps even Canada.
I can remember my parents, way back in the seventies and one Christmas, producing a bottle of Merrydown Mead and being cock-a-hoop that they'd found some. As I was knee-high to a grasshopper at the time, I didn't get to taste any but their happiness at having found it was testament to its popularity (at the time).
As time went on, it seems to have fallen by the wayside as so many good things often do. However, there does seem to be something of a resurgence going on - and in home brewing terms. Now my hubby is a bit keen on dallying about with demijohns and hydrometers, but it was the news that Mead contains a significant number (by which I mean SHEDLOADS) of probiotics, that tipped the balance for us. We're all into probiotics in this house as my use of Kefir (a fermented milk drink) and liking for Kombucha (have yet to try fermenting this one), along with the use of goat milk (unfermented, this time) seem to have made a significant difference to my irritable bowel syndrome. Have a read of this piece here, for more information on that happy side of Mead.
Chicken in a Mead and mustard cream sauce
This being, primarily, a food blog, I think it is important to underline the very good work that our Mead has been doing in the cooking department. My pork with parsnips and Mead was unbelievably good, the chicken in a Mead and mustard cream sauce was just out of this world and hubby has mounted an armed perimeter guard around the freezer since I made my rhubarb & mead semifreddo, with rhubarb & mead compote. So, you see, Mead is not just for warming your cockles on a chilly night!
So as hubby is the Master Brewer in our house, I shall turn the remainder of this blog post - and the recipe of course - over to him.
There really is no magic involved in Mead, it is quite simply a combination of good quality honey, brewer's yeast and water, left to ferment. The better the honey you use, the better the mead will be, so take care not to get any of the honey blends, as some will contain a sugar syrup.
You can flavour your Mead by adding raisins, spices such as cinnamon and cloves, or any number of other botanicals such as elderflowers, juniper berries and sweet herbs into the first demijohn. It is also possible to make a fruit Mead (called a melomel) by adding fruit (peaches, pineapple, oranges, rhubarb or whatever you want) into the second demijohn. (We haven't tried this one yet!).
As regards the yeast required, baking yeast just won't do, so put that back in the fridge before we go any further. Brewers yeast (or wine making yeast) is what you want - as it is better at converting sugar to alcohol. Champagne yeast is the very best and I found mine on Amazon. Generally, one sachet of yeast is 5g although they can differ. However 5g of yeast is the amount I use in this recipe.
You might be wondering what use the lemon juice is put to, but apparently it helps to wake the yeast up and kickstarts the fermentation process. Sounds likely!
Yes, you do need some specialised equipment for the task, but really, not much of it! Two 5 litre demijohns are a must, together with a length of silicone tubing, an airlock and bung, a large bottle brush for cleaning everything and a good selection of glass bottles to carry the final product. I've found that Grolsch bottles - being swing-topped - are great. It is an easy matter to obtain corks with which to seal wine bottles and these are great when storing the Mead for any length of time. A hydrometer is useful if you want to check the alcohol content by any other means than "have I got a headache" when you wake up in the morning.
There are lots of ways to sterilise glass, the easiest of which is to use a sterilising solution. I use one called "Bruclense" which is easy to use and leaves no chemical residue once rinsed. There are other solutions which are sold to sterilise babies' bottles that do the same job. If you hate the idea of chemicals though, just wash the glass well, rinse thoroughly and then put into an oven at 110 degrees celcius for ten minutes.
Having assembled your small collection of equipment, you'll be raring to go - so here's the recipe.
MEAD (makes approx. 4.5 litres)
Ingredients :
1,200 - 1,500g of runny honey (depending on how sweet you want the finished mead)
1 sachet (5g approx.) of brewing or wine yeast (I use champagne yeast)
1 lemon, juice only
5 litres of water.
Method :
In a saucepan, add the honey to 1 litre of the water and warm it up so that the honey dissolves. Make sure not to let the mixture boil, just get it warm enough to be pourable.
Once dissolved, cover and leave to cool to room temperature before pouring it into a clean, sterilised 5 litre demijohn along with the lemon juice, the brewing yeast and then top the demijohn up with the remaining water, leaving a 5 cm air gap at the top. An initial hydrometer reading can be taken at this stage if you're into that kind of thing.
Seal the demijohn with an airlock and bung and leave in a dark place for around 30 days to ferment.
Fermentation should, initially, be quite vigorous (more than one bloop per second) but after 30 days or so, the airlock should be bubbling only very slowly (a bloop every ten seconds or so). This is time to carefully rack the mead into another clean sterilised demijohn, taking care to leave the sediment behind in the original one. (Racking = decanting). Racking can be a tricky procedure and I suggest that you visit YouTube to get a good sense of how it is done. You can take the opportunity to top up with water to the full 5 litres, if you wish. Now is also the time to take a second hydrometer reading, which will give you an idea of the alcohol content at that moment. Mine was 13.5%.
This is also the stage at which any botanicals or fruits can be added. For my second batch of mead, I've used half a cinnamon stick and a few juniper berries but there are all manner of extra flavours that would work very well too. Replace the airlock and bung and leave the whole thing for another 30 days to clear before racking into clean, sterilised bottles.
The mead can be drunk at this stage but the longer it is left in the bottles, the better it becomes. Six months is a good time to wait but it should keep for much longer than that if all of your equipment was sterilised and scrupulously clean.
I can't remember why I suddenly had a notion to make a caraway seed cake, all I know is that I'd been trying to make one for the last week or so. Well, when I say "trying to" what I mean is trying to find time, rather than trying to and failing in a welter of eggs, butter and flour! It has been an absolute dog's age since I last made a caraway seed cake and I recall the last one was very successful. I've used caraway in various savoury recipes (braised red cabbage, that sort of thing) and had plenty to call upon in the cupboard - which always helps.
So this cake is actually a collaboration between Saint Delia Smith of hallowed baking and cooking fame and myself. You see, I took Delia's Caraway Seed Cake recipe (just click on the link to see it) and adapted it with somewhat spectacular results. It's often an extremely dodgy thing to do, adapting something like a cake recipe, but I've always been a tryer.
Because I'm me, I just had to consider a bit of a spin on an old favourite and decided to pair lemon up with the caraway. It seemed to me to be a compatible pairing. Delia's recipe uses ground almond and I didn't want that, so out that went and I simply replaced it with the same amount of flour. To up the lemon influence, I added a small amount of lemon essence along with the lemon zest. Oh boy, what a team we make, Delia and I. The cake baked well, rose beautifully and smelled divine.
The addition of the lemon juice drizzle icing is perfect in that it adds a yummy zing to the cake and the caraway comes in once the lemon calms down, adding a deliciously warm aromatic element to the flavour.
The texture of the cake is just perfect, if I say so myself. Light as a proverbial feather, it dances across your tongue like a deliciously cakey zephyr, leaving mouthwatering lemon and comforting caraway flavours. Mmmmmn, get the kettle on Mother, I'll cut us another slice!
Pre-heat the oven to 180degC/350degF/Gas 4. Prepare a 2lb loaf tin by lining with either a pre-formed tin liner or with baking parchment. Take a large mixing bowl and add all the cake ingredients (not the icing ingredients!). Now, using an electric hand whisk, mix the lot up until you have a smooth, creamy consistency. It really is as easy as that. Spoon the mixture into the prepared tin. Take a moment to level the surface to achieve a more even bake.
Place into the oven on a low shelf for 60-65 minutes or until a skewer inserted in the middle comes out clean. It will be worthwhile checking the cake at around 40 minutes and placing some baking parchment over the top (we know this as "putting a hat on it!") if the cake looks particularly brown. Once done, let the cake cool in the tin for some 10 minutes, then remove onto a cooling rack. Once the cake is cool, mix together the icing ingredients in a small bowl and drizzle the icing over the top of the cake. Allow some time for the icing to dry - and tuck in! Printable version
I've been going through a whole heap of old paperwork recently - which included my many and various files and folders chock-a-block full of collected recipes. In doing so, I have re-discovered several favourites from pre-Rhubarb & Ginger times, one of which being this citrus & spice chicken.
The recipe has developed over the years (as recipes are wont to do) but I note from the paper recipe in my folder, that the original was adapted from the
Good Food Magazine's "40 Best Chicken Recipes" booklet. Well, it's been adapted yet again - and very much for the better. The very first recipe was basically a traybake, my first version added several ingredients such as the honey and chilli powder. This last incarnation has separated out the vegetables to be cooked on the hob instead of in the oven, which I much prefer.
Marinate, my little lovelies!
Oven cooking the vegetables inevitably led to burned ends and undercooked middles, as the sheer quantity of meat and vegetables in the tray didn't really allow for even cooking. Plus, it is nice to have a small degree of char on the chicken, but not so nice on the peppers and mushrooms.
This way, the chicken has plenty of air space around each piece and the cooking is much more even - particularly if you place the larger pieces to the outside and the smaller pieces to the inside of the tray. The surface attains nice little charred corners, while the chicken itself stays moist and delicious.
Cooking the vegetables in a frying pan enables much more degree of control. Inevitably the leftover marinade isn't enough moisture to see them through the entirety of the cook, but adding a little water from time to time not only allows the vegetables to steam, but also keeps the marinade saucy. This way, you have the relatively dry chicken, accompanied by the saucy vegetables - which provides a lovely balance and completely without burned ends.
Ready for the oven - Bacofoil's non-stick aluminium foil is great for this!
Another huge positive to this recipe - apart from the flavour which is really tasty - is its speed. Provided you get the chicken on to marinade in advance, it is a really simple task to prepare a couple of salad veggies, cook some rice, put the chicken in the oven and pan cook the vegetables. From taking the marinating chicken out of the fridge to dishing up, probably only took around 45 minutes in total. I love that - especially when there's such a pay-off by way of flavour.
So what's the flavour like? The chicken flavour is there, no one flavour overrules it and because the curry past is used fairly sparingly and is very much tempered by the use of the yoghurt, it doesn't take precedence. The honey gives a quiet sweetness and the garlic helps to savoury it all up nicely. In fact, don't tell anyone, but if you add the yoghurt, then the lemon juice, then the honey, stir it all together and have a taste - mmmmn, it would make a smashing dessert!
Once the curry paste, oil and garlic are added though, I wouldn't recommend tipping it on top of your strawberries. The oven adds the last element of flavour to the chicken, in the small degree of charring as the tops of the chicken pieces catch in the oven. It all amounts to an absolutely scrumptious whole.
Now, as for Cook's Tips, I don't have many but there are a few worth mentioning.
The recipe calls for the juice of half a lemon. If, however, you don't have a lemon but do have a lime - then no worries, use that instead! You will need the whole lime's juice and the flavour will be slightly different, but no less nice. I have used both in the past and can't decide which one I like the best.
Where the chilli powder is concerned, feel free to add as little or as much as you like. However, if you're new to chilli powder and curry spice, I'd suggest you err on the side of caution to begin with - you can always add a little bit more the next time.
You can certainly freewheel a bit where the accompaniments are concerned. I think the chicken and vegetables would be lovely served in a soft Indian flatbread with some salad alongside. On this occasion, I served the chicken with some basmati rice that I had cooked in chicken stock and turmeric, along with the cooling influence of avocado and cucumber. For my son, who isn't keen on avocado, I served a sliced juicy tomato and cucumber. The chicken is certainly flexible enough in flavour profile, that there are a whole host of accompaniments you could serve with it.
Calories are in the range of 398 per portion, it is low in sodium and high in Vitamins B6 and C, so it could be worse!
I am so happy to have rediscovered this recipe. I think it is going to appear fairly regularly on the menu plan and I recommend it to you. Without the chilli powder, it would be great for children, too.
CITRUS & SPICE CHICKEN (Serves 3)
Ingredients:
For the marinade :
150ml natural yoghurt (I used Greek yoghurt)
juice of half a lemon
1 tsp runny honey
1 tbsp vegetable oil (I used sunflower)
2 generous tsp curry paste or powder
1 garlic clove, crushed
chilli powder to taste (I used 1 tsp Kashmiri chilli powder).
Other ingredients :
3 skinless, boneless chicken breasts cut into large chunks
1 red pepper, deseeded and cut into large slices
half a green pepper, deseeded and cut into large slices
1 onion cut into large slices
6 medium chestnut mushrooms , quartered
1 tbsp olive oil.
Method :
1. Mix together the marinade ingredients in a bowl.
2. Add chicken chunks to the marinade, stir to coat and set aside to marinate for as long as you've got - from 4 hours to 30 minutes.
3. Pre-heat your oven to 180degC/350degF/Gas 4.
4. Place the chicken chunks onto a baking tray, taking care to leave as much of the marinade in the bowl, but without scraping any off the chicken.
5. Bake the chicken for 30 minutes, remembering to turn the tray half way through to ensure even colouring.
6. Add the vegetables to the bowl and stir to coat them in the marinade.
7. Heat the olive oil in a large frying pan and add the vegetables, marinade and 200ml water. Cook, covered, on a medium heat until the peppers are softened and onions are cooked through. You may need to add more water, but only a little at a time.
8. Once the vegetables are cooked, remove the lid and allow the sauce to reduce and thicken, which will only take 2-3 minutes if you haven't added too much water.
9. The chicken is ready once the chunks are cooked through and they have gained a little bit of charred colour.
Serve with steamed basmati rice, avocado and cucumber.
This year was my mum's 80th birthday. Now I know you're not supposed to broadcast a lady's age, but there comes a time when it is to be celebrated rather than hidden - and I reckon that 80 is that time.
My mum's birthday has been the source of some amusement and confusion over the years, because it arrives so quickly after Christmas - the 6th January - and she'd got fed up with having a Chrisbirthday. One year we even tried delaying her birthday until May. Of course, we all forgot and she didn't get a birthday at all that year. Ooops.
In order to make a fuss of her, this year I decided to lay on an afternoon tea with every little tasty morsel in flavours that she would like and in sizes that would mean both her and my Dad could sample a little bit of everything. As I know only to well, the older you get the smaller your capacity for tasty morsels becomes!
So we had a lovely tea, which consisted of Emmenthal & Bacon Quichelets, egg mayonnaise & cress sandwiches, Bavarian ham & wholegrain mustard sandwiches, a tiny salad in a leaf and almond & raspberry biscuits. All of which were delicious and all of which led up to the piece de resistance - the lemon sponge birthday cake.
For one of my Dad's birthdays, I had made a big, butch, manly chocolate & beetroot cake which went down very well. However, I needed something a lot more ladylike and refined. I pondered on coffee cake, as I know she makes a wonderful coffee and walnut cake - but I doubted that mine would be able to compete and anyway, I felt it would be better to make something that wasn't "usual" for her.
Lemon top right being the interloper in the bunch!
Just that week, we'd bought some fantastic Sicilian lemons for use in drinks and I'd been able to sample how sweet and juicy they were. This, naturally, brought the idea of the lemon sponge to the fore. The Sicilian lemons would be perfect, as they were huge - so would provide a good quantity of lemon zest, they were as sweet as a dessert fruit and the intensity of the lemon aroma and zing was just incredible. It just so happened that I also had a little bottle of Sicilian Lemon concentrate in the baking cupboard. I felt sure that with a lemon curd filling, the cake would be perfect.
For the last 15 years or more, whenever I've been required to produce a sponge cake, I've used Delia Smith's All In One Sponge recipe. I've made coconut versions, chocolate, lemon, coffee - just about every combination you could think of, so I didn't have to look very far for a tried and tested recipe.
However, this was an 80th birthday cake - so a dash of icing sugar on the top with a few sprinkles just wasn't going to cut it. I needed to think up something a bit better as regards decoration.
So what do you think? I reckon I thought up something a bit better than icing sugar and sprinkles. *wink*
Now this was the very first time I had ever used fondant icing on anything - much less a very important birthday cake.
I made the cake the day before and kept it overnight in a freezer bag so as to ensure it didn't dry out at all.
The day before the tea party, I set to with fondant icing, apricot jam and lemon curd. Well, the lemon curd bit was easy enough - a nice thick covering on top of one sponge and then delicately lay the second on top. So far so good.
Next, was painting the surface and sides with watered down apricot jam - enough to help the fondant icing to stick nicely.
Then because the colour of the base icing was white, I spent a good ten minutes or so cleaning up every single little cake crumb (and sponge cakes are very good at shedding cake crumbs) from the working surface.
The leaves are finished, now for the flowers!
This next was the bit that I was the most nervous about, as I knew I had just one go at getting it right. I had to roll the icing out (which it does very well, no arguing at all) to a shape that would easily cover the cake without any holes or gaps and make sure it didn't crack on the way from worktop to cake. Deep breaths. Well, it went perfectly. As per the instructions, I draped the icing over the rolling pin and with a quick but steady "whoop!", whooped it over and flump - on top it went and couldn't have been better. It sat perfectly (and without any militant crumbs to break the pristine whiteness), covered beautifully and I was able to trim it up so easily. I don't really know what I was worried about. *wink*
The next job was to smooth and stroke the white icing, so as to gain a slightly shiny surface rather than the matte one that is natural for the icing. That took another ten minutes or so and a clean pastry brush certainly helped with removing the loose sugar grains.
All that was left was to cut out the leaves (easy done, with a set of differently sized icing cutters) and flowers (ditto), marble the icing with green food colouring and cut out more leaves, paint the plain coloured leaves (yes, every one was painted with food colour) in different shades and patterns and form some of the leaves (the ones to go on top) into distorted shapes so as to give the leaf trail some movement.
I used lemon juice to wet each leaf and flower before settling them into place on the cake. Well, why turn down the opportunity to get a little more lemon flavour in there? The icing is flavoured with vanilla naturally, so there was no clash in flavours.
The whole process of filling and decorating the cake took around three hours, all in all. Every minute spent was worth it though. If it wasn't for the fact that we'd all be shaped like bowling balls, I would make many more cakes that require extensive decoration!
I love how the cake looked when it was finished. If I've ever been proud of something I've created, it was this. Mum looked suitably impressed and happy with it when we produced it along with a truly appalling rendition of "Happy Birthday To You" and I hope its prettiness helped to smooth over the worst of the singing.
As for the recipe, I have set it out below as there are a couple of little baking variations to Delia's original recipe and if you want a REALLY lemony lemon sponge, you might want to follow along.
I haven't detailed the decoration in the recipe as you can serve the sponge very successfully with just a sprinkle of icing sugar on top. You could even drizzle some lemon syrup over it once you've filled it - and some dairy cream would be delicious in the middle with the lemon curd if you're feeling summery too. The world is your oyster with this sponge cake recipe, it really is that forgiving! For dessert or with a cup of tea, it will do the lot.
Now, in an enormous departure for Rhubarb & Ginger - and as an indication of just how pleased I was with this cake - I took a 365 degree video of it. Feel free to gasp in awe and exclaim in admiration, I'll hear you!
REALLY LEMONY LEMON SPONGE CAKE (serves 6-12 depending on size of slice!)
Ingredients :
175g self raising flour
1 tsp baking powder
3 large eggs
175g caster sugar
175g softened unsalted butter
the zest of 1 large lemon
the juice of half a large lemon
1 tsp Sicilian lemon extract
4-5 tbsp lemon curd.
Method :
1. Take a very large mixing bowl. Measure out the flour and baking powder and using a sieve, sift into the bowl.
2. Now simply add all the other ingredients (apart from the lemon curd, which is for the filling) to the bowl and whisk everything together until you have a smooth, well-combined mixture. Provided the butter is good and soft, this shouldn't take longer than a couple of minutes.
3. You should have a soft mixture that is of dropping consistency. If it seems a little too stiff, you can always add some more lemon juice or a tablespoonful of warm water to mobilise it a bit.
4. Divide the mixture between two eight inch (20cm) tins that have a piece of greaseproof paper or cooking parchment covering the base of each and that have been lightly buttered. Level out the surface but leave a very slight dip in the centre to prevent the cake from crowning too much as it rises. Place on the centre shelf of a pre-heated oven at 170degC/325degF/Gas 3. It will take 30-35 minutes to cook – but don't open the oven door to check it until 25 minutes have elapsed.
5. You will know when the cakes are done, by touching the centre of the cake lightly. If your finger leaves no impression - and the cake springs back - it is cooked.
6. Leave the cakes to cool slightly on a cooling rack, before removing them from their tins. Leave them sat upon the paper layer, on the cooling rack, to cool completely.
7. Once utterly cold, carefully remove the paper layer and decide which is to be the bottom layer and which the top. Place the bottom layer onto your cake plate top surface down. Coat the cake in the lemon curd - generously - and carefully lay the second cake on top.
8. You are now free to decorate the cake in whichever way you feel appropriate!
A quite disgracefully long time ago now (I've been SO remiss in not blogging stuff that needs to be blogged), I was contacted by the lovely Julie at Barcut Rose Veal in Wales, about taking some of their produce to try - and blog about.
Now those of you who have been reading along for a while will know about my own particular keenness for that jewel in the butcher's crown that is British Rose Veal. Not only that, but the knock on effect that is finding a job for the many millions of bull calves to do, rather than be shot at just 2 days old (or less, in some cases). These bull calves are a by-product (what a horrid thing to call a calf) of the already beleaguered dairy industry. You see, the mother cows don't produce milk willy nilly for the whole of their lives. No, they need to keep on having calves to stimulate the milk supply. Now a heifer calf (they're the female ones) are easy to find a job for as they can go straight back into the dairy business and have their own babies and supply their own milk. But what happens to the boys?
Some of Barcut's happy calves
In far too many cases, they are either shot at or very near to birth, or alternatively are sold on to be produced for beef (which they're not very good at, being of a breed that makes milk well and doesn't make beef well). As a result, they - not in every case, it's true, but in most cases - aren't worth very much and aren't really valued as a "crop" as such. In lots of particularly awful instances, the bull calves are sold at market where they're picked up by European (or further distant) purchasers who will then ship the animals huge distances to the kind of future that nobody in their right mind would wish for.
So how much better is it, for a calf to be bought by a local producer who takes care of them in an ethical manner - with large strawed pens, where they can play with their mates, eat to their hearts' content and be happy (most even spend time out at grass, in the field, in the sunshine) - before being taken to a local abattoir (the important bit about that being both local and British) at 8 months of age where they are killed humanely and their meat is valued by home cooks and chefs alike.It's just a no-brainer, so far as I can see.
Barcut Rose Veal is just one of those ethical producers. A quick look at their website's "Why our Rose Veal" page gives you all the assurances you could require. So I was very excited to be the recipient of an enormous box of their beautiful, lean, Rose Veal.
As always, the quandary is what to do with the sudden rainfall of choice cuts of meat. We had a gorgeous lean topside roasting joint, some braising steaks and some cubed topside. Now we generally use 500g of meat per meal for the three of us - so we had at least five or six meals to think of!
The meat arrived exceptionally well packaged in vacuum sealed bags with freezer blocks to keep it cool - and looked as fresh as a daisy. It felt almost sacrilegious to put it in the freezer, but as it is fresh and not previously frozen, in the freezer it went. With the best will in the world, even my family can't eat five or six meals in one go. Well, everything except the topside roasting joint. That one's destination was marked out for our Sunday dinner almost as soon as I clapped eyes upon it.
Now I won't lie and say that I knew exactly what I was going to do with it, because when you've got the one go at an ingredient (who knows when I would find another piece of roasting Rose Veal as good as this one), you have to give your next move some serious consideration. Or I do, at any rate.
Eventually - after much thought, a significant amount of changes of mind and some considerable research, I came to a conclusion. I would prepare a rub, then roast the joint (hopefully) to a state where it remains just pink in the middle.
Now the rub I devised was one of my own concoction which I hoped would bring out the delicate flavour of the Rose Veal, without stamping all over its own characteristics. It would be a terrible shame to lose the gentle flavour by heavy handedness in the dressing of it. So, I put together some dried rosemary, fennel seeds, lemon zest, sea salt and ground white pepper into my pestle and mortar and gave everything a good crush, then brought it together with some lovely fruity rapeseed oil. It smelled divine.
Rubbed all over the Rose Veal joint - into every nook and cranny - it looked suitably dressed and ready for the party. I made a trivet in the roasting pan of whole carrots that had been sliced in half and added a sliced onion, on top of which balanced the Veal. Into the oven at 200degC it went, for just 10 minutes. Then the oven was turned right down to 160degC and I left it to chuckle along slowly (with the occasional pause for some basting) for around an hour and a half. I tested the joint with a meat thermometer and waited until the internal temperature was up to a minimum of 65degC before removing from the oven and covering it in tin foil (still in the roasting tin), to rest in a warm place for around 30 minutes. It looked incredible and smelled even better.
When it came time to carve, the Rose Veal just accepted the carving knife without complaint. You know how sometimes when you're carving a joint, your arm feels a bit like chewed string by the end of it all? Not with this one. The meat, although not as pink in the centre as I had hoped, was just so tender and so juicy it was making my mouth water. My Dad introduced me (years ago) to the concept of "cutter's tasters" thanks to which I was able to tell that the herby, fruity rub had done its work well. The flavour of the Veal was still there, just accentuated with layers of rosemary, fennel and lemon. Naturally, I had saved the pan juices along with a little of the veal stock from the celeriac fondant, which together with some Sherry, made a completely fantastic gravy.
Oh my gosh but what a meal that was. I served the Rose Veal with Duchesse potatoes, Chantenay carrots, broccoli, celeriac fondant (braised in veal stock with butter) and Yorkshire puddings, along with the glossy rich gravy that just brought everything together.
I look at these photographs of that meal and can remember every nuance of every flavour involved with that veal. It fed the four of us (we had a visitor that day) with enough left over for a terrine of Rose Veal with Antipasti vegetables and asparagus the following day, served with salad. So gorgeous! Barcut Rose Veal are based near Abergele in Wales, so if you are in the area it is worthwhile visiting any of the shops on their website and enquiring. They also sell wholesale, so if you and a few friends can get an order together and share the cost, it is also well worth doing - after all, the Rose Veal freezes perfectly. Who knows, as the business progresses, they might even consider selling retail to the world at large. Well, we can but hope! For those of you on Facebook, you can support Barcut Rose Veal by visiting their page at https://www.facebook.com/barcutveal ROSE VEAL TOPSIDE ROAST (serves 6-7) Ingredients : 1kg topside Rose Veal 1 tsp dried rosemary (chopped fine) 1 tsp fennel seeds 1 tsp fresh lemon zest a pinch of sea salt a large pinch of ground white pepper 1-2 tbsp rapeseed oil 2 chunky carrots, halved lengthwise 1 onion, sliced. Method : 1. Pre-heat your oven to 200degC/400degF/Gas 6. 2. Prepare a roasting tin by placing the carrots, cut side down to form a trivet, in the bottom of the roasting tin. Scatter the onion rings on and around the carrots. 3. Prepare the rub by placing the rosemary, fennel, lemon, salt and pepper into a pestle and mortar (or use a spice grinder) and give everything a good bash to release the oils. Add the rapeseed oil and stir to combine. 4. Rub the Rose Veal all over with the mixture, making sure to get it into all the nooks and crannies. 5. Place the Veal onto the carrots and onions, making sure to keep the fat uppermost. This will allow the fat, as it melts, to slowly baste the meat and keep it moist. 6. Put the roasting tin and contents into the oven for 10 minutes, then reduce the temperature to 160degC/325degF/Gas 3 for another hour and a half - or until the inside temperature of the meat reaches a minimum of 65degC/149degF on a meat thermometer. 7. Once the correct temperature is reached, remove from the oven and cover the meat and roasting tin with silver foil. Keep in a warm place to rest for approximately 30 minutes, then carve. Serve with roasted potatoes and vegetables of your choice, making sure to use the pan juices in your gravy (which is made extra delicious by the addition of a little Medium Sherry). Printable version