Showing posts with label mushrooms. Show all posts

27 February 2017

Chestnut & aubergine stew - big, punchy flavours.

I seem to be having a bit of a Mediterranean leaning at the moment where cooking is concerned.  So much so that everything seems to have at least one red pepper in it and my olive oil stocks are depleting rapidly.

It has even crept into my Sunday dinner plans.  You see, we're currently shopping at Lidl as our primary supermarket - they've just opened a nice big store quite close by where you can get most things and what you can't get, you can either stop at Sainsbury's (if you go home one way) or Tesco (if you go home the other!) for.  Now Lidl has a regular weekly special offer on four items of fruit/vegetable and four items of meat/fish, which I keep in mind when it comes to creating the menu plan.  Hence, the pork being part of the special offer dealio was why I was focused on roast pork loin for our Sunday dinner this week.  I'm going to have to buy another piece and do a blog post on successful roasting of pork loin with rosemary and sumac, because it was by far and away the nicest piece of pork we've had in a long time.

Anyway, I digress.  I didn't want to do a standard roast pork with all the trimmings, as that is so much up and downing to the oven that I'm exhausted by the end of it.  No, this week I thought I'd couple it with delicious sweet potato and nutmeg (with outrageous amounts of butter) mash and some kind of vegetable stew.

Now I know that the name "vegetable stew" is an instant turn-off for a lot of people and understand why.  However, the stew I wanted to create wouldn't be that dull and boring.  Oh no. It was to have deliciousness like red onion, saffron, chestnuts and aubergine in there, along with the carrots and mushrooms and all in a delicious richly sweet tomato sauce.  Oh alright, it also had a red pepper.  I admit, I couldn't resist.

Now you may raise your eyebrows at the idea of humble chestnuts along with such exotic ingredients as saffron and aubergine, but the phrase "they were brought in by the Romans, don'cha know?" (the chestnuts, that is) was all the encouragement I required to place them in what turned out to be a very appropriate recipe.

You will need a fair old amount of time to create this stew because, well, it's a stew.  It needs time to hubble, to bubble, to toil and well hopefully not create trouble, but to cook all those ingredients to a stage where they're all very good friends.  It needs to stew.  It's no good throwing all the ingredients into a pot and hoping for the best, although you would get something more closely resembling a weak soup.


However, your reward for that time spent stirring (plus lifting the lid hopefully and having a wee soupcon as a taste - which is essential, of course) is such an unusual and delicious accompaniment to just about every meat and fish that's on the planet (bearing in mind I've not tried them all, but of those I have tried ...).  It would even be brilliant with eggs.  Perhaps a little odd as an accompaniment for a pineapple cheesecake, so let's just stay with the savouries, I think.

Anyway, as you will see from the photographs, I paired mine with the roast loin of pork (which I roasted for 35mins per pound, plus 35 mins, at 180degC/350degF/Gas4 covered for the first hour then uncovered for the rest, if that helps) and the sweet potato mash.  The combination made for an excellent Sunday dinner that made a lovely change from the standard roasties etc.

A closer look at that roast pork because, well, it deserves it.
So, whether you're choosing to eat it with roast pork, sausages, or salmon, I just hope that you like it as much as we did!

CHESTNUT & AUBERGINE STEW     (Serves 4)

Ingredients :

1 tbsp plus 2 tbsp olive oil (used separately)
1 small aubergine, diced
1 red onion, finely diced
2 big garlic cloves, sliced finely
2 carrots, peeled and sliced thinly
1 medium red pepper, cored and sliced
a pinch of sea salt
half a tsp ground black pepper
2 large tomatoes, tough cores removed and diced
1 tbsp tomato puree
1 pinch of saffron strands
a quarter of one preserved lemon, sliced into fine shreds
300ml hot water
1 heaped tsp of chicken stock powder (or 1 stock cube)
90g halved chestnuts (I use Merchant Gourmet brand)
5 large white mushrooms, quartered
1 tsp runny honey (if required)
2 tbsp fresh Basil leaves, torn
1 tbsp fresh Parsley leaves, chopped, for garnish.

Method :

Heat the one tablespoonful of olive oil in a large, deep frying pan or wok until very hot.  Gently add the diced aubergine and fry until quite deeply coloured on at least three sides.  Remove the aubergine from the pan and set aside.

Heat the two tablespoonfuls of olive oil to a moderate heat and add the red onion, garlic, carrots and red pepper with the sea salt & black pepper.  Cook until the onion is softened, then add the diced tomatoes, tomato puree and saffron.  Stir occasionally until the tomatoes are beginning to break down.

Add the preserved lemon shreds, hot water and stock and stir through.  Bring to a simmer, cover with a lid and cook - stirring every so often - for around 20-30 minutes until the tomatoes have broken down completely and the carrots are al dente.

Add the aubergine, chestnuts and mushrooms and stir through.  Replace the lid and cook for 10 minutes, stirring occasionally.

Taste for seasoning and add the honey if the sauce seems acidic.

Remove the lid and allow the liquid to evaporate, until the sauce has become thick and is covering the vegetables and the carrots are cooked through - around another 10 minutes or so.

Finally, stir in the torn basil leaves and serve, sprinkling with a little fresh parsley as garnish.

Printable version

9 March 2016

Chicken, mushroom & black garlic puff pastry slices - it's British Pie Week!

Now you all know, I'm sure, what a big fan I am of comfort food.  Well, when Jus-Rol (the ready made/ready rolled pastry people) got in touch with me and suggested I might like to create something to honour British Pie Week (which is their very own confection and hooray to them for it), of course I said a big "yes please!".

If you're still in the dark as to what British Pie Week is all about (not that it's likely, but just in case), Jus-Rol have a web page to answer all your questions at http://jusrol.co.uk/british-pie-week/.


I'm quite proud to say that I have been getting along quite well with making my own pastry just lately, however, there's no way on this earth I shall ever be making my own puff pastry.  It just seems like a strange kind of torture, when Jus-Rol make such a good ready made version!  It rises beautifully into deliciously light, crisp and airy flakes of golden loveliness, I am quite sure I couldn't compete - so I don't - and that is why I chose to use puff pastry for my chicken, mushroom & black garlic slices.  The choice honours both British Pie Week and Jus-Rol's reliability where both quality and flavour are concerned.


Of course, you know what I'm like by now and making a simple pie was out of the question.  Far too predictable.  I tossed various recipe ideas around in my head, but kept on coming back to the savoury slice that was the first idea to surface.  They're basically hand held (well you can try!) savoury filled, small (well they were supposed to be small) pies that aren't pasties.  The pastry flakes so much, that I would suggest when eating al fresco that you make sure you're near a duck pond, as I am positive the ducks would very much enjoy the flaky fallout - which will be fairly considerable.  Oh - and don't attempt to eat one in a high wind or you may be left with a handful of filling as your pastry flies off into the wide blue yonder.  Jus-Rol's puff pastry is REALLY puffy!

I would anticipate that just about everyone is familiar with the chicken & mushroom savoury slice.  Many have been consumed in moments of random onset hunger and they are one of the staples of supermarket pie & pastry sections.  However, you know what I'm like for wanting to give a bit of added value to my recipes and as Balsajo's black garlic is one of my new favourite things - and of course, it would be luscious with chicken and mushroom - I couldn't resist including it and hence the new chicken, mushroom & black garlic savoury slice was born.


Now if you haven't sampled black garlic, hie thee hence to your local supermarket and put that right.  Black garlic is ordinary garlic that has been aged by the use of heat and humidity until it becomes thoroughly blackened, incredibly sweet and balsamicky (is that a word?) and not like ordinary raw garlic at all.  It's just lovely and I have to resist eating it straight from the bulb, whenever I'm cooking with it.  Oh and interestingly, it doesn't set of my garlic sensitivity - which is great.

The filling for the slices might seem a bit of a faff to prepare, but in reality it couldn't be any easier.  It's simply a matter of a bit of a-chopping and a-peeling, heating up some stock and away we go with the frying pan.


It is very worthwhile making the filling several hours before you require it, so that it can cool right down.  Trying to fill puff pastry rectangles as they dissolve under a hot filling is nothing short of guaranteed disaster.  I know, I've tried it.  So don't do that - make it early and chill it down.  It's so much easier.


Also, please don't be put off at the thought of making the slices.  That doesn't get any easier either when you are using Jus-Rol's ready rolled puff pastry sheets.  Buy two, cut them into quarters and all the hard work has been done by the factory.  You can sit back and accept the admiration and appreciation of your audience, without ever having broken a sweat.  Perfect.


Now, I have a few Cook's Tips for you - it's been a while since any of those turned up, hasn't it!


Firstly, don't be tempted to add more vegetables than you need.  The slices are intended to be primarily chicken, not vegetable.  For instance, where the carrot is concerned, I say to use one small carrot, but in fact I used one third of a big donkey carrot as they have such a big carroty flavour.  However, it's entirely up to you, just keep it small.

If you have a bunch of celery to hand, dig out the small sticks from the centre of the bunch.  They are way more tender and sweet.

Now I know I've gone on rather about the black garlic, but in case you don't have any to hand, regular garlic will do just as nicely.  Finely chop one clove and add it along with the onions and bacon etc.   It will require more cooking than the black version.


Everyone might know this tip, but it's worth passing on just in case.  Whenever you are cutting puff pastry, make sure to cut directly vertically downwards.  Lift your knife and make the second cut and so on.  When you draw a knife through the pastry, it bends the layers and can make the rise uneven.

Lastly, when egg washing, remember to paint liberally with your egg wash and THEN cut the steam holes.  This prevents the holes from becoming clogged by cooked egg, which can make your slices burst at the seams.

I was so very pleased with the flavours.  The chicken is right up there - as it should be - and softly tender.  The mushroom has a definite presence, with the remainder of the vegetables acting as a harmonious choir in the background.  The black garlic is subtly sweet and adds delicious umami to the whole.  The pastry is light, crispy and tastes just great.  I'm only pleased that there's just three in this family and there are four slices. That's lunch tomorrow sorted, then.

So there you are.  No need to wait until next British Pie Week - get your slice on!

CHICKEN, MUSHROOM & BLACK GARLIC SLICES    (serves 4)

Ingredients :

2 boneless, skinless chicken breasts
1 Knorr chicken stock pot
200ml hot water
1 tbsp olive oil
10g salted butter
half a medium onion, chopped finely
2 rashers of smoked streaky bacon, chopped finely
1 small carrot, diced finely
3" stick of celery, diced finely
half a tsp dried rosemary
sea salt & black pepper
1 mushroom, chopped finely plus 4 mushrooms, sliced
3 cloves of black garlic, chopped
1 heaped tbsp of plain flour
1 tbsp single cream
2 320g packs of Jus-Rol Puff pastry
1 beaten egg.

Method :

To make the filling, cut the two chicken breasts in half along their length, in order to reduce their thickness.

In a medium sized saucepan, add the water and chicken stock pot and heat until the stock pot has melted.  Add the chicken and poach until just done.  Remove the chicken to a bowl and reserve the stock.

In a frying pan, add the olive oil and butter and heat until the butter is melted.

Add the onion, bacon, carrot, celery and chopped mushroom and fry over a moderate heat until softened but not coloured.   Add the rosemary and season with a pinch each of sea salt & black pepper.  Add the sliced mushrooms and black garlic and continue to fry until the mushrooms have softened slightly.

Sprinkle over the plain flour and stir in.  Reduce the heat under the pan, then add the reserved stock in small increments, stirring well in between each addition.  You are looking for a thick sauce that coats the vegetables to a dropping consistency, but not runny, so you may well have unused stock left over.

Take each piece of chicken and, with two forks, shred the meat.  Make sure to leave some of the chicken in small chunks, for texture.  Add them to the pan with the vegetables as you go.

Stir the chicken into the sauce and add the single cream.  Taste for seasoning and adjust if necessary.

Decant the filling into a bowl and refrigerate until perfectly cool.

Taking the two sheets of pastry, cut each into four equal sized rectangles.

Place two rectangles each onto baking trays that have been lined with greaseproof paper or baking parchment.  

Paint the edges of the four pastry rectangles with beaten egg, then pile a quarter of the chicken mixture into each of these rectangles, taking care to spread the filling evenly across each piece.

Take an unfilled rectangle of pastry and place it over the chicken mix, making sure that the edges meet evenly.  Press down lightly around the edges.  You may wish to just trim off the corners, to give a rounded appearance.  Crimp the edges together, or seal by pressing a fork into the pastry to leave a nice pattern.

Egg wash the tops of the four slices and don't forget to cut two little holes in the top to let the steam escape.  Decorate the tops with a light sprinkle of freshly ground black pepper.

Place into a pre-heated oven at 180degC/350degF/gas 4 for 40-45 minutes, until the pastry is risen and evenly golden brown.

Serve with baby potatoes, vegetables of your choice and a yummy chicken gravy.

Printable version

7 December 2015

Midweek braised pork steaks with mushrooms


In days gone by (more days than I care to consider), I used to write a blog on another platform.  When that closed, I saved all my recipes and pictures and although I have cherry picked from them over the years, I have been meaning to get back to them in some kind of structured way.

So I shall be including them as I go along and these posts are going to be fairly brief (blessedly so, you may say) but they all represent a recipe that I think is worth passing on. 

The first of which is this, my midweek braised pork steaks with mushrooms.  

Firstly, I just happened to have some home made pork stock in the freezer.  However, if you don't have that and need to use a stock cube, you may want to include a finely chopped carrot in with the onion, celery & garlic.  This will give the sweetness and a further depth to the flavour of the sauce/gravy.

Secondly, the pork steaks I have used here are loin steaks.  As such they don't need a lot of cooking to become tender, unlike a leg or shoulder steak.  Hence you might need to adjust the braising time to suit whichever cut you have at the time.

Lastly, the Bisto Best gravy granules aren't essential if you're ethically opposed to them for some reason, just use whichever thickener you prefer - cornflour, or plain flour, or some other proprietary brand.  I use Bisto Best because a) they provide the best flavour of all the gravy products available and b) they mix in really easily, without leaving great sticky clumps of goo.  Goo is definitely not essential to the success of your pork dinner. 

MIDWEEK BRAISED PORK STEAKS WITH MUSHROOMS    (serves 3)

Ingredients :

1 tbsp rapeseed or olive oil
3 pork steaks (I used 2 each as they were very thin, so 6 in all)
1 onion, chopped finely
2 sticks celery, chopped finely
(1 carrot, chopped finely - optional)
1 large clove of garlic, roughly chopped
sea salt and black pepper
750ml home made pork stock (or chicken - or at a pinch, use 1.5 good low salt stock cubes)
125g chestnut mushrooms, cleaned and quartered
1 tbsp Bisto Best pork gravy granules.

Method :

Heat the oil in a deep frying pan or wok until smoking hot, then add the pork steaks (three at a time, if necessary, so as not to overcrowd the pan) and brown them lightly on both sides.  Remove to keep warm on a plate.

Once all the steaks are browned, reduce the heat and add a little more oil if necessary, then add the onion, celery and garlic (plus the carrot, if you're using it).  Stir fry gently until softened and just beginning to colour.

Replace the pork back into the pan and add the stock and mushrooms.  Stir to combine.

Bring up to a lively simmer and taste for seasoning.  Adjust if necessary.  Place a lid onto the pan and cook for 30 minutes or so, stirring occasionally, until the pork is tender.

Remove the pan from the heat and add the gravy granules, stirring quickly to prevent any lumps.

Serve with steamed new potatoes and an assortment of in season vegetables.

Printable version

13 July 2015

Citrus & spice chicken

I've been going through a whole heap of old paperwork recently - which included my many and various files and folders chock-a-block full of collected recipes.  In doing so, I have re-discovered several favourites from pre-Rhubarb & Ginger times, one of which being this citrus & spice chicken.

The recipe has developed over the years (as recipes are wont to do) but I note from the paper recipe in my folder, that the original was adapted from the Good Food Magazine's "40 Best Chicken Recipes" booklet.  Well, it's been adapted yet again - and very much for the better.  The very first recipe was basically a traybake, my first version added several ingredients such as the honey and chilli powder.  This last incarnation has separated out the vegetables to be cooked on the hob instead of in the oven, which I much prefer.

Marinate, my little lovelies!
Oven cooking the vegetables inevitably led to burned ends and undercooked middles, as the sheer quantity of meat and vegetables in the tray didn't really allow for even cooking.  Plus, it is nice to have a small degree of char on the chicken, but not so nice on the peppers and mushrooms.

This way, the chicken has plenty of air space around each piece and the cooking is much more even - particularly if you place the larger pieces to the outside and the smaller pieces to the inside of the tray.  The surface attains nice little charred corners, while the chicken itself stays moist and delicious.

Cooking the vegetables in a frying pan enables much more degree of control.  Inevitably the leftover marinade isn't enough moisture to see them through the entirety of the cook, but adding a little water from time to time not only allows the vegetables to steam, but also keeps the marinade saucy.  This way, you have the relatively dry chicken, accompanied by the saucy vegetables - which provides a lovely balance and completely without burned ends.

Ready for the oven - Bacofoil's non-stick aluminium foil is great for this!
Another huge positive to this recipe - apart from the flavour which is really tasty - is its speed.  Provided you get the chicken on to marinade in advance, it is a really simple task to prepare a couple of salad veggies, cook some rice, put the chicken in the oven and pan cook the vegetables.  From taking the marinating chicken out of the fridge to dishing up, probably only took around 45 minutes in total.  I love that - especially when there's such a pay-off by way of flavour.


So what's the flavour like?  The chicken flavour is there, no one flavour overrules it and because the curry past is used fairly sparingly and is very much tempered by the use of the yoghurt, it doesn't take precedence.  The honey gives a quiet sweetness and the garlic helps to savoury it all up nicely.  In fact, don't tell anyone, but if you add the yoghurt, then the lemon juice, then the honey, stir it all together and have a taste - mmmmn, it would make a smashing dessert!

Once the curry paste, oil and garlic are added though, I wouldn't recommend tipping it on top of your strawberries.  The oven adds the last element of flavour to the chicken, in the small degree of charring as the tops of the chicken pieces catch in the oven.  It all amounts to an absolutely scrumptious whole.

Now, as for Cook's Tips, I don't have many but there are a few worth mentioning.

The recipe calls for the juice of half a lemon.  If, however, you don't have a lemon but do have a lime - then no worries, use that instead!  You will need the whole lime's juice and the flavour will be slightly different, but no less nice.  I have used both in the past and can't decide which one I like the best.

Where the chilli powder is concerned, feel free to add as little or as much as you like.  However, if you're new to chilli powder and curry spice, I'd suggest you err on the side of caution to begin with - you can always add a little bit more the next time.


You can certainly freewheel a bit where the accompaniments are concerned.  I think the chicken and vegetables would be lovely served in a soft Indian flatbread with some salad alongside.  On this occasion, I served the chicken with some basmati rice that I had cooked in chicken stock and turmeric, along with the cooling influence of avocado and cucumber.  For my son, who isn't keen on avocado, I served a sliced juicy tomato and cucumber.  The chicken is certainly flexible enough in flavour profile, that there are a whole host of accompaniments you could serve with it.


Calories are in the range of 398 per portion, it is low in sodium and high in Vitamins B6 and C, so it could be worse!

I am so happy to have rediscovered this recipe.  I think it is going to appear fairly regularly on the menu plan and I recommend it to you.  Without the chilli powder, it would be great for children, too.

CITRUS & SPICE CHICKEN   (Serves 3)

Ingredients:

For the marinade :

150ml natural yoghurt (I used Greek yoghurt)
juice of half a lemon
1 tsp runny honey
1 tbsp vegetable oil (I used sunflower)
2 generous tsp curry paste or powder
1 garlic clove, crushed
chilli powder to taste (I used 1 tsp Kashmiri chilli powder).

Other ingredients :

3 skinless, boneless chicken breasts cut into large chunks
1 red pepper, deseeded and cut into large slices
half a green pepper, deseeded and cut into large slices
1 onion cut into large slices
6 medium chestnut mushrooms , quartered
1 tbsp olive oil.

Method :

1.  Mix together the marinade ingredients in a bowl.

2.  Add chicken chunks to the marinade, stir to coat and set aside to marinate for as long as you've got - from 4 hours to 30 minutes.

3.  Pre-heat your oven to 180degC/350degF/Gas 4.

4.  Place the chicken chunks onto a baking tray, taking care to leave as much of the marinade in the bowl, but without scraping any off the chicken.

5.  Bake the chicken for 30 minutes, remembering to turn the tray half way through to ensure even colouring.

6.  Add the vegetables to the bowl and stir to coat them in the marinade.

7.  Heat the olive oil in a large frying pan and add the vegetables, marinade and 200ml water.  Cook, covered, on a medium heat until the peppers are softened and onions are cooked through.  You may need to add more water, but only a little at a time.

8.  Once the vegetables are cooked, remove the lid and allow the sauce to reduce and thicken, which will only take 2-3 minutes if you haven't added too much water.

9.  The chicken is ready once the chunks are cooked through and they have gained a little bit of charred colour.

Serve with steamed basmati rice, avocado and cucumber.

Printable version

9 March 2015

Pork, aubergine & porcini ragu - natural umami!

I have a very embarrassing confession to make. I can't remember what inspired hubby to make this Italian style, porky, auberginey, mushroomy deliciousness - not because I am singularly forgetful (which I am!), but because he made it *blush* on the 26th January 2013.  Yes, it is now the 8th of March 2015.  *hangs head in shame*  I'm a bit behind with some ~koff~ of my blog posts.

Because these "forgotten" posts (which aren't really forgotten, but have just slipped on by in the rush of other things) are burning their unsung presence into my brain, I have decided that I must bring them to the forefront of existence.  Hence, I am going to do my best to remember at least something of the why's and wherefores of their creation, but the more important thing is to get them out there where they can be enjoyed by others!


I do recall that hubby was really keen to make a dish which did justice to the wonderful woody, rich flavour of the porcini mushroom and who who better to pair it with than with pork?  After all, both of them live in wooded areas (well, given the chance the piggies would!).  The aubergine, we felt, would give the ragu a smokiness and subtle creaminess - and so it proved.  My memory of this ragu is of a really intensely mushroomy, savoury, umami-filled forkful that was both satisfying from a comfort food angle and complex from a flavour angle.  It wasn't a simple combination of flavours, but one that developed on the tongue depending on how much of what was in your forkful.  Now you don't find that every day!


I have a few Cook's Tips for you with regard to this one :

Firstly, when you're char-grilling the aubergines, always oil the aubergines and not the pan.  Aubergines are total sponges and will soak up as much oil as you want to give them, so make sure to brush on just enough to help them to cook, or you'll end up with a greasy ragu.

Secondly, with regard to soaking the Porcini mushrooms.  When it comes to adding them to the dish, take care not to disturb the bottom of the soaking liquid.  Porcini's are renowned for containing little pieces of grit which will sink to the bottom of the bowl as the dried mushroom softens.  Pour the liquid gently and leave the last little bit in the bowl and you will be as sure as you can be, that your ragu will be grit free.

Lastly, be aware that as the ragu sauce reduces, the intensity of salt and pepper will change accordingly, so be sparing with the salt to begin with.

We didn't serve ours with any Parmesan cheese for sprinkling, but if you particularly enjoy a dash of Parmesan, then by all means feel free.  The flavours can certainly cope!


I have just received notification that this recipe has been awarded "Recipe of the Day" by eRecipe.com!  ~curtseys and composes a winner's speech~

Badge

PORK, AUBERGINE & PORCINI RAGU    (serves 3)

Ingredients :

Olive oil

500g minced pork
1 large aubergine, cut into 7mm slices and chargrilled
2 banana shallots, finely sliced
2 cloves garlic, minced
a handful dried
porcini mushrooms, soaked in a little boiling water
3 chestnut mushrooms
75ml red wine
500ml pork stock (or 1 pork stock cube, dissolved in 500ml water)
400g tinned tomatoes
2 tbsp tomato puree
1 tsp dried sage
half a tsp smoked paprika
half a tsp dried basil
half a tsp dried rosemary
a dash of Worcestershire sauce

sea salt and black pepper to taste.
 
Method :

 
1.  Firstly, prepare the aubergines.  Using a blisteringly hot griddle pan, barbecue or cooker grill, cook the aubergine slices until they are softened, ideally with dark griddle marks.  Once cooked, place onto a plate, cover with clingfilm and allow to cool.

 
To make the Ragu :

 
2.  Dry fry the minced pork in a large wok or deep frying pan until lightly browned, then remove from the pan and set aside.


3.  Add a little olive oil to the pan and cook the shallots, chestnut mushrooms and garlic until soft but not coloured.

4.  Return the pork to the pan and turn the heat up to high.  Once the pan is sizzling, add the red wine and stir for five minutes to allow the majority of the alcohol to cook off.

5.  Add the tomato puree and stir well to combine with the pork for a couple of minutes.

6.  Now add the paprika, herbs, tinned tomatoes and stock.  Bring the pan to a lively simmer before adding the porcini mushrooms along with their soaking liquid.

7.  Season with the Worcestershire sauce and simmer until the ragu sauce has reduced to a thick consistency.  Once at your preferred consistency, taste for seasoning and add more if necessary.

Serve with freshly cooked pasta.

Printable version


8 March 2014

Slow Cooker Mushroom & Tarragon Chicken

I have discovered that, whilst all these replacements for potato are all very well, I do - and son & heir agrees with me - begin to get a terrible hankering for something potato.  So, as I'd been doing so well with the last seven or eight meals being successful, I thought I'd risk throwing a potato meal into the mix.

Now I didn't chance my arm too far - I mean, had I have dished up a frittata with dauphinoise and chips, it might have been three potatoes too many.  No, I went for a relatively safe bet, which was mash.  Good old, reliable, yummy, comfort food for the soul, mashed potato.

I was, mind you, supposed to have cooked this on the previous day.  However, when my tongue (I know, don't ask me, I haven't a clue) decided to go completely mad (bizarre swellings, weird colours) following a pastrami sandwich and a nectarine, it kind of put me off eating a bit.  So we all fended for ourselves that night (hurrah for tins of soup!) and the chicken got moved on to the following night.

Owing to the fact that we were attending a reading at son & heir's school that afternoon, ("a reading" being where the students were reading from work they had done at that day's Writer's Workshop - which turned out to be really very good indeed), I decided to break out the slow cooker.  Well, it saved me from stressing about getting the chicken cooked in time without paying for it by way of pain and discomfort later.  This is one of the very good reasons why I love my slow cooker.


I put the chicken in to cook at around 12.30pm and fished it back out to eat at around 6pm - and it was perfect.  Still succulent, not dried out at all and as tasty as a tasty thing.  The Marsala wine had contributed lots by way of flavour and aroma, and the mushrooms gave that savoury edge that took the sweetness of the wine down a notch or two.

I used my favourite Essential Cuisine powdered chicken stock in the sauce, so beware if you are using a stock cube and either use a low salt one, or don't include salt at all when you are seasoning the chicken.  Using a combination of seasoning, a salty stock cube and fairly salty gravy granules could be disastrous when all are combined!  Get yourself some Essential Cuisine stock - it's not expensive (£3.95 for enough to make 6 litres) low salt and tastes fabulous, so you never have to worry about salt levels.

Chicken loves Marsala, however the use of Marsala wine is not cast in stone.  A sweet sherry would do just as good a job - or a dessert wine, if you've got one lurking in the fridge.  As long as it's not too dry, it will do the job perfectly.


The mushrooms seem to soak up the sweet wine and become flavour bombs, so make sure not to leave any in the slow cooker when you serve up!  It would be such a shame to lose all that intense flavour.

I used dried tarragon, basically because I find that the small expense of buying a bunch of fresh tarragon just isn't worth it to use a tablespoonful and have the remainder die off in the fridge.  Dried does a perfectly good job - just don't overdo it!  By the time the mix has spent a few hours chuckling in the slow cooker, you won't know the difference between dried and fresh anyway.

A quick word about the use of gravy granules.  Now I don't see any reason to be embarrassed or shady about using them - particularly the really good ones like the Bisto Best ones.  They are a complete boon for thickening gravies and sauces, they can add a bit of oomph to an otherwise fairly uninteresting gravy and you can get so many different flavours of them now, that there is no longer any reason to have to use chicken for pork, or beef for lamb.  However, if you're interested in keeping your meals pure, then by all means go for the use of a little flour when you fry off the chicken, or introduce a cornflour slurry at gravy thickening time.  It all works.

If you have time on your hands, you can always pop the ingredients into a casserole dish and cook it in the oven.  I'd say you'd need a 180degC/350 degF/gas 4 - or moderate - oven, for probably around an hour and a half, or maybe slightly longer depending on the size of your chicken breasts.  You could cut each breast into three pieces, which would speed up the process a little.  However, I must stress that I've not tried this recipe this way - so you'd be trailblazing.

Hubby really enjoyed his meal, commenting that it was "really delicious".  Fine praise indeed!  Son and heir also approved, leaving a clean plate behind him.  I gave the entire meal a big thumb's up for satisfaction, flavour and comfort - the perfect meal for a bit of a tiring day.  So, are you feeling like you need a "meat and two veg with mash" meal?  If so, then this is the one for you.

SLOW COOKER MUSHROOM & TARRAGON CHICKEN    (serves 3)

Ingredients :

3 chicken breasts, skinless and boneless
1 tbsp rapeseed oil
sea salt & ground black pepper
1 onion, chopped fine
2 garlic cloves, chopped fine
1 tsp dried tarragon
6-7 chestnut mushrooms, sliced thinly
100ml sweet Marsala wine
400ml chicken stock
1 tbsp fresh parsley, chopped finely
1-2 tbsp Bisto Best gravy granules.

Method :

1.  Heat the oil in a large frying pan and add the chicken.  Season the side that is uppermost and fry until golden.  Turn the chicken, season lightly again and fry until golden.  Remove to the slow cooker and turn the cooker on to Low.

2.  Add the onions to the frying pan and gently cook until softened but not coloured.

3.  Add the garlic and tarragon and continue to cook for 1-2 minutes.

4.  Add the mushrooms and increase the heat slightly.  Cook until slightly softened.

5.  Add the Marsala and allow it to bubble and reduce slightly.

6.  Add the chicken stock and stir through, then add the parsley.

7.  Add the vegetables and sauce to the slow cooker, replace the lid and cook for 5-6 hours on Low.

8.  Once your vegetable accompaniments are cooking, remove the slow cooker lid and move the chicken breasts to one side.  Sprinkle the gravy granules evenly into the sauce and stir through until thickened.  Replace the lid until you are ready to serve.

Printable version


26 February 2014

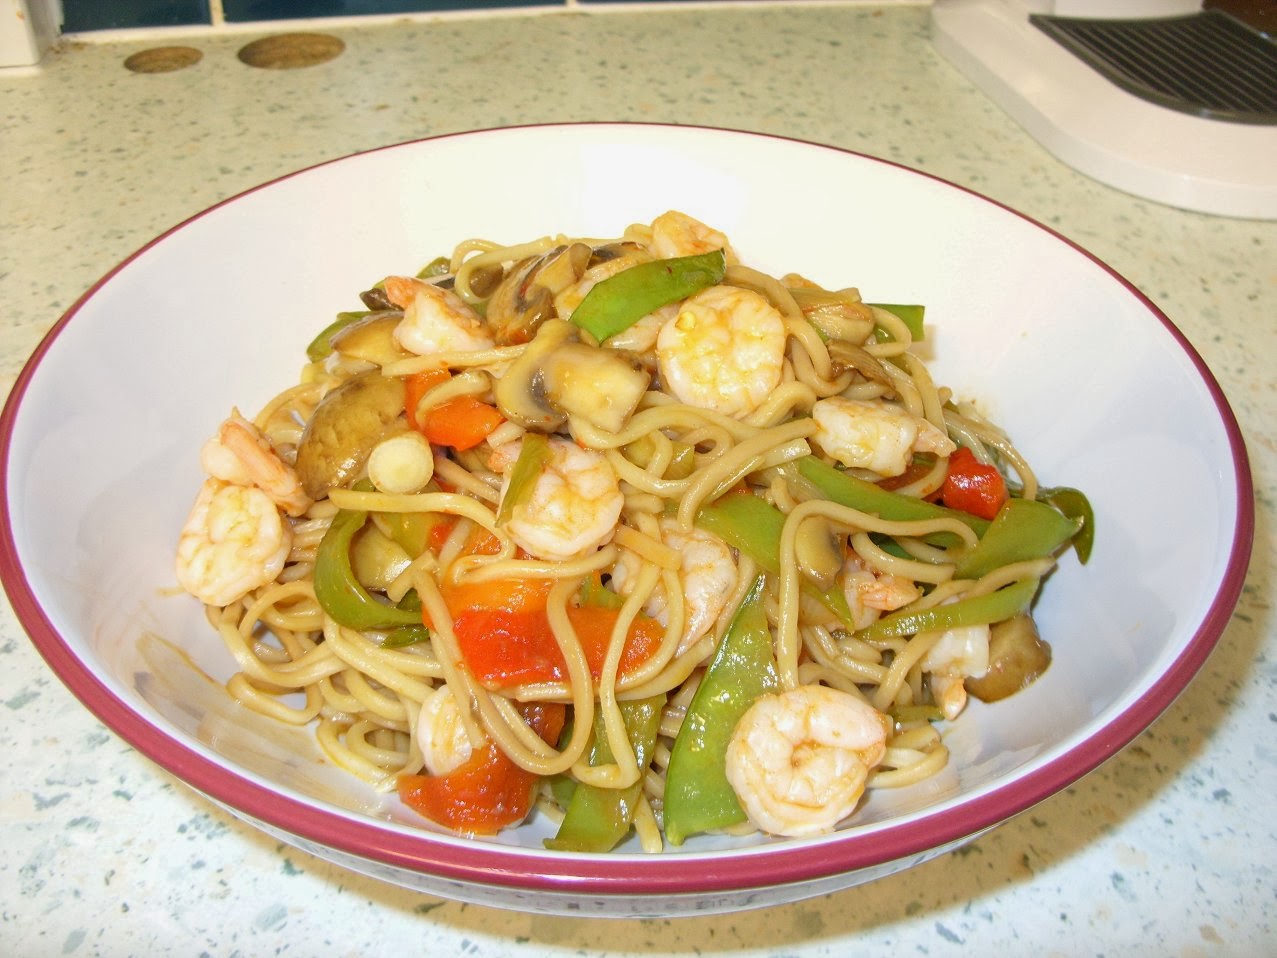
Prawn noodle stir fry - it's a stir fry, with prawns and noodles!

It really is that simple - a noodle stir fry that involves lovely veggies and juicy prawns - and the prawns don't even need to be raw.  That gets a big thumbs up from me.

Now oddly, this recipe contains very similar veggies to yesterday's gnocchi dish - which makes the shopping both simple and relatively economic.  After all, how many times have you bought a pack of three peppers because you needed two and the three were cheaper?  You always wind up with one pepper that has no home to go to - so using them across two recipes is really useful!  Still, it's not often that you can travel from an Italian inspired recipe to a Chinese inspired recipe and use some of the same ingredients!

The original recipe - and I really haven't tweaked this one much at all - came from the allrecipes.co.uk site again.  You can see the original here, if you're curious.

The sheer bliss of this recipe is that it takes under an hour from sighing heavily and getting onto your feet to make dinner, to settling down with your fork in your hand.  Not many really tasty dishes have that claim to fame!  Such is the joy of stir fries - really speedy cooking as a matter of necessity.

So what did I change in this recipe?  Well, for starters, I chargrilled the two red peppers that I used in it - and yes, the use of a second pepper isn't in the original recipe either.  If you're not bothered by the skins of peppers then don't worry about following suit - but chargrilling (putting the whole pepper under the grill until the skin burns and blisters) not only removes the skin but gives the pepper a lovely sweet intensity.  It also speeds up the cooking, (provided you chargrilled your peppers earlier in the day, as I did) as you don't need to wait for the peppers to soften in the pan!

So aside from that, I also added some sliced mushrooms because I had them to hand with no job waiting for them - and a stir fry just isn't right without a mushroom or two.


I also changed the order of cooking for a few of the ingredients, as the mange tout required longer cooking than most people would give them.  My menfolk aren't keen on their mange tout being too crunchy, you see.  If you like crunchy mange tout, then by all means put them in after the onions go in.

Ah yes, the onions - they received more cooking than they would normally get as well.  I have to be very careful with green (or Spring) onions, not to kick off my raw onion reaction - which is never a comfortable experience.  Again, if you're safe as houses with uncooked onion, feel free to leave them crunchy.

I felt that the ingredients could cope with a decent hit of chilli - and was doubtful that the Sweet Chilli sauce would have enough, on its own.  I tasted the sauce once it had been in the pan for a minute or two and sure enough, it could handle more chilli.  I have a huge pack of dried red chilli flakes just for this sort of job - and a pinch of those made all the difference.  By all means leave them out if you're cooking for children, or folk who like a little chilli tingle and nothing more.

I also used a small amount of sesame oil to coat the cooked noodles, which both adds to the flavour and also stops them from congealing whilst they wait.  However, make sure not to add too much - it is powerful stuff!

My last change was to use tomato ketchup instead of tomato puree.  I find that tomato puree has to be cooked out for a decent length of time in order to lose its rawness and acidity.  The sheer nature of a stir fry doesn't give tomato puree long enough in which to do that - so tomato ketchup is a good replacement.  It also has that touch of spiciness that is great in this stir fry - but do remember to cut down the amount of honey that you add, in order to prevent everything becoming too sweet!

Hmmmn ... maybe I did tweak it quite a bit, come to think about it!

I served the stir fry with some yummy prawn crackers alongside, which went very well and provided a nice crunch for when you were tired of sucking up noodles!
 
It is a really forgiving recipe - you can add any additional vegetables to it, just be careful not to clash the flavours with the sauce.  The end result was tasty, spicy, satisfying and healthy to boot.  Can't ask for more than that!  Son and heir wasn't impressed, unfortunately, as he's generally unimpressed by stir fries.  Hubby really liked it and would have it again - and so would I.  We'll just have to remember to feed son & heir pizza that night!


PRAWN NOODLE STIR FRY   (serves 3)

Ingredients : 

1 tbsp tomato ketchup or puree
2 tbsp light soy sauce
2 tbsp sweet chilli sauce
1 tbsp runny honey
a pinch of red chilli flakes
1 tbsp rapeseed oil
100g mange tout peas - each sliced into three strips
4 or 5 chestnut mushrooms, sliced
250g Chinese egg noodles
1 tsp sesame oil
a bunch of spring onions, sliced into 2cm pieces
2 red peppers, sliced (chargrilled if you prefer them that way)
250g cooked, peeled large prawns.

Method :

1.  Put a large saucepan of salted water on to boil for the noodles.

2.  In a small bowl, combine the tomato ketchup (or puree), soy sauce, sweet chilli sauce, runny honey and chilli flakes and set aside.

3.  Heat the oil in a wok over a high heat.

4.  Add the mange tout and mushrooms and stir fry until softened.

5.  Put the dry noodles into the boiling water for 4 minutes - or follow the pack instructions.  Stir gently regularly to separate the strands.  Once cooked and tender, drain and return to the saucepan.  Add the sesame oil and toss until coated.  Replace the lid while you finish cooking the veggies and prawns.

5.  Add the spring onions to the wok and cook until softening, then add the peppers to heat through.  Keep on stirring and moving the contents of the wok around to prevent anything from burning.

6.  Add the sauce and the prawns and toss for 2-3 minutes to heat everything through and get the sauce bubbling.

7.  Add the noodles and toss again, to coat them with the sauce.

Serve with prawn crackers and napkins to clean saucy chins.

Printable version
 

14 December 2013

BBQ Paprika Chicken with mushroom rice

I dunno - I don't post for ages and then suddenly I'm back with a double recipe post!  Ah well, I like to keep you all on your toes.

This 'ere BBQ paprika chicken with mushroom rice meal was really good.  I had a horrid sinking feeling that the rice was going to be a bit bland and dull - but no.  I think the addition of the ground cumin, turmeric and chilli flakes were sufficient to provide the layers of flavour that made my original mushroom rice recipe (which was good, but not quite there) into something a lot more interesting.

As for the BBQ paprika chicken, well that inspiration came from the brilliant Herbie Likes Spaghetti blog - and you can see the original recipe here : http://www.herbielikesspaghetti.com/2011/05/chicken-paprika.html.


I tweaked the recipe a bit here and there to suit our preferences - such as changing chicken thighs for chicken breasts, plus I used an Indian BBQ spice rub rather than a Cajun one.  However, the biggest change I made was that instead of mixing in some soured cream to the BBQ sauce at the end of the recipe, I served it separately.  Well, the BBQ sauce was so good, it would have been a crime to weaken the intensity of the flavours with the cream.  By serving it separately, it enabled you to add a little to each forkful or not, depending on which you wanted - which worked very well indeed.


I'll admit, I was skeptical as to how so much paprika would work with the BBQ sauce, as a good BBQ sauce has all the flavour you need without anything being added.  However, it blended in there perfectly and added that piquancy - supported by the sweetness of the onion and savouriness of the garlic - that makes this dish a very definite do-again one!

It was just a shame there wasn't any leftover chicken, as I've got leftover rice with no gorgeous BBQ paprika chicken to eat with it!


chicken thighs
2 tablespoons creole seasoning
1/4 cup olive oil
medium onion
2 cloves garlic
1/4 cup paprika
1 cup bar-b-que sauce
2.5 cups chicken broth
1.5 cups sour cream
1/2 cup sliced scallion - See more at: http://www.herbielikesspaghetti.com/2011/05/chicken-paprika.html#sthash.tjqdcYH5.dpuf
chicken thighs
2 tablespoons creole seasoning
1/4 cup olive oil
medium onion
2 cloves garlic
1/4 cup paprika
1 cup bar-b-que sauce
2.5 cups chicken broth
1.5 cups sour cream
1/2 cup sliced scallion - See more at: http://www.herbielikesspaghetti.com/2011/05/chicken-paprika.html#sthash.tjqdcYH5.dpuf
BBQ PAPRIKA CHICKEN  (serves 3)

Ingredients :

3 skinless, boneless breasts of chicken
A spicy chicken dry rub (Cajun or an Indian BBQ rub are great)
2 tbsp olive oil
1 large onion, finely chopped
1-2 cloves garlic, finely chopped
2 heaped teaspoonfuls paprika
1-200ml BBQ sauce (Bull's Eye BBQ sauce is good)
150ml chicken stock.

Method : 

1.  Take each chicken breast and cut into three pieces.  Place into a bowl and add sufficient dry rub to coat them.  I used approximately 2 tsp of Zaiqa's Al Faham BBQ spice rub, which worked beautifully.

2.  While the chicken marinates briefly, prepare the onions, garlic and other vegetables for accompanying dishes.

3.  Heat the oil in a wok until hot and fry the chicken for 3 minutes or so on each side - sufficient to create a lovely golden colour and a degree of caramelisation, but without any burning.  Remove from the pan to keep warm.

4.  Add the onion to the pan and cook on a medium heat until softened, whereupon you should add the garlic and continue to cook for another few minutes.

5.  Add the paprika to the pan and stir to combine.  Cook for a few minutes - no longer than 5 - and add the chicken to the pan.

6.  Add the BBQ sauce and the chicken stock and stir to combine.  Bring to a boil, then reduce to a lively simmer and cook until the sauce has retained its stickiness and the chicken is cooked through.

Serve 3 pieces for each person, with sour cream and the mushroom rice :

MUSHROOM RICE  (serves 3-4)

Ingredients :
 
2 tbsp rapeseed or olive oil
2 x 10g pieces of butter
1 onion, chopped finely
200g basmati rice
1 fat garlic clove, chopped finely
200g mushrooms, diced
sea salt
freshly ground black pepper
1 tsp ground cumin
1 tsp ground turmeric
a pinch of dried red chilli flakes
a large handful of frozen peas
a tbsp fresh chopped coriander.

Method :
 
1.  Fill a large saucepan to 2" or so below the edge, with water.  Add a pinch of salt and place onto a high heat to boil.

2.  Whilst the water is heating, rinse the dry rice in a sieve under running water until the majority of the starch had been removed and the water runs clear.

3.  Place a frying pan onto a medium heat and add the oil and one knob of butter.  Once heated, add the onion plus a pinch of salt and cook until softened and just beginning to caramelise.

4.  The water will boil in the meantime, so add the rice and simmer for 7-10 minutes - then drain and replace into the warm saucepan.

5.  Add the garlic to the frying pan and cook for 1-2 minutes, then add the mushrooms and cook until softened.

6.   Add a good pinch of freshly ground black pepper, the cumin, turmeric and chilli flakes and stir to combine.  Continue cooking on a gentle heat, until the rice has 2-3 minutes left to go, then add the frozen peas to the mushroom mixture and increase the heat to ensure they defrost and cook properly.

7.  Add the final knob of butter and the chopped coriander and add to the cooked rice.  Stir through and serve immediately.

Printable version
 
Related Posts Plugin for WordPress, Blogger...