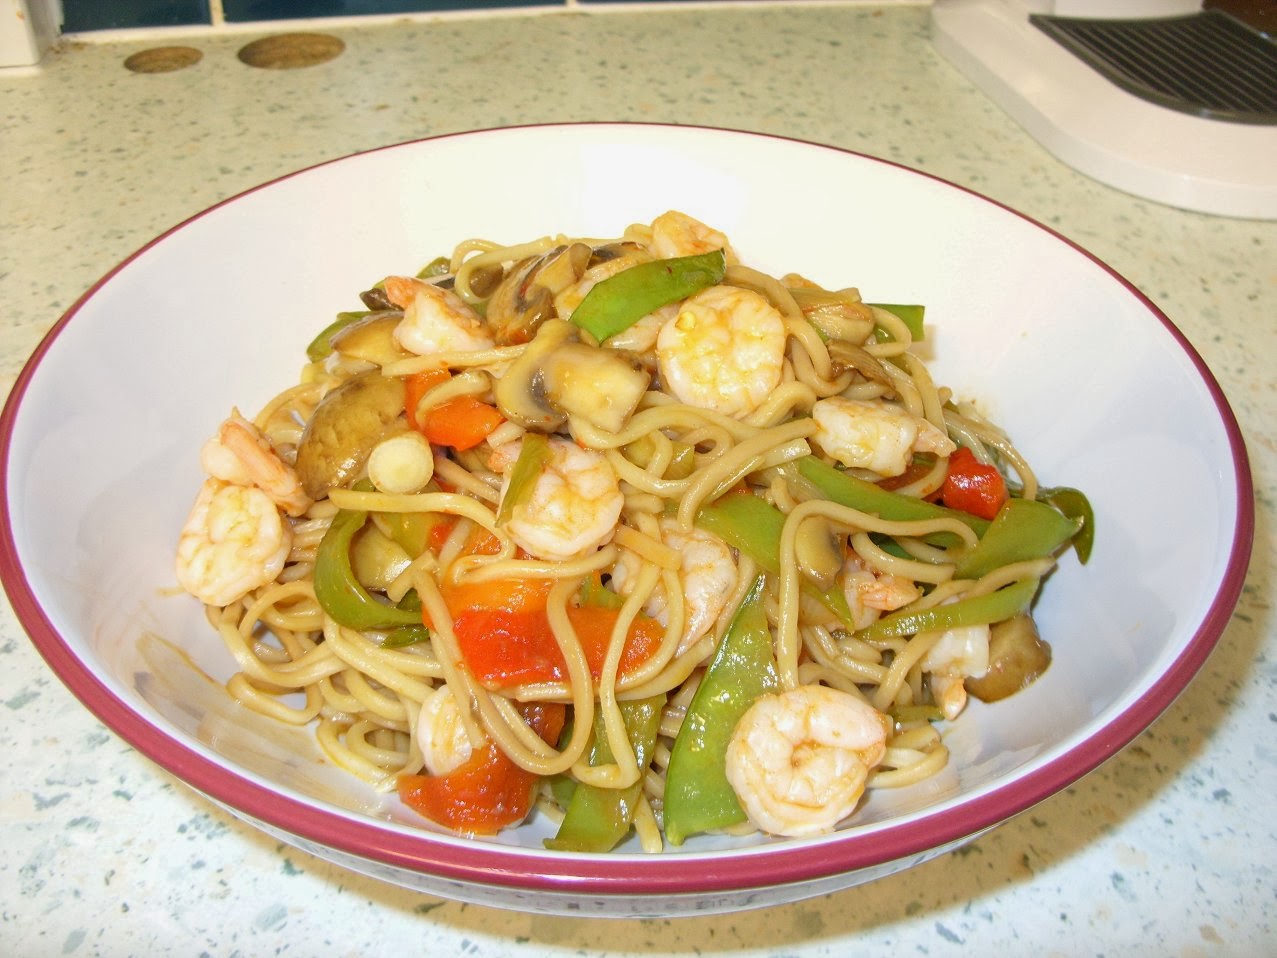
It really is that simple - a noodle stir fry that involves lovely veggies and juicy prawns - and the prawns don't even need to be raw. That gets a big thumbs up from me.
Now oddly, this recipe contains very similar veggies to yesterday's gnocchi dish - which makes the shopping both simple and relatively economic. After all, how many times have you bought a pack of three peppers because you needed two and the three were cheaper? You always wind up with one pepper that has no home to go to - so using them across two recipes is really useful! Still, it's not often that you can travel from an Italian inspired recipe to a Chinese inspired recipe and use some of the same ingredients!
The original recipe - and I really haven't tweaked this one much at all - came from the allrecipes.co.uk site again. You can see the original here, if you're curious.
The sheer bliss of this recipe is that it takes under an hour from sighing heavily and getting onto your feet to make dinner, to settling down with your fork in your hand. Not many really tasty dishes have that claim to fame! Such is the joy of stir fries - really speedy cooking as a matter of necessity.
So what did I change in this recipe? Well, for starters, I chargrilled the two red peppers that I used in it - and yes, the use of a second pepper isn't in the original recipe either. If you're not bothered by the skins of peppers then don't worry about following suit - but chargrilling (putting the whole pepper under the grill until the skin burns and blisters) not only removes the skin but gives the pepper a lovely sweet intensity. It also speeds up the cooking, (provided you chargrilled your peppers earlier in the day, as I did) as you don't need to wait for the peppers to soften in the pan!
So aside from that, I also added some sliced mushrooms because I had them to hand with no job waiting for them - and a stir fry just isn't right without a mushroom or two.
I also changed the order of cooking for a few of the ingredients, as the mange tout required longer cooking than most people would give them. My menfolk aren't keen on their mange tout being too crunchy, you see. If you like crunchy mange tout, then by all means put them in after the onions go in.
Ah yes, the onions - they received more cooking than they would normally get as well. I have to be very careful with green (or Spring) onions, not to kick off my raw onion reaction - which is never a comfortable experience. Again, if you're safe as houses with uncooked onion, feel free to leave them crunchy.
I felt that the ingredients could cope with a decent hit of chilli - and was doubtful that the Sweet Chilli sauce would have enough, on its own. I tasted the sauce once it had been in the pan for a minute or two and sure enough, it could handle more chilli. I have a huge pack of dried red chilli flakes just for this sort of job - and a pinch of those made all the difference. By all means leave them out if you're cooking for children, or folk who like a little chilli tingle and nothing more.
I also used a small amount of sesame oil to coat the cooked noodles, which both adds to the flavour and also stops them from congealing whilst they wait. However, make sure not to add too much - it is powerful stuff!
My last change was to use tomato ketchup instead of tomato puree. I find that tomato puree has to be cooked out for a decent length of time in order to lose its rawness and acidity. The sheer nature of a stir fry doesn't give tomato puree long enough in which to do that - so tomato ketchup is a good replacement. It also has that touch of spiciness that is great in this stir fry - but do remember to cut down the amount of honey that you add, in order to prevent everything becoming too sweet!
Hmmmn ... maybe I did tweak it quite a bit, come to think about it!
I served the stir fry
with some yummy prawn crackers alongside, which went very well and
provided a nice crunch for when you were tired of sucking up noodles!
It is a really forgiving recipe - you can add any additional vegetables to it, just be careful not to clash the flavours with the sauce. The end result was tasty, spicy, satisfying and healthy to boot. Can't ask for more than that! Son and heir wasn't impressed, unfortunately, as he's generally unimpressed by stir fries. Hubby really liked it and would have it again - and so would I. We'll just have to remember to feed son & heir pizza that night!
PRAWN NOODLE STIR FRY (serves 3)
Ingredients :
1 tbsp tomato ketchup or puree
2 tbsp light soy sauce
2 tbsp sweet chilli sauce
1 tbsp runny honey
a pinch of red chilli flakes
1 tbsp rapeseed oil
100g mange tout peas - each sliced into three strips
4 or 5 chestnut mushrooms, sliced
250g Chinese egg noodles
1 tsp sesame oil
a bunch of spring onions, sliced into 2cm pieces
2 red peppers, sliced (chargrilled if you prefer them that way)
250g cooked, peeled large prawns.
Method :
1. Put a large saucepan of salted water on to boil for the noodles.
2. In a small bowl, combine the tomato ketchup (or puree), soy sauce, sweet chilli sauce, runny honey and chilli flakes and set aside.
3. Heat the oil in a wok over a high heat.
4. Add the mange tout and mushrooms and stir fry until softened.
5. Put the dry noodles into the boiling water for 4 minutes - or follow the pack instructions. Stir gently regularly to separate the strands. Once cooked and tender, drain and return to the saucepan. Add the sesame oil and toss until coated. Replace the lid while you finish cooking the veggies and prawns.
5. Add the spring onions to the wok and cook until softening, then add the peppers to heat through. Keep on stirring and moving the contents of the wok around to prevent anything from burning.
6. Add the sauce and the prawns and toss for 2-3 minutes to heat everything through and get the sauce bubbling.
7. Add the noodles and toss again, to coat them with the sauce.
Serve with prawn crackers and napkins to clean saucy chins.
Printable version
Showing posts with label red peppers. Show all posts
26 February 2014
25 June 2013
Curry baked chicken with vegetable curry & green pea rice
Just recently, I've made several chicken & salad meals by coating chicken pieces in some kind of sauce or rub, then baking it in the oven. I think, so far as I can remember, I've done a BBQ version, a Cajun version, a garlic and herb version - you get the idea. So when I was considering a curry for one of the week's meals, it occurred to me that I could do the same sort of arrangement - but with a vegetable curry instead of salad.
If I were to marinate the chicken in something, then bake it - and make a vegetable curry earlier on in the day, then that would result in a really quite simple dinner preparation. All I'd have to do is put the chicken in the oven, warm up the vegetable curry and cook the rice and peas. Lovely!
Now sometimes, this sort of plan goes awry at the last minute as I haven't anticipated how long it would take me to chop the vegetables, or I'd run out of pans and make horrid amounts of washing up. This time, however, it all went beautifully according to plan and was indeed the most satisfying dinner not just from an eating perspective, but from the preparation and clearing up perspective too.
I started off the processes by marinating the chicken in a mixture of curry paste, mango chutney and Greek yoghurt (doesn't have to be Greek - it's just that Greek yoghurt is my plain yoghurt of choice) for the day.
Next - and during the morning - I sat down and peeled, cut and chopped all the vegetables for the curry and set about making it. I do so enjoy cooking without time constraints. It was lovely to just sail along, cooking without having to keep an eye on the time. We try to have our meals on the table for 6pm, you see. Sometimes I have a lot of trouble hitting that 6pm deadline!
As ever, when cooking a curry, I had an end result in mind but no real idea how I was going to get there. So, I knew I wanted to emulate the British Takeaway vegetable curry flavour and texture of the thing - without over cooking any of the veggies and without it winding up too watery, too stew-like or too greasy. Shouldn't be a problem!
I went through the fridge and pulled out everything that didn't have a home to go to as well as the few veggies that I'd bought with this particular dish in mind. So we wound up with onion, garlic, red chilli, carrot, potato, mushroom, baby red peppers, cauliflower, broccoli, fresh quartered tomato, fresh coriander and red lentils. That should take care of our five a day!
Whenever I do the chopping-and-a-peeling, I always put the cut veggies onto plates or in dishes in the order I'll be needing them. So the onion, garlic and chilli went onto one plate, the carrots were in a dish on their own. The potato, mushroom and baby red peppers went into the colander and the tomato, cauliflower and broccoli were on another plate. That way, I don't have to waste any time separating one from the other - and they're all ready to go when I start cooking. I can't cook and chop - just doesn't work.
I was tempted to spice the curry myself, but in the end decided to use our pre-prepared Sharwoods Korma curry paste - the same one I'd used on the chicken. I was going for simplicity and the Sharwoods is a very good middle of the road curry paste that you can pep up with additional chilli if you want. The ingredients list reads very well, too. With tomato puree, coriander, cumin, turmeric, ginger, chilli, paprika, cardamom, mustard seeds, fenugreek and fennel and the only additive being acetic acid, it is a very acceptable quick curry fix.
So, it went like this. First of all I chose my biggest saucepan in which to cook so that I had enough room for everything as I wasn't entirely sure how much it would come to. I put 2-3 tbsp of sunflower oil in and got that heating, then added the onion - and a small pinch of salt - which cooked until golden brown, but not burned. The garlic then went in for a minute, before I added the chilli and carrot. Next in was the curry paste and tomato puree which I cooked until the oil was released - just a few minutes. The next things into the pot were the potato/mushroom/red pepper combo which got mixed all around and coated in the aromatic loveliness.
I wanted to include some coconut milk at this point, but didn't want to use a whole 400g tin of the stuff. Amazingly, I found a small carton of Blue Dragon coconut cream which did the job perfectly - and was just about to go out of date - so that went in next. I added a teaspoonful of Essential Cuisine chicken stock powder and approximately 200-300ml of water and gave everything a good stir. I was tying my hands behind my back to prevent myself from adding more salt at this stage. The temptation was enormous, but I resisted - and jolly good job too. I satisfied the urge by adding some black pepper instead. *chuckle* In went the red lentils and I let everything simmer gently together for around 20-30 minutes until almost cooked. Finally, I added the cauliflower and turned off the heat - leaving it to cool.
When I came back to start the dinner properly, first thing was to put the chicken into the oven, then start the vegetable curry warming up and boil the water for the rice.
Once the curry had heated through enough to start bubbling, I removed the lid and let it reduce slightly - just to thicken the sauce a little. In went the broccoli and the tomato quarters, plus three quarters of the chopped fresh coriander. Once the broccoli was cooked and the sauce reduced to my liking, it was done.
The chicken came out of the oven still beautifully coated in the curried yoghurty mix, which had slightly caramelised on top, thanks to the mango chutney - which was exactly what I was hoping for.
The plain basmati rice was brightened up by the addition of a few green peas. A tip for adding frozen peas to cooking rice is to run the peas under the hot tap to defrost them and warm them up before adding them to the rice with around 2 minutes to go. That way, you don't stop the cooking process by adding freezing peas and they will stay a vibrant green.
The whole meal was absolutely delicious, comforting, satisfying and got a huge thumbs up from everyone. So long as you make the veggie curry earlier in the day, it was ultimately all finished in around 30 minutes and was a perfect arrangement for anyone who loves curry but wants healthy along with it - and who can't spend too long in the kitchen making it.
Son and heir was practically begging for this curry to be made again and soon - so I'm sure it won't be long!
CURRY BAKED CHICKEN, VEGETABLE CURRY WITH RICE AND PEAS (Serves 3 with leftover vegetable curry)
Ingredients :
3 boneless skinless chicken breasts
3 tbsp plain (Greek) yoghurt
1 tbsp mango chutney
1.5 tbsp curry paste.
3 tbsp sunflower oil
2 onions, sliced finely
2 fat garlic cloves, chopped finely
1 hot red chilli (seeds are optional)
1 donkey carrot, peeled and diced
3 tbsp curry paste
2 tbsp tomato puree
2 medium potatoes, peeled and diced
6-10 mushrooms, washed and quartered
6 baby red peppers (or one red pepper, cut into pieces), top & tailed
250ml coconut cream
1 tsp chicken stock powder or a low salt chicken stock cube
enough water to just cover the contents
3 heaped tbsp red lentils
3-4 cauliflower florets, broken into small pieces
3-4 broccoli florets, broken into small pieces
1 large ripe tomato, quartered (or smaller) into wedges
a large handful of fresh coriander, chopped.
1 cup of uncooked basmati rice
sea salt
half a cup of frozen peas.
Method :
1. In the morning, mix together the yoghurt, chutney and curry paste in a large bowl.
2. Trim the chicken breasts of fat and gristle, then score lightly across the top to allow the marinade to more easily penetrate the meat.
3. Add the chicken to the marinade and mix gently to ensure every little bit of chicken is covered in marinade. Cover with cling film and refrigerate until 30 minutes prior to cooking.
4. To make the vegetable curry (which I recommend should also be done in the morning), heat the oil in a large, deep saucepan. Add the oil.
5. Add the onion - and a small pinch of salt - and cook for around 10-15 minutes until golden brown, but not burned. Add the garlic and stir quickly, then add the chilli and stir.
6. Next, add the carrot pieces, which will help to cool the pan and so avoid burning the garlic.
7. Next add the curry paste and tomato puree and stir well to combine with the rest of the ingredients. Cooked until the oil is released - just a few minutes.
8. Add the potato/mushroom/red peppers and stir well to ensure they are coated with the curry mixture.
9. Add the coconut cream, stock powder and water and stir gently to combine. Do not add any salt at this stage, but if you're yearning to - add a little black pepper instead!
10. Stir in the red lentils and let everything simmer gently together for around 20-30 minutes until almost cooked.
11. Finally - for this stage - add the cauliflower, turn off the heat, cover and leave to cool.
12. Several hours later and when you're ready to prepare the dinner proper, begin by turning on the heat under the vegetable curry and pre-heating the oven to 200degC/400degF/Gas 6. Line a shallow baking tray with silver foil (optional - but it helps with the washing up!) and place the chicken onto the foil. Spoon any additional marinade over the top of each chicken breast. Place into the oven for 25-35 minutes or until the juices run clear if pricked with a knife.
13. Three quarters fill a good sized saucepan with water, add a pinch of sea salt and place it on a high heat, to boil.
14. Put the dry rice into a seive and run it under a hot tap until the water runs clear. Once the water in the pan boils, add the rice and cook - simmering - for 7-9 minutes. 2 minutes before the rice is due to be ready, add the defrosted peas.
15. As the rice is cooking, the vegetable curry should have come up to temperature. Remove the lid and allow the sauce to reduce a little as you add the broccoli, tomato and three quarters of the fresh coriander. Stir from time to time, to make sure it doesn't stick to the bottom of the pan.
16. Once the rice is ready, drain and return to the warm pan. You can add a little of the chopped coriander for some extra flavour, if you like.
17. Once the chicken is done, serve with the vegetable curry and green pea rice - with an added flourish of a sprinkle of chopped coriander for garnish.
Printable version
If I were to marinate the chicken in something, then bake it - and make a vegetable curry earlier on in the day, then that would result in a really quite simple dinner preparation. All I'd have to do is put the chicken in the oven, warm up the vegetable curry and cook the rice and peas. Lovely!
Now sometimes, this sort of plan goes awry at the last minute as I haven't anticipated how long it would take me to chop the vegetables, or I'd run out of pans and make horrid amounts of washing up. This time, however, it all went beautifully according to plan and was indeed the most satisfying dinner not just from an eating perspective, but from the preparation and clearing up perspective too.
I started off the processes by marinating the chicken in a mixture of curry paste, mango chutney and Greek yoghurt (doesn't have to be Greek - it's just that Greek yoghurt is my plain yoghurt of choice) for the day.
Next - and during the morning - I sat down and peeled, cut and chopped all the vegetables for the curry and set about making it. I do so enjoy cooking without time constraints. It was lovely to just sail along, cooking without having to keep an eye on the time. We try to have our meals on the table for 6pm, you see. Sometimes I have a lot of trouble hitting that 6pm deadline!
As ever, when cooking a curry, I had an end result in mind but no real idea how I was going to get there. So, I knew I wanted to emulate the British Takeaway vegetable curry flavour and texture of the thing - without over cooking any of the veggies and without it winding up too watery, too stew-like or too greasy. Shouldn't be a problem!
I went through the fridge and pulled out everything that didn't have a home to go to as well as the few veggies that I'd bought with this particular dish in mind. So we wound up with onion, garlic, red chilli, carrot, potato, mushroom, baby red peppers, cauliflower, broccoli, fresh quartered tomato, fresh coriander and red lentils. That should take care of our five a day!
Whenever I do the chopping-and-a-peeling, I always put the cut veggies onto plates or in dishes in the order I'll be needing them. So the onion, garlic and chilli went onto one plate, the carrots were in a dish on their own. The potato, mushroom and baby red peppers went into the colander and the tomato, cauliflower and broccoli were on another plate. That way, I don't have to waste any time separating one from the other - and they're all ready to go when I start cooking. I can't cook and chop - just doesn't work.
I was tempted to spice the curry myself, but in the end decided to use our pre-prepared Sharwoods Korma curry paste - the same one I'd used on the chicken. I was going for simplicity and the Sharwoods is a very good middle of the road curry paste that you can pep up with additional chilli if you want. The ingredients list reads very well, too. With tomato puree, coriander, cumin, turmeric, ginger, chilli, paprika, cardamom, mustard seeds, fenugreek and fennel and the only additive being acetic acid, it is a very acceptable quick curry fix.
So, it went like this. First of all I chose my biggest saucepan in which to cook so that I had enough room for everything as I wasn't entirely sure how much it would come to. I put 2-3 tbsp of sunflower oil in and got that heating, then added the onion - and a small pinch of salt - which cooked until golden brown, but not burned. The garlic then went in for a minute, before I added the chilli and carrot. Next in was the curry paste and tomato puree which I cooked until the oil was released - just a few minutes. The next things into the pot were the potato/mushroom/red pepper combo which got mixed all around and coated in the aromatic loveliness.
I wanted to include some coconut milk at this point, but didn't want to use a whole 400g tin of the stuff. Amazingly, I found a small carton of Blue Dragon coconut cream which did the job perfectly - and was just about to go out of date - so that went in next. I added a teaspoonful of Essential Cuisine chicken stock powder and approximately 200-300ml of water and gave everything a good stir. I was tying my hands behind my back to prevent myself from adding more salt at this stage. The temptation was enormous, but I resisted - and jolly good job too. I satisfied the urge by adding some black pepper instead. *chuckle* In went the red lentils and I let everything simmer gently together for around 20-30 minutes until almost cooked. Finally, I added the cauliflower and turned off the heat - leaving it to cool.
When I came back to start the dinner properly, first thing was to put the chicken into the oven, then start the vegetable curry warming up and boil the water for the rice.
Once the curry had heated through enough to start bubbling, I removed the lid and let it reduce slightly - just to thicken the sauce a little. In went the broccoli and the tomato quarters, plus three quarters of the chopped fresh coriander. Once the broccoli was cooked and the sauce reduced to my liking, it was done.
The chicken came out of the oven still beautifully coated in the curried yoghurty mix, which had slightly caramelised on top, thanks to the mango chutney - which was exactly what I was hoping for.
The plain basmati rice was brightened up by the addition of a few green peas. A tip for adding frozen peas to cooking rice is to run the peas under the hot tap to defrost them and warm them up before adding them to the rice with around 2 minutes to go. That way, you don't stop the cooking process by adding freezing peas and they will stay a vibrant green.
The whole meal was absolutely delicious, comforting, satisfying and got a huge thumbs up from everyone. So long as you make the veggie curry earlier in the day, it was ultimately all finished in around 30 minutes and was a perfect arrangement for anyone who loves curry but wants healthy along with it - and who can't spend too long in the kitchen making it.
Son and heir was practically begging for this curry to be made again and soon - so I'm sure it won't be long!
CURRY BAKED CHICKEN, VEGETABLE CURRY WITH RICE AND PEAS (Serves 3 with leftover vegetable curry)
Ingredients :
3 boneless skinless chicken breasts
3 tbsp plain (Greek) yoghurt
1 tbsp mango chutney
1.5 tbsp curry paste.
3 tbsp sunflower oil
2 onions, sliced finely
2 fat garlic cloves, chopped finely
1 hot red chilli (seeds are optional)
1 donkey carrot, peeled and diced
3 tbsp curry paste
2 tbsp tomato puree
2 medium potatoes, peeled and diced
6-10 mushrooms, washed and quartered
6 baby red peppers (or one red pepper, cut into pieces), top & tailed
250ml coconut cream
1 tsp chicken stock powder or a low salt chicken stock cube
enough water to just cover the contents
3 heaped tbsp red lentils
3-4 cauliflower florets, broken into small pieces
3-4 broccoli florets, broken into small pieces
1 large ripe tomato, quartered (or smaller) into wedges
a large handful of fresh coriander, chopped.
1 cup of uncooked basmati rice
sea salt
half a cup of frozen peas.
Method :
1. In the morning, mix together the yoghurt, chutney and curry paste in a large bowl.
2. Trim the chicken breasts of fat and gristle, then score lightly across the top to allow the marinade to more easily penetrate the meat.
3. Add the chicken to the marinade and mix gently to ensure every little bit of chicken is covered in marinade. Cover with cling film and refrigerate until 30 minutes prior to cooking.
4. To make the vegetable curry (which I recommend should also be done in the morning), heat the oil in a large, deep saucepan. Add the oil.
5. Add the onion - and a small pinch of salt - and cook for around 10-15 minutes until golden brown, but not burned. Add the garlic and stir quickly, then add the chilli and stir.
6. Next, add the carrot pieces, which will help to cool the pan and so avoid burning the garlic.
7. Next add the curry paste and tomato puree and stir well to combine with the rest of the ingredients. Cooked until the oil is released - just a few minutes.
8. Add the potato/mushroom/red peppers and stir well to ensure they are coated with the curry mixture.
9. Add the coconut cream, stock powder and water and stir gently to combine. Do not add any salt at this stage, but if you're yearning to - add a little black pepper instead!
10. Stir in the red lentils and let everything simmer gently together for around 20-30 minutes until almost cooked.
11. Finally - for this stage - add the cauliflower, turn off the heat, cover and leave to cool.
12. Several hours later and when you're ready to prepare the dinner proper, begin by turning on the heat under the vegetable curry and pre-heating the oven to 200degC/400degF/Gas 6. Line a shallow baking tray with silver foil (optional - but it helps with the washing up!) and place the chicken onto the foil. Spoon any additional marinade over the top of each chicken breast. Place into the oven for 25-35 minutes or until the juices run clear if pricked with a knife.
13. Three quarters fill a good sized saucepan with water, add a pinch of sea salt and place it on a high heat, to boil.
14. Put the dry rice into a seive and run it under a hot tap until the water runs clear. Once the water in the pan boils, add the rice and cook - simmering - for 7-9 minutes. 2 minutes before the rice is due to be ready, add the defrosted peas.
15. As the rice is cooking, the vegetable curry should have come up to temperature. Remove the lid and allow the sauce to reduce a little as you add the broccoli, tomato and three quarters of the fresh coriander. Stir from time to time, to make sure it doesn't stick to the bottom of the pan.
16. Once the rice is ready, drain and return to the warm pan. You can add a little of the chopped coriander for some extra flavour, if you like.
17. Once the chicken is done, serve with the vegetable curry and green pea rice - with an added flourish of a sprinkle of chopped coriander for garnish.
Printable version
27 June 2012
Mediterranean style giant couscous with barbecue pork chops
If you're me, you'd look at that title and have to come and see what it's on about! After all, giant couscous?
It really isn't so long ago that I was bewailing not being able to get enough flavour into normal couscous, without venturing into giant couscous - or Mograbiah, to give it its proper name.
Mograbiah does bear plenty of similarity to ordinary couscous in that both of them are round in shape, made from pasta dough and are vehicles for other flavours. However, where they differ (apart from the obvious size) is that where ordinary couscous is prepared by putting in a bowl and pouring a small amount of boiling water onto it, giant couscous is prepared by putting into a saucepan, pouring a slightly larger amount of water (or stock) on and heating gently or simmering until the majority of the water is absorbed, then you can leave it to soak up the remainder of the liquid.
It has a different texture too, well okay each grain is a lot larger so that would follow, but it also has a slightly slippery texture that can make eating it a bit of a challenge for youngsters who haven't yet learned that they eat with their mouth closed. Son and heir had no problem with it, but then there's little that disappears into his maw that ever sees the light of day again.
As with all couscous, its own flavour is very bland and it is entirely reliant upon what you put with it, for flavour. As such, cooking it in stock is a very good start.
With our Mograbiah, I decided to go for one last mediterranean style dish and roasted some courgette, aubergine, butternut squash, red pepper and red onion and dressed the lot with fresh mint and coriander plus a lemon juice and olive oil dressing.
For a welcome zing, I baked the pork chops in some of the excellent Mic's Chilli El Loco BBQ Sauce. The highly flavoured pork went so well with the calming influence of the roasted vegetables and zesty dressing. A real ying/yang thing was going on there!
Of course, it isn't essential that you put a barbecue pork chop with your giant couscous - you can use it however you fancy and with whatever you fancy. I found my pack of Mograbiah in my local Asda, which has a particularly good World Foods section. However, I'm sure you would be able to find some at your local ethnic food store - for instance, I know that Makkah's on the Ashley Road, Poole, definitely carries it. For me, it makes a nice change from ordinary couscous - and as I often have problems trying to decide upon the carbohydrate element in a meal, anything that extends my options can't be bad!
MEDITERRANEAN STYLE GIANT COUSCOUS (MOGRABIAH) (feeds 3)
Ingredients :
1 tablespoonful of giant couscous pearls per person, plus a little for luck
vegetable or chicken stock (home-made, powder, cube or Knorr stock pot - all are good)
half a butternut squash, cut into half inch dice
a red pepper, seeds removed and cut into one inch sheets
a courgette, cut into half inch dice
half an aubergine, cut into half inch dice
a red onion, peeled and cut into thin wedges
olive oil
sea salt & freshly ground black pepper
1 tbsp extra virgin olive oil
juice of half a lemon
a handful of mint leaves, shredded
a handful of coriander, chopped finely.
Method :
1. Pre-heat your oven to 180degC/350degF/Gas 4.
2. Check the cooking instructions on the side of the packet of Mograbiah and follow them, substituting stock for water.
3. While the couscous (Mograbiah) is cooling, place the vegetables (without the herbs) onto a baking sheet that has been lined with non-stick silver foil. Drizzle the olive oil over and season well. Toss the vegetables in the oil and seasoning, then place them into the oven to bake for 25-30 minutes or until tender.
4. Just before the vegetables are finished cooking, mix together the dressing for the couscous by placing the extra virgin olive oil, lemon juice and some seasoning into a small bowl and whisk together.
5. Shred the mint leaves and chop the coriander.
6. When the vegetables are cooked, tip them from the baking sheet directly onto the couscous. Stir through gently, taking care not to break up the pieces of vegetable.
7. Add the dressing and herbs and gently stir through again and serve before the herbs have a chance to wilt.
Printable version
.
It really isn't so long ago that I was bewailing not being able to get enough flavour into normal couscous, without venturing into giant couscous - or Mograbiah, to give it its proper name.
Mograbiah does bear plenty of similarity to ordinary couscous in that both of them are round in shape, made from pasta dough and are vehicles for other flavours. However, where they differ (apart from the obvious size) is that where ordinary couscous is prepared by putting in a bowl and pouring a small amount of boiling water onto it, giant couscous is prepared by putting into a saucepan, pouring a slightly larger amount of water (or stock) on and heating gently or simmering until the majority of the water is absorbed, then you can leave it to soak up the remainder of the liquid.
It has a different texture too, well okay each grain is a lot larger so that would follow, but it also has a slightly slippery texture that can make eating it a bit of a challenge for youngsters who haven't yet learned that they eat with their mouth closed. Son and heir had no problem with it, but then there's little that disappears into his maw that ever sees the light of day again.
As with all couscous, its own flavour is very bland and it is entirely reliant upon what you put with it, for flavour. As such, cooking it in stock is a very good start.
With our Mograbiah, I decided to go for one last mediterranean style dish and roasted some courgette, aubergine, butternut squash, red pepper and red onion and dressed the lot with fresh mint and coriander plus a lemon juice and olive oil dressing.
For a welcome zing, I baked the pork chops in some of the excellent Mic's Chilli El Loco BBQ Sauce. The highly flavoured pork went so well with the calming influence of the roasted vegetables and zesty dressing. A real ying/yang thing was going on there!
Of course, it isn't essential that you put a barbecue pork chop with your giant couscous - you can use it however you fancy and with whatever you fancy. I found my pack of Mograbiah in my local Asda, which has a particularly good World Foods section. However, I'm sure you would be able to find some at your local ethnic food store - for instance, I know that Makkah's on the Ashley Road, Poole, definitely carries it. For me, it makes a nice change from ordinary couscous - and as I often have problems trying to decide upon the carbohydrate element in a meal, anything that extends my options can't be bad!
MEDITERRANEAN STYLE GIANT COUSCOUS (MOGRABIAH) (feeds 3)
Ingredients :
1 tablespoonful of giant couscous pearls per person, plus a little for luck
vegetable or chicken stock (home-made, powder, cube or Knorr stock pot - all are good)
half a butternut squash, cut into half inch dice
a red pepper, seeds removed and cut into one inch sheets
a courgette, cut into half inch dice
half an aubergine, cut into half inch dice
a red onion, peeled and cut into thin wedges
olive oil
sea salt & freshly ground black pepper
1 tbsp extra virgin olive oil
juice of half a lemon
a handful of mint leaves, shredded
a handful of coriander, chopped finely.
Method :
1. Pre-heat your oven to 180degC/350degF/Gas 4.
2. Check the cooking instructions on the side of the packet of Mograbiah and follow them, substituting stock for water.
3. While the couscous (Mograbiah) is cooling, place the vegetables (without the herbs) onto a baking sheet that has been lined with non-stick silver foil. Drizzle the olive oil over and season well. Toss the vegetables in the oil and seasoning, then place them into the oven to bake for 25-30 minutes or until tender.
4. Just before the vegetables are finished cooking, mix together the dressing for the couscous by placing the extra virgin olive oil, lemon juice and some seasoning into a small bowl and whisk together.
5. Shred the mint leaves and chop the coriander.
6. When the vegetables are cooked, tip them from the baking sheet directly onto the couscous. Stir through gently, taking care not to break up the pieces of vegetable.
7. Add the dressing and herbs and gently stir through again and serve before the herbs have a chance to wilt.
Printable version
.
13 May 2012
Roast lamb & chargrilled vegetable terrine - a leftovers triumph
As you know, we had roasted a huge - nay, mahoooosive - leg of lamb for our Sunday dinner. With stringent portion size control in place, we had rather a lot left over - which we had planned for, as it's not every day you spent £10 on a piece of meat. Or perhaps I should say, it's not every day we spend that on meat! So we'd planned to make at least one more meal from it - and more than one would be a bonus.
Naturally, we had thought of all the classic uses for leftover lamb such as Shepherd's Pie, braised lamb, lamb curry etc., but we wanted something that would make the most of the flavours we had introduced to the meat and also something that would do justice to the quality. All these suggestions, although perfectly viable, just weren't hitting the proverbial spot with us.
We went through all the North African flavour combinations - tagines, couscous recipes, kebab-type combinations, but all these just added extra flavours to the meat, rather than capitalising on those that were there already. It was a real brain-teaser!
I was trying to "think outside of the box" as they say, and from hot recipes suddenly went off on a tangent into salad recipes - and struck on terrine.
Now I hadn't a clue how to make a terrine, other than those that I've seen made on t.v. - which ranged from really easy to "oh my god, how did he do that?". However, we both liked the idea instantly, we just needed to work out what we could put in the terrine with the lamb and what we'd use to stick it all together, rather than cook it again.
I had been intending to make a small batch of lamb stock from the roasted bones and it occurred to me that if I reduced the stock down to intensify the flavours, then added gelatine, it might answer the problem of what to use as "glue". The stock would have to be very reduced though - and I'd need to be careful about how much gelatine to use, as stock made from bones can jellify when cold anyway. I also haven't had a good history with using gelatine, as the last attempt resulted in my using eight leaves for one pint of a fruit concoction, which stalwartly refused to set.
In pondering on what vegetables we had in the fridge as suitable bedmates for the lamb, it dawned on me that we had half an aubergine and a pack of asparagus looking for a home. Now if you were to say either "aubergine" or "asparagus" to me, my instant response is "griddle pan". Char-grilled vegetables. Oooh yes! Whilst imagining the combined flavours of the lamb with the vegetables, it occurred to me that we would need something to give a sweet note to the whole - perhaps some sweet red pepper. I had a quick think through the larder cupboard for ideas and remembered a few semi-dried prunes - sliced finely, they would be perfect at lending that shot of sweetness, too. So, ultimately, the only thing we had to buy in order to make the terrine, were some baby peppers to chargrill for an additional vegetable layer. As a use for leftovers, this was evolving into something of a triumph.
The slow cooker took care of making the stock - I left it on overnight. I had to close the kitchen door, though, as the smell of the stock cooking always gives me nightmares, bizarrely. Into the stock pot went the bones and all the yukky but flavoursome bits, plus two plums (well, why not?), an onion, a carrot, some parsley and some swede, along with a good dash of sea salt & black pepper.
We drained the stock in the morning (once it had cooled down a little) and remembered to catch the liquid and throw away the solids - yes, I have done the reverse on one spectacularly dopey occasion.
Then whilst I chargrilled the aubergine, peppers and asparagus, the stock was put on to reduce. I reckon we had about 700-800ml to begin with, which I reduced down to 250ml. I stopped reducing once the flavours had reached a certain level of intensity that I felt would stand alone amongst the meat and vegetables.
There was a bit of lull in the action then, as the vegetables needed to cool completely and I couldn't add the gelatine to the stock as I needed it to be runny at assembly time.
So, once the kitchen was clear again that evening, I spent a happy hour or so building the terrine.
Firstly, I re-heated the stock, adding the gelatine, then cooling it all down again by sitting the pan in some cold water. I didn't want to be adding hot stock to cold meat, especially as we were planning on eating the whole thing cold. Safety first!
Of course, you have to think upside down when creating a terrine, as you'll be turning it out - and you don't want to have to turn it around, to find the pretty side! I also lined the loaf tin with a layer of cling film which not only helped when it came to turning it out, but was a godsend when it came to carving.
First in, was the asparagus, curved side down. Then, in between each halved stick, was a tiny sliver of prune. Then, a layer of chopped lamb. I then spooned into the tin enough of the stock to just under the surface and pressed the contents down with the back of a spoon. Next was a layer of red and orange pepper, then more lamb, then more stock, then more pressing. Next was a layer of aubergine, lamb, stock and pressing. I was running out of both lamb and room in the tin by this time. So I put in the few asparagus spears that were left, plus a few slivers of prune and finished it all off with another layer of aubergine. All that was left to do was to pour in enough stock to just under the final layer, another firm press with the back of the spoon - and wrap it all up. Into the fridge it went and I spent the next 18 hours worrying that it would either fall apart, or not set, or taste disgusting.
First thing the following morning, I had to have a look. Oh happy day - the gelatine had set! Cautiously, I turned the tin over and the terrine fell out into my hand (something else you couldn't do without the cling film!) - and held together. Oh my goodness, but it was pretty! (Well, as pretty as a lamb terrine made with dark brown stock can get!). I slid it back into the tin and felt better.
I served the terrine as two slices accompanied by a salad made with lamb's lettuce and rocket, cherry tomatoes, red pepper, cucumber and radish along with some baby beetroots that had been marinated in rosemary and raspberry vinegar. I dressed the salad leaves lightly with a honey/mustard dressing and we ate it with slices of baguette - although I very quickly found that the baguette was superfluous and the terrine was delicious eaten just with the salad. Son & heir wasn't feeling very confident about whether he'd like the terrine, but even he (who really dislikes chargrilled vegetables) had to concede that it was flipping lovely. You could still taste the cinnamon, fennel and citrus flavours that had been put into the lamb during the roasting - all of which had been helped no end by using stock made from the bones - and the chargrilling of the vegetables was delightful beside the earthy lamb. The high points in flavour were the slivers of prune, which were just an inspired thought, plus the dressing on the salad which gave a palate cleansing burst of tanginess when you had had enough of lamb. Every mouthful delivered a different combination of flavours and it was impossible to get bored with it.
So, the lamb itself provided three main courses in its roasted form. We then ate three more main courses from the terrine, plus three lunches and a sandwich from the last few bits that didn't go into the terrine. Add in to that the stock - and I think we made best use of our £10.
ROAST LAMB & CHARGRILLED VEGETABLE TERRINE
Ingredients :
A good quantity of leftover roast lamb, diced
half an aubergine, sliced quite finely
four mini red/yellow peppers, stalk removed, quartered and de-seeded
150g asparagus spears, halved lengthways
3-4 semi-dried prunes, cut into fine slivers
olive oil
sea salt & freshly ground black pepper
300ml good strong lamb stock (made from roasted bones, if possible)
5 sheets gelatine.
Method :
1. Presuming your stock is reduced and ready to have gelatine added (if not, you'll need to reduce it before you reach this stage), heat up a griddle pan. In a bowl, add a handful of veggies and sprinkle with a little olive oil and seasoning. Griddle until softened, then lay on a plate to cool. Repeat these steps until all the veggies are cooked and cooling.
2. Once the vegetables are completely cold, drop the five sheets of gelatine into some cold water to soak and become flexible.
3. Heat your stock through and, just before it boils, take it from the heat, squeeze the excess water from the gelatine and add to the stock. Stir well to ensure that the gelatine is dissolved and well combined.
4. Cool the stock quickly by sitting the pan in cold water and stirring. You will feel the gelatine setting as the mixture cools, so remove it while still tepid.
5. Line a loaf tine with some cling film - sufficient to fold over the top once filled - and start to build your layers. Begin with the layer that is going to be seen on the top - I started with some asparagus and prune. Add a layer of the lamb meat, then spoon in just enough stock to just under the surface and press down with the back of the spoon until flat.
6. Build your next layer of vegetable, followed by meat, followed by stock. Press down.
7. Continue in this way until the tin is full or you run out of ammunition to fill it with!
8. Before wrapping, give the tin 2-3 sharp taps on the work surface, just to encourage any air bubbles up to the top, then flatten the surface and fold the cling film over to seal.
9. Place into the fridge overnight, to set.
10. To serve, carve with a very sharp knife and with the cling film still in situ as this helps to keep the whole lot together and prevent any one layer sliding off on its own. It is an easy matter, once cut, to remove the cling film.
Printable version
.
Naturally, we had thought of all the classic uses for leftover lamb such as Shepherd's Pie, braised lamb, lamb curry etc., but we wanted something that would make the most of the flavours we had introduced to the meat and also something that would do justice to the quality. All these suggestions, although perfectly viable, just weren't hitting the proverbial spot with us.
We went through all the North African flavour combinations - tagines, couscous recipes, kebab-type combinations, but all these just added extra flavours to the meat, rather than capitalising on those that were there already. It was a real brain-teaser!
![]() |
| Whatever shall we make with this lot? |
Now I hadn't a clue how to make a terrine, other than those that I've seen made on t.v. - which ranged from really easy to "oh my god, how did he do that?". However, we both liked the idea instantly, we just needed to work out what we could put in the terrine with the lamb and what we'd use to stick it all together, rather than cook it again.
I had been intending to make a small batch of lamb stock from the roasted bones and it occurred to me that if I reduced the stock down to intensify the flavours, then added gelatine, it might answer the problem of what to use as "glue". The stock would have to be very reduced though - and I'd need to be careful about how much gelatine to use, as stock made from bones can jellify when cold anyway. I also haven't had a good history with using gelatine, as the last attempt resulted in my using eight leaves for one pint of a fruit concoction, which stalwartly refused to set.
![]() |
| Now that is a work of art |
The slow cooker took care of making the stock - I left it on overnight. I had to close the kitchen door, though, as the smell of the stock cooking always gives me nightmares, bizarrely. Into the stock pot went the bones and all the yukky but flavoursome bits, plus two plums (well, why not?), an onion, a carrot, some parsley and some swede, along with a good dash of sea salt & black pepper.
We drained the stock in the morning (once it had cooled down a little) and remembered to catch the liquid and throw away the solids - yes, I have done the reverse on one spectacularly dopey occasion.
Then whilst I chargrilled the aubergine, peppers and asparagus, the stock was put on to reduce. I reckon we had about 700-800ml to begin with, which I reduced down to 250ml. I stopped reducing once the flavours had reached a certain level of intensity that I felt would stand alone amongst the meat and vegetables.
There was a bit of lull in the action then, as the vegetables needed to cool completely and I couldn't add the gelatine to the stock as I needed it to be runny at assembly time.
So, once the kitchen was clear again that evening, I spent a happy hour or so building the terrine.
![]() |
| So proud - so pretty - so edible looking! |
Of course, you have to think upside down when creating a terrine, as you'll be turning it out - and you don't want to have to turn it around, to find the pretty side! I also lined the loaf tin with a layer of cling film which not only helped when it came to turning it out, but was a godsend when it came to carving.
First in, was the asparagus, curved side down. Then, in between each halved stick, was a tiny sliver of prune. Then, a layer of chopped lamb. I then spooned into the tin enough of the stock to just under the surface and pressed the contents down with the back of a spoon. Next was a layer of red and orange pepper, then more lamb, then more stock, then more pressing. Next was a layer of aubergine, lamb, stock and pressing. I was running out of both lamb and room in the tin by this time. So I put in the few asparagus spears that were left, plus a few slivers of prune and finished it all off with another layer of aubergine. All that was left to do was to pour in enough stock to just under the final layer, another firm press with the back of the spoon - and wrap it all up. Into the fridge it went and I spent the next 18 hours worrying that it would either fall apart, or not set, or taste disgusting.
First thing the following morning, I had to have a look. Oh happy day - the gelatine had set! Cautiously, I turned the tin over and the terrine fell out into my hand (something else you couldn't do without the cling film!) - and held together. Oh my goodness, but it was pretty! (Well, as pretty as a lamb terrine made with dark brown stock can get!). I slid it back into the tin and felt better.
I served the terrine as two slices accompanied by a salad made with lamb's lettuce and rocket, cherry tomatoes, red pepper, cucumber and radish along with some baby beetroots that had been marinated in rosemary and raspberry vinegar. I dressed the salad leaves lightly with a honey/mustard dressing and we ate it with slices of baguette - although I very quickly found that the baguette was superfluous and the terrine was delicious eaten just with the salad. Son & heir wasn't feeling very confident about whether he'd like the terrine, but even he (who really dislikes chargrilled vegetables) had to concede that it was flipping lovely. You could still taste the cinnamon, fennel and citrus flavours that had been put into the lamb during the roasting - all of which had been helped no end by using stock made from the bones - and the chargrilling of the vegetables was delightful beside the earthy lamb. The high points in flavour were the slivers of prune, which were just an inspired thought, plus the dressing on the salad which gave a palate cleansing burst of tanginess when you had had enough of lamb. Every mouthful delivered a different combination of flavours and it was impossible to get bored with it.
So, the lamb itself provided three main courses in its roasted form. We then ate three more main courses from the terrine, plus three lunches and a sandwich from the last few bits that didn't go into the terrine. Add in to that the stock - and I think we made best use of our £10.
ROAST LAMB & CHARGRILLED VEGETABLE TERRINE
Ingredients :
A good quantity of leftover roast lamb, diced
half an aubergine, sliced quite finely
four mini red/yellow peppers, stalk removed, quartered and de-seeded
150g asparagus spears, halved lengthways
3-4 semi-dried prunes, cut into fine slivers
olive oil
sea salt & freshly ground black pepper
300ml good strong lamb stock (made from roasted bones, if possible)
5 sheets gelatine.
Method :
1. Presuming your stock is reduced and ready to have gelatine added (if not, you'll need to reduce it before you reach this stage), heat up a griddle pan. In a bowl, add a handful of veggies and sprinkle with a little olive oil and seasoning. Griddle until softened, then lay on a plate to cool. Repeat these steps until all the veggies are cooked and cooling.
2. Once the vegetables are completely cold, drop the five sheets of gelatine into some cold water to soak and become flexible.
3. Heat your stock through and, just before it boils, take it from the heat, squeeze the excess water from the gelatine and add to the stock. Stir well to ensure that the gelatine is dissolved and well combined.
4. Cool the stock quickly by sitting the pan in cold water and stirring. You will feel the gelatine setting as the mixture cools, so remove it while still tepid.
5. Line a loaf tine with some cling film - sufficient to fold over the top once filled - and start to build your layers. Begin with the layer that is going to be seen on the top - I started with some asparagus and prune. Add a layer of the lamb meat, then spoon in just enough stock to just under the surface and press down with the back of the spoon until flat.
6. Build your next layer of vegetable, followed by meat, followed by stock. Press down.
7. Continue in this way until the tin is full or you run out of ammunition to fill it with!
8. Before wrapping, give the tin 2-3 sharp taps on the work surface, just to encourage any air bubbles up to the top, then flatten the surface and fold the cling film over to seal.
9. Place into the fridge overnight, to set.
10. To serve, carve with a very sharp knife and with the cling film still in situ as this helps to keep the whole lot together and prevent any one layer sliding off on its own. It is an easy matter, once cut, to remove the cling film.
Printable version
.
10 January 2012
Lemony Prawn & Chorizo Rice - a fab quick one pot supper
Just before Christmas I took out a subscription (very nearly put "prescription" - totally different thing!) with the BBC's Good Food Magazine.
Now I know that the majority of the recipes that appear in the magazine also appear online, but I just enjoy having the pictures right there - up close and in front of me - when I am sitting in the living room and there's something dull on the t.v. (or there's nothing on the t.v. - which is more like it, these days!). No, I'm afraid I don't possess a laptop - it's a desktop or nothing, for me. Comes of being a very swift touch typist - I really hate the restriction of a laptop's keyboard. Either that or I'm just plain old fashioned - which could easily be it, I'll admit.
Anyway, back to the magazine. To save having great teetering piles of magazines lurking around the flat, I've taken to cutting out the recipes that attract my attention and keeping them in a concertina file. I'll then consult the file when I'm putting together the week's menu's - and a very good system it has proven to be.
All of which was a fairly long-winded way of saying that this recipe originated in the BBC Good Food magazine for February!
Hubby loves chorizo, all of us love prawns and son & heir particularly enjoys one pot, no side dishes, type meals. Add to those good points the extra positive point that it is relatively low in fat, which is something I'm very keen on, these days and you've got a winner of a dish.
I tweaked the original recipe a little, adding twice the amount of chorizo (which apparently still wasn't enough - hubby could have had lots more!) and using vegetable stock instead of just water for the rice. I also used cooked peeled prawns instead of raw, basically because they're easier to get hold of and cheaper.
I also tweaked it slightly in retrospect, as both chaps found the lemon to be too dominant. Now I like lemon in this context, but it must be a girl thing, as neither of the chaps do. Hence, if your family like lemon then add the zest as well as the juice and maybe increase it back to the one lemon in the original recipe.
I found the dish to be lovely and light, with plenty of interest from the mix of chorizo and prawn. It also contains turmeric - and any dish that does that, is immediately in my good books. Son & heir completely cleared his plate, which was something of a surprise as I'd expected to at least find strips of red pepper left. From that, I'd say that you could class this dish as being "teenager friendly", if nothing else!
Edited to say : time has moved on and it's now 10 April 2013. I've just made this recipe (see photo above) and swapped out the vegetable stock for the beautiful Essential Cuisine fish stock. I also added two chestnut mushrooms, sliced. The end result was really, really good and I recommend it to you.
LEMONY PRAWN & CHORIZO RICE (feeds 3)
Now I know that the majority of the recipes that appear in the magazine also appear online, but I just enjoy having the pictures right there - up close and in front of me - when I am sitting in the living room and there's something dull on the t.v. (or there's nothing on the t.v. - which is more like it, these days!). No, I'm afraid I don't possess a laptop - it's a desktop or nothing, for me. Comes of being a very swift touch typist - I really hate the restriction of a laptop's keyboard. Either that or I'm just plain old fashioned - which could easily be it, I'll admit.
Anyway, back to the magazine. To save having great teetering piles of magazines lurking around the flat, I've taken to cutting out the recipes that attract my attention and keeping them in a concertina file. I'll then consult the file when I'm putting together the week's menu's - and a very good system it has proven to be.
All of which was a fairly long-winded way of saying that this recipe originated in the BBC Good Food magazine for February!
Hubby loves chorizo, all of us love prawns and son & heir particularly enjoys one pot, no side dishes, type meals. Add to those good points the extra positive point that it is relatively low in fat, which is something I'm very keen on, these days and you've got a winner of a dish.
![]() |
| Mmmn, yummy! Who'd have thought it'd be good for you? |
I also tweaked it slightly in retrospect, as both chaps found the lemon to be too dominant. Now I like lemon in this context, but it must be a girl thing, as neither of the chaps do. Hence, if your family like lemon then add the zest as well as the juice and maybe increase it back to the one lemon in the original recipe.
I found the dish to be lovely and light, with plenty of interest from the mix of chorizo and prawn. It also contains turmeric - and any dish that does that, is immediately in my good books. Son & heir completely cleared his plate, which was something of a surprise as I'd expected to at least find strips of red pepper left. From that, I'd say that you could class this dish as being "teenager friendly", if nothing else!
Edited to say : time has moved on and it's now 10 April 2013. I've just made this recipe (see photo above) and swapped out the vegetable stock for the beautiful Essential Cuisine fish stock. I also added two chestnut mushrooms, sliced. The end result was really, really good and I recommend it to you.
LEMONY PRAWN & CHORIZO RICE (feeds 3)
Ingredients :
1 tbsp olive oil
1 onion, sliced
2 small red peppers, deseeded and sliced
100g chorizo, thinly sliced
2 garlic cloves, crushed
1 red chilli, chopped & deseeded if you don’t like it too hot
½ tsp turmeric
250g long grain rice (I used Basmati)
500ml boiling low salt vegetable or fish stock (I use Essential Cuisine stock)
200g cooked peeled prawns, defrosted if frozen
100g frozen peas
juice of ½ lemon.
Method :
1. Heat the oil in a shallow pan (or frying pan) with a lid. Add the onion, peppers, chorizo, garlic and chilli and fry over a high heat for 3 minutes.
2. Reduce the heat to medium, and add the turmeric and rice, stirring to ensure the rice is coated in the cooking juices.
3. Pour in the stock, stir then cover and cook for 12 minutes or until the rice is nicely al dente.
4. Uncover and stir in the prawns and peas. Add a splash more water if the mix is looking a little dry and cook for as long as it takes for the peas to defrost and cook and the prawns to be heated through – around 2 minutes or so.
5. The rice should now be tender, so stir in the lemon juice and serve.
28 June 2011
The elusive Beef "Red Dragon" and Aduki Bean Pie
Why is it elusive, you ask? Well, because we were initially supposed to be having it two weeks ago but it got bumped until last week owing to the fact that I just couldn't find Aduki (or Adzuki, or Azuki) beans.
Of course, I should have gone to Makkha's on the Ashley Road - the best ethnic food store in the area - straight away, but life just didn't take us that way. Hubby eventually called in there on his way to another appointment and bingo - got the beans.
So, we were all set for this last weekend, when we were due to be having the pie on Saturday. I even remembered to put the beans in to soak before going to bed on Friday evening - which was a start!
Of course, we hadn't foreseen the problems that arose with Son & heir and his sleepover guest, which culminated in said sleepover guest returning home rather earlier than previously anticipated. Not through any fault of his own - she hastened to add - but because they both ran out of things to amuse themselves with and terminal boredom set in. All of which stamped all over the time I should have been preparing the Beef "Red Dragon" Pie.
So we had bacon & egg sandwiches that night and the pie got bumped to Sunday evening. I was beginning to think that perhaps I might have stepped on a gypsy's toe and had the hex put on me - especially considering how a number of different dishes lately had failed!
Would you believe it, having woken up Sunday morning thinking we had a free day, we ultimately found ourselves heading in Bournemouth's direction for an unavoidable, emergency bit of shopping!
I was so determined to make the flipping pie, I managed to make it in stages. I put the dish together - consisting of beef brisket, it required a couple of hours of slow cooking before adding the potatoes and beans - and took advantage of the automatic cooking function on our cooker to switch the oven on at the right time to begin cooking.
Consequently, it seemed to take all day to make - but goodness me, it was worth it!
I had my first taste once I'd combined the sauce ingredients prior to putting it in the oven and it showed promise even then. I have got to say, though, that was nothing compared to how it tasted after the first 2 hours of cooking. It was rich and tasty and so very unlike a Shepherd's Pie as to be incomparable. I was relieved about that, as I had been under instructions from the recipe's source, Martin Kitcher, to make sure it went in a Stir Fried Beef direction and not in a Shepherd's Pie direction! So I felt all was as it should be.
Hey Martin - did you notice the extra ingredient? *chuckle*
Having added the beans, some more peppers and the sliced potato to the top, I put it back into the oven for another hour and felt a whole lot more confident about it than I had been!
After what seemed to be an unconscionably long time, we sat down to tuck in. I'd served it with some steamed Pak Choi and Broccoli, which seemed to go very well. Hubby had insisted on some gravy, which amazingly went absolutely perfectly with the pie too. All in all, we were very happy bunnies with our dinner that night. Everyone cleared their plates and, if I hadn't have been so full, I'd have made inroads into the leftovers!
So, Beef "Red Dragon" and Aduki Bean Pie was not only a hit, but was marked as a "Do again" recipe. Can't wait to see what Martin finds for me next!
BEEF "RED DRAGON" AND ADUKI BEAN PIE (Serves 4)
Ingredients :
1 tbsp olive oil
500g brisket of beef, finely sliced
1 onion, chopped
1 red pepper, sliced and divided into two halves
1 green pepper, sliced and divided into two halves
1.5 tsp ground cumin
2 tsp ground coriander
1 tbsp tomato puree
1 tbsp tomato ketchup
2 tsp sugar
1 flat tsp of paprika
1 tsp Tikka Masala powder
2 cups soaked & reconstituted Aduki beans, boiled for 15-20 minutes
3 or 4 par cooked peeled, sliced potatoes
olive oil to drizzle
sea salt & ground black pepper.
Method :
1. Pre-heat your oven to 160deg fan. In a large frying pan, heat the olive oil until hot and sear the beef. Remove to a large casserole dish.
2. Place the onion and half the two peppers into the pan and cook on a medium heat until everything has softened and the onion is becoming transparent.
3. Add the cumin, coriander, tomato puree, tomato ketchup, sugar, paprika and tikka masala powder into the pan and cook for 2-3 minutes, before adding a little water - just enough to mobilise the spices and create a thick sauce.
4. Add to the beef and stir to combine. Add seasoning, cover and place into the oven for 2 hours. Take a look after an hour to ensure it hasn't dried out. If it is looking dry, then just add a little water to take it back to being saucy - but not runny.
5. At the end of the two hours, remove from the oven and stir in the remaining peppers and the beans. Add a little more water if necessary, bearing in mind it's got another 45 minutes at least, to go.
6. Finally, add the sliced potatoes in a neat layer on top, drizzle olive oil over, season and put back in the oven for 45-50 minutes or until the potatoes are golden.
Serve.
Of course, I should have gone to Makkha's on the Ashley Road - the best ethnic food store in the area - straight away, but life just didn't take us that way. Hubby eventually called in there on his way to another appointment and bingo - got the beans.
So, we were all set for this last weekend, when we were due to be having the pie on Saturday. I even remembered to put the beans in to soak before going to bed on Friday evening - which was a start!
Of course, we hadn't foreseen the problems that arose with Son & heir and his sleepover guest, which culminated in said sleepover guest returning home rather earlier than previously anticipated. Not through any fault of his own - she hastened to add - but because they both ran out of things to amuse themselves with and terminal boredom set in. All of which stamped all over the time I should have been preparing the Beef "Red Dragon" Pie.
So we had bacon & egg sandwiches that night and the pie got bumped to Sunday evening. I was beginning to think that perhaps I might have stepped on a gypsy's toe and had the hex put on me - especially considering how a number of different dishes lately had failed!
Would you believe it, having woken up Sunday morning thinking we had a free day, we ultimately found ourselves heading in Bournemouth's direction for an unavoidable, emergency bit of shopping!
I was so determined to make the flipping pie, I managed to make it in stages. I put the dish together - consisting of beef brisket, it required a couple of hours of slow cooking before adding the potatoes and beans - and took advantage of the automatic cooking function on our cooker to switch the oven on at the right time to begin cooking.
Consequently, it seemed to take all day to make - but goodness me, it was worth it!
I had my first taste once I'd combined the sauce ingredients prior to putting it in the oven and it showed promise even then. I have got to say, though, that was nothing compared to how it tasted after the first 2 hours of cooking. It was rich and tasty and so very unlike a Shepherd's Pie as to be incomparable. I was relieved about that, as I had been under instructions from the recipe's source, Martin Kitcher, to make sure it went in a Stir Fried Beef direction and not in a Shepherd's Pie direction! So I felt all was as it should be.
Hey Martin - did you notice the extra ingredient? *chuckle*
Having added the beans, some more peppers and the sliced potato to the top, I put it back into the oven for another hour and felt a whole lot more confident about it than I had been!
After what seemed to be an unconscionably long time, we sat down to tuck in. I'd served it with some steamed Pak Choi and Broccoli, which seemed to go very well. Hubby had insisted on some gravy, which amazingly went absolutely perfectly with the pie too. All in all, we were very happy bunnies with our dinner that night. Everyone cleared their plates and, if I hadn't have been so full, I'd have made inroads into the leftovers!
So, Beef "Red Dragon" and Aduki Bean Pie was not only a hit, but was marked as a "Do again" recipe. Can't wait to see what Martin finds for me next!
BEEF "RED DRAGON" AND ADUKI BEAN PIE (Serves 4)
Ingredients :
1 tbsp olive oil
500g brisket of beef, finely sliced
1 onion, chopped
1 red pepper, sliced and divided into two halves
1 green pepper, sliced and divided into two halves
1.5 tsp ground cumin
2 tsp ground coriander
1 tbsp tomato puree
1 tbsp tomato ketchup
2 tsp sugar
1 flat tsp of paprika
1 tsp Tikka Masala powder
2 cups soaked & reconstituted Aduki beans, boiled for 15-20 minutes
3 or 4 par cooked peeled, sliced potatoes
olive oil to drizzle
sea salt & ground black pepper.
Method :
1. Pre-heat your oven to 160deg fan. In a large frying pan, heat the olive oil until hot and sear the beef. Remove to a large casserole dish.
2. Place the onion and half the two peppers into the pan and cook on a medium heat until everything has softened and the onion is becoming transparent.
3. Add the cumin, coriander, tomato puree, tomato ketchup, sugar, paprika and tikka masala powder into the pan and cook for 2-3 minutes, before adding a little water - just enough to mobilise the spices and create a thick sauce.
4. Add to the beef and stir to combine. Add seasoning, cover and place into the oven for 2 hours. Take a look after an hour to ensure it hasn't dried out. If it is looking dry, then just add a little water to take it back to being saucy - but not runny.
5. At the end of the two hours, remove from the oven and stir in the remaining peppers and the beans. Add a little more water if necessary, bearing in mind it's got another 45 minutes at least, to go.
6. Finally, add the sliced potatoes in a neat layer on top, drizzle olive oil over, season and put back in the oven for 45-50 minutes or until the potatoes are golden.
Serve.
11 June 2011
The Recipe Queen's Tave Me Presh (a.k.a. Baked Mince with Leeks)
This may, quite conceivably, be the first Albanian recipe I've ever tried - and if it is representative of an Albanian's cuisine, count me in!
I found the original recipe on The Recipe Queen's blog, along with the Paprika Chicken from last week. In fact, this is representative of the worth of having food blogs around in the first place, as had I have found the recipe without a photograph or explanatory piece of writing, I'd have probably passed it by. As it was, the photograph caught my eye to begin with and upon reading the explanation, it intrigued me and got my saliva glands working. Always a good sign!
I had a couple of reservations as regards the recipe. Firstly, I had taken note of the "brothy" nature of the gravy/sauce and as I'm sure you all know by now, Hubby isn't all that keen on "brothy" recipes. The second worry was that it might be too gentle a flavour. The ingredients are all fairly flavoursome, but there was nothing there that could provide a "punch", so I was concerned that Hubby's jaded tastebuds (after a lifetime of smoking - but he's just celebrated his 2nd year of being smoke-free! Yay!) might not register such delicate flavouring. All of which might have you thinking "that Hubby is a picky wotsit", but everyone has their likes and dislikes and it's pointless my putting together a recipe that I'm absolutely sure he won't like. So, adaptations need to be made.
In fact, the adaptations I made were simple. I added 3tbsp of flour to the sauce/gravy, which thickened it up a treat. Where the flavours were concerned, the simple addition of a shake or two of Worcester Sauce and Tabasco provided the lift to the flavour range that made the difference between "meh!" and "ooooh, yum!".
The original recipe also asked for either carrot or red pepper to be used. Because Hubby so enjoys his red pepper and I really like carrots, I used them both. I also had some leftover asparagus (from the risotto which got bumped off of the menu list) which I cut into two and added. I haven't included the asparagus on the ingredients list, because it was simply using up a leftover. I suspect that the recipe for Tave Me Presh is probably another one like Cottage Pie, in that there are many different versions and you could pretty much include any vegetable you really liked. I apologise to all the Albanians out there, if my version has strayed from the traditional - but we liked it a LOT.
In fact, I liked it so much that I had the last portion for lunch today - and I can confirm that it was just as buttery and delicious as it had been yesterday.
I give the recipe, as I made it, below. My method differs a bit from The Recipe Queen's, as I don't have a pan which will transfer easily to the oven. Hence all the cooking and decanting! If you aren't so bothered at having a thick sauce, then either refer to The Recipe Queen's recipe on her blog, or just leave out the flour!
UPDATE : It is now May 2014 and I have cooked this several times since that first go. I absolutely love this dish and every time it comes out as soothing and satisfying as the first time. Whether you include asparagus or mushrooms, so long as you include the leeks, red pepper and carrots, you just can't go wrong.
TAVE ME PRESH (a.k.a. Baked Mince with Leeks) Serves 4
Ingredients :
75ml olive oil
4 leeks, cut into 2.5cm logs, then cut into half
1 onion, roughly chopped
450g lamb mince
3 tbsp flour
2 tbsp tomato puree
1 red pepper, de-seeded and cut into squares
1 carrot, peeled and chopped diagonally
500ml vegetable or lamb stock
a shake or two of Worcestershire Sauce
a shake or two of Tabasco.
Method :
1. Pre-heat your oven to 190deg C (fan).
2. Heat half the oil in a frying pan and fry the leeks over a low heat until soft, but not browned. Decant into a casserole dish.
3. Heat the remaining oil in the pan and cook the onion and red pepper until the onion is transparent, then decant that into the casserole dish.
4. Place the mince and carrots into the frying pan and fry on a high heat until the mince is browned and beginning to caramelise. Tip the pan and drain off the larger part of the oil, leaving some behind.
5. With a slotted spoon, decant the mince and carrots into the casserole dish.
6. Add the flour and tomato puree to the pan, soaking up the remainder of the lamb fat. Cook for 2 mins or so, or until you see the flour start to turn golden.
7. Add the stock, little by little, stirring or whisking as you go until you have a lump-free sauce. Bring to the boil, season to taste and add the Worcestershire Sauce and the Tabasco.
8. Decant into the casserole dish and give everything a good stir. If you are adding mushrooms, now is the time to mix them, quartered, into the casserole. Cover, then place into the oven and bake for 1 hour. If you are using asparagus, cut them into one inch pieces and stir them in with 30 minutes to go.
Serve with lovely buttery mashed potato. Comfort food at its absolute best!
Printable version
I found the original recipe on The Recipe Queen's blog, along with the Paprika Chicken from last week. In fact, this is representative of the worth of having food blogs around in the first place, as had I have found the recipe without a photograph or explanatory piece of writing, I'd have probably passed it by. As it was, the photograph caught my eye to begin with and upon reading the explanation, it intrigued me and got my saliva glands working. Always a good sign!
I had a couple of reservations as regards the recipe. Firstly, I had taken note of the "brothy" nature of the gravy/sauce and as I'm sure you all know by now, Hubby isn't all that keen on "brothy" recipes. The second worry was that it might be too gentle a flavour. The ingredients are all fairly flavoursome, but there was nothing there that could provide a "punch", so I was concerned that Hubby's jaded tastebuds (after a lifetime of smoking - but he's just celebrated his 2nd year of being smoke-free! Yay!) might not register such delicate flavouring. All of which might have you thinking "that Hubby is a picky wotsit", but everyone has their likes and dislikes and it's pointless my putting together a recipe that I'm absolutely sure he won't like. So, adaptations need to be made.
In fact, the adaptations I made were simple. I added 3tbsp of flour to the sauce/gravy, which thickened it up a treat. Where the flavours were concerned, the simple addition of a shake or two of Worcester Sauce and Tabasco provided the lift to the flavour range that made the difference between "meh!" and "ooooh, yum!".
The original recipe also asked for either carrot or red pepper to be used. Because Hubby so enjoys his red pepper and I really like carrots, I used them both. I also had some leftover asparagus (from the risotto which got bumped off of the menu list) which I cut into two and added. I haven't included the asparagus on the ingredients list, because it was simply using up a leftover. I suspect that the recipe for Tave Me Presh is probably another one like Cottage Pie, in that there are many different versions and you could pretty much include any vegetable you really liked. I apologise to all the Albanians out there, if my version has strayed from the traditional - but we liked it a LOT.
In fact, I liked it so much that I had the last portion for lunch today - and I can confirm that it was just as buttery and delicious as it had been yesterday.
I give the recipe, as I made it, below. My method differs a bit from The Recipe Queen's, as I don't have a pan which will transfer easily to the oven. Hence all the cooking and decanting! If you aren't so bothered at having a thick sauce, then either refer to The Recipe Queen's recipe on her blog, or just leave out the flour!
UPDATE : It is now May 2014 and I have cooked this several times since that first go. I absolutely love this dish and every time it comes out as soothing and satisfying as the first time. Whether you include asparagus or mushrooms, so long as you include the leeks, red pepper and carrots, you just can't go wrong.
TAVE ME PRESH (a.k.a. Baked Mince with Leeks) Serves 4
Ingredients :
75ml olive oil
4 leeks, cut into 2.5cm logs, then cut into half
1 onion, roughly chopped
450g lamb mince
3 tbsp flour
2 tbsp tomato puree
1 red pepper, de-seeded and cut into squares
1 carrot, peeled and chopped diagonally
500ml vegetable or lamb stock
a shake or two of Worcestershire Sauce
a shake or two of Tabasco.
Method :
1. Pre-heat your oven to 190deg C (fan).
2. Heat half the oil in a frying pan and fry the leeks over a low heat until soft, but not browned. Decant into a casserole dish.
3. Heat the remaining oil in the pan and cook the onion and red pepper until the onion is transparent, then decant that into the casserole dish.
4. Place the mince and carrots into the frying pan and fry on a high heat until the mince is browned and beginning to caramelise. Tip the pan and drain off the larger part of the oil, leaving some behind.
5. With a slotted spoon, decant the mince and carrots into the casserole dish.
6. Add the flour and tomato puree to the pan, soaking up the remainder of the lamb fat. Cook for 2 mins or so, or until you see the flour start to turn golden.
7. Add the stock, little by little, stirring or whisking as you go until you have a lump-free sauce. Bring to the boil, season to taste and add the Worcestershire Sauce and the Tabasco.
8. Decant into the casserole dish and give everything a good stir. If you are adding mushrooms, now is the time to mix them, quartered, into the casserole. Cover, then place into the oven and bake for 1 hour. If you are using asparagus, cut them into one inch pieces and stir them in with 30 minutes to go.
Serve with lovely buttery mashed potato. Comfort food at its absolute best!
Printable version
25 May 2011
Pepperpot Beef & Orange Stew
We had this for dinner on Sunday last. As you'll know if you've been reading along for a while, I got bored with doing the same old roasts on a Sunday and went looking for more interesting recipes to try.
However, I think I'm going to have to ban myself from buying Brisket of beef for a while, as that seems to wind up being the meat of choice for a Sunday - and that's getting just as boring as doing the same old roast chicken! In fact, I found myself hankering for a lovely pot-roast chicken, but that may also have something to do with the fact that my reservoir of chicken stock is running low!
Anyway, the reasons I chose to do this Pepperpot Beef & Orange Stew are as follows. For starters, it's beef and oranges. Now you don't often find those two in the same cooking dish. Secondly, it involved mashed red kidney beans being used as a method of thickening the gravy. An interesting idea and one which I was keen to try out. Lastly, it had Caribbean overtones and I'm very interested in Caribbean cooking, as I really like the combination of meat and fruit which they are very good at.
So that all amounted to an interested "I'll give that a try!".
As a first go, it didn't turn out too badly. I made one or two mistakes which I would remedy the second time around - and which have been incorporated into the recipe below. For example, I used the aforesaid Brisket of beef rather than the braising steak that was originally suggested. Do you blame me? There's a whole heap of difference in the price of the two! However, that meant that the dish would require a minimum of 2 hours cooking and a maximum of 3 hours. Regrettably, it never occurred to me that in that time the red and yellow peppers would have been cooked away to nothing more than an ingredient in the gravy/sauce, which was a shame. It would have been nice to have had them more prominently in the dish. As such, I have suggested adding them a lot later into the cooking process.
I was also a little leery of putting too much chilli in - and as it happened, I would have been absolutely fine to have included the seeds, rather than binning them. I did test the chilli on my tongue (for heat), but couldn't have paid much attention to the result, as a) I don't remember it and b) if I had have done, I'd have included the seeds!
What you wind up with, is a casserole dish full of lovely tender beef in a thick pinky-brown gravy (that's the red kidney beans) that is multi-faceted in flavour and well worth the effort of making it.
PEPPERPOT BEEF & ORANGE STEW ( serves 3-4)
Ingredients :
700g brisket of beef, trimmed and cut into small cubes
2 tbsp vegetable oil
2 tbsp plain flour
1 tbsp tomato puree
1 red onion, peeled and chopped
25g fresh ginger, peeled and grated
1 small red chilli, de-seeded (if it's a hot one!) and chopped
400ml beef stock
410g can red kidney beans, drained and rinsed
1 small orange, cut into six wedges
1 red pepper, de-seeded and chopped
1 yellow pepper, de-seeded and chopped
2 tbsp roughly chopped coriander leaves.
Method :
1. Pre-heat the oven to 180deg C/Gas 4.
2. Heat 1 tbsp of the oil in a non-stick frying pan and add half the meat, browning all over. Decant into a warmed casserole dish.
3. Repeat the process with the second batch of meat, but when browned, sprinkle with the flour and add the tomato puree. Mix well and cook for a couple of minutes without burning. Decant the lot into the casserole dish.
4. Give the frying pan a wipe out, then add the remainder of the oil and the onion, ginger and chilli. Cook gently until softened and golden brown - around 10 minutes.
5. Take one half of the red kidney beans and mash them with a potato masher, then add them to the casserole dish, along with the whole beans.
6. Add the stock and tip into the casserole dish, add the orange and stir to ensure everything is amalgamated.
7. Cover the casserole dish and place into the oven for 1 hour.
8. In the meantime, add the peppers to the frying pan and fry them lightly until just beginning to soften.
9. At the end of the first hour, remove the casserole dish from the oven and give the contents a good stir. Add the peppers and stir again. Season, cover and replace into the oven for another hour and a half.
10. Remove from the oven and test the beef. If not tender enough, return to the oven for another half an hour. You may need to add a little water at this stage, if the gravy/sauce has reduced too much.
11. Once the beef is tender, remove and serve with rice and green peas with a blob of sour cream on the side.
Delicious!
However, I think I'm going to have to ban myself from buying Brisket of beef for a while, as that seems to wind up being the meat of choice for a Sunday - and that's getting just as boring as doing the same old roast chicken! In fact, I found myself hankering for a lovely pot-roast chicken, but that may also have something to do with the fact that my reservoir of chicken stock is running low!
Anyway, the reasons I chose to do this Pepperpot Beef & Orange Stew are as follows. For starters, it's beef and oranges. Now you don't often find those two in the same cooking dish. Secondly, it involved mashed red kidney beans being used as a method of thickening the gravy. An interesting idea and one which I was keen to try out. Lastly, it had Caribbean overtones and I'm very interested in Caribbean cooking, as I really like the combination of meat and fruit which they are very good at.
So that all amounted to an interested "I'll give that a try!".
As a first go, it didn't turn out too badly. I made one or two mistakes which I would remedy the second time around - and which have been incorporated into the recipe below. For example, I used the aforesaid Brisket of beef rather than the braising steak that was originally suggested. Do you blame me? There's a whole heap of difference in the price of the two! However, that meant that the dish would require a minimum of 2 hours cooking and a maximum of 3 hours. Regrettably, it never occurred to me that in that time the red and yellow peppers would have been cooked away to nothing more than an ingredient in the gravy/sauce, which was a shame. It would have been nice to have had them more prominently in the dish. As such, I have suggested adding them a lot later into the cooking process.
I was also a little leery of putting too much chilli in - and as it happened, I would have been absolutely fine to have included the seeds, rather than binning them. I did test the chilli on my tongue (for heat), but couldn't have paid much attention to the result, as a) I don't remember it and b) if I had have done, I'd have included the seeds!
What you wind up with, is a casserole dish full of lovely tender beef in a thick pinky-brown gravy (that's the red kidney beans) that is multi-faceted in flavour and well worth the effort of making it.
PEPPERPOT BEEF & ORANGE STEW ( serves 3-4)
Ingredients :
700g brisket of beef, trimmed and cut into small cubes
2 tbsp vegetable oil
2 tbsp plain flour
1 tbsp tomato puree
1 red onion, peeled and chopped
25g fresh ginger, peeled and grated
1 small red chilli, de-seeded (if it's a hot one!) and chopped
400ml beef stock
410g can red kidney beans, drained and rinsed
1 small orange, cut into six wedges
1 red pepper, de-seeded and chopped
1 yellow pepper, de-seeded and chopped
2 tbsp roughly chopped coriander leaves.
Method :
1. Pre-heat the oven to 180deg C/Gas 4.
2. Heat 1 tbsp of the oil in a non-stick frying pan and add half the meat, browning all over. Decant into a warmed casserole dish.
3. Repeat the process with the second batch of meat, but when browned, sprinkle with the flour and add the tomato puree. Mix well and cook for a couple of minutes without burning. Decant the lot into the casserole dish.
4. Give the frying pan a wipe out, then add the remainder of the oil and the onion, ginger and chilli. Cook gently until softened and golden brown - around 10 minutes.
5. Take one half of the red kidney beans and mash them with a potato masher, then add them to the casserole dish, along with the whole beans.
6. Add the stock and tip into the casserole dish, add the orange and stir to ensure everything is amalgamated.
7. Cover the casserole dish and place into the oven for 1 hour.
8. In the meantime, add the peppers to the frying pan and fry them lightly until just beginning to soften.
9. At the end of the first hour, remove the casserole dish from the oven and give the contents a good stir. Add the peppers and stir again. Season, cover and replace into the oven for another hour and a half.
10. Remove from the oven and test the beef. If not tender enough, return to the oven for another half an hour. You may need to add a little water at this stage, if the gravy/sauce has reduced too much.
11. Once the beef is tender, remove and serve with rice and green peas with a blob of sour cream on the side.
Delicious!
Subscribe to:
Posts (Atom)


