Showing posts with label potato. Show all posts

29 December 2017

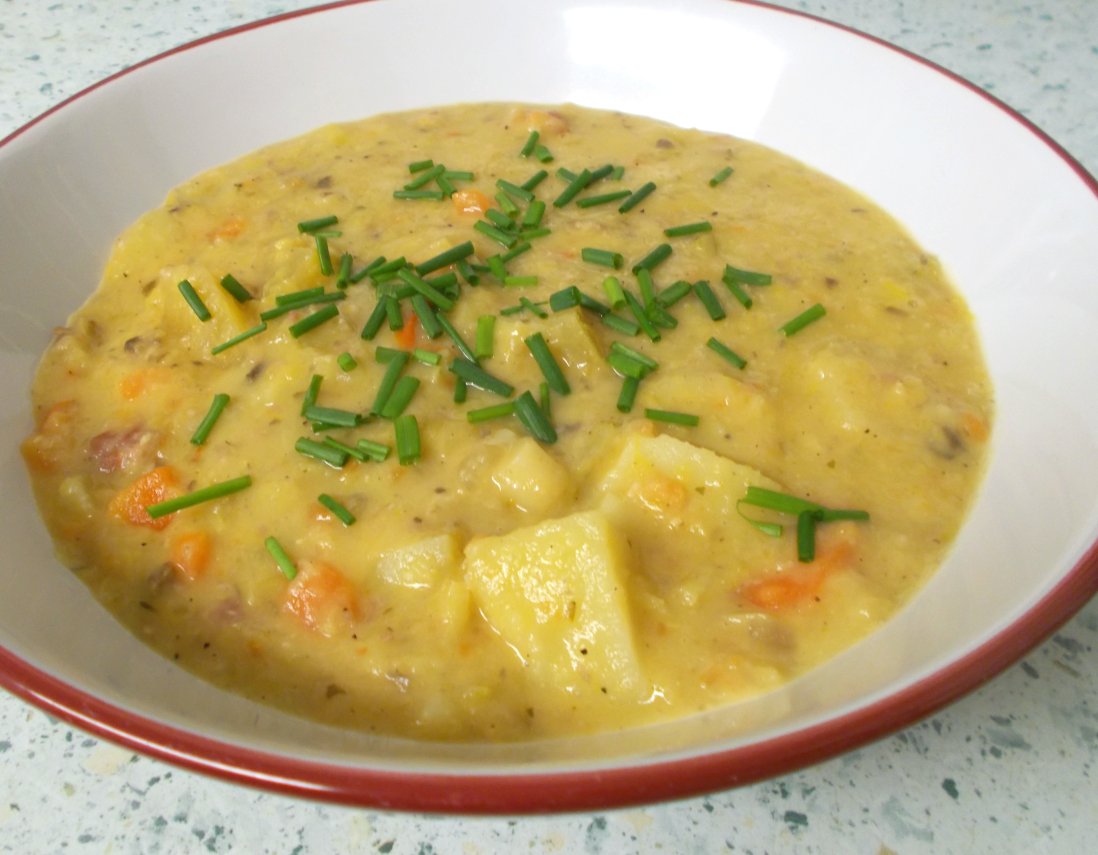
Thick, chunky creamed vegetable soup (with a little bacon)

It's the 29th December, 2017.  We have eaten our own body weight in turkey over Christmas.  It is time to give our digestions a bit of consideration, hence, a vegetable soup.  However, because we're not vegetarians, it's got a wee bit of bacon in it too - just for the flavour input, don'tcha know.

Now for all that I like the brothy kind of soups, I wanted this one to be hearty, thick and worthy of being served as a dinner soup.  Perhaps with some crusty bread, or as it turned out, a gorgeous thin flatbread with mozzarella, basil and olive oil.  Mmmnn, delicious.

Truth be told, you could use just about any vegetables you wanted for this soup.  I will give you the full rundown of vegetable input in the recipe, but you need to follow a few rules, no matter what veggies you use.  Said rules go like this :

a)  chop some veggies very small, so that they cook down and disappear into the vegetable stock.

b)  chop some veggies into bite sized pieces, so that they will be retained and create lovely texture.

c)  start with a tasty oil - coconut, or butter, or rapeseed - and a finely chopped onion.  Do not be tempted to use a bland vegetable oil, or a slightly bitter olive oil.  If you start wrong, you won't ever be able to come back from it.

d)  use the best vegetable stock you can source.  It is the base of your soup and deserves to be delicious.


So there you are.  Not difficult at all, but make sure to set aside a good time to be spent  choppin', cuttin' and a-peelin'.  Not to mention a good hour or so in the preliminary cooking stage and a pause in the middle of however long you've got.  Good soup does not come about in a half an hour.  Well actually it can, but not with this one.


Here comes the recipe!

THICK, CHUNKY CREAMED VEGETABLE SOUP    (Serves 4)

Ingredients :

1 tbsp coconut oil
1 red onion, finely chopped
4 rashers of streaky bacon, finely chopped (optional)
2 tsp ground coriander
a large pinch of sea salt
1 tsp ground black pepper
half a tsp dried thyme
half a tsp dried parsley

Peeled and chopped small :

1 medium carrot
1 large stick of celery, with fluffy green bits if possible
1 large leek
2 chestnut mushrooms
6 sweet cherry tomatoes (halved works for these)
half a medium potato

Peeled and chopped into bite sized chunks :

2 medium carrots
2 large sticks of celery
5 chestnut mushrooms (quartered)
1 and a half medium potatoes
2 small parsnips
a decent sized chunk of swede or turnip

plus :

750ml of strong vegetable stock (I used 1.5 tsp Marigold vegetable bouillon and 1 tsp Essential Cuisine vegetable stock powder)
4-5 tbsp dry split red lentils
3-4 large leaves of Savoy cabbage, ribs removed and leaves sliced
2-3 tbsp double (or heavy) cream
2 tsp cornflour mixed with a drop of water to thick pouring consistency
sea salt & ground black pepper to taste.

Method :

To begin, make sure you are using a pan which can contain the entire contents.  It needs to be BIG and have a lid which fits.  I used my steep sided wok, which worked perfectly.

Heat the oil and add the onion & bacon (if using).  Cook, stirring often, until the onion is transparent and the bacon is beginning to render its oil.  Add the coriander, sea salt, black pepper and herbs and stir through.

Add all the chopped small ingredients and cook on, stirring regularly to turn the pan contents.  Once the leek and mushroom pieces are softened and the whole is beginning to look cooked, add the vegetable stock.

Increase the temperature under the pan and bring the contents to a gentle boil.  Add the bite sized chunks of veggies, the red lentils and the cabbage.  Gently stir through, cover the pan and bring back to a gentle boil.  Cook on for 30-40 minutes, stirring occasionally.

Taste to check the seasoning levels - which should be fairly high as when you add it later, the cream will obliterate a certain level of seasoning.

Remove from the heat, leave covered and go and have a sit down for a couple of hours.

When you return, using a hand blender, blitz a certain amount of the soup to your preference.  I probably made it 50:50 blitzed to chunks which seemed to go down well.

Turn the heat on under the pan and add the cream and cornflour slurry and stir through.  As the soup heats up to a lively simmer, the cornflour will thicken the soup to a consistency where it will coat the back of a spoon - which is what you are aiming for.  If it becomes too thick, add a little water.

Finally, check the seasoning and adjust to your taste.  Serve into warm bowls with crusty bread for dipping.

Printable version

10 September 2013

Tonight's Dinner : An oldie - Slow Cooker Split Pea & Ham Soup

Well.  I don't think that was half bad.  We bought the gammon join for Sunday's dinner (remember?  Gammon with Piedmontese Peppers?) then we had Ham Egg & Chips last night and this evening, we finished off the £7.50 piece of gammon with a home made Split Pea and Ham Soup.  Roughly £2.50 per meal over the three days for the meat content.  Very nice too.


The soup was an absolute dream to make, it was so easy.  I didn't follow anyone's recipe in particular, but read several different recipes (not all of which were for Pea and Ham soup!) for inspiration and just winged it after that.  What made it so easy was the use of my slow cooker (or crockpot) - although if you don't have one of these paragons, you can easily make the same soup on the cooker top in less time with a little more stirring and watching of liquid levels.

I used my favourite Essential Cuisine stock - 1 tsp vegetable stock powder and 1.5 tsp veal stock powder in 1 litre of water.  Now Essential Cuisine stock is naturally low in salt, but if you decide to use stock cubes - do beware of the salt content and definitely use a low salt version.

Hubby declared it to be "proper gorgeous, proper delicious", which I take to be high praise.  Son and heir decided it was a little too salty for his taste (which was odd, as I hadn't used any salt at all!).  I thought it was quite the nicest pea and ham soup I'd had in a very long while.  We ate it with some nice Cheese & Pickle crusty bread from Asda.

SLOW COOKER SPLIT PEA & HAM SOUP  (serves 3)

Ingredients :

1 onion, chopped finely
2 sticks of celery and a few celery leaves, chopped finely
2 medium carrots, peeled, halved lengthways and sliced thinly
1 medium potato, diced finely
2 rashers of back bacon, diced finely
1 tbsp of finely chopped fresh parsley
2-3 bay leaves
1 litre very hot stock of your choice (see note above)
250g dried, unsoaked, yellow split peas
freshly ground black pepper
a large knob of butter
6 slices of ham leftover from a gammon joint, cut into fine shreds.

Method : 

1.  Place all the ingredients except the pepper and the butter into the slow cooker and stir to combine.

2.  Turn the slow cooker to High and cook for 5 hours, or Medium and cook for 6-7 hours.

3.  Half way through the cooking time, remove the lid and give the contents a stir.

4.  Add a good pinch of black pepper and stir through, then replace the lid.

5.  At the end of the cooking time, mash the contents roughly with a potato masher.  Do not use a blender, as it will turn your soup into a puree.

6.  Add the shredded ham and stir through.

7.  Remove any bay leaves you can find and add the butter.  Allow it to melt and stir it through, then taste for seasoning and add more freshly ground black pepper if necessary.

Serve, with a little of the shredded ham and some freshly ground black pepper on top for garnish and crusty bread for dipping.

Printable version 

25 June 2013

Curry baked chicken with vegetable curry & green pea rice

Just recently, I've made several chicken & salad meals by coating chicken pieces in some kind of sauce or rub, then baking it in the oven.  I think, so far as I can remember, I've done a BBQ version, a Cajun version, a garlic and herb version - you get the idea.  So when I was considering a curry for one of the week's meals, it occurred to me that I could do the same sort of arrangement - but with a vegetable curry instead of salad.

If I were to marinate the chicken in something, then bake it - and make a vegetable curry earlier on in the day, then that would result in a really quite simple dinner preparation.  All I'd have to do is put the chicken in the oven, warm up the vegetable curry and cook the rice and peas.  Lovely!

Now sometimes, this sort of plan goes awry at the last minute as I haven't anticipated how long it would take me to chop the vegetables, or I'd run out of pans and make horrid amounts of washing up.  This time, however, it all went beautifully according to plan and was indeed the most satisfying dinner not just from an eating perspective, but from the preparation and clearing up perspective too.

I started off the processes by marinating the chicken in a mixture of curry paste, mango chutney and Greek yoghurt (doesn't have to be Greek - it's just that Greek yoghurt is my plain yoghurt of choice) for the day.


Next - and during the morning - I sat down and peeled, cut and chopped all the vegetables for the curry and set about making it.  I do so enjoy cooking without time constraints.  It was lovely to just sail along, cooking without having to keep an eye on the time.  We try to have our meals on the table for 6pm, you see.  Sometimes I have a lot of trouble hitting that 6pm deadline!

As ever, when cooking a curry, I had an end result in mind but no real idea how I was going to get there.  So, I knew I wanted to emulate the British Takeaway vegetable curry flavour and texture of the thing - without over cooking any of the veggies and without it winding up too watery, too stew-like or too greasy.  Shouldn't be a problem!

I went through the fridge and pulled out everything that didn't have a home to go to as well as the few veggies that I'd bought with this particular dish in mind.  So we wound up with onion, garlic, red chilli, carrot, potato, mushroom, baby red peppers, cauliflower, broccoli, fresh quartered tomato, fresh coriander and red lentils.  That should take care of our five a day!

Whenever I do the chopping-and-a-peeling, I always put the cut veggies onto plates or in dishes in the order I'll be needing them.  So the onion, garlic and chilli went onto one plate, the carrots were in a dish on their own.  The potato, mushroom and baby red peppers went into the colander and the tomato, cauliflower and broccoli were on another plate.  That way, I don't have to waste any time separating one from the other - and they're all ready to go when I start cooking.  I can't cook and chop - just doesn't work.

I was tempted to spice the curry myself, but in the end decided to use our pre-prepared Sharwoods Korma curry paste - the same one I'd used on the chicken.  I was going for simplicity and the Sharwoods is a very good middle of the road curry paste that you can pep up with additional chilli if you want.  The ingredients list reads very well, too.  With tomato puree, coriander, cumin, turmeric, ginger, chilli, paprika, cardamom, mustard seeds, fenugreek and fennel and the only additive being acetic acid, it is a very acceptable quick curry fix.

So, it went like this.  First of all I chose my biggest saucepan in which to cook so that I had enough room for everything as I wasn't entirely sure how much it would come to.  I put 2-3 tbsp of sunflower oil in and got that heating, then added the onion - and a small pinch of salt - which cooked until golden brown, but not burned.  The garlic then went in for a minute, before I added the chilli and carrot.  Next in was the curry paste and tomato puree which I cooked until the oil was released - just a few minutes.  The next things into the pot were the potato/mushroom/red pepper combo which got mixed all around and coated in the aromatic loveliness.

I wanted to include some coconut milk at this point, but didn't want to use a whole 400g tin of the stuff.  Amazingly, I found a small carton of Blue Dragon coconut cream which did the job perfectly - and was just about to go out of date - so that went in next.  I added a teaspoonful of Essential Cuisine chicken stock powder and approximately 200-300ml of water and gave everything a good stir.  I was tying my hands behind my back to prevent myself from adding more salt at this stage.  The temptation was enormous, but I resisted - and jolly good job too.  I satisfied the urge by adding some black pepper instead.  *chuckle*  In went the red lentils and I let everything simmer gently together for around 20-30 minutes until almost cooked.  Finally, I added the cauliflower and turned off the heat - leaving it to cool.

When I came back to start the dinner properly, first thing was to put the chicken into the oven, then start the vegetable curry warming up and boil the water for the rice.

Once the curry had heated through enough to start bubbling, I removed the lid and let it reduce slightly - just to thicken the sauce a little.  In went the broccoli and the tomato quarters, plus three quarters of the chopped fresh coriander.  Once the broccoli was cooked and the sauce reduced to my liking, it was done.

The chicken came out of the oven still beautifully coated in the curried yoghurty mix, which had slightly caramelised on top, thanks to the mango chutney - which was exactly what I was hoping for.


The plain basmati rice was brightened up by the addition of a few green peas.  A tip for adding frozen peas to cooking rice is to run the peas under the hot tap to defrost them and warm them up before adding them to the rice with around 2 minutes to go.  That way, you don't stop the cooking process by adding freezing peas and they will stay a vibrant green.

The whole meal was absolutely delicious, comforting, satisfying and got a huge thumbs up from everyone.  So long as you make the veggie curry earlier in the day, it was ultimately all finished in around 30 minutes and was a perfect arrangement for anyone who loves curry but wants healthy along with it - and who can't spend too long in the kitchen making it.

Son and heir was practically begging for this curry to be made again and soon - so I'm sure it won't be long!

CURRY BAKED CHICKEN, VEGETABLE CURRY WITH RICE AND PEAS   (Serves 3 with leftover vegetable curry)

Ingredients :

3 boneless skinless chicken breasts
3 tbsp plain (Greek) yoghurt
1 tbsp mango chutney
1.5 tbsp curry paste.

3 tbsp sunflower oil
2 onions, sliced finely
2 fat garlic cloves, chopped finely
1 hot red chilli (seeds are optional)
1 donkey carrot, peeled and diced
3 tbsp curry paste
2 tbsp tomato puree
2 medium potatoes, peeled and diced
6-10 mushrooms, washed and quartered
6 baby red peppers (or one red pepper, cut into pieces), top & tailed
250ml coconut cream
1 tsp chicken stock powder or a low salt chicken stock cube
enough water to just cover the contents
3 heaped tbsp red lentils
3-4 cauliflower florets, broken into small pieces
3-4 broccoli florets, broken into small pieces
1 large ripe tomato, quartered (or smaller) into wedges
a large handful of fresh coriander, chopped.

1 cup of uncooked basmati rice
sea salt
half a cup of frozen peas.

Method :

1.  In the morning, mix together the yoghurt, chutney and curry paste in a large bowl.

2.  Trim the chicken breasts of fat and gristle, then score lightly across the top to allow the marinade to more easily penetrate the meat.

3.  Add the chicken to the marinade and mix gently to ensure every little bit of chicken is covered in marinade.  Cover with cling film and refrigerate until 30 minutes prior to cooking.

4.  To make the vegetable curry (which I recommend should also be done in the morning), heat the oil in a large, deep saucepan.  Add the oil.

5.  Add the onion - and a small pinch of salt - and cook for around 10-15 minutes until golden brown, but not burned.  Add the garlic and stir quickly, then add the chilli and stir.

6.  Next, add the carrot pieces, which will help to cool the pan and so avoid burning the garlic.

7.  Next add the curry paste and tomato puree and stir well to combine with the rest of the ingredients.  Cooked until the oil is released - just a few minutes.

8.  Add the potato/mushroom/red peppers and stir well to ensure they are coated with the curry mixture.  

9.  Add the coconut cream, stock powder and water and stir gently to combine.  Do not add any salt at this stage, but if you're yearning to - add a little black pepper instead!

10. Stir in the red lentils and let everything simmer gently together for around 20-30 minutes until almost cooked.

11.  Finally - for this stage - add the cauliflower, turn off the heat, cover and leave to cool.

12.  Several hours later and when you're ready to prepare the dinner proper, begin by turning on the heat under the vegetable curry and pre-heating the oven to 200degC/400degF/Gas 6.  Line a shallow baking tray with silver foil (optional - but it helps with the washing up!) and place the chicken onto the foil.  Spoon any additional marinade over the top of each chicken breast.  Place into the oven for 25-35 minutes or until the juices run clear if pricked with a knife.

13.  Three quarters fill a good sized saucepan with water, add a pinch of sea salt and place it on a high heat, to boil.

14.  Put the dry rice into a seive and run it under a hot tap until the water runs clear.  Once the water in the pan boils, add the rice and cook - simmering - for 7-9 minutes.  2 minutes before the rice is due to be ready, add the defrosted peas.

15.  As the rice is cooking, the vegetable curry should have come up to temperature.  Remove the lid and allow the sauce to reduce a little as you add the broccoli, tomato and three quarters of the fresh coriander.  Stir from time to time, to make sure it doesn't stick to the bottom of the pan.

16.  Once the rice is ready, drain and return to the warm pan.  You can add a little of the chopped coriander for some extra flavour, if you like.

17.  Once the chicken is done, serve with the vegetable curry and green pea rice - with an added flourish of a sprinkle of chopped coriander for garnish.

Printable version

26 September 2012

Egg & Vegetable Curry

It has been a long time since I made a curry.  Well, a curry from scratch that is - you know, without the "benefit" of a shop bought curry paste or suchlike.  One where you devise the spicing yourself and pray it comes out okay.

Now I have made a couple of meals that involved curry in the recent past and all have been pretty darned poor.  Take the Kedgeree that I made only a couple of weeks ago.  It really was horrid.  For some reason I overcooked the rice and also used a pre-made curry paste that was really bad.  I've no idea why I didn't spice it myself and have no clue as to why we seemed to go back to buying curry paste - as the marked decline in my curried fortunes seemed to coincide with that.

I have been having a dalliance with "authentic" type curries recently, which has meant that hubby hasn't been too pleased with them.  You see, generally, "authentic" i.e. not British Indian Restaurant style curries are a lot wetter than the BIR style ones.  I've talked in the past about hubby's hatred for "pond water" (i.e. broth) rather than a more robust sauce and these "authentic" style curries (such as Malay and Thai) just aren't his "thing".  It's a shame, because I was quite keen to investigate these more "brothy" types of curry and explore the flavours involved.  Hey ho - another single person lunch project, maybe!

Looking like magma with a couple of eggs inside it!

Hence, I had made a mental note that my next curry was to be a BIR style one - and I suspect that the curry paste came along because I'd lost confidence in my ability to cook a curry from scratch.

However, the meal on this night wasn't supposed to be curry at all.  It was supposed to be cornish pasties!  Not a lot of difference there, is there?

I served mine with curried flatbreads
Well the cornish pasty thing got scotched (or cornished) when I realised that I'd left the beef in the freezer and it wouldn't be defrosted by lunchtime, when I was going to be making the pasties.  This demanded a bit of a side-step and an audit of the contents of said freezer and the fridge, for alternative ideas.

I'd accumulated a fair amount of little bits of vegetables that had been left over from previous meals and which set me to thinking about a vegetable curry.  At this point, a lightbulb went on and I remembered that I'd been vaguely hankering after an egg curry, after seeing a photograph of one on the excellent Facebook page "The Food Court".  Obviously, I couldn't make simply an egg curry, as hubby's sensitivity to eggs would rule him out of one of those - but a veggie curry with a couple of additional hard boiled eggs for son & heir and myself was sounding increasingly good.

A quick rummage in the tin cupboard turned up a tin of coconut milk and a small tin of chick peas and a rummage in the larder cupboard turned up a carton of tomato passata.  Along with a bit of leftover single cream in the fridge and a well stocked spice cupboard, I had just about all I needed.

The curry was delicious.  Hubby really enjoyed his vegetable version and son & heir loved his egg along with the curry.  My vague lusting after an egg curry was assuaged and we all went away smiling.  Can't ask for more than that - especially from a last-minute decision of a curry that was made out of leftover and forgotten ingredients!


EGG & VEGETABLE CURRY    (serves 3)

Ingredients :


1 tbsp vegetable or groundnut oil
15g butter
2 onions, one chopped fine and one sliced
2 cloves garlic, chopped
2 tsp ground cumin
2 heaped tsp ground coriander
1 heaped tsp ground black pepper
1 flat tsp ground turmeric
a hefty pinch of red chilli flakes
1 heaped tsp Madras curry powder
3 green cardamom, crushed
250ml tomato passata
2 carrots, peeled and cut into small chunks
1 medium potato, peeled and cut into small chunks
a quarter of a swede, peeled and cut into small chunks
400ml can of coconut milk
1 heaped tsp (or 1 crumbled cube) vegetable stock powder
220g tin of chick peas
2 big pinches of dried Methi (Fenugreek) leaves
1 courgette, sliced thickly on the diagonal, then halved
sea salt
200ml single cream
a knob of Jaggery (or 1 tsp brown sugar)
another (smaller) knob of butter
3 eggs, just hard boiled (around 7 minutes).

Method :

1.   In a deep saucepan, heat the oil and butter until the butter has melted.  Add the onion and fry on a medium heat until soft and deep golden brown.  Add the garlic and cook for an additional 2-3 minutes.

2.  Add the cumin, coriander, black pepper, turmeric, chilli flakes, curry powder and cardamom and stir to combine.  Cook for another 3-4 minutes, stirring all the time to prevent the spices burning.

3.  Add the tomato passata and stir to combine.  Continue to cook until the mixture has lost a good deal of its water and the fat is being released.

4.  Add the carrots, potato and swede and stir well until the vegetables are all coated in the spice mixture.

5.  Add the coconut milk and vegetable stock powder and gently stir to combine.

6.  Add the chick peas and the methi leaves and bring to a simmer.  Cook, simmering, until the vegetables are softened, but not quite tender.

7.  Add the courgette, stir to combine and continue to cook until the vegetables are tender.  You may need to add a little water from time to time, if the curry begins to get too thick.

8.  Once the curry has thickened, add the cream, jaggery (or sugar) and salt to taste.  Once you are happy with the flavour and the cream is well combined, add the knob of butter and the three shelled hard boiled eggs.

9.  Allow the eggs time to heat through and serve on white rice, with the eggs halved and placed on top.

Serve with naan bread, chapatis or flatbreads.

Printable version


9 July 2011

The best (and biggest!) Cornish Pasties

If I can remember that far back (last Tuesday - it's a close run thing, to be honest!), I seem to recall that I made some crackingly good Cornish Pasties.

Now, of course, one wonders whether they should in fact be called "Dorset Pasties" as we're in Dorset, not Cornwall.  However, I think we can safely leave that a moot point and in calling them "Cornish", I trust everyone will know what sort of pasty we're talking about.

The original plan, with this pasty meal, was to have the Cornish Pasties with an accompanying salad.  I had thought that would be somewhat healthier (less fat & sugar, potentially) than baked beans and chips.  However, when I checked on them in the oven and saw what a humungous size they had reached, I quickly revised that idea.  It seemed to me that the pasty itself would be quite enough for a meal (as indeed, was the original idea behind them) with perhaps a few baked beans in order to provide something to lubricate the jaws.  Quite apart from anything else, I was beginning to feel distinctly peculiar - and the idea of putting together a salad was rapidly becoming less and less attractive both from a personal point of view and from a "not passing on whatever I've got" point of view.

So, the chaps had one each with some baked beans - and indeed, they proved perfectly adequate for a meal.  All of which leads me to suppose it might be better to draw 4" circles in the pastry, rather than 8" circles, in order to produce a smaller more manageable pasty!

I used shop-bought frozen puff pastry and it was brought home to me just how enfeebled I had become, because the simple act of rolling out the pastry was incredibly difficult.  When I'd done the first quarter - and cut out the first circle - I can remember thinking "OMG - I've three more of these to go!".  Which is crazy, when you consider that I used to think nothing of picking up 25kg of horse feed bag and slinging it over my shoulder.  How times change!

I kept the ingredients for the filling completely traditional, apart from the fact that I used some lovely steak mince, rather than cut up a piece of steak.  I felt this would rule out any pieces of steak being too "bouncy" and not tender enough, plus there was the outside chance that some fat would get through the net.  

Another interesting point regarding the pasties, is that I used the Mandolin to cut the potatoes, onions and swede.  This ensured that they were cut to the exact-same thickness and although each slice wasn't cut in the exact-same way, so some were bigger in diameter than others, it seemed to work beautifully where the cooking time was concerned.  I have, in the past, had pasties come out of the oven with the potato or the swede still really quite hard, where I've diced them instead of sliced them.

I put the slices into a bowl, which enabled me to balance the quantities of all three much more easily than taking a little handful for each pasty.  You could see, once you'd added the onion, how much potato you would need and likewise the swede.  It also enabled me to season with freshly ground black pepper - loads of it! - and sea salt, mixing the slices to ensure the seasoning was carried throughout the filling.  I did give each pasty a little extra grind of both seasonings just before closing them, but hubby reckons that although they were very nice, I could still have given them more pepper.

A note about the pastry.  I rolled the pastry out between two pieces of cling film (a la Rachel Allen), which is by far the cleanest way I know of it do it.  Now this has the added benefit, once you've cut out your circle, of providing you with some cling film to close over the top of the pastry and prevent it from drying out while you make the other three!  I found it was worth turning the pastry over before adding the filling, as it was easier to pick it up from the cling film, that way.

As for the crimping, well, in the past my pasties have looked rather like a rabid dog has put them together.  However, this time, I was quite pleased with the crimping and it looked even better once they'd cooked.  For once - faint! - none of them came undone in the cooking!

CORNISH PASTIES  (makes 4 x 8" circles = 4 pasties)

Ingredients :


1 pack with 2 blocks of Puff Pastry
300g steak mince
1 large onion, thinly sliced
2 medium potatoes, peeled, thinly sliced
175g swede, peeled, thinly sliced
freshly ground black pepper
sea salt
beaten egg.


Method :


1.  Pre-heat oven to 220c/fan 200c/gas 7.


2.  Roll out the pastry, a half a pack at a time, in between two pieces of cling film and until you can place an 8" plate on top with extra to spare around the edges.  Remove the top layer of cling film and draw a knife around the plate to remove the extra pastry.  Close the cling film over the circle and leave it to one side while you prepare the remaining circles.


3.  Using a Mandolin - or by slicing as finely and evenly as possible with a knife - slice the onion, potatoes and swede.  Place the onion directly into a bowl, however with the potato and swede, cut each slice (you can heap them and cut a number at one time) into four, then place in the bowl.


4.  Add the seasoning - and go wild with the pepper, as these pasties can take a huge amount of black pepper - and mix through with your fingers.


5.  Take the first of your circles and peel the cling film from it, turn it over and place it back onto the cling film.  Add a handful of vegetable mix along the centre line and add a quarter of the steak mince, broken into pieces, along the same line and on top of the vegetables.


6.  Season again, then brush a little of the beaten egg mixture around the outside edges of the circle.  Bring the half furthest away from you up and over the top of the meat & vegetables, towards you, sealing it on its opposite side.  Then, starting from one end, crimp the edges - sealing as you go.


7.  Once done, cut three lines into the body of the pasty and place onto a baking tray.  Brush with the egg wash and place into the oven for 10 minutes, then reduce the heat to 180c/fan 160c/gas 4 and bake for 45 mins or so until golden.


Serve warm.


28 June 2011

The elusive Beef "Red Dragon" and Aduki Bean Pie

Why is it elusive, you ask?  Well, because we were initially supposed to be having it two weeks ago but it got bumped until last week owing to the fact that I just couldn't find Aduki (or Adzuki, or Azuki) beans.

Of course, I should have gone to Makkha's on the Ashley Road - the best ethnic food store in the area - straight away, but life just didn't take us that way.  Hubby eventually called in there on his way to another appointment and bingo - got the beans.

So, we were all set for this last weekend, when we were due to be having the pie on Saturday.  I even remembered to put the beans in to soak before going to bed on Friday evening - which was a start!

Of course, we hadn't foreseen the problems that arose with Son & heir and his sleepover guest, which culminated in said sleepover guest returning home rather earlier than previously anticipated.  Not through any fault of his own - she hastened to add - but because they both ran out of things to amuse themselves with and terminal boredom set in.  All of which stamped all over the time I should have been preparing the Beef "Red Dragon" Pie.

So we had bacon & egg sandwiches that night and the pie got bumped to Sunday evening.  I was beginning to think that perhaps I might have stepped on a gypsy's toe and had the hex put on me - especially considering how a number of different dishes lately had failed!

Would you believe it, having woken up Sunday morning thinking we had a free day, we ultimately found ourselves heading in Bournemouth's direction for an unavoidable, emergency bit of shopping! 

I was so determined to make the flipping pie, I managed to make it in stages.  I put the dish together - consisting of beef brisket, it required a couple of hours of slow cooking before adding the potatoes and beans - and took advantage of the automatic cooking function on our cooker to switch the oven on at the right time to begin cooking.


Consequently, it seemed to take all day to make - but goodness me, it was worth it!

I had my first taste once I'd combined the sauce ingredients prior to putting it in the oven and it showed promise even then.  I have got to say, though, that was nothing compared to how it tasted after the first 2 hours of cooking.  It was rich and tasty and so very unlike a Shepherd's Pie as to be incomparable.  I was relieved about that, as I had been under instructions from the recipe's source, Martin Kitcher, to make sure it went in a Stir Fried Beef direction and not in a Shepherd's Pie direction!  So I felt all was as it should be.

Hey Martin - did you notice the extra ingredient?  *chuckle*

Having added the beans, some more peppers and the sliced potato to the top, I put it back into the oven for another hour and felt a whole lot more confident about it than I had been!

After what seemed to be an unconscionably long time, we sat down to tuck in.  I'd served it with some steamed Pak Choi and Broccoli, which seemed to go very well.  Hubby had insisted on some gravy, which amazingly went absolutely perfectly with the pie too.  All in all, we were very happy bunnies with our dinner that night.  Everyone cleared their plates and, if I hadn't have been so full, I'd have made inroads into the leftovers!

So, Beef "Red Dragon" and Aduki Bean Pie was not only a hit, but was marked as a "Do again" recipe.  Can't wait to see what Martin finds for me next!

BEEF "RED DRAGON" AND ADUKI BEAN PIE  (Serves 4)

Ingredients :

1 tbsp olive oil
500g brisket of beef, finely sliced
1 onion, chopped
1 red pepper, sliced and divided into two halves
1 green pepper, sliced and divided into two halves
1.5 tsp ground cumin
2 tsp ground coriander
1 tbsp tomato puree
1 tbsp tomato ketchup
2 tsp sugar
1 flat tsp of paprika
1 tsp Tikka Masala powder
2 cups soaked & reconstituted Aduki beans, boiled for 15-20 minutes
3 or 4 par cooked peeled, sliced potatoes
olive oil to drizzle
sea salt & ground black pepper.

Method :

1.  Pre-heat your oven to 160deg fan.  In a large frying pan, heat the olive oil until hot and sear the beef.  Remove to a large casserole dish.

2.  Place the onion and half the two peppers into the pan and cook on a medium heat until everything has softened and the onion is becoming transparent.

3.  Add the cumin, coriander, tomato puree, tomato ketchup, sugar, paprika and tikka masala powder into the pan and cook for 2-3 minutes, before adding a little water - just enough to mobilise the spices and create a thick sauce.

4.  Add to the beef and stir to combine.  Add seasoning, cover and place into the oven for 2 hours.  Take a look after an hour to ensure it hasn't dried out.  If it is looking dry, then just add a little water to take it back to being saucy - but not runny.

5.  At the end of the two hours, remove from the oven and stir in the remaining peppers and the beans.  Add a little more water if necessary, bearing in mind it's got another 45 minutes at least, to go.

6.  Finally, add the sliced potatoes in a neat layer on top, drizzle olive oil over, season and put back in the oven for 45-50 minutes or until the potatoes are golden.

Serve.

17 June 2011

Spring vegetable chowder with ham - swerving the failed Gnocchi


You'll recall from the earlier Menu Plan blog that I was planning on having Gnocchi for dinner one night this week, but due to an oversight in the Sweet Potato front, the whole lot went in the bin.

Well, this left us with a whole heap of diced carrot, celeriac, fennel and asparagus sitting with no home to go to.

I'd already mentioned to hubby (who was doing the chopping and a-peeling) to keep the woody ends of the asparagus and I'd make some soup at the weekend.  (Darn it, just remembered we forgot to buy a leek in the shopping!).  Anyway, this throwaway request had obviously sowed a seed in hubby's brain as he suggested I make some soup with all the dice.

So, back he went to chopping and a-peeling-land and added an onion and two potatoes to the mix, finding some tinned sweetcorn on the way.

I had bought a litre of Jersey milk to make the sauce which was to have gone with the Gnocchi, so I had the basics for a really nice chowder-style soup.

The ham was a last-minute inclusion, but for all that it was the making of the soup.  It added that little bit of savouriness that otherwise would have been missing.

With some bread and butter for dipping, this made a perfect main course soup - and is  easy to have as a vegetarian option, by simply leaving out the ham.

This soup actually took me back to a time when I was vegetarian for a while.  It was just after I'd had my first horse, Baringa, put to sleep and the whole experience had made me turn my back on meat.  As often happens, it was the demon bacon sandwich that turned me back again! 


SPRING VEGETABLE CHOWDER  (feeds 4)

Ingredients :

A knob of butter
a splosh of olive oil
1 onion, chopped finely
2 carrots, peeled and diced small
2 potatoes, peeled and diced
1 celeriac, peeled and diced
100ml vegetable stock using half a stock cube

1 litre of jersey milk
sea salt & freshly ground black pepper

1 fennel bulb, diced small and with herby fronds chopped & retained
a bunch of asparagus, trimmed and sliced to 1cm pieces
2/3 slices of thick cut ham, shredded thinly
crusty bread with butter, to serve.

Method :


1.  Melt the butter in a deep saucepan and add the olive oil.


2.  Add the onion and saute until transparent (around 5 minutes on a light/medium heat) - do not let the onion brown at all.


3.  Add the carrots and stir to combine.  Allow to cook for 4-5 minutes.


4.  Add the potato and celeriac and stir to combine.  Allow to cook until the heat appears to have penetrated the mass.


5.  Add the stock and as much of the milk as it takes to cover the vegetables.  Season to taste, being careful of the amount of salt that the stock may have brought.


6.  Bring to the boil, then reduce the heat and simmer for 5 minutes.


7.  Test a piece of potato.  If it is well on it's way to being cooked, add the fennel - but not the frondy fennel herb.  Continue simmering until the carrot is within minutes of being cooked.


8.  Add the asparagus and the fennel herb, stir to combine and simmer until the asparagus is done (around 2-3 minutes).

9.  Using a stick blender, whizz the soup until the majority of the cubes are pulverised, then add water until it becomes the consistency you are happy with.

10.  If you are using the  ham, add it now by either resting it on top of the soup, or mixing it in.


11.  Serve in deep warmed bowls, with crusty bread and butter.


Scrumptious!


.

8 September 2010

Scotch Broth

I won't wax lyrical about this soup, as I intend writing about it in my blog post for the Bournemouth Echo's "Taste" pages and don't want to bore you by repeating myself, as happened last week.

Suffice to say, that this soup was a considerable experiment which worked brilliantly!

I adapted the recipe from a Readers' Digest tome - "Farmhouse Cookery - recipes from the country kitchen".  I will add that I didn't take 3-4 hours to make mine, as I didn't use a kilo of scrag end of neck!  *chuckle*

SCOTCH BROTH

Ingredients :

(In truth, apart from the lamb, pearl barley and onions, I bet you could make this with any vegetables you have to hand.  However, I followed the recipe as closely as I was able - so here it is.)

500g lamb mince (you could easily use casserole lamb, just cook the lamb with the onions and stock for around 1hr or until it is fairly tender, before adding the vegetables.  I used mince, as one member of my family is fat-phobic).
1 litre lamb stock
125g pearl barley
125g peas (the recipe recommends dried peas, soaked overnight. I used frozen.)
Bouquet garni
Salt & pepper
1 large leek, cleaned and sliced
1 small potato, peeled and diced
1 onion, finely chopped
A half a medium Swede, peeled and diced
2 large carrots, peeled and diced
125g cabbage, finely shredded
1 tbsp parsley, finely chopped
Cornflour, as necessary.

Method :

1.  Dry fry the mince until starting to frizzle and caramelise, drain the fat, remove and set aside.

2.  Fry the onion in a little of the lamb fat, until softened.

3.  Re-introduce the mince, then add the stock, barley, bouquet garni, leek, swede and carrots and simmer for as long as it takes for the vegetables and barley to be cooked.  (10+ minutes, for the barley).  Skim off any fat that rises to the surface.

4.  Add the cabbage and peas, adjust seasoning (I found it needed quite a lot of salt and pepper) and continue to simmer until the cabbage is cooked.

5.  Thicken with cornflour.

6.  Garnish with parsley.

Serve with crusty bread and a lot of time to eat it in.  You can't hurry the eating of this soup and it would be perfect for bonfire night when you're outdoors and need something hearty and warming.

Son's review is : "It was all good, except for the pearl barley".  But then, this was his first go at Pearl Barley!
Related Posts Plugin for WordPress, Blogger...