Over the last few months, my hubby has slowly taken agin the curry pastes that are widely available for home made curries. He's begun to find them very one-dimensional but more importantly to him, they don't taste of curry. Now this curry flavour is a very definite thing that we have yet to quite pin down, but this Jalfrezi got the closest to it in any curry for a long time. We're still not quite there, but as I liked this recipe a lot for its flavour and use of fresh vegetables, I thought I'd pass it on to you all.
This recipe doesn't result in a heavy, thickly sauced curry but one that is a lot lighter in texture and without the pools of oil that characterise so many curries these days. Oh and I'm really not sure how much of a Jalfrezi it really is, but I'm hoping that it is close at least. As it uses curry powder, my first word of warning is to make sure you are using a good curry powder. One which has a number of different flavours to it is by far and away the best. I have yet to find - and yes, I will admit that perhaps there is one somewhere - a supermarket own brand curry powder that would even remotely fit the bill. My favourite curry powders come from our local ethnic shop, where I'm hoping that the curry powders on offer are close to the "real thing", but are certainly a long way from bland.
Secondly, make sure to use tomatoes that have flavour. Vine ripened are the best of the supermarket choices, but it is worthwhile throwing in a few cherry tomatoes just to boost the profile a bit.
Lastly, make sure to leave yourself enough time. Once the tomatoes get cooking, you need time for them to cook down, then time for the juice to reduce and intensify the flavour. If you take the pot off the heat and think it's finished too soon, you'll just have a vaguely spicy tomato stew and not a curry. So, give yourself and your curry time to chuckle, burp and spit tiny blobs of curry into random spots in your kitchen, you'll be glad you did even if the clean up is tricky. (Of course, I could have got out the splatter guard which would have made sure no blobs escaped, but I was comfy and would have had to have moved. What can I tell you? ~shrug~).
From first putting the coconut oil into the wok, to calling everyone to attention in order to get them sat down and ready for the meal, my curry took around 50 minutes (with a good 30 minutes of chopping beforehand). So it's not an earth-shattering amount of time, but if you only have half an hour, you're going to be in tomato stew land. So leave sufficient time.
I really liked this curry. Hubby wasn't so enthused, but I've already told you about the quest for curryness that we're on there. When cooking it, I was concerned that it didn't have enough curry character, but as our son came home from college and immediately knew it was curry for dinner, I'm assuming it was just that my nose had got used to the aromas. It tasted good right from the off and really came together in the last 10 minutes, once the liquid had reduced and the proper curry sauce texture arrived. It was amazing the difference that reduction made to the overall flavour.
So, enough blathering and on with the recipe!
CHICKEN JALFREZI (serves 4)
Ingredients :
2 red peppers, one roughly chopped into chunks, the other sliced
1 large onion, half roughly chopped into chunks, the other half sliced
4 large garlic cloves, peeled and roughly chopped
1 tbsp coconut oil
3 boneless, skinless chicken breasts, sliced
a pinch of sea salt
4 heaped teaspoonfuls curry powder
1 heaped teaspoonful garam masala
a quarter of a teaspoonful of ground black pepper
2 very large sweet tomatoes, chopped
6 cherry tomatoes, quartered
1 tsp chicken stock powder (or 1 stock cube)
150ml hot water
1-2 tsp runny honey (optional)
10g butter (optional)
15g fresh coriander, chopped (reserve a little for garnish)
cooked white rice to serve.
Method :
Begin by placing the chunks of red pepper, the chunks of onion and the garlic into a food processor and blitz until a purée is achieved. Set this aside.
Next, heat the coconut oil in a large saucepan or wok until really quite hot and gently add the sliced chicken breasts and sprinkle with the sea salt. Spread the pieces across the pan and leave them to achieve a little colour, then turn and do the same again. The slices do not need to be cooked through at this stage.
Using a slotted spoon, remove the chicken to a bowl and reserve.
Add the sliced red pepper and sliced onion to the wok and cook, covered, for 5-6 minutes stirring half way through, until they have gained a little colour and begun to soften.
Add the puree to the wok, along with the curry powder, garam masala and black pepper. Stir well to combine and fry, stirring occasionally, until the juices are released and the mix has dried out considerably. This should take around 10 minutes if your wok heat is high enough.
Add the chopped tomatoes and stir through, along with the chicken stock and the water. Once combined, add the chicken pieces and stir through. Now this is where the patience is required. You need to have the pan hot enough that the tomatoes will cook and release their juices, then the juices (and the chicken stock) will reduce and the full flavour be created. You will start with a quite considerable quantity in the pan, but once everything has cooked down and reduced, the sauce will thicken and the liquid will evaporate.
Marginally before the sauce reaches its final few minutes, taste for the salt level and add a little more if necessary, but remember that there will be a little salt in the butter that if you're using, should be added now. Taste also for acidity and add the honey to your preference to correct that. If you consider there's no sweetening required, then don't use the honey.
Once everything is combined and happy to be there, the sauce is thick and there are no pools of water on the surface of the curry, then you're ready to serve.
Serve with plain white Basmati rice and sprinkle with the reserved chopped fresh coriander as garnish.
Printable version
Showing posts with label onion. Show all posts
23 February 2017
30 December 2015
Bacon with Red Pepper Pesto Pasta - done in a twinkling!
What a success this one proved to be! Mind you, I don't know why I'm sounding surprised because it uses three of my favourite things - bacon, mushrooms and Asda's ricotta & red pepper pesto. To my way of thinking, it was a winner before I even took my knife to the bacon. However, sometimes what seems like the perfect combination of ingredients turns out to leave a little to be desired in one way or another - but happily, not so here. Plus, of course, it has the added bonus of being simplicity itself to prepare.
Oh and as a little aside, have you noticed how often my food seems to turn out to be orange coloured? I don't try to make it that way, honest I don't, it seems as though my choice of ingredients has a marked lean towards the orange. But then, the menfolk grumble if there's too much green on the plate, grumble again if I serve them "brown food" and would justifiably grumble at being served black food, so aside from white I guess that just leaves the red/yellow/orange palette as there's not too many blue foods out there! So this one is following along in the tradition of being the seemingly man-friendly colour of orange.
Now, let me recommend to you Asda's little pot of Ricotta & Red Pepper pesto. This seemingly unassuming little jar contains one of the most delicious substances that I have used in everything from sandwiches to pasta. Along with the rich ricotta and flavoursome red pepper, it also has a sneaky little bite from red chilli that just makes it glorious. I would be very happy if you were all to rush out and buy some, love it and continue buying it, as that would mean it will stay around on the shelves for ever!
The pesto marries up with bacon perfectly, of course. The celery adds a welcome freshness that prevents the dish from becoming too heavy on the palate and the addition of the small amount of sour cream helps to loosen the pesto into a sauce without impinging on the flavour at all.
I call this one a very definite win. The empty bowls and enquiries as to whether there was any left, gave proof to that belief, too. As a mid-week, easy, relatively cheap dinner, you can't go wrong.
BACON WITH RED PEPPER PESTO PASTA (serves 3)
Ingredients :
1 tbsp olive oil
350g smoked back bacon, trimmed of fat and diced
1 large onion, diced finely
1 clove garlic, chopped finely
2 sticks of celery, diced finely
black pepper
half a tsp dried oregano
200g quartered mushrooms
190g jar red pepper & ricotta pesto
1 tbsp sour cream
200ml water
250g dried pasta shapes - tubes are good.
Method :
Heat the olive oil in a large deep sided frying pan and add the bacon. Fry over a high heat until all the moisture has evaporated and the bacon is cooked through.
Reduce the heat to moderate and add the onion, garlic and celery, along with a pinch of black pepper and the oregano. Fry until the onion is transparent and the celery is beginning to soften.
Add the mushrooms and continue to fry until they are beginning to soften.
Three quarters fill a large saucepan with water and add a pinch of salt. Bring to the boil and once boiling, add the dried pasta. Remember to give the pasta a stir every so often to ensure it's not sticking to the bottom of the pan. Cook for 10-12 minutes, or to manufacturer's instructions.
Add the contents of the pesto jar to the bacon mix, along with 100ml of water (you can use it to rinse out the pesto jar, so as to get every last little bit!) and stir to combine.
Once the ingredients are looking mixed, stir in the sour cream. Simmer on a very low heat until the pasta is ready. You may need to add a little more water from time to time to keep the mixture saucy.
Once the pasta is cooked, drain it well and return it to the hot saucepan. Take the bacon mixture and decant it on top of the pasta and stir gently, but thoroughly, through.
Serve in warmed bowls with some garlic bread to accompany.
Printable version
Oh and as a little aside, have you noticed how often my food seems to turn out to be orange coloured? I don't try to make it that way, honest I don't, it seems as though my choice of ingredients has a marked lean towards the orange. But then, the menfolk grumble if there's too much green on the plate, grumble again if I serve them "brown food" and would justifiably grumble at being served black food, so aside from white I guess that just leaves the red/yellow/orange palette as there's not too many blue foods out there! So this one is following along in the tradition of being the seemingly man-friendly colour of orange.
Now, let me recommend to you Asda's little pot of Ricotta & Red Pepper pesto. This seemingly unassuming little jar contains one of the most delicious substances that I have used in everything from sandwiches to pasta. Along with the rich ricotta and flavoursome red pepper, it also has a sneaky little bite from red chilli that just makes it glorious. I would be very happy if you were all to rush out and buy some, love it and continue buying it, as that would mean it will stay around on the shelves for ever!The pesto marries up with bacon perfectly, of course. The celery adds a welcome freshness that prevents the dish from becoming too heavy on the palate and the addition of the small amount of sour cream helps to loosen the pesto into a sauce without impinging on the flavour at all.
I call this one a very definite win. The empty bowls and enquiries as to whether there was any left, gave proof to that belief, too. As a mid-week, easy, relatively cheap dinner, you can't go wrong.
BACON WITH RED PEPPER PESTO PASTA (serves 3)
Ingredients :
1 tbsp olive oil
350g smoked back bacon, trimmed of fat and diced
1 large onion, diced finely
1 clove garlic, chopped finely
2 sticks of celery, diced finely
black pepper
half a tsp dried oregano
200g quartered mushrooms
190g jar red pepper & ricotta pesto
1 tbsp sour cream
200ml water
250g dried pasta shapes - tubes are good.
Method :
Heat the olive oil in a large deep sided frying pan and add the bacon. Fry over a high heat until all the moisture has evaporated and the bacon is cooked through.
Reduce the heat to moderate and add the onion, garlic and celery, along with a pinch of black pepper and the oregano. Fry until the onion is transparent and the celery is beginning to soften.
Add the mushrooms and continue to fry until they are beginning to soften.
Three quarters fill a large saucepan with water and add a pinch of salt. Bring to the boil and once boiling, add the dried pasta. Remember to give the pasta a stir every so often to ensure it's not sticking to the bottom of the pan. Cook for 10-12 minutes, or to manufacturer's instructions.
Add the contents of the pesto jar to the bacon mix, along with 100ml of water (you can use it to rinse out the pesto jar, so as to get every last little bit!) and stir to combine.
Once the ingredients are looking mixed, stir in the sour cream. Simmer on a very low heat until the pasta is ready. You may need to add a little more water from time to time to keep the mixture saucy.
Once the pasta is cooked, drain it well and return it to the hot saucepan. Take the bacon mixture and decant it on top of the pasta and stir gently, but thoroughly, through.
Serve in warmed bowls with some garlic bread to accompany.
Printable version
Labels:
Asda,
bacon,
celery,
garlic,
main course recipe,
midweek recipe,
onion,
pasta recipe,
red chilli,
Ricotta and Red Pepper Pesto,
simple recipe,
Smoked back bacon,
smoked bacon,
sour cream,
spirali pasta
25 February 2014
Bacon & Pesto Gnocchi - suspending disbelief
I've been going through a bit of a purple patch with my cooking lately again, in that I had lost my way a bit - well, a lot in fact. It happens that way sometimes. Eating is something that we HAVE to do, to keep operating and to stay as well as possible - but sometimes it can be just the most dull, time consuming and tedious thing imaginable. Add to that it being more than a little bit painful to complete and you have all the ingredients for a purple patch.
However, I hadn't lost my interest in all things culinary or my curiosity for new ingredients - so I knew I'd be back to it, if I just wound things back a bit and swung with the tide for a while. So here I am, quietly getting back into the swing of things. I didn't stop cooking, either - we just went through a few weeks of some fairly dull meals, incredibly unhealthy meals and some stellar and spectacularly gorgeous Sunday roasts. Well, it had to come out in some way or another - and I saved it all for Sundays. LOL
I will do a couple of posts detailing some of the Sunday meals we've had - as they deserve to spend some time in the spotlight.
Now don't go thinking that I'm back with dishes of Lark's tongue in aspic, or a new take on Lobster thermidor, far from it. For this week's menu plan (yes, I'm still doing those!) I've tried to come out of my default "meat and two veg" and venture into things - like today's Gnocchi - that I haven't cooked for ages because of lack of inspiration and enthusiasm.
So, all that aside, this evening's meal of Bacon & Pesto Gnocchi was a great start. We all love gnocchi and I had simply forgotten about it. After all, there are so many different ingredients out there, it is impossible to remember them all. Well, that's my excuse and I'm sticking to it. Like a hot gnocchi to an aluminium pan. *wink*
I can't claim this recipe as all my own work, the inspiration and basic idea came from a recipe on the U.K. & Ireland All Recipes site - which you can see here if you fancy having a look. I simply added a couple of extra ingredients - mushrooms and onion - to the recipe, to pad it out a little further and to increase the veggie quota.
I'm currently trying to eat mushrooms whenever I can, having read that folk who eat mushrooms and drink green tea (not necessarily together at the same time, but whatever floats your boat) stand considerably less chance of contracting cancer - of all sorts of types. Now it's not hard work to eat mushrooms and fairly easy to add a cup of green tea to my day, so that's what I've been doing.
This recipe really is simplicity itself. Now I approve of that, because not every recipe needs to take an aeon, involve every pan you possess and take you an hour to get over cooking. Far from it. It sounded easy - it's one of those "put stuff in the pan in order and cook on various heats, boil other stuff, combine the two" recipes. They get a big thumbs up from me.
The peppers do need chargrilling earlier in the day, but if you don't have the time or inclination to do this (it is well worth it though, as the flavour is so much better), you can use them ready done, out of a jar.
There are two odd things about the recipe, however. One is that it involves Philadelphia cream cheese - which isn't odd on its own, it's just that it uses Sweet Chilli Philadelphia. In a dish which is ostensibly Italian. ~scratches head~ Demands the suspension of disbelief to do it, but it's worth it! If it is any consolation, the Sweet Chilli version is one of the low fat types of Philadelphia, so it could be worse!
The second odd thing is the end colour - which, thanks to the green Pesto, is eccentric at best. Don't panic when you see it all combined in the pan before you add it to the gnocchi - the addition of the gnocchi helps to lighten the colour and if served with a green salad alongside, it kind of makes sense.
My menfolk liked it a lot - well, cheese and bacon? It'd have to go a long way to shake off a man's love for bacon. I was a little bit concerned that there wouldn't be enough for everyone, whereas the reality was that it was absolutely perfect. No leftovers and everyone was satisfied. Works for me!
So, having said all that, let's get on and make it shall we?
BACON & PESTO GNOCCHI (serves 3)
Ingredients :
1 red and 1 green pepper
1 onion, chopped finely
1 tbsp rapeseed or olive oil
300g smoked back bacon, chunkily chopped
4-5 chestnut mushrooms, sliced
500g potato gnocchi
3 heaped tsp green pesto (to taste)
3 dessertspoonfuls sweet chilli Philadelphia
1 generous handful of grated cheddar cheese.
Method :
1. If you are using your own home chargrilled peppers, some hours before you begin to make the dish, heat your grill to high and place the whole peppers under the grill. Leave them there for their skins to turn black and blister, turning them until they are completely charred. Cool for a moment, then pop into a freezer bag and seal the top. Condensation will form, which will enable their skins to be removed really easily - and they have such a gorgeous smokey taste.
2. So, place a large pan of salted water on to boil for the gnocchi.
3. While the water is heating, add the oil and the onion to a frying pan and cook gently until softened and just beginning to caramelise.
4. Add the bacon, which will cool the pan - so increase the temperature to cook the bacon until all the water has dispersed, then add the mushrooms and cook on until they have softened.
5. Add the peppers and heat them through - by which time the water should have boiled for the gnocchi, so in they go for their three minutes, or whatever the pack demands.
6. Add the pesto, Philadelphia and grated cheese to the frying pan and stir through until the cheddar has melted and the whole lot has combined. This is where you'll start getting a little bit worried about the colour. Do not despair!
7. As the gnocchi cook, lift them out with a slotted spoon, directly into the bacon mixture. Once they are all done, fold them through until everything is combined, check for seasoning and adjust if necessary - and serve.
I thoroughly recommend serving the gnocchi with a green side salad, which provides a lovely freshness to counteract the richness of the pesto and cheese. Perfect!
Printable version
However, I hadn't lost my interest in all things culinary or my curiosity for new ingredients - so I knew I'd be back to it, if I just wound things back a bit and swung with the tide for a while. So here I am, quietly getting back into the swing of things. I didn't stop cooking, either - we just went through a few weeks of some fairly dull meals, incredibly unhealthy meals and some stellar and spectacularly gorgeous Sunday roasts. Well, it had to come out in some way or another - and I saved it all for Sundays. LOL
I will do a couple of posts detailing some of the Sunday meals we've had - as they deserve to spend some time in the spotlight.
Now don't go thinking that I'm back with dishes of Lark's tongue in aspic, or a new take on Lobster thermidor, far from it. For this week's menu plan (yes, I'm still doing those!) I've tried to come out of my default "meat and two veg" and venture into things - like today's Gnocchi - that I haven't cooked for ages because of lack of inspiration and enthusiasm.
So, all that aside, this evening's meal of Bacon & Pesto Gnocchi was a great start. We all love gnocchi and I had simply forgotten about it. After all, there are so many different ingredients out there, it is impossible to remember them all. Well, that's my excuse and I'm sticking to it. Like a hot gnocchi to an aluminium pan. *wink*
I can't claim this recipe as all my own work, the inspiration and basic idea came from a recipe on the U.K. & Ireland All Recipes site - which you can see here if you fancy having a look. I simply added a couple of extra ingredients - mushrooms and onion - to the recipe, to pad it out a little further and to increase the veggie quota.
I'm currently trying to eat mushrooms whenever I can, having read that folk who eat mushrooms and drink green tea (not necessarily together at the same time, but whatever floats your boat) stand considerably less chance of contracting cancer - of all sorts of types. Now it's not hard work to eat mushrooms and fairly easy to add a cup of green tea to my day, so that's what I've been doing.
This recipe really is simplicity itself. Now I approve of that, because not every recipe needs to take an aeon, involve every pan you possess and take you an hour to get over cooking. Far from it. It sounded easy - it's one of those "put stuff in the pan in order and cook on various heats, boil other stuff, combine the two" recipes. They get a big thumbs up from me.
The peppers do need chargrilling earlier in the day, but if you don't have the time or inclination to do this (it is well worth it though, as the flavour is so much better), you can use them ready done, out of a jar.
There are two odd things about the recipe, however. One is that it involves Philadelphia cream cheese - which isn't odd on its own, it's just that it uses Sweet Chilli Philadelphia. In a dish which is ostensibly Italian. ~scratches head~ Demands the suspension of disbelief to do it, but it's worth it! If it is any consolation, the Sweet Chilli version is one of the low fat types of Philadelphia, so it could be worse!
The second odd thing is the end colour - which, thanks to the green Pesto, is eccentric at best. Don't panic when you see it all combined in the pan before you add it to the gnocchi - the addition of the gnocchi helps to lighten the colour and if served with a green salad alongside, it kind of makes sense.
My menfolk liked it a lot - well, cheese and bacon? It'd have to go a long way to shake off a man's love for bacon. I was a little bit concerned that there wouldn't be enough for everyone, whereas the reality was that it was absolutely perfect. No leftovers and everyone was satisfied. Works for me!
So, having said all that, let's get on and make it shall we?
BACON & PESTO GNOCCHI (serves 3)
Ingredients :
1 red and 1 green pepper
1 onion, chopped finely
1 tbsp rapeseed or olive oil
300g smoked back bacon, chunkily chopped
4-5 chestnut mushrooms, sliced
500g potato gnocchi
3 heaped tsp green pesto (to taste)
3 dessertspoonfuls sweet chilli Philadelphia
1 generous handful of grated cheddar cheese.
Method :
1. If you are using your own home chargrilled peppers, some hours before you begin to make the dish, heat your grill to high and place the whole peppers under the grill. Leave them there for their skins to turn black and blister, turning them until they are completely charred. Cool for a moment, then pop into a freezer bag and seal the top. Condensation will form, which will enable their skins to be removed really easily - and they have such a gorgeous smokey taste.
2. So, place a large pan of salted water on to boil for the gnocchi.
3. While the water is heating, add the oil and the onion to a frying pan and cook gently until softened and just beginning to caramelise.
4. Add the bacon, which will cool the pan - so increase the temperature to cook the bacon until all the water has dispersed, then add the mushrooms and cook on until they have softened.
5. Add the peppers and heat them through - by which time the water should have boiled for the gnocchi, so in they go for their three minutes, or whatever the pack demands.
6. Add the pesto, Philadelphia and grated cheese to the frying pan and stir through until the cheddar has melted and the whole lot has combined. This is where you'll start getting a little bit worried about the colour. Do not despair!
7. As the gnocchi cook, lift them out with a slotted spoon, directly into the bacon mixture. Once they are all done, fold them through until everything is combined, check for seasoning and adjust if necessary - and serve.
I thoroughly recommend serving the gnocchi with a green side salad, which provides a lovely freshness to counteract the richness of the pesto and cheese. Perfect!
Printable version
12 September 2013
Tonight's dinner : I cut my finger - does that make me a cook, now?
There is a train of thought in amongst the Shamanic fraternity that it takes a near death experience (preferably with lightning) in order to make a Shaman. So, I was wondering whether nearly taking the top of your finger off on a mandolin, qualifies you as a Cook with a capital "c"?
I'll go with a "yes", I think.
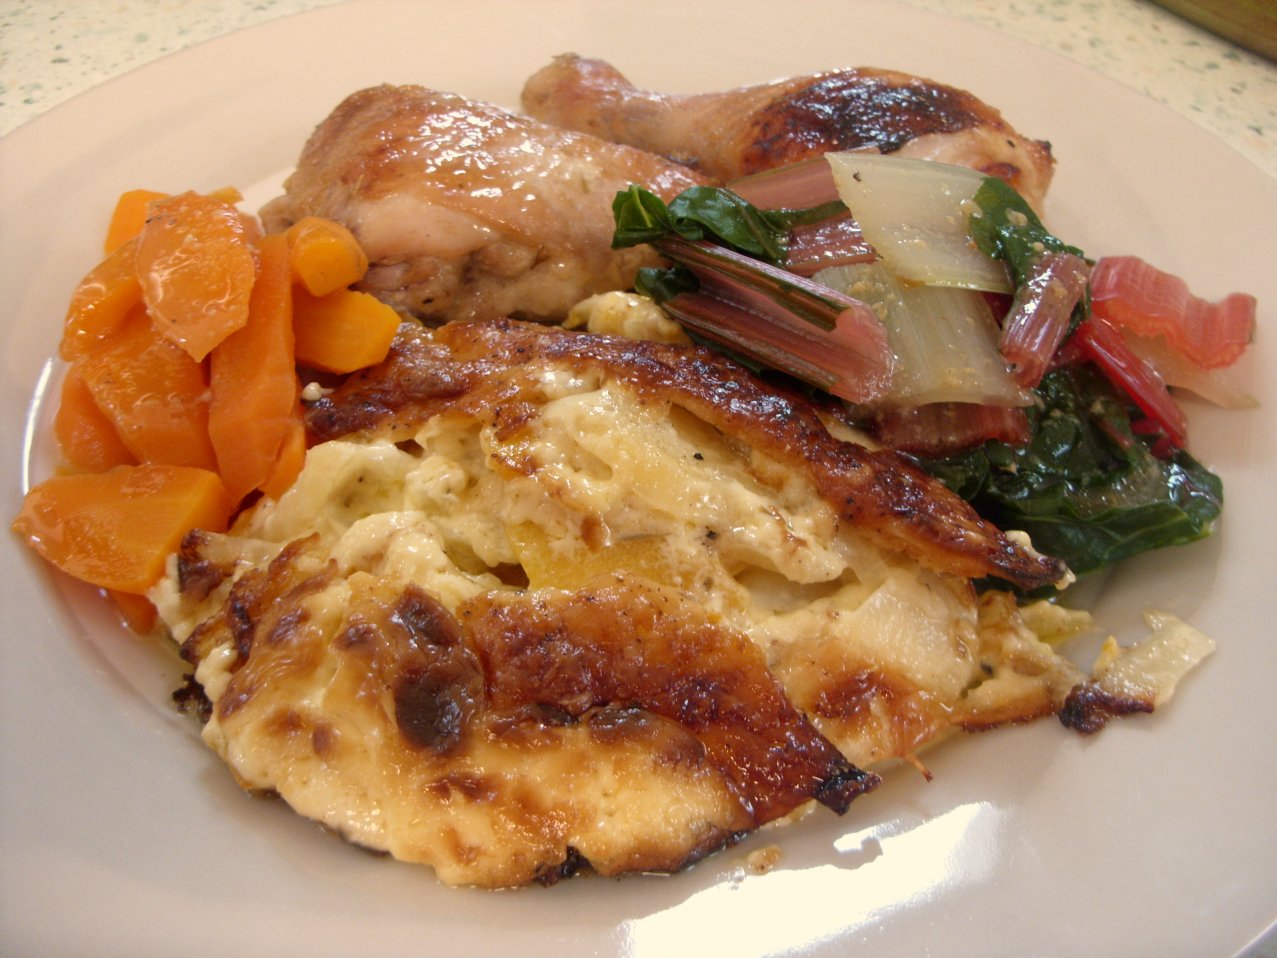
I was slicing parsnips and squash (beautiful parsnips and squash from thevegibox.com), to make this creamy parsnip & squash bake. Poor hubby and son & heir came back from walking the dogs, to find me hyperventilating whilst holding my right hand in the air with my little finger swathed in kitchen paper. Yes, it did leak - copiously. However, with the addition of a dressing, a plaster and a latex glove, I soldiered on like the brave likkle Cook that I now am.
Now, this 'ere bake very definitely deserves its own recipe post - so watch this space and it shall appear. It was utterly delicious, incredibly moreish and comfort food to the Nth degree. Like so many of my favourite recipes, it was so easy to make too! (Well, not counting the first aid requirement).
I partnered the bake up with some honey & mustard chicken (gorgeous) together with some steamed young carrots and rainbow chard from thevegibox.com. This was our first go with chard as a side veggie and combined with the cooking juices from the chicken, it was really good. It didn't taste how I was expecting it to - it has a definite spinach quality, whereas I was expecting more of a cabbage quality. Very nice!
The chicken was rolled around in some runny honey that I'd combined with Dijon mustard, a little dried thyme and a pinch of salt and pepper. It baked up well and provided some lovely juices that stood in well instead of having to make a gravy or jus.
The whole family enjoyed the meal and there were clear plates all round. Can't ask for more than that!
I'll go with a "yes", I think.
I was slicing parsnips and squash (beautiful parsnips and squash from thevegibox.com), to make this creamy parsnip & squash bake. Poor hubby and son & heir came back from walking the dogs, to find me hyperventilating whilst holding my right hand in the air with my little finger swathed in kitchen paper. Yes, it did leak - copiously. However, with the addition of a dressing, a plaster and a latex glove, I soldiered on like the brave likkle Cook that I now am.
Now, this 'ere bake very definitely deserves its own recipe post - so watch this space and it shall appear. It was utterly delicious, incredibly moreish and comfort food to the Nth degree. Like so many of my favourite recipes, it was so easy to make too! (Well, not counting the first aid requirement).
I partnered the bake up with some honey & mustard chicken (gorgeous) together with some steamed young carrots and rainbow chard from thevegibox.com. This was our first go with chard as a side veggie and combined with the cooking juices from the chicken, it was really good. It didn't taste how I was expecting it to - it has a definite spinach quality, whereas I was expecting more of a cabbage quality. Very nice!
The chicken was rolled around in some runny honey that I'd combined with Dijon mustard, a little dried thyme and a pinch of salt and pepper. It baked up well and provided some lovely juices that stood in well instead of having to make a gravy or jus.
The whole family enjoyed the meal and there were clear plates all round. Can't ask for more than that!
23 August 2013
Chicken & Sweet Potato Curry
It had been a while since I'd made a curry from scratch when I decided to do this one.
Oh for sure we'd had curry, but they were usually "quickie" versions using a curry paste from a jar, as opposed to concocting the spicing myself. I thought it was probably about time I had another go at it, before I forgot how to do it altogether!
Chicken was the obvious - and most forgiving - choice of meat to use. You'd have to go some to let the meat spoil a curry using chicken, whereas with a prawn curry you can wind up with it being too thin and watery with leathery prawns and a beef curry is rife with problems such as the beef not being tender enough. So, in order to concentrate on the spicing and not have to worry about the meat, chicken was the best option.
I'd decided to use sweet potato as the vegetable input. It had been a while since we'd had sweet potato and it was an apparently good choice with chicken, as I'd seen a number of recipes for it in my travels. I know that hubby likes a sweet curry, because his choice from the takeaway is often one of the sweeter curries, such as Pathia or Dhansak. Anyway, sweet potato is very good for you, so I didn't need any further encouragement than that.
I didn't have any particular direction in mind for this curry, other than "sweet" and "not coconutty". We've been having a lot of curries that utilised coconut milk and so I was keen to get away from that style - for a change.
As a result, I sort of built this curry as I went along. Now I know - from bitter experience - that this can often result in disaster. However, this time, I managed to rein in my more random impulses to put a bit of this in or a bit of that in - and kept it logical. In the back of my mind I had my friend Jasvinder Singh's Facebook page - The Food Court - playing back to me all the curries he has posted to it, their methods and spices particularly. I honestly think that I have learned an enormous amount from him as regards spicing curries, not to mention what I've learned from watching Yotam Ottolenghi's bold spicing of his food.
Interestingly, I knew this was going to be a great curry from a very early stage. In fact, I think it was as early as the cooking the onions. The combination of onion frying in groundnut oil with the addition of the cinnamon sticks, just smells so fabulous. Each additional ingredient just made it better, until a taste confirmed that yes - this was going to be a great curry.
The nice thing about this curry is that you can decide just how chilli hot you would like it to be by reducing or increasing the chilli, or how thick you like the sauce by cutting out the reduction part. Any type of vegetable would do well with it, too. No need to keep to sweet potato. Chuck any little homeless vegetables in there and it will give them a very good job to do.
In fact, so good was this curry that hubby was heard to declare that it was nicer than any of the takeaway curries we've had since being in Dorset. In your face, Heart of India! *chuckle* All of which is an amazing accolade of course, except that it now means it's going to be even more difficult to convince him to go for an Indian takeaway - and that's difficult enough as it is!
CHICKEN & SWEET POTATO CURRY (serves 3-4)
Ingredients :
3 tbsp groundnut oil
1 onion, thickly sliced and 1 onion, chopped finely
2 cinnamon sticks 3" long
pinch of sea salt & freshly ground black pepper
3 cloves garlic, finely chopped
1 hot red chilli, chopped (including seeds)
1 tbsp tomato puree
2 heaped tsp ground cumin
2 heaped tsp ground coriander
half a dessertspoon of Madras curry powder
half a dessertspoon of Garam Masala
1 tsp paprika
2 heaped tsp ground turmeric
2 small sweet potatoes, cubed small
3 chicken breasts, sliced and chunked
500ml chicken stock (I used Essential Cuisine chicken stock powder)
1 dessertspoonful of Kasuri Methi (fenugreek) leaves
2 tsp sugar
3 tbsp full fat plain yoghurt
10g butter.
Method :
1. Add the groundnut oil to a large wok or deep frying pan. Heat until a slice of onion causes the fat to pop and spit, then add all the onion and stir fry until lightly golden brown. Part way through, stir in a pinch of salt and freshly ground black pepper plus the two cinnamon sticks.
2. Reduce the heat, and add the garlic and chilli, continuing to stir fry for another minute.
3. Add the tomato puree, ground cumin, ground coriander, curry powder, Garam Masala and paprika. Stir through and continue to cook until the moisture has all left the tomato puree mixture and the oil is visible around the edges.
4. Add the ground turmeric and stir through, then increase the heat and add the sweet potatoes and chicken pieces. Continue to cook until the chicken has turned opaque but isn't cooked through.
5. Add the chicken stock and gently stir until completely combined. Add the fenugreek and stir through, then leave to reduce and develop the curry sauce. Stir every five minutes or so, to ensure nothing is sticking to the bottom of the pan.
You should see the sauce turn from a fairly watery mixture, to a thickened and proper curry looking sauce, albeit still slightly thin. The content will have reduced by just over half and the sauce should be coating the sweet potatoes and chicken nicely.
6. Taste for sweetness and salt - the sweet potato will be pretty much cooked by now and releasing its sweetness into the sauce. Add sugar if necessary until you achieve the kind of sweetness you like and if necessary add a pinch more salt.
7. Stir in the plain yoghurt and mix in quickly. Don't panic if it appears to split, as it will melt into the sauce in the last few minutes of cooking. Add the butter and allow to melt. Continue stirring and simmering - and reducing - the sauce (as the addition of the yoghurt will have liquified it a little) until you are happy with its consistency.
Serve with some steamed white rice.
Printable version
Oh for sure we'd had curry, but they were usually "quickie" versions using a curry paste from a jar, as opposed to concocting the spicing myself. I thought it was probably about time I had another go at it, before I forgot how to do it altogether!
Chicken was the obvious - and most forgiving - choice of meat to use. You'd have to go some to let the meat spoil a curry using chicken, whereas with a prawn curry you can wind up with it being too thin and watery with leathery prawns and a beef curry is rife with problems such as the beef not being tender enough. So, in order to concentrate on the spicing and not have to worry about the meat, chicken was the best option.
I'd decided to use sweet potato as the vegetable input. It had been a while since we'd had sweet potato and it was an apparently good choice with chicken, as I'd seen a number of recipes for it in my travels. I know that hubby likes a sweet curry, because his choice from the takeaway is often one of the sweeter curries, such as Pathia or Dhansak. Anyway, sweet potato is very good for you, so I didn't need any further encouragement than that.
![]() |
| Hubble, bubble, curry on the way! |
I didn't have any particular direction in mind for this curry, other than "sweet" and "not coconutty". We've been having a lot of curries that utilised coconut milk and so I was keen to get away from that style - for a change.
As a result, I sort of built this curry as I went along. Now I know - from bitter experience - that this can often result in disaster. However, this time, I managed to rein in my more random impulses to put a bit of this in or a bit of that in - and kept it logical. In the back of my mind I had my friend Jasvinder Singh's Facebook page - The Food Court - playing back to me all the curries he has posted to it, their methods and spices particularly. I honestly think that I have learned an enormous amount from him as regards spicing curries, not to mention what I've learned from watching Yotam Ottolenghi's bold spicing of his food.
Interestingly, I knew this was going to be a great curry from a very early stage. In fact, I think it was as early as the cooking the onions. The combination of onion frying in groundnut oil with the addition of the cinnamon sticks, just smells so fabulous. Each additional ingredient just made it better, until a taste confirmed that yes - this was going to be a great curry.
The nice thing about this curry is that you can decide just how chilli hot you would like it to be by reducing or increasing the chilli, or how thick you like the sauce by cutting out the reduction part. Any type of vegetable would do well with it, too. No need to keep to sweet potato. Chuck any little homeless vegetables in there and it will give them a very good job to do.
In fact, so good was this curry that hubby was heard to declare that it was nicer than any of the takeaway curries we've had since being in Dorset. In your face, Heart of India! *chuckle* All of which is an amazing accolade of course, except that it now means it's going to be even more difficult to convince him to go for an Indian takeaway - and that's difficult enough as it is!
CHICKEN & SWEET POTATO CURRY (serves 3-4)
Ingredients :
3 tbsp groundnut oil
1 onion, thickly sliced and 1 onion, chopped finely
2 cinnamon sticks 3" long
pinch of sea salt & freshly ground black pepper
3 cloves garlic, finely chopped
1 hot red chilli, chopped (including seeds)
1 tbsp tomato puree
2 heaped tsp ground cumin
2 heaped tsp ground coriander
half a dessertspoon of Madras curry powder
half a dessertspoon of Garam Masala
1 tsp paprika
2 heaped tsp ground turmeric
2 small sweet potatoes, cubed small
3 chicken breasts, sliced and chunked
500ml chicken stock (I used Essential Cuisine chicken stock powder)
1 dessertspoonful of Kasuri Methi (fenugreek) leaves
2 tsp sugar
3 tbsp full fat plain yoghurt
10g butter.
Method :
1. Add the groundnut oil to a large wok or deep frying pan. Heat until a slice of onion causes the fat to pop and spit, then add all the onion and stir fry until lightly golden brown. Part way through, stir in a pinch of salt and freshly ground black pepper plus the two cinnamon sticks.
2. Reduce the heat, and add the garlic and chilli, continuing to stir fry for another minute.
3. Add the tomato puree, ground cumin, ground coriander, curry powder, Garam Masala and paprika. Stir through and continue to cook until the moisture has all left the tomato puree mixture and the oil is visible around the edges.
4. Add the ground turmeric and stir through, then increase the heat and add the sweet potatoes and chicken pieces. Continue to cook until the chicken has turned opaque but isn't cooked through.
5. Add the chicken stock and gently stir until completely combined. Add the fenugreek and stir through, then leave to reduce and develop the curry sauce. Stir every five minutes or so, to ensure nothing is sticking to the bottom of the pan.
You should see the sauce turn from a fairly watery mixture, to a thickened and proper curry looking sauce, albeit still slightly thin. The content will have reduced by just over half and the sauce should be coating the sweet potatoes and chicken nicely.
6. Taste for sweetness and salt - the sweet potato will be pretty much cooked by now and releasing its sweetness into the sauce. Add sugar if necessary until you achieve the kind of sweetness you like and if necessary add a pinch more salt.
7. Stir in the plain yoghurt and mix in quickly. Don't panic if it appears to split, as it will melt into the sauce in the last few minutes of cooking. Add the butter and allow to melt. Continue stirring and simmering - and reducing - the sauce (as the addition of the yoghurt will have liquified it a little) until you are happy with its consistency.
Serve with some steamed white rice.
Printable version
16 July 2013
Pork steaks in satay style sauce
I blame this one on hubby. Of course, he'll say that I blame everything on him, but that's not exactly true. In reality, it's just most things. *chuckle* However, this one is all his fault, because he's been swerving my lovely pork steaks in mushroom sauce meal for weeks, eventually coming up with the suggestion that "you know what I'd really like? Pork done in a Satay style sauce". So I did some research and came up with this recipe, which worked very nicely.
In the course of my research, I discovered that there are three styles of satay sauce and each style harks from a different part of the world. One is the thick style that you would dip marinated and grilled chicken or pork on a stick into, another is a thinner, less robust but fiercely hotter version. I went for the Thai version, which seemed to suit my plans for the pork, better than any of the others.
For varying reasons that I won't bore you by going into here, I needed to poach or otherwise cook in liquid, the pork steaks so as to render them tender and ensure they weren't in any way dry. Now it made sense - in my mind if nobody else's - to capitalise on the meaty flavours by cooking the pork in the satay sauce. However, I knew that once the peanut butter is included, you have a very short time before it starts to catch on the bottom of the pan - and nobody likes a burned satay sauce.
So I could have seared the pork, cooked the onion and then poached the meat in stock - but then how would I have included the red Thai curry paste? The obvious answer was to sear the pork, cook the onion, add the curry paste, the stock (for which I used the beautiful chicken stock powder from Essential Cuisine) and coconut milk - and then poach the pork in the lovely curried coconut flavours. Basically, create a pork red Thai curry, then add the ingredients to turn it Satay.
Would you believe it, it worked. The poaching liquor, of onion, red Thai curry paste, chicken stock and coconut milk tasted divine and the pork steaks simmered away very happily until they were cooked through, staying moist and tender. I realised that, even with the Thai curry paste, the chilli heat wasn't going to survive the not-very-tender mercies of being hammered by a great dollop of peanut butter, so quickly added a teaspoonful of dried red chilli flakes to bolster the chilli ratio. After that, it was a simple matter of adding the peanut butter and the all-important cider vinegar.
Now, if you make this recipe, don't ever be tempted to leave the cider vinegar out. It is essential and changes your sauce from being a chilli/peanut combo, into a Satay sauce. It provides that sweet/sour thing that so many oriental dishes have. The coriander is optional, in that if you don't like it, it won't hurt the dish to leave it out. I have heard that sweet Thai basil would be good instead, but never having tried it can't recommend it. However, it's worth a go if you really dislike coriander.
One more thing, from the cook's perspective, is to make sure that you don't continue cooking and trying to reduce the sauce, once you've put the peanut butter in. As I've said up there ^^^ somewhere, it will burn easily but not only that the peanut butter releases its oil and you'll wind up with a pan full of oil with the over reduced, thickened sauce hiding somewhere underneath. At that point, all you can do is retrieve the meat and throw the sauce away. So, be sure that your meat is ready, before you add the peanut butter.
All the family were very happy with this recipe. Son & heir declared it to be "meaty, very very meaty!" (which is always a good thing in his book, as he's a young caveman in training). Hubby wasn't too struck on the pork, but loved the sauce and ventured the opinion that it would be as good if not better, with chicken or large prawns. By jingo, I think he's right, too! I loved the pork (predictably) and really enjoyed the sauce's relationship with the meat. I felt the flavours complemented each other very well. The sauce was also really good with the rice and I had designs upon decanting the leftovers of both into a bowl for lunch today, right up until I discovered that the remains of the sauce had done the releasing its oil thing and was unusable. Hey ho. I'll have to remember to cool it quickly the next time.
I also enjoyed the sugar snap peas with the pork and sauce. The rice is there to bulk out the meal, but the peas just added that light and refreshing crunch with accompanying sweetness, making them a perfect palate cleanser between mouthfuls. Now, where sugar snap peas are concerned, can I make a plea? Can everyone - restaurants included - please make an effort to remove the strings from either side of the pea pod? Please? It really only takes a second to do - and makes such a difference to the eating experience. Thanks. Appreciated. *wink*
So anyway, all in all, I'll be doing this one again!
PORK STEAKS IN SATAY STYLE SAUCE (serves 3)
Ingredients:
2 tbsp sunflower oil
6 pork steaks, trimmed of 95% of their fat (assuming 2 each)
1 onion, chopped finely
3 dessertspoonfuls of red Thai curry paste
400ml tin of coconut milk
200ml chicken stock
1 teaspoonful of dried red chilli flakes (to taste)
2 dessertspoonfuls of peanut butter
2 dessertspoonfuls of cider vinegar
sea salt & freshly ground black pepper
1 tbsp chopped fresh coriander.
Method :
1. In a deep frying pan or wok, heat the oil until really quite hot, then sear the pork steaks on both sides. Once the steaks are golden brown, remove and reserve to keep warm.
2. Add the onion to the pan and cook on a moderate heat until softened and golden brown.
3. Add the Thai curry paste and stir to combine. Cook for some 3-4 minutes until the oil is separating from the paste.
4. Add the coconut milk and stir well to combine. Make sure you get all the bits from the bottom of the pan, as these are all flavour.
5. Add the chicken stock and stir to combine.
6. Once the sauce is bubbling, return the pork steaks to the pan and simmer - uncovered - for some 10-15 minutes, or until the pork is cooked through. It is at this stage that you can taste the sauce and decide whether or not to add the dried red chilli flakes, but just remember that the peanut butter will do its best to wipe out every other flavour, so be brave!
7. Add the peanut butter and stir gently to combine. The sauce will thicken at this stage, so take care to stir regularly to prevent it catching on the bottom of the pan.
8. Add the cider vinegar, stir to combine. Give the vinegar 5 minutes or so to simmer and amalgamate with the other flavours, then taste for seasoning and adjust. I found the dish required a fair amount of salt, to bring out the flavours of the peanuts.
9. Just before serving, add the chopped coriander, saving a little back to sprinkle over the plated up dish.
Serve with plain white rice (basmati is good) and a light, green vegetable such as sugar snap peas.
Printable version
In the course of my research, I discovered that there are three styles of satay sauce and each style harks from a different part of the world. One is the thick style that you would dip marinated and grilled chicken or pork on a stick into, another is a thinner, less robust but fiercely hotter version. I went for the Thai version, which seemed to suit my plans for the pork, better than any of the others.
For varying reasons that I won't bore you by going into here, I needed to poach or otherwise cook in liquid, the pork steaks so as to render them tender and ensure they weren't in any way dry. Now it made sense - in my mind if nobody else's - to capitalise on the meaty flavours by cooking the pork in the satay sauce. However, I knew that once the peanut butter is included, you have a very short time before it starts to catch on the bottom of the pan - and nobody likes a burned satay sauce.
Would you believe it, it worked. The poaching liquor, of onion, red Thai curry paste, chicken stock and coconut milk tasted divine and the pork steaks simmered away very happily until they were cooked through, staying moist and tender. I realised that, even with the Thai curry paste, the chilli heat wasn't going to survive the not-very-tender mercies of being hammered by a great dollop of peanut butter, so quickly added a teaspoonful of dried red chilli flakes to bolster the chilli ratio. After that, it was a simple matter of adding the peanut butter and the all-important cider vinegar.Now, if you make this recipe, don't ever be tempted to leave the cider vinegar out. It is essential and changes your sauce from being a chilli/peanut combo, into a Satay sauce. It provides that sweet/sour thing that so many oriental dishes have. The coriander is optional, in that if you don't like it, it won't hurt the dish to leave it out. I have heard that sweet Thai basil would be good instead, but never having tried it can't recommend it. However, it's worth a go if you really dislike coriander.
One more thing, from the cook's perspective, is to make sure that you don't continue cooking and trying to reduce the sauce, once you've put the peanut butter in. As I've said up there ^^^ somewhere, it will burn easily but not only that the peanut butter releases its oil and you'll wind up with a pan full of oil with the over reduced, thickened sauce hiding somewhere underneath. At that point, all you can do is retrieve the meat and throw the sauce away. So, be sure that your meat is ready, before you add the peanut butter.
All the family were very happy with this recipe. Son & heir declared it to be "meaty, very very meaty!" (which is always a good thing in his book, as he's a young caveman in training). Hubby wasn't too struck on the pork, but loved the sauce and ventured the opinion that it would be as good if not better, with chicken or large prawns. By jingo, I think he's right, too! I loved the pork (predictably) and really enjoyed the sauce's relationship with the meat. I felt the flavours complemented each other very well. The sauce was also really good with the rice and I had designs upon decanting the leftovers of both into a bowl for lunch today, right up until I discovered that the remains of the sauce had done the releasing its oil thing and was unusable. Hey ho. I'll have to remember to cool it quickly the next time.
I also enjoyed the sugar snap peas with the pork and sauce. The rice is there to bulk out the meal, but the peas just added that light and refreshing crunch with accompanying sweetness, making them a perfect palate cleanser between mouthfuls. Now, where sugar snap peas are concerned, can I make a plea? Can everyone - restaurants included - please make an effort to remove the strings from either side of the pea pod? Please? It really only takes a second to do - and makes such a difference to the eating experience. Thanks. Appreciated. *wink*
So anyway, all in all, I'll be doing this one again!
PORK STEAKS IN SATAY STYLE SAUCE (serves 3)
Ingredients:
2 tbsp sunflower oil
6 pork steaks, trimmed of 95% of their fat (assuming 2 each)
1 onion, chopped finely
3 dessertspoonfuls of red Thai curry paste
400ml tin of coconut milk
200ml chicken stock
1 teaspoonful of dried red chilli flakes (to taste)
2 dessertspoonfuls of peanut butter
2 dessertspoonfuls of cider vinegar
sea salt & freshly ground black pepper
1 tbsp chopped fresh coriander.
Method :
1. In a deep frying pan or wok, heat the oil until really quite hot, then sear the pork steaks on both sides. Once the steaks are golden brown, remove and reserve to keep warm.
2. Add the onion to the pan and cook on a moderate heat until softened and golden brown.
3. Add the Thai curry paste and stir to combine. Cook for some 3-4 minutes until the oil is separating from the paste.
4. Add the coconut milk and stir well to combine. Make sure you get all the bits from the bottom of the pan, as these are all flavour.
5. Add the chicken stock and stir to combine.
6. Once the sauce is bubbling, return the pork steaks to the pan and simmer - uncovered - for some 10-15 minutes, or until the pork is cooked through. It is at this stage that you can taste the sauce and decide whether or not to add the dried red chilli flakes, but just remember that the peanut butter will do its best to wipe out every other flavour, so be brave!
7. Add the peanut butter and stir gently to combine. The sauce will thicken at this stage, so take care to stir regularly to prevent it catching on the bottom of the pan.
8. Add the cider vinegar, stir to combine. Give the vinegar 5 minutes or so to simmer and amalgamate with the other flavours, then taste for seasoning and adjust. I found the dish required a fair amount of salt, to bring out the flavours of the peanuts.
9. Just before serving, add the chopped coriander, saving a little back to sprinkle over the plated up dish.
Serve with plain white rice (basmati is good) and a light, green vegetable such as sugar snap peas.
Printable version
6 April 2013
Tapas meatballs in tomato & fennel sauce
It has been a long old trail to this recipe, if I'm honest.
I now have a reputation (in the family - not globally, you understand), for being a master meatball maker. This is something of a turnaround from the days when I would suggest meatballs for dinner and be greeted with lukewarm interest and the remark "well, you're not very good at meatballs". Let me tell you, though, that there have been many meatballs passed under the bridge between then and now.
I'm pretty sure that I told you in another meatball post how I really wanted to create a tapas-style meatball, able to be eaten on its own - tapas style - with a glass of wine and maybe some bread as accompaniments.
Well, with tonight's "I really must make something with that lamb mince and that fennel, before they both go off" dinner, I think I achieved it.
I used lamb mince for its superb flavour, but I'm sure it would work as well with pork mince. Beef might be a tad too flavoursome for the fennel, but I imagine that turkey would work, although you'd lose some of the savouriness of the flavour. Anyway, give it a go with whatever you've got - and let me know!
I recently made some lamb meatballs that involved fresh mint and grated carrot. Now I was a bit dubious about the grated carrot, but I liked the idea of the sweetness it would bring, plus the added moistness. One of the big problems with meatballs, is keeping them moist and juicy. Nobody likes a dry, pasty meatball.
So when I was contemplating what to do with this lamb mince in conjunction with the fennel, I remembered the carrot meatballs and how successful they were. Carrot was a definite, but I pondered on adding some of the fennel to the meatball mix. Maybe if I grate some of the tougher, woody stems? No - they probably wouldn't cook quickly enough even with being grated. It needed something smaller and more tender. The bulb I was definitely going to slice and put in the sauce - which left the green, ferny, frondy bits that taste so good in a much milder way and are more of a herb than the bulb. If I chopped them finely, they would be perfect in the meatballs! Sorted.
The recipe I used for the meatballs with carrot, also rolled them in seasoned flour which when browned gave the meatballs a lovely tasty coating that then dissolved a little in the sauce, thickening it as it went. This solves the problem of "do I reduce the sauce further, or do I serve it thinner than I wanted, or shall I thicken it somehow?", so that method was a definite here too.
The sauce couldn't be any easier. It gave me an excuse to use two cloves of garlic (we could use some garlic about the place, as we have cold and sore throat germs floating around!) and use up a long lost rasher of bacon. Incidentally, the bacon - because it is cut into such fine strips - just melts away into the sauce lending it a special kind of saltiness and smokiness that you can't get any other way. Yummy.
Now, a cook's tip is to watch the amount of salt you use in the seasoning of the flour and the meatballs. Because you're using the bacon and if you're using a stock powder or cube that isn't reduced salt, you need to rein your salt sprinkling back. This is why I recommend to taste before serving and adjust then if necessary. You can't take it out if there's too much there to begin with! I used the beautiful Essential Cuisine Lamb Stock powder which is naturally low in salt and saves any need for worrying. Check out their website, as the fabulous stock powders really aren't expensive and last for absolutely ages - well, apart from the chicken version which disappeared at the rate of knots!
Son and heir was out on a sleepover and missed this one. He's going to be very cross about that when he finds out, as this was his perfect kind of dinner. Hubby thoroughly enjoyed his, even though he is poorly at the moment (see earlier comment about sore throat germs) and ate the lot, which he was seriously dubious about doing before he tasted it. As for me, well I was busy congratulating myself over - finally - making the elusive tapas style meatballs, but I did pause to note that it tasted as good as I wanted it to - if not better.
TAPAS MEATBALLS IN TOMATO & FENNEL SAUCE (serves 3-4)
Ingredients :
600g lamb mince
1 medium carrot, top & tailed and grated
sea salt & black pepper
1 onion, chopped fine
1 rasher of smoked bacon, cut into fine strips
2 cloves garlic, chopped fine
1 bulb of fennel, sliced finely and
1 tbsp fennel frondy tops, chopped finely
2 tbsp seasoned plain flour
1 tbsp rapeseed oil
500ml good quality tomato passata
1 tbsp tomato ketchup
1 tsp of powder or half a cube of lamb stock
100ml cold water.
Method :
1. It is very worthwhile making sure you have all the vegetables prepared before you roll the meatballs in flour, to avoid the meatballs sticking catastrophically to their plate.
2. In a large bowl, add the lamb mince, the grated carrot and the frondy parts of the fennel. Season with a little sea salt and a lot of black pepper and mix with your hands, making sure the component parts are all well combined.
3. Place the seasoned flour onto a large plate and begin to roll your meatballs. Larger meatballs will feed less people, smaller ones more people, so it is up to you what size you make them. Place each meatball onto the plate, roll in the flour and continue until you have run out of meatball mix.
4. Heat the rapeseed oil in a deep frying pan and add enough meatballs so that you aren't overcrowding the pan. You want the heat to stay moderately high so as to cook the outside of the meatballs, without burning and without stewing in their own juice. Cook the meatballs in batches, if necessary. It is not necessary to cook them all the way through at this stage, so remove to a clean plate as they are done.
5. Without wiping out the pan (you don't want to lose all that flavour), add the onion and bacon and cook on a moderate heat until the onion is transparent. This should take 3-4 minutes.
6. Add the garlic and cook, stirring well, for a minute.
7. Add the fennel slices and stir to combine. Cook until the fennel is beginning to demonstrate some softening.
8. Add the tomato passata, tomato ketchup, water and stock powder or cube. Stir well to combine, then put a lid on so as to allow some steam to escape but keep the heat in (half cocked, I call it!) and allow to simmer for 25-30 minutes, stirring occasionally.
9. Your sauce should have reduced a little and thickened a little. Try the fennel to see whether it is soft and cook on for a little longer if not. Taste for seasoning and adjust as necessary.
10. Serve into warmed bowls, with bread for dipping and a side salad if you wish.
Printable version
I now have a reputation (in the family - not globally, you understand), for being a master meatball maker. This is something of a turnaround from the days when I would suggest meatballs for dinner and be greeted with lukewarm interest and the remark "well, you're not very good at meatballs". Let me tell you, though, that there have been many meatballs passed under the bridge between then and now.
I'm pretty sure that I told you in another meatball post how I really wanted to create a tapas-style meatball, able to be eaten on its own - tapas style - with a glass of wine and maybe some bread as accompaniments.
Well, with tonight's "I really must make something with that lamb mince and that fennel, before they both go off" dinner, I think I achieved it.
I used lamb mince for its superb flavour, but I'm sure it would work as well with pork mince. Beef might be a tad too flavoursome for the fennel, but I imagine that turkey would work, although you'd lose some of the savouriness of the flavour. Anyway, give it a go with whatever you've got - and let me know!
I recently made some lamb meatballs that involved fresh mint and grated carrot. Now I was a bit dubious about the grated carrot, but I liked the idea of the sweetness it would bring, plus the added moistness. One of the big problems with meatballs, is keeping them moist and juicy. Nobody likes a dry, pasty meatball.
So when I was contemplating what to do with this lamb mince in conjunction with the fennel, I remembered the carrot meatballs and how successful they were. Carrot was a definite, but I pondered on adding some of the fennel to the meatball mix. Maybe if I grate some of the tougher, woody stems? No - they probably wouldn't cook quickly enough even with being grated. It needed something smaller and more tender. The bulb I was definitely going to slice and put in the sauce - which left the green, ferny, frondy bits that taste so good in a much milder way and are more of a herb than the bulb. If I chopped them finely, they would be perfect in the meatballs! Sorted.
The recipe I used for the meatballs with carrot, also rolled them in seasoned flour which when browned gave the meatballs a lovely tasty coating that then dissolved a little in the sauce, thickening it as it went. This solves the problem of "do I reduce the sauce further, or do I serve it thinner than I wanted, or shall I thicken it somehow?", so that method was a definite here too.
The sauce couldn't be any easier. It gave me an excuse to use two cloves of garlic (we could use some garlic about the place, as we have cold and sore throat germs floating around!) and use up a long lost rasher of bacon. Incidentally, the bacon - because it is cut into such fine strips - just melts away into the sauce lending it a special kind of saltiness and smokiness that you can't get any other way. Yummy.
Now, a cook's tip is to watch the amount of salt you use in the seasoning of the flour and the meatballs. Because you're using the bacon and if you're using a stock powder or cube that isn't reduced salt, you need to rein your salt sprinkling back. This is why I recommend to taste before serving and adjust then if necessary. You can't take it out if there's too much there to begin with! I used the beautiful Essential Cuisine Lamb Stock powder which is naturally low in salt and saves any need for worrying. Check out their website, as the fabulous stock powders really aren't expensive and last for absolutely ages - well, apart from the chicken version which disappeared at the rate of knots!
Son and heir was out on a sleepover and missed this one. He's going to be very cross about that when he finds out, as this was his perfect kind of dinner. Hubby thoroughly enjoyed his, even though he is poorly at the moment (see earlier comment about sore throat germs) and ate the lot, which he was seriously dubious about doing before he tasted it. As for me, well I was busy congratulating myself over - finally - making the elusive tapas style meatballs, but I did pause to note that it tasted as good as I wanted it to - if not better.
TAPAS MEATBALLS IN TOMATO & FENNEL SAUCE (serves 3-4)
Ingredients :
600g lamb mince
1 medium carrot, top & tailed and grated
sea salt & black pepper
1 onion, chopped fine
1 rasher of smoked bacon, cut into fine strips
2 cloves garlic, chopped fine
1 bulb of fennel, sliced finely and
1 tbsp fennel frondy tops, chopped finely
2 tbsp seasoned plain flour
1 tbsp rapeseed oil
500ml good quality tomato passata
1 tbsp tomato ketchup
1 tsp of powder or half a cube of lamb stock
100ml cold water.
Method :
1. It is very worthwhile making sure you have all the vegetables prepared before you roll the meatballs in flour, to avoid the meatballs sticking catastrophically to their plate.
2. In a large bowl, add the lamb mince, the grated carrot and the frondy parts of the fennel. Season with a little sea salt and a lot of black pepper and mix with your hands, making sure the component parts are all well combined.
3. Place the seasoned flour onto a large plate and begin to roll your meatballs. Larger meatballs will feed less people, smaller ones more people, so it is up to you what size you make them. Place each meatball onto the plate, roll in the flour and continue until you have run out of meatball mix.
4. Heat the rapeseed oil in a deep frying pan and add enough meatballs so that you aren't overcrowding the pan. You want the heat to stay moderately high so as to cook the outside of the meatballs, without burning and without stewing in their own juice. Cook the meatballs in batches, if necessary. It is not necessary to cook them all the way through at this stage, so remove to a clean plate as they are done.
5. Without wiping out the pan (you don't want to lose all that flavour), add the onion and bacon and cook on a moderate heat until the onion is transparent. This should take 3-4 minutes.
6. Add the garlic and cook, stirring well, for a minute.
7. Add the fennel slices and stir to combine. Cook until the fennel is beginning to demonstrate some softening.
8. Add the tomato passata, tomato ketchup, water and stock powder or cube. Stir well to combine, then put a lid on so as to allow some steam to escape but keep the heat in (half cocked, I call it!) and allow to simmer for 25-30 minutes, stirring occasionally.
9. Your sauce should have reduced a little and thickened a little. Try the fennel to see whether it is soft and cook on for a little longer if not. Taste for seasoning and adjust as necessary.
10. Serve into warmed bowls, with bread for dipping and a side salad if you wish.
Printable version
28 October 2012
Slow Cooker Braised Pulled Pork
Oh my goodness, but this Pulled Pork interest is turning up some cracking recipes!
This one came about because we just couldn't resist a piece of pork shoulder that had been marked down in Asda. Needless to say, we put it straight into the freezer and then worked out what to do with it.
There was some interest in keeping it for Christmas, but when we thought about Christmas, there didn't seem to be a space for it in our plans. Then, when son & heir's birthday hove into view and we needed to devote many pennies to that cause, we began to wonder what we had in the freezer that could be press-ganged into use. The obvious thing to do with the pork was to just roast it and have it for Sunday lunch.
However, because the BBQ pulled pork that I'd made was so good, I was interested in carrying it a little bit sideways and maybe not involving so many flavours, but letting the pork speak for itself.
It was a big old piece - around 2kg - and so it would be perfect for this, as we could dress the leftovers any way we wanted with additional flavours and so transform the piece of pork into several dishes.
So it was decided. I'd put the pork into the slow cooker with the normal collection of stock vegetables and we'd have a pulled pork roast dinner, then decide what to do with the rest another day.
Oh yes. That worked - it worked beautifully.
I put the pork into the slow cooker at around 9.30 a.m. - accompanied by the usual suspects of carrots, celery, garlic, onion, parsley etc. I kept the cooker on high all day, as it really was a very chunky piece of pork and I did want to pull it apart.
When it came time to remove the pork, my goodness but it was just falling apart. Because I'd left the thick fat along the top, this had been slowly rendering down all day and trickling through the meat, keeping it succulent and juicy.
Now normally, I'd run the stock through a sieve and throw away the stock veggies - which always hurt, as they look so soft and unctuous after cooking with the meat. It really is a wonder I hadn't thought of doing this myself - but I recently saw a lady on t.v. use a hand held blender to whizz the stock veggies into the stock for an incredibly tasty gravy. This fits so well with my "don't waste a thing!" ethos that I had resolved to do the same the first chance I got.
So I picked out the woody stems of the herbs, plus the garlic. I'm not that keen on heavily garlicked gravies and sauces - but feel free to leave them there if you try this and are very keen on garlic! The stock veggies didn't argue and disappeared into a lovely russet coloured, enriched stock - which tasted absolutely divine.
I added a little Essential Cuisine Veal stock powder (just a small teaspoonful) to help bring out the meatiness, plus a little salt and pepper and it was ready for thickening into a gorgeous gravy.
I've frozen another two helpings of the stock, one to go with the other half of the pork - which I've also frozen - and another which may very well become soup! Liquid gold!
The pork, with some gravy and a dot of apple sauce, was utterly gorgeous. No other word for it. Soft, tender, unctuous, well flavoured, sweet, savoury, tiny sour notes from the apples - just divine.
For me, this pork beat the BBQ version into a cocked hat. Given the choice, I'd have this one any day - and BBQ it up, if I wanted it to go that way!
So the next time you have a piece of pork shoulder that you don't know what to do with, either break out the slow cooker, or put it in the bottom of the oven on low for some 8 hours or so. You won't regret it!
SLOW COOKER BRAISED PULLED PORK (serves 6-7)
Ingredients :
2kg piece of pork shoulder, fat and skin on
1 large carrot, sliced thickly
2 large celery sticks, chopped into large pieces
2 garlic cloves, still in their jackets but bashed with the back of a knife
1 onion, peeled and cut into 4 quarters
1 bunch parsley (around 10g)
1 bunch tarragon (around 10g)
1 Knorr chicken stock pot
1 Knorr herb infusion stock pot
sea salt & black pepper
1 tsp veal stock powder (optional)
cornflour.
Method :
1. Fairly early in the morning, place the carrot pieces into the bottom of the slow cooker to form a trivet.
2. Place the pork - skin side up - on the carrots.
3. Throw the remaining ingredients except the stock pots, into the slow cooker with gay abandon.
4. Make up the two stock pots (together in the same jug) with 800g hot water and decant into the slow cooker.
5. Sprinkle the top of the pork with a tiny pinch of sea salt and a whole heap of black pepper.
6. Put the lid on, turn it on to High and forget about it for the next 7 hours.
7. Remove the lid and place the pork onto a warmed plate. Cover with tin foil and leave to rest while you deal with the stock.
8. Remove the garlic (unless you're particularly keen on garlicky gravy!) and the woody stems of the herbs and discard.
9. Blitz with a hand-held blender until all the vegetables have disappeared.
10. Decant as much of the stock as you anticipate you'll need for gravy into a saucepan. the remainder can be cooled and frozen for use another day.
11. To thicken the gravy, use approximately 1 tablespoonful of cornflour per third of the quantity of the stock. So, if you're using all the stock, you'll need around 3 tablespoonfuls. I used a third of the stock, so I used just the one tablespoonful. Slake the cornflour with a little water, until you have a runny paste.
12. Pour half the cornflour mixture into the gravy and begin to heat it through to a simmer, whisking all the time to prevent the gravy forming lumps. Once it has thickened, you will be able to know how much of the remainder of the cornflour you will need to obtain your preferred thickness.
13. Once the gravy is done, uncover the pork and carefully remove the skin and thick fat. (You can hang this fat from the nearest tree for the birdies, once it has cooled. It's also good entertainment for the local cats and dogs - who will sit beneath it trying to exercise telekinesis in order to get at it). Begin to pull the meat apart into shreds. This is a perfect opportunity to remove any lumpy bits of fat, which are quite unpleasant to discover on your fork.
14. You can serve this pork in any way you so desire. I served mine as part of a roast dinner.
Printable version
Subscribe to:
Posts (Atom)