You may not be altogether surprised to hear that the name of this meatloaf is one of my own devising. Of course, it's because the herbs involved are parsley, sage, rosemary and thyme. LOL
You see, I was after a midweek, no frills, relatively plain, good and savoury, tasty meatloaf that could be served with some denomination of potato dish and a selection of vegetables. A meat & three veg. meatloaf, if you like!
I used beef and pork mince in a two thirds/one third combination because the pork mince just serves to lighten the texture of the beef. Adding loads of extra flavours - mustard, herbs, onion & garlic granules - helped pep up the savouriness and my now indispensable method of draining off the cooking juices halfway through the cooking time as ever, resulted in a good firm loaf. I do so hate meatloaf that you could serve with a spoon. Gak!
Now you might be wondering why I used the onion & garlic granules instead of adding fresh onion and fresh garlic. Good question! I find that fresh onion has to be almost grated or minced, so as not to leave small pieces of quite firm, almost crunchy, onion behind in the mix. Some people might like that, but I'm not a fan. Grating or mincing the onion just serves to increase the liquid in the mix, which I pour off at half time anyway so its not a good method.
It's a similar thing with garlic. I'm allergic to raw garlic, so it has to be incredibly finely chopped to wind up cooked sufficiently for me. Hitting on a piece of semi raw garlic is so overpowering to the other flavours, that again, it's just not a good method for me. However, if I add onion and garlic granules - which are simply dehydrated and finely minced - I get all the benefit of the flavour and none of the drawbacks. It's a personal taste thing. If you like to find onion or garlic in your meatloaf, or have the time and energy to pre-cook and caramelise them, then by all means go ahead and use fresh!
Oh and I'm also assured that this meatloaf is fairly epic when used, cold, as part of a sandwich. Happy days!
SCARBOROUGH FAIRLY MEATLOAF (Serves 5)
Ingredients :
1 bread crust, blitzed into breadcrumbs
500g reduced fat beef mince
250g pork mince
1 large egg
1 heaped tsp wholegrain mustard
1 tbsp Worcestershire sauce
pinch of sea salt
pinch of ground black pepper
1 tsp onion granules
half a tsp garlic granules
1 tbsp fresh parsley, chopped fine (dried parsley would work too - use 1 tsp)
1 tsp dried sage
1 tsp dried rosemary
half a tsp dried thyme
1 tsp beef stock powder or 1 tsp Bovril.
Method :
Pre-heat your oven to 180degC/350degF/Gas 4.
Place all the ingredients into a large bowl and mix together well, using your hands. Try not to over-mix or the meatloaf will become tough, but ensure all the ingredients are distributed well across the mix.
Line a 1lb loaf tin with silver foil and pack the meatloaf mix in well. I find it best to put half in and press into the corners, pushing it well down and ensuring all air bubbles are out, before adding the second half and repeating the process.
Using your fingertips, create a small space along the edge of the mix between the loaf tin and the ingredients - a gutter, effectively! This will help when it comes to draining off the excess liquid, later.
Place onto the middle oven shelf and bake for 30 minutes.
Remove the meatloaf from the oven and carefully drain off any accumulated liquid. Take care not to let the loaf slip from within the tin, into the sink!
Place back into the oven for another 30 minutes.
Remove from the oven and, using the silver foil, pull the meatloaf from inside the loaf tin. Place onto a chopping board and carefully unwrap. Cut the meatloaf into slices and serve with mashed potato and seasonal vegetables of your choice.
Printable version
Showing posts with label thyme. Show all posts
25 October 2017
27 August 2017
Chicken in a Marsala & mustard cream sauce - as easy as winking!
Chicken in a Marsala & mustard cream sauce is quite probably my absolute favourite chicken dish from my repertoire. I've used Marsala wine, our home made Mead and even sherry in it, with excellent results for all three. I've also swapped out the wholegrain mustard for Dijon and loved that version too. So, it's a very flexible and forgiving recipe that provides incredibly yummy results.
Right at this moment, I'm on a white meat only diet following on from a really bad gout attack and I'm so glad that I remembered this one. Eating just chicken, turkey and white fish can get a bit ho hum, even after just a week. So it was nice to have chicken with a lovely unctuous, tasty sauce and I'm only surprised that I haven't got around to blogging it before now!
Another good thing about this recipe is that if you ever find yourself with no onions but a tub of cream in the fridge and chicken in the freezer, you're half way there. It's not often, these days, you find a recipe that doesn't include onion. I've often pondered on including a sauteed onion or maybe some garlic in the sauce but always reject the idea on the basis that the sauce is so good without it, why mess with perfection?
As for Cook's Notes, there's really only one you need to be aware of which is to monitor the temperature of the pan when you're frying the chicken. Of course, you don't want your chicken to burn, but equally you really don't want it to be more than a gentle golden brown or your sauce could end up a little bitter. It all depends on your particular pan. You know it best, so just keep your eye on it during the cooking.
Mmmmnnn, I could eat this all over again today if I had the chicken!
CHICKEN IN A MARSALA & MUSTARD CREAM SAUCE (serves 3)
Ingredients :
Right at this moment, I'm on a white meat only diet following on from a really bad gout attack and I'm so glad that I remembered this one. Eating just chicken, turkey and white fish can get a bit ho hum, even after just a week. So it was nice to have chicken with a lovely unctuous, tasty sauce and I'm only surprised that I haven't got around to blogging it before now!
Another good thing about this recipe is that if you ever find yourself with no onions but a tub of cream in the fridge and chicken in the freezer, you're half way there. It's not often, these days, you find a recipe that doesn't include onion. I've often pondered on including a sauteed onion or maybe some garlic in the sauce but always reject the idea on the basis that the sauce is so good without it, why mess with perfection?
As for Cook's Notes, there's really only one you need to be aware of which is to monitor the temperature of the pan when you're frying the chicken. Of course, you don't want your chicken to burn, but equally you really don't want it to be more than a gentle golden brown or your sauce could end up a little bitter. It all depends on your particular pan. You know it best, so just keep your eye on it during the cooking.
Mmmmnnn, I could eat this all over again today if I had the chicken!
CHICKEN IN A MARSALA & MUSTARD CREAM SAUCE (serves 3)
Ingredients :
3 boneless, skinless chicken breasts
a pinch of sea salt
1 tbsp olive or rapeseed oil
120ml Marsala wine (or Mead, or Sherry)
2 tsp wholegrain mustard
100ml water
1 tsp low salt chicken stock granules (or half a low salt stock cube)
a pinch of ground black pepper
1 tsp thyme
150ml double cream
1 tsp cornflour, let down with a small amount of water.
Method :
Trim each chicken breast of any gristle or fat, then slice each breast through horizontally from the thick end to the thin end, creating two thin halves.
Place the olive or rapeseed oil into a frying pan and heat until sizzly. Gently lay each chicken breast down - and leave it alone apart from to sprinkle with a small amount of sea salt. You are aiming to achieve some colour on the chicken breasts, so they will need to stay in one position until they achieve a lovely golden colour.
Flip each breast over onto the other side and again, leave it alone to cook and gain colour for another few minutes.
Remove the chicken to a warmed plate, it doesn't matter if it isn't quite cooked through - it will finish cooking once it is in the sauce.
Pour the wine into the pan and deglaze by stirring and releasing any crispy bits that may be stuck to the pan. All these are flavour!
Once the wine has reduced by half, add the mustard, water, stock granules, black pepper and thyme. Stir thoroughly to combine.
Add the cream and stir through, then return the chicken to the pan, together with any juices that have accumulated under the chicken. Stir gently and allow the sauce to simmer.
When you are satisfied that the chicken is cooked through, if necessary add the cornflour/water mix and stir to combine. Once the sauce has thickened to your preferred consistency, serve with a selection of steamed vegetables and new potatoes.
Printable version
1 tbsp olive or rapeseed oil
120ml Marsala wine (or Mead, or Sherry)
2 tsp wholegrain mustard
100ml water
1 tsp low salt chicken stock granules (or half a low salt stock cube)
a pinch of ground black pepper
1 tsp thyme
150ml double cream
1 tsp cornflour, let down with a small amount of water.
Method :
Trim each chicken breast of any gristle or fat, then slice each breast through horizontally from the thick end to the thin end, creating two thin halves.
Place the olive or rapeseed oil into a frying pan and heat until sizzly. Gently lay each chicken breast down - and leave it alone apart from to sprinkle with a small amount of sea salt. You are aiming to achieve some colour on the chicken breasts, so they will need to stay in one position until they achieve a lovely golden colour.
Flip each breast over onto the other side and again, leave it alone to cook and gain colour for another few minutes.
Remove the chicken to a warmed plate, it doesn't matter if it isn't quite cooked through - it will finish cooking once it is in the sauce.
Pour the wine into the pan and deglaze by stirring and releasing any crispy bits that may be stuck to the pan. All these are flavour!
Once the wine has reduced by half, add the mustard, water, stock granules, black pepper and thyme. Stir thoroughly to combine.
Add the cream and stir through, then return the chicken to the pan, together with any juices that have accumulated under the chicken. Stir gently and allow the sauce to simmer.
When you are satisfied that the chicken is cooked through, if necessary add the cornflour/water mix and stir to combine. Once the sauce has thickened to your preferred consistency, serve with a selection of steamed vegetables and new potatoes.
Printable version
18 December 2015
Sweet Potato & Chorizo soup - a smooth and exotic spoonful
A few weeks ago, I spotted a recipe for sweet potato and chorizo soup and I liked the idea of that combination. However, the recipe I saw didn't seem to have enough depth of flavour for a really tasty and satisfying soup.
I spent the next couple of weeks - on and off - thinking about the soup and how I could add more flavour to it, without detracting from the main two components. Ultimately, I didn't adjust the recipe radically - just added carrot, celery, rosemary and thyme, all of which served to round it out and add a few extra layers of flavour.
By the way, for those who are baffled by the mention of a "donkey" carrot, think of the kind of carrot that a donkey would like to receive. A great, big, chunky fat carrot not less than six inches long and preferably longer. Now THAT is a donkey carrot.
The original method underwent a bit of a re-think as well and the roasting of the sweet potato and carrot was a great idea. The original recipe had them cooked in the stock, however the roasting added an intensity to the flavour that you couldn't hope to gain any other way.
The use of olive oil instead of the original vegetable oil helped the flavours along, too. In fact, between the sweet potato, herbs and olive oil, if it wasn't for the Chorizo, it would have been a disgracefully healthy soup! *Phew* Thank goodness for Chorizo, eh?
I served this as a dinner soup and it was easily enough for the three of us. As a starter, it would definitely make sufficient for four.
As ever, if you are not using low salt stock, be careful about how much salt you include when seasoning. Far easier to add later, you certainly can't take it away!
Hubby pointed out that this soup would make a wonderful November soup for supping around a bonfire, or for warming cold hands around a hearty mugful. It certainly has got all the hallmarks for that! However or whenever you decide to sample it, I'm sure you'll love it as much as we did.
SWEET POTATO & CHORIZO SOUP (serves 3-4)
Ingredients :
1kg sweet potato, peeled and cut into large chunks
1 large donkey carrot, peeled and cut into large chunks
1-2 tbsp olive oil
sea salt & black pepper
200g cooking Chorizo sausage - 100g cut into quarters, 100g cut in half
1 red onion, diced finely
2 cloves garlic, chopped finely
1 stick of celery, diced finely
1 tsp dried rosemary
half tsp dried thyme
750ml hot water
2 tsp chicken stock powder (low salt) or 2 chicken stock cubes (low salt).
Method :
Place the sweet potato and carrot chunks onto a baking tray and drizzle with 1 tbsp olive oil. Season with sea salt & pepper and put into a pre-heated oven at 200degC/400degF/Gas 6 for 30 mins or until softened and just beginning to caramelise.
Remove from the oven and set aside.
Heat the remaining olive oil in a frying pan and fry the quartered Chorizo until crispy. Remove from the pan onto a plate and reserve to keep warm. This Chorizo will form your garnish.
Add the halved Chorizo to the pan next and fry until lightly coloured. Remove from the pan onto a plate and set aside.
Decrease the heat under the pan and remove some of the oil to a small dish. Reserve the oil in case you need to replace any - and you can use a little of the remainder to garnish once the soup is served.
Add the onion, garlic and celery to the pan, along with a pinch of salt and a good helping of black pepper. Fry until softened but not coloured. Part way through, add the rosemary and thyme.
Once softened, decant the contents of the pan into a large saucepan, add the sweet potato, carrot, hot water and chicken stock powder. Heat through and taste for seasoning but before simmering point blitz with a hand-held blender until smooth. Add the halved Chorizo and stir through. Simmer, without boiling, to heat the soup through. Taste for seasoning and adjust if necessary - I found my soup needed more black pepper at this stage.
Serve in warmed bowls and add a spoonful of the quartered Chorizo and a swirl of Chorizo oil as garnish and warm crusty bread (or fresh baked American biscuits) for dipping.
Printable version
I spent the next couple of weeks - on and off - thinking about the soup and how I could add more flavour to it, without detracting from the main two components. Ultimately, I didn't adjust the recipe radically - just added carrot, celery, rosemary and thyme, all of which served to round it out and add a few extra layers of flavour.
By the way, for those who are baffled by the mention of a "donkey" carrot, think of the kind of carrot that a donkey would like to receive. A great, big, chunky fat carrot not less than six inches long and preferably longer. Now THAT is a donkey carrot.
The original method underwent a bit of a re-think as well and the roasting of the sweet potato and carrot was a great idea. The original recipe had them cooked in the stock, however the roasting added an intensity to the flavour that you couldn't hope to gain any other way.
The use of olive oil instead of the original vegetable oil helped the flavours along, too. In fact, between the sweet potato, herbs and olive oil, if it wasn't for the Chorizo, it would have been a disgracefully healthy soup! *Phew* Thank goodness for Chorizo, eh?
I served this as a dinner soup and it was easily enough for the three of us. As a starter, it would definitely make sufficient for four.
As ever, if you are not using low salt stock, be careful about how much salt you include when seasoning. Far easier to add later, you certainly can't take it away!
Hubby pointed out that this soup would make a wonderful November soup for supping around a bonfire, or for warming cold hands around a hearty mugful. It certainly has got all the hallmarks for that! However or whenever you decide to sample it, I'm sure you'll love it as much as we did.
SWEET POTATO & CHORIZO SOUP (serves 3-4)
Ingredients :
1kg sweet potato, peeled and cut into large chunks
1 large donkey carrot, peeled and cut into large chunks
1-2 tbsp olive oil
sea salt & black pepper
200g cooking Chorizo sausage - 100g cut into quarters, 100g cut in half
1 red onion, diced finely
2 cloves garlic, chopped finely
1 stick of celery, diced finely
1 tsp dried rosemary
half tsp dried thyme
750ml hot water
2 tsp chicken stock powder (low salt) or 2 chicken stock cubes (low salt).
Method :
Place the sweet potato and carrot chunks onto a baking tray and drizzle with 1 tbsp olive oil. Season with sea salt & pepper and put into a pre-heated oven at 200degC/400degF/Gas 6 for 30 mins or until softened and just beginning to caramelise.
Remove from the oven and set aside.
Heat the remaining olive oil in a frying pan and fry the quartered Chorizo until crispy. Remove from the pan onto a plate and reserve to keep warm. This Chorizo will form your garnish.
Add the halved Chorizo to the pan next and fry until lightly coloured. Remove from the pan onto a plate and set aside.
Decrease the heat under the pan and remove some of the oil to a small dish. Reserve the oil in case you need to replace any - and you can use a little of the remainder to garnish once the soup is served.
Add the onion, garlic and celery to the pan, along with a pinch of salt and a good helping of black pepper. Fry until softened but not coloured. Part way through, add the rosemary and thyme.
Once softened, decant the contents of the pan into a large saucepan, add the sweet potato, carrot, hot water and chicken stock powder. Heat through and taste for seasoning but before simmering point blitz with a hand-held blender until smooth. Add the halved Chorizo and stir through. Simmer, without boiling, to heat the soup through. Taste for seasoning and adjust if necessary - I found my soup needed more black pepper at this stage.
Serve in warmed bowls and add a spoonful of the quartered Chorizo and a swirl of Chorizo oil as garnish and warm crusty bread (or fresh baked American biscuits) for dipping.
![]() |
| Canadian apple & cheddar biscuits - yum! |
5 December 2014
Sticky Marmalade Chicken - the one that (almost) got away!
Now, this is a bit of a departure for me where blogging recipes is concerned. Ordinarily, you see, I would get on with consigning a new recipe to paper almost as soon as I've put my knife and fork down. However, I first cooked this dish quite literally years ago - when I was blogging on Multiply. I cooked it again a few times over the years and in the meantime, started Rhubarb & Ginger. However, when I came to look for the recipe in the Recipe Index, I was astounded to see that I hadn't included it here!
Thank goodness - because I can't remember where I found the original recipe - I still had a copy of all my Multiply pieces and was able to find the recipe. I copied it over to Rhubarb & Ginger and then real life got in the way and I just didn't get around to blogging it properly.
So here I am fulfilling those good intentions of all those years ago - and getting on with it. I think that really does take the biscuit for procrastination, but perhaps we should skip lightly over that.
Now because I've cooked the recipe several times, I have had the benefit of trying it with both salad and cooked vegetables. I think - for all that the photographs are of the cooked vegetables version - my favourite version has to be the white rice and salad one. The use of the marmalady sauce as a dressing through the salad (so note, not a lettucy salad as the sauce/dressing is warm and will wilt anything less robust than rocket, spinach or watercress far too quickly) is just such a satisfying thing.
This is one of those dishes that you think is going to taste one way - but then it turns out to taste completely different. When imagining how it would taste, I forgot all about the garlic, chilli and thyme and the effect they would have. Although, I do think that how it tastes depends entirely upon what marmalade you use. If you go for a strongly flavoured, not so sweet one like the Oxford Vintage, then you'll wind up with a very strongly flavoured dish. However, something like Golden Shred will give you a much sweeter end result that you may find requires a dash of lemon juice to add the required acidity and is perhaps better for a younger palate. So in a way, you can tailor the results depending on what marmalade you use. I reckon that Rose's Lime Marmalade would be awesome with a dash of lemon juice, lemon zest and a sprinkle of ground ginger - however, I haven't tried that thought yet!
Anyway, we thoroughly enjoyed it - and its a 100% definite do-it-again.
If you decide to go with the rice version and want to be totally cheffy, you can make mounds of rice by lightly oiling the inside of a cup and packing the rice into it. Turn it upside down and bingo - cheffy mounds of rice!
The cooked vegetable version is good (and probably better, as we're in December and it's frosty outdoors!) however I'd stick with veggies that are compatible with Chinese style food. Things such as broccoli, green beans, carrots, peas - you can dress them up however you like, maybe add some chilli to your broccoli or (as I have done in the photographs), sesame seeds and a little butter to your green beans. However, be sure that your family enjoy citrus flavours with their potatoes! Not everyone enjoys this combination, although I think it's the proverbial bees knees.
Something else to bear in mind (I suppose these are the Cook's tips!) is the size of the pieces of peel in the marmalade, in relation to everyone's preference. My friend Marion, for instance, would need a marmalade that was totally bereft of "fishes", as she calls them. For me, the bigger the pieces, the better!
So there you are. Do have a go at this one - it's taken for ever to get to you and it really didn't deserve it!
STICKY MARMALADE CHICKEN (feeds 3)
Ingredients :
3 skinless, boneless chicken breasts, each cut into 3 similar sized pieces
sea salt & black pepper
2-3 tbsp cornflour
1 tbsp olive oil
300ml chicken stock
1 garlic clove, chopped
1 chilli, chopped
4 tbsp fine-cut well flavoured orange marmalade
1 tsp fresh thyme leaves, or half a tsp dried
juice of a quarter of a lemon, if necessary, to taste.
Method :
1. Place the chicken into a bowl and add the seasoning and cornflour. Toss the chicken until liberally coated.
2. Heat the oil in a frying pan and when hot, add the chicken pieces. Fry for 8-10 mins, until golden on all sides.
3. Reduce the heat, add the garlic and chilli and cook for 1 minute more.
4. Add the stock, marmalade and thyme. Stir through until the marmalade has dissolved, then simmer for 5 minutes or until the chicken is cooked through.
5. Remove the chicken and reserve to keep warm.
6. Boil the mixture hard to reduce to a syrupy sauce, serve the chicken and pour the sauce over the chicken.
Printable version
Thank goodness - because I can't remember where I found the original recipe - I still had a copy of all my Multiply pieces and was able to find the recipe. I copied it over to Rhubarb & Ginger and then real life got in the way and I just didn't get around to blogging it properly.
So here I am fulfilling those good intentions of all those years ago - and getting on with it. I think that really does take the biscuit for procrastination, but perhaps we should skip lightly over that.
Now because I've cooked the recipe several times, I have had the benefit of trying it with both salad and cooked vegetables. I think - for all that the photographs are of the cooked vegetables version - my favourite version has to be the white rice and salad one. The use of the marmalady sauce as a dressing through the salad (so note, not a lettucy salad as the sauce/dressing is warm and will wilt anything less robust than rocket, spinach or watercress far too quickly) is just such a satisfying thing.
This is one of those dishes that you think is going to taste one way - but then it turns out to taste completely different. When imagining how it would taste, I forgot all about the garlic, chilli and thyme and the effect they would have. Although, I do think that how it tastes depends entirely upon what marmalade you use. If you go for a strongly flavoured, not so sweet one like the Oxford Vintage, then you'll wind up with a very strongly flavoured dish. However, something like Golden Shred will give you a much sweeter end result that you may find requires a dash of lemon juice to add the required acidity and is perhaps better for a younger palate. So in a way, you can tailor the results depending on what marmalade you use. I reckon that Rose's Lime Marmalade would be awesome with a dash of lemon juice, lemon zest and a sprinkle of ground ginger - however, I haven't tried that thought yet!
Anyway, we thoroughly enjoyed it - and its a 100% definite do-it-again.
If you decide to go with the rice version and want to be totally cheffy, you can make mounds of rice by lightly oiling the inside of a cup and packing the rice into it. Turn it upside down and bingo - cheffy mounds of rice!The cooked vegetable version is good (and probably better, as we're in December and it's frosty outdoors!) however I'd stick with veggies that are compatible with Chinese style food. Things such as broccoli, green beans, carrots, peas - you can dress them up however you like, maybe add some chilli to your broccoli or (as I have done in the photographs), sesame seeds and a little butter to your green beans. However, be sure that your family enjoy citrus flavours with their potatoes! Not everyone enjoys this combination, although I think it's the proverbial bees knees.
Something else to bear in mind (I suppose these are the Cook's tips!) is the size of the pieces of peel in the marmalade, in relation to everyone's preference. My friend Marion, for instance, would need a marmalade that was totally bereft of "fishes", as she calls them. For me, the bigger the pieces, the better!
So there you are. Do have a go at this one - it's taken for ever to get to you and it really didn't deserve it!
STICKY MARMALADE CHICKEN (feeds 3)
Ingredients :
3 skinless, boneless chicken breasts, each cut into 3 similar sized pieces
sea salt & black pepper
2-3 tbsp cornflour
1 tbsp olive oil
300ml chicken stock
1 garlic clove, chopped
1 chilli, chopped
4 tbsp fine-cut well flavoured orange marmalade
1 tsp fresh thyme leaves, or half a tsp dried
juice of a quarter of a lemon, if necessary, to taste.
Method :
1. Place the chicken into a bowl and add the seasoning and cornflour. Toss the chicken until liberally coated.
2. Heat the oil in a frying pan and when hot, add the chicken pieces. Fry for 8-10 mins, until golden on all sides.
3. Reduce the heat, add the garlic and chilli and cook for 1 minute more.
4. Add the stock, marmalade and thyme. Stir through until the marmalade has dissolved, then simmer for 5 minutes or until the chicken is cooked through.
5. Remove the chicken and reserve to keep warm.
6. Boil the mixture hard to reduce to a syrupy sauce, serve the chicken and pour the sauce over the chicken.
Printable version
24 March 2014
Knock your socks off Bacon & Herb Stuffing
Why - on earth - haven't I made my own stuffing before now?
I reckon it's a combination of stuffing being one of those things that just floats around as an "also", an "add on" to a roast dinner and also my own bad experience with it as a youngster. You see, my Mum would often stuff (good old Paxo, the stuffing of choice for the millions) our Sunday chicken, which I remember vividly because I would be vaguely revolted by the colour of the stuffing that had sat in the (apologies) blood while the chicken was roasting. As a consequence, when the recommendation came out that you didn't stuff your chicken any longer owing to E-coli scares - and my Mum stopped - I wasn't unhappy about it.
So we got out of the habit of eating stuffing. It became something that we had at Christmas with the turkey - and only in the shape of stuffing balls that were baked in the oven.
When it came to making my own roast dinners, to include stuffing on the menu was just one step too many for a long time. Well, making a roast dinner is quite an undertaking one way and another. There's the timings, the vegetables, the roast potatoes, the gravy - everything has to be ready on time and it's a whole lot more complicated than making a spaghetti bolognese!
In fact, I didn't really bother with stuffing (the associations between sage & onion stuffing and hideous discoloured soggy breadcrumbs being too much to bear) until hubby came along and professed an undying love for the dish. By then, I'd managed to get a small grip on the mechanics of making a roast dinner - particularly a roast chicken - and it wasn't too difficult to mix up a packet of stuffing and bung it in the oven to cook alongside the rest. I didn't waste any love or attention on it though - and didn't particularly enjoy it on my dinner, either. Well - sage and onion again, you see.
It wasn't until I joined a couple of Facebook groups and saw other people were making home made stuffings, that I began to foster an interest in doing it myself.
This was a slow burning interest though, I have to admit. I'm fairly sure that those early days of sage and onion were still colouring the picture of "stuffing" that I had in my memory. I still hadn't put the idea that I could venture away from sage & onion, together with the concept of "stuffing". Now everyone knows that home made is very often better than shop bought packet mixes, but I was particularly slow on the uptake where this was concerned.
However, once it had dawned on me - and I noticed that I had half a packet of bacon sitting doing nothing one Sunday morning - the old grey matter got to work.
It was the perfect moment - I had a gorgeously huge, fat chicken to be roasted. I had my lovely oven dish to use. I had bacon. I had a good quantity of Polish Bakery bread to use for breadcrumbs and I had a profusion of both fresh and dried herbs in the house. Never had a moment been so propitious!
I didn't use a recipe - after all, people have been stuffing things for years by using whatever they had to hand. Yes, dear reader, I winged it. In a BIG way - and (pretty much) got away with it.
Even having put the stuffing together and knowing a) what was in it, plus b) how they went together, I still wasn't particularly keen on the idea. Oh I was interested in how it would come out and concerned that everyone would like it, but I wasn't anticipating liking it much myself. Oh, how wrong I was. I not only liked it, I loved it. I could have eaten the stuffing and dropped the chicken from my dinner - which is truly remarkable.
However, the stuffing came into its own the following day when I put together a cold roast chicken, stuffing and sweetcorn relish sandwich. Oh .. my .. word. Shoot me now, I'm all over happy.
I have one cook's tip for you with regard to this stuffing, which is not to use salt unless you are absolutely convinced that the bacon does not carry any of its own. Because the bacon becomes considerably reduced by the double cooking process, the saltiness of it is intensified. Additional salt just isn't necessary - particularly if you are using smoked bacon.
So, on the reckoning that where I came from others might follow and if you're one of those who was put off stuffing by - well, let's not go into it again, eh? - then find some lost bacon and give this a go with your next roast chicken. Then tell me you don't like stuffing. *grin*
KNOCK YOUR SOCKS OFF BACON & HERB STUFFING (serves 5-6)
Ingredients :
1-2 tbsp rapeseed or olive oil
1 onion, finely chopped
freshly ground black pepper
4-5 rashers of lean back smoked bacon, finely diced
3 slices crusty bread, slightly stale, chopped into chunky breadcrumbs
2 tbsp fresh parsley, finely chopped
1 tbsp fresh chives, finely chopped
1 tsp dried oregano
half a tsp dried thyme
half a tsp dried rosemary
1 large egg.
Method :
1. Heat the oil in a frying pan and cook the bacon and onion together until the onion is softened and beginning to turn golden. Add a pinch of black pepper, stir to combine then leave to cool slightly.
2. Once cooled, stir the breadcrumbs into the bacon & onion pan making sure to absorb the bacon fat.
3. Decant the contents of the bacon pan into a large bowl and add the remainder of the ingredients, including the egg.
4. Stir well to combine - until the egg cannot be traced.
5. Decant into an oven proof dish, level the surface and place into a pre-heated 180degC/350degF/Gas 4 oven for 25-30 minutes or until the surface is baked crispy.
Serve with your favourite roasted meats and vegetables, or cold the following day in a sandwich.
Printable version
I reckon it's a combination of stuffing being one of those things that just floats around as an "also", an "add on" to a roast dinner and also my own bad experience with it as a youngster. You see, my Mum would often stuff (good old Paxo, the stuffing of choice for the millions) our Sunday chicken, which I remember vividly because I would be vaguely revolted by the colour of the stuffing that had sat in the (apologies) blood while the chicken was roasting. As a consequence, when the recommendation came out that you didn't stuff your chicken any longer owing to E-coli scares - and my Mum stopped - I wasn't unhappy about it.
So we got out of the habit of eating stuffing. It became something that we had at Christmas with the turkey - and only in the shape of stuffing balls that were baked in the oven.
When it came to making my own roast dinners, to include stuffing on the menu was just one step too many for a long time. Well, making a roast dinner is quite an undertaking one way and another. There's the timings, the vegetables, the roast potatoes, the gravy - everything has to be ready on time and it's a whole lot more complicated than making a spaghetti bolognese!
In fact, I didn't really bother with stuffing (the associations between sage & onion stuffing and hideous discoloured soggy breadcrumbs being too much to bear) until hubby came along and professed an undying love for the dish. By then, I'd managed to get a small grip on the mechanics of making a roast dinner - particularly a roast chicken - and it wasn't too difficult to mix up a packet of stuffing and bung it in the oven to cook alongside the rest. I didn't waste any love or attention on it though - and didn't particularly enjoy it on my dinner, either. Well - sage and onion again, you see.
It wasn't until I joined a couple of Facebook groups and saw other people were making home made stuffings, that I began to foster an interest in doing it myself.
This was a slow burning interest though, I have to admit. I'm fairly sure that those early days of sage and onion were still colouring the picture of "stuffing" that I had in my memory. I still hadn't put the idea that I could venture away from sage & onion, together with the concept of "stuffing". Now everyone knows that home made is very often better than shop bought packet mixes, but I was particularly slow on the uptake where this was concerned.
However, once it had dawned on me - and I noticed that I had half a packet of bacon sitting doing nothing one Sunday morning - the old grey matter got to work.
It was the perfect moment - I had a gorgeously huge, fat chicken to be roasted. I had my lovely oven dish to use. I had bacon. I had a good quantity of Polish Bakery bread to use for breadcrumbs and I had a profusion of both fresh and dried herbs in the house. Never had a moment been so propitious!
I didn't use a recipe - after all, people have been stuffing things for years by using whatever they had to hand. Yes, dear reader, I winged it. In a BIG way - and (pretty much) got away with it.
Even having put the stuffing together and knowing a) what was in it, plus b) how they went together, I still wasn't particularly keen on the idea. Oh I was interested in how it would come out and concerned that everyone would like it, but I wasn't anticipating liking it much myself. Oh, how wrong I was. I not only liked it, I loved it. I could have eaten the stuffing and dropped the chicken from my dinner - which is truly remarkable.
However, the stuffing came into its own the following day when I put together a cold roast chicken, stuffing and sweetcorn relish sandwich. Oh .. my .. word. Shoot me now, I'm all over happy.
I have one cook's tip for you with regard to this stuffing, which is not to use salt unless you are absolutely convinced that the bacon does not carry any of its own. Because the bacon becomes considerably reduced by the double cooking process, the saltiness of it is intensified. Additional salt just isn't necessary - particularly if you are using smoked bacon.
So, on the reckoning that where I came from others might follow and if you're one of those who was put off stuffing by - well, let's not go into it again, eh? - then find some lost bacon and give this a go with your next roast chicken. Then tell me you don't like stuffing. *grin*
KNOCK YOUR SOCKS OFF BACON & HERB STUFFING (serves 5-6)
Ingredients :
1-2 tbsp rapeseed or olive oil
1 onion, finely chopped
freshly ground black pepper
4-5 rashers of lean back smoked bacon, finely diced
3 slices crusty bread, slightly stale, chopped into chunky breadcrumbs
2 tbsp fresh parsley, finely chopped
1 tbsp fresh chives, finely chopped
1 tsp dried oregano
half a tsp dried thyme
half a tsp dried rosemary
1 large egg.
Method :
1. Heat the oil in a frying pan and cook the bacon and onion together until the onion is softened and beginning to turn golden. Add a pinch of black pepper, stir to combine then leave to cool slightly.
2. Once cooled, stir the breadcrumbs into the bacon & onion pan making sure to absorb the bacon fat.
3. Decant the contents of the bacon pan into a large bowl and add the remainder of the ingredients, including the egg.
4. Stir well to combine - until the egg cannot be traced.
5. Decant into an oven proof dish, level the surface and place into a pre-heated 180degC/350degF/Gas 4 oven for 25-30 minutes or until the surface is baked crispy.
Serve with your favourite roasted meats and vegetables, or cold the following day in a sandwich.
Printable version
12 September 2013
Tonight's dinner : I cut my finger - does that make me a cook, now?
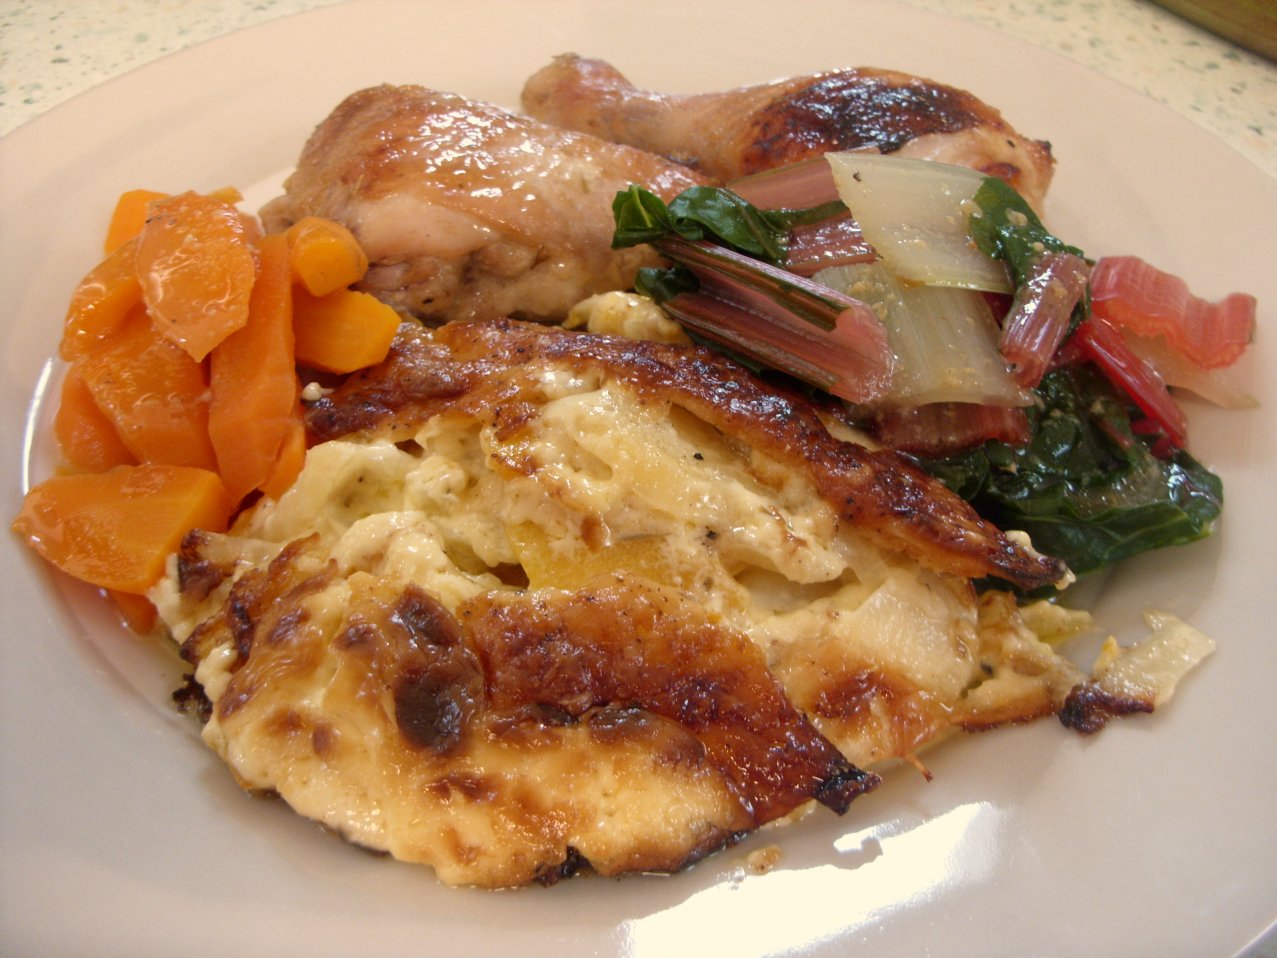
There is a train of thought in amongst the Shamanic fraternity that it takes a near death experience (preferably with lightning) in order to make a Shaman. So, I was wondering whether nearly taking the top of your finger off on a mandolin, qualifies you as a Cook with a capital "c"?
I'll go with a "yes", I think.
I was slicing parsnips and squash (beautiful parsnips and squash from thevegibox.com), to make this creamy parsnip & squash bake. Poor hubby and son & heir came back from walking the dogs, to find me hyperventilating whilst holding my right hand in the air with my little finger swathed in kitchen paper. Yes, it did leak - copiously. However, with the addition of a dressing, a plaster and a latex glove, I soldiered on like the brave likkle Cook that I now am.
Now, this 'ere bake very definitely deserves its own recipe post - so watch this space and it shall appear. It was utterly delicious, incredibly moreish and comfort food to the Nth degree. Like so many of my favourite recipes, it was so easy to make too! (Well, not counting the first aid requirement).
I partnered the bake up with some honey & mustard chicken (gorgeous) together with some steamed young carrots and rainbow chard from thevegibox.com. This was our first go with chard as a side veggie and combined with the cooking juices from the chicken, it was really good. It didn't taste how I was expecting it to - it has a definite spinach quality, whereas I was expecting more of a cabbage quality. Very nice!
The chicken was rolled around in some runny honey that I'd combined with Dijon mustard, a little dried thyme and a pinch of salt and pepper. It baked up well and provided some lovely juices that stood in well instead of having to make a gravy or jus.
The whole family enjoyed the meal and there were clear plates all round. Can't ask for more than that!
I'll go with a "yes", I think.
I was slicing parsnips and squash (beautiful parsnips and squash from thevegibox.com), to make this creamy parsnip & squash bake. Poor hubby and son & heir came back from walking the dogs, to find me hyperventilating whilst holding my right hand in the air with my little finger swathed in kitchen paper. Yes, it did leak - copiously. However, with the addition of a dressing, a plaster and a latex glove, I soldiered on like the brave likkle Cook that I now am.
Now, this 'ere bake very definitely deserves its own recipe post - so watch this space and it shall appear. It was utterly delicious, incredibly moreish and comfort food to the Nth degree. Like so many of my favourite recipes, it was so easy to make too! (Well, not counting the first aid requirement).
I partnered the bake up with some honey & mustard chicken (gorgeous) together with some steamed young carrots and rainbow chard from thevegibox.com. This was our first go with chard as a side veggie and combined with the cooking juices from the chicken, it was really good. It didn't taste how I was expecting it to - it has a definite spinach quality, whereas I was expecting more of a cabbage quality. Very nice!
The chicken was rolled around in some runny honey that I'd combined with Dijon mustard, a little dried thyme and a pinch of salt and pepper. It baked up well and provided some lovely juices that stood in well instead of having to make a gravy or jus.
The whole family enjoyed the meal and there were clear plates all round. Can't ask for more than that!
5 January 2012
Pork Ballotine for New Year's Day
Considering how terribly, terribly wrong this could all have gone, it actually went extremely well.
The plan was to make a Pork Ballotine - which was to be a pork fillet, halved and pounded flat then filled with a stuffing mixture and strips of chicken breast, then rolled, wrapped tightly in cling film and cooked for 3 hrs in the slow cooker, sous vide style.
I can't see any room within that description for it to go wrong, can you? ~rolls eyes~
The pork could have refused to flatten out (it didn't), the stuffing mixture could have been pallid and uninteresting (it wasn't) or over-seasoned and over-flavoured (it wasn't). The cling film could have let go and allowed the water to penetrate the meat (the top layer allowed water in, but the second layer resisted the temptation) and the cooking could have been too long (it wasn't) or too short (it wasn't that, either). All things considered, it was a triumphant combination of both skill and luck.
So, to give you an idea of the whole dish, it was the Pork Ballotine accompanied by an Ottolenghi recipe for Parsnip & Sweet Potato Roast, along with baby courgettes and baby aubergines. I wasn't sure whether we'd need a gravy, as the roast vegetables included a lemon dressing. However, the gravy was definitely a good thing because the Ballotine was fat-free apart from the sausage meat & olive oil that went into the stuffing and it needed that sauciness. Even after 3 hours' cooking, it wasn't dry - but the dish definitely needed something saucy to help the jaws go around.
I can safely say that the Ballotine was by far and away the most advanced culinary task I've had to produce yet. I had no idea that it would take as long as it did to produce - I seemed to be sitting there for aeons, trimming meat, making stuffing, trimming up the chicken into slices, stuffing, rolling and wrapping.
I made four individual Ballotines, which gave us one to have cold (another useful and successful experiment) later on.
I had every intention (I even had the camera beside me) of photographing the process of producing the Ballotines, but I am afraid I got so "into" the process that I completely forgot to take photographs. Sorry!
So to talk you through the process of making four Ballotines, I need to start with a large slow cooker (or I suppose an enormous stock pot in the oven would do the same thing), filled three quarters of the way with hot water and pre-heated to medium (approx 65-70deg C). I tested mine with a meat thermometer before adding the Ballotines, just to reassure myself that it was hot enough.
Take two pork fillets (or tenderloins) which require to be trimmed of gristle. Then nip off either end, to create a neat edge. Retain the nipped off ends, as they can be included in the stuffing mix. Next, cut each fillet into half, which will leave you with four fat sausage shapes of meat and set aside while you make the stuffing.
I based my stuffing mix around two top quality Cumberland sausages, which I skinned and used the meat from. However, because the sausage meat is already ground you don't want to include it with the ingredients for the stuffing that are going to require chopping in a food processor, so simply place the sausage meat into a bowl with an egg yolk.
Then, to the food processor, I added the ends of the pork, a chopped onion that I had sauteed in butter and allowed to cool, two tablespoons of pine nuts, six prunes, a half a teaspoon of dried sage, a teaspoonful of dried thyme, a handful of fresh parsley, a dessertspoon of olive oil, a pinch of salt and a whole heap of freshly ground black pepper. In retrospect, I think I'd probably have added a clove of garlic to the mixture, too. Blitz until you have a fairly smooth, sticky paste and decant into the bowl with the sausage meat and egg. Give the whole lot a good mix to combine it well and set aside.
Turning our attention back to the meat, the next thing is to cut a slice through the long side of the meat bi-secting it three-quarters of the way, but not cutting through the other side. Lay the meat down - opened out - onto a piece of cling film, cut side down, and lay another piece of cling film over the top. Take a rolling pin or other blunt heavy instrument and gently but firmly pound the meat until it is as thin as you dare. Take care, initially, with hitting it where the join is or you'll split the two pieces - and that way leads to an exploding Ballotine, which isn't good!
Once the meat is pounded thin, strip off the top layer of cling film and take an eighth of the stuffing mix. Place this in a wide strip across the centre of the short side of the meat. The Ballotine is going to be quite fat, so you'll need the extra length to roll it successfully.
Next, cut three long strips of meat from a chicken breast and lay two along the top of the stuffing strip.
Take another eighth of stuffing and form into a long sausage shape, which gets laid in between the two strips of chicken and smoothed to cover them. Place the third strip of chicken on top.
Pick up one of the free sides and flap it over the stuffing, then begin to roll towards the remaining free side, shaping into an even but fat, cigar-shape as you go.
Once rolled, pick up the cling film edge that it is sitting on and roll the Ballotine up until it is tightly held by the cling film. Twist both ends, then sit the Ballotine on one end and gently tighten the other. This will force the meat down the tube of cling film and create a neat edge. Tighten the uppermost twist and then re-wrap in another piece of cling film so that you have two layers of waterproofing. If you want to be even more sure of it, wrap it a third time.
There you are - one Pork Ballotine. Now all you've got to do is repeat that again three times and you'll have lost a good couple of hours, but have four fat sausages.
The only thing left to do now, is to say whichever prayer you think suits the moment and place your prize Ballotines into the slow cooker bath - which, just for today, we'll upgrade to a Sous Vide Immersion Thermostatically Controlled Device. There, don't you feel swanky?
Now run away and hide until you have to look at them again - which, for me, was within a half an hour when hubby helpfully commented "your Ballotines have exploded a bit!". It turned out that the top layer of cling film had ballooned somewhat through not being rolled tightly enough - but all was thankfully still waterproof under that.
At the end of some three hours' cooking (which is probably all you've got left, by the time you've made the darned things!), remove them from the slow cooker and peel off their cling film, watching out for the cooking juices which will be hot and all too ready to jet out at random angles, preferably all down your front.
Heat a good knob of butter and a glug of olive oil in a frying pan and brown the outside of each Ballotine, before leaving them for 10-15 minutes to rest.
Having done this procedure, what came out of the cling film looking fairly unappetising, miraculously turns into something that looks blinking lovely.
Slice carefully into three and serve with your choice of accompanying vegetables. You'll be jolly glad you made these - but I can tell you that it'll be a long old time before you find me making them again! Not because of any hesitation over their flavour or texture - all of which were divine - but because the day spent tending to them in the kitchen very nearly wiped me out for the next two days. I'd very definitely make these again - but I'll have to be a whole lot less disabled before I do so!
.
The plan was to make a Pork Ballotine - which was to be a pork fillet, halved and pounded flat then filled with a stuffing mixture and strips of chicken breast, then rolled, wrapped tightly in cling film and cooked for 3 hrs in the slow cooker, sous vide style.
I can't see any room within that description for it to go wrong, can you? ~rolls eyes~
The pork could have refused to flatten out (it didn't), the stuffing mixture could have been pallid and uninteresting (it wasn't) or over-seasoned and over-flavoured (it wasn't). The cling film could have let go and allowed the water to penetrate the meat (the top layer allowed water in, but the second layer resisted the temptation) and the cooking could have been too long (it wasn't) or too short (it wasn't that, either). All things considered, it was a triumphant combination of both skill and luck.
So, to give you an idea of the whole dish, it was the Pork Ballotine accompanied by an Ottolenghi recipe for Parsnip & Sweet Potato Roast, along with baby courgettes and baby aubergines. I wasn't sure whether we'd need a gravy, as the roast vegetables included a lemon dressing. However, the gravy was definitely a good thing because the Ballotine was fat-free apart from the sausage meat & olive oil that went into the stuffing and it needed that sauciness. Even after 3 hours' cooking, it wasn't dry - but the dish definitely needed something saucy to help the jaws go around.
I can safely say that the Ballotine was by far and away the most advanced culinary task I've had to produce yet. I had no idea that it would take as long as it did to produce - I seemed to be sitting there for aeons, trimming meat, making stuffing, trimming up the chicken into slices, stuffing, rolling and wrapping.
I made four individual Ballotines, which gave us one to have cold (another useful and successful experiment) later on.
![]() |
| Pork tenderloin prior to trimming |
So to talk you through the process of making four Ballotines, I need to start with a large slow cooker (or I suppose an enormous stock pot in the oven would do the same thing), filled three quarters of the way with hot water and pre-heated to medium (approx 65-70deg C). I tested mine with a meat thermometer before adding the Ballotines, just to reassure myself that it was hot enough.
Take two pork fillets (or tenderloins) which require to be trimmed of gristle. Then nip off either end, to create a neat edge. Retain the nipped off ends, as they can be included in the stuffing mix. Next, cut each fillet into half, which will leave you with four fat sausage shapes of meat and set aside while you make the stuffing.
I based my stuffing mix around two top quality Cumberland sausages, which I skinned and used the meat from. However, because the sausage meat is already ground you don't want to include it with the ingredients for the stuffing that are going to require chopping in a food processor, so simply place the sausage meat into a bowl with an egg yolk.
Then, to the food processor, I added the ends of the pork, a chopped onion that I had sauteed in butter and allowed to cool, two tablespoons of pine nuts, six prunes, a half a teaspoon of dried sage, a teaspoonful of dried thyme, a handful of fresh parsley, a dessertspoon of olive oil, a pinch of salt and a whole heap of freshly ground black pepper. In retrospect, I think I'd probably have added a clove of garlic to the mixture, too. Blitz until you have a fairly smooth, sticky paste and decant into the bowl with the sausage meat and egg. Give the whole lot a good mix to combine it well and set aside.
Turning our attention back to the meat, the next thing is to cut a slice through the long side of the meat bi-secting it three-quarters of the way, but not cutting through the other side. Lay the meat down - opened out - onto a piece of cling film, cut side down, and lay another piece of cling film over the top. Take a rolling pin or other blunt heavy instrument and gently but firmly pound the meat until it is as thin as you dare. Take care, initially, with hitting it where the join is or you'll split the two pieces - and that way leads to an exploding Ballotine, which isn't good!
![]() |
| You can see the three pieces of chicken, surrounded by stuffing |
Next, cut three long strips of meat from a chicken breast and lay two along the top of the stuffing strip.
Take another eighth of stuffing and form into a long sausage shape, which gets laid in between the two strips of chicken and smoothed to cover them. Place the third strip of chicken on top.
Pick up one of the free sides and flap it over the stuffing, then begin to roll towards the remaining free side, shaping into an even but fat, cigar-shape as you go.
Once rolled, pick up the cling film edge that it is sitting on and roll the Ballotine up until it is tightly held by the cling film. Twist both ends, then sit the Ballotine on one end and gently tighten the other. This will force the meat down the tube of cling film and create a neat edge. Tighten the uppermost twist and then re-wrap in another piece of cling film so that you have two layers of waterproofing. If you want to be even more sure of it, wrap it a third time.
There you are - one Pork Ballotine. Now all you've got to do is repeat that again three times and you'll have lost a good couple of hours, but have four fat sausages.
The only thing left to do now, is to say whichever prayer you think suits the moment and place your prize Ballotines into the slow cooker bath - which, just for today, we'll upgrade to a Sous Vide Immersion Thermostatically Controlled Device. There, don't you feel swanky?
Now run away and hide until you have to look at them again - which, for me, was within a half an hour when hubby helpfully commented "your Ballotines have exploded a bit!". It turned out that the top layer of cling film had ballooned somewhat through not being rolled tightly enough - but all was thankfully still waterproof under that.
At the end of some three hours' cooking (which is probably all you've got left, by the time you've made the darned things!), remove them from the slow cooker and peel off their cling film, watching out for the cooking juices which will be hot and all too ready to jet out at random angles, preferably all down your front.
Heat a good knob of butter and a glug of olive oil in a frying pan and brown the outside of each Ballotine, before leaving them for 10-15 minutes to rest.
Having done this procedure, what came out of the cling film looking fairly unappetising, miraculously turns into something that looks blinking lovely.
Slice carefully into three and serve with your choice of accompanying vegetables. You'll be jolly glad you made these - but I can tell you that it'll be a long old time before you find me making them again! Not because of any hesitation over their flavour or texture - all of which were divine - but because the day spent tending to them in the kitchen very nearly wiped me out for the next two days. I'd very definitely make these again - but I'll have to be a whole lot less disabled before I do so!
.
2 May 2011
Boulangere Potatoes : a "special" version
We had these Boulangere Potatoes with the Pot Roast Brisket on Easter Sunday. I had made Boulangere Potatoes previously, but this recipe looked a teensy bit more "special" and thus suitable for a celebration lunch such as I was planning.
It's a cracking good potato dish to do if you're going to be pushed for cooker top space, or you'd quite like to spend time with your guests rather than in the kitchen thrashing around! You can easily make this to the "putting in the oven" stage, then cover with clingfilm and leave until you are ready to cook it.
I used a mandolin to cut both the onions and the potatoes, so that they would be of uniform size and so cook evenly. Don't worry if you don't have one of these natty gadgets, it'll just take you a bit longer to carefully cut the potatoes.
There's not a lot more to say, other than "I commend these to the house"!
BOULANGERE POTATOES (serves 4-5)
Ingredients :
50g butter
1 garlic clove, grated
2 onions, finely sliced
4-5 large Maris Piper potatoes, peeled & finely sliced
20g thyme, leaves only, chopped
100ml chicken stock.
Method :
1. Pre-heat the oven to 200deg C/fan 180deg C/gas 6.
2. Butter a large ovenproof dish and sprinkle with some of the chopped garlic and onion.
3. Layer up the sliced potato, onion, garlic and thyme, seasoning each layer as you go.
4. Continue until the dish is three-quarters full, then pour the chicken stock over the mix.
5. Put 4 or 5 knobs of butter over the top and bake in the oven for 20-40 minutes or until the potatoes are tender and browned on top.
Serve.
.
It's a cracking good potato dish to do if you're going to be pushed for cooker top space, or you'd quite like to spend time with your guests rather than in the kitchen thrashing around! You can easily make this to the "putting in the oven" stage, then cover with clingfilm and leave until you are ready to cook it.
I used a mandolin to cut both the onions and the potatoes, so that they would be of uniform size and so cook evenly. Don't worry if you don't have one of these natty gadgets, it'll just take you a bit longer to carefully cut the potatoes.
There's not a lot more to say, other than "I commend these to the house"!
BOULANGERE POTATOES (serves 4-5)
Ingredients :
50g butter
1 garlic clove, grated
2 onions, finely sliced
4-5 large Maris Piper potatoes, peeled & finely sliced
20g thyme, leaves only, chopped
100ml chicken stock.
Method :
1. Pre-heat the oven to 200deg C/fan 180deg C/gas 6.
2. Butter a large ovenproof dish and sprinkle with some of the chopped garlic and onion.
3. Layer up the sliced potato, onion, garlic and thyme, seasoning each layer as you go.
4. Continue until the dish is three-quarters full, then pour the chicken stock over the mix.
5. Put 4 or 5 knobs of butter over the top and bake in the oven for 20-40 minutes or until the potatoes are tender and browned on top.
Serve.
.
26 January 2011
Thyme & Mustard Gammon - quick and so tasty!
![]() |
| Photograph care of BBC Good Food, where the original recipe came from |
Fortunately, I'd planned to have Thyme & Mustard Gammon for dinner. This is one of those "quick as a flash" sorts of dinners (well, once you've got the potatoes and carrots peeled, anyway!).
Being mid-week, we'd bought the common-as-muck munched-up-and-stuck-back-together-again Gammon steaks (£1 for 2), which would do fine for this meal as the meat is fried, then braised and any toughness would be cooked out of it.
So, as it was, it worked perfectly as a "quick, get dinner early, we need to go and collect son & heir" meal, which is also the reason why I forgot to take a photograph of it. In fact, it even left us with some 20 minutes to fall asleep in front of the t.v. before sallying forth into the night. However, aside from all that, this really is an extremely tasty dish. The Gammon lends itself to sweetness in whatever form, and the orange zest and juice combined with the thyme really is a very good marriage that even goes deliciously well with mashed potato.
It proved a hit on all fronts. Cheap, quick and tasty - can't ask for more than that!
THYME & MUSTARD GAMMON (feeds 3)
Ingredients :
4 Gammon steaks
1 tsp olive oil
knob of butter
1 large onion, thinly sliced
1 tsp thyme leaves
zest of 1 orange
juice of 2 oranges
2 tsp wholegrain mustard
300ml chicken stock
Ground black pepper
Method :
1. Melt half the butter in a frying pan and add the oil.
2. Season the bacon with pepper (no need to add extra salt). Then sizzle and brown the meat over a medium heat for 5 mins, turning once. Cook in batches, rather than overcrowd the pan, then lift onto a plate.
3. Add the remainder of the butter to the pan. Once it looks foamy, stir in the onion and thyme, and fry very gently for 15 mins until the onion is soft and golden.
4. Stir in the orange zest, juice, mustard and stock, return the gammon to the pan then simmer for 5 mins until it starts to thicken to a sauce.
Serve with mashed potatoes, together with peas and carrots.
.
7 November 2010
Ottolenghi's Fennel, Cherry Tomato & Crumble Gratin
![]() |
| All cooked and gloriously lovely |
"Ottolenghi" seems to be taking up pole position for the word which gets bandied about in conversations the most here, at the moment.
You know how some styles of cuisine just hit you right between the eyes as being just beyond brilliant and totally in accord with the way you'd like to be able to cook? Well that's Ottolenghi for me.
I had spotted this recipe when I first browsed through "The Cookbook" as it seemed a) achievable financially and b) achievable where the cooking was concerned. I have to be careful which recipes I choose, as I just don't have the stamina in my legs for recipes that have you galloping all over the kitchen for hours. Hence, I particularly like recipes that demand input at the beginning, then you get a rest while they're in the oven, with a final burst of activity prior to plating up - which hubby gets to do, while I give my back a rest and compose myself. Otherwise I'm just too stressed, what with the pain, finishing the dish and making sure the plating up happens neatly, to eat comfortably.
Aaaanyway, all that aside, this is by far and away the most delicious fennel dish I have ever had the good fortune to encounter. The juxtaposition of the savoury fennel with its creaminess and hints of garlic and thyme, set against the sweet but cheesy crumble, is just amazing. Hubby really really liked this dish and would be very happy to see it appear on the menu list again really quite soon. Son was rather less committed to it, but then he doesn't like cooked tomatoes, which were integral to the character of the dish. However, to give him his due, he did eat it all - which says quite a bit about it's acceptability.
![]() |
| Halfway through cooking : just added crumble and tomatoes |
FENNEL, CHERRY TOMATO & CRUMBLE GRATIN (feeds 3)
Ingredients :
2 Fennel bulbs, sliced
2 tbsp olive oil
2 tsp fresh thyme leaves or 1 tsp dried thyme leaves
2 garlic cloves, crushed
coarse sea salt
black pepper
200ml double cream
200ml double cream
enough crumble to cover
50g Parmesan cheese, grated
150g cherry tomatoes – on the vine if possible
1 tsp chopped parsley to garnish
Method :
1. Preheat oven to 200degC/Gas mark 6. Trim off the fennel stalks and cut each bulb lengthways in half. Cut each half into slices. Place in a large bowl with the olive oil, thyme leaves, garlic, salt & pepper and toss together.
2. Transfer to an ovenproof dish and pour the cream over the fennel.
3. Mix the crumble with the grated parmesan and scatter evenly on top.
4. Cover the dish with foil and bake for 45 minutes. Remove the foil and arrange the tomatoes on top. Scatter a few fresh thyme springs on top and return to the oven and bake for another 15 minutes.
5. Fennel should feel soft when poked with a knife & gratin should have a golden colour.
6. Remove from the oven and allow to rest for a few minutes then sprinkle with chopped parsley prior to serving.
24 August 2010
Courgettes with crisp cheese crumbs
![]() |
| Just out of the oven |
Serves 3-4
Ingredients
4 courgettes, trimmed and cut into chunky pieces
pinch of dried chilli flakes
1-2 tsp fresh (or less if dried) thyme leaves
1 tbsp olive oil
1 garlic clove, crushed or grated
45g dry breadcrumbs
2 tbsp grated Parmesan
tomato passata (or leftover tomato sauce would do fine!)
Method
1. Heat oven to 100C/180C fan/gas 6.
2. In a bowl, combine chilli, thyme, seasoning and oil.
3. Add courgettes and toss to coat.
4. Place courgettes into baking dish and bake for 20 mins or until softened.
![]() |
| Ready for baking |
5. Meanwhile, put remaining oil in bowl. Stir in the garlic, breadcrumbs, parmesan and some seasoning.
6. Once courgettes are softened, pour over enough passata to cover the base of the dish, then sprinkle with the crumbs.
7. Bake for a further 10-15 mins until crisp.
I served them with Chicken Kiev, new potatoes and peas. I have to say that the peas were a bit unnecessary and hubby had sneaked one of his potatoes onto my plate, when I wasn't looking!
Labels:
breadcrumbs,
chilli,
Courgettes,
garlic,
parmesan,
passata,
thyme
Subscribe to:
Posts (Atom)