Showing posts with label parmesan. Show all posts

17 January 2015

Beer & bacon pasta cheese - don't look if you're calorie counting!

Well now, that was a great brainwave, if ever I tasted one.

We were due to have "macaroni cheese" at some point during the week, but although the intent was good, the body was weak and we wound up having pizza instead.  I know, what can you do, eh?  So, inevitably, this gave me time in which to think "Goodness, but this is dull.  What can I do to liven up our standard macaroni cheese recipe?" - which as we all know is sometimes the beginning of the end.

However, in this instance, it worked out brilliantly.

Do you remember my making some beef, ale & cheese soup, way back last year some time?  Well I suddenly remembered this recipe and how well the beer combined with the melted cheese - and it was a short hop from there to combining beer into the cheese sauce for the pasta.


Now I always add bacon to my cheese sauce for a macaroni or pasta cheese, as we're confirmed carnivores who feel a bit short changed if a meal doesn't include meat somewhere along the line.  Plus, bacon goes so well with cheese.  Now, I can confirm that bacon goes very well with an India Pale Ale and cheese, in a sauce.  Oh yes.


Ordinarily, I'd have sweated off an onion and included that, but we had run out of onions owing to the last two having turned to slush when I wasn't looking, so that was a non-starter.  So to include the onion flavour, I rummaged around in the herb cupboard and added a half a teaspoonful of the onion granules that I normally use in barbecue sauces.

As for the healthiness of this dinner, I can quite categorically deny any element of healthiness.  However, as to flavour, well yes it has that in spades.  It also has that soft, warming, filling, comforting thing that anything involving cheese and pasta will deliver - especially on a cold, damp day like today.  Add to all that the bacon - and we all know that a bit of bacon makes everything better - and the crisp, crunchy herby breadcrumbs sprinkled on top and you've got a sure fire winner.

Just don't make this for dinner if you're counting your calories.  Like I am.  ~koff~  Oops.

BEER & BACON PASTA CHEESE   (serves 3)

Ingredients :

1 tsp & 1 tbsp olive oil
12 rashers thick cut smoked back bacon, diced
10g & 20g salted butter
50g dry breadcrumbs
half a tsp dried parsley
half a tsp dried thyme
sea salt & freshly ground black pepper
3 tbsp plain flour
350ml India Pale Ale
450ml semi skimmed milk
1 tsp Dijon mustard
half a tsp onion granules
quarter of a tsp freshly grated nutmeg
300g mature cheddar cheese, grated
50g parmesan cheese, grated
40g Leerdammer (or similar) cheese, grated
15g Philadelphia cream cheese
200g pasta - small tubes work well.

Method :

1.  Heat a large frying pan and add the diced bacon.  Fry until the fat has rendered, any water has burned off and the bacon is beginning to turn golden.  Remove the pieces from the pan with a slotted spoon, so as to drain the fat back into the pan and reserve.

2.  Add the breadcrumbs to a bowl and mix in the parsley, thyme and a small pinch of sea salt, along with a good quantity of black pepper.

3.  Melt the 10g of salted butter into the bacon fat and, once melted, add the breadcrumb mixture.  Fry on a moderate heat until the breadcrumbs have taken on the fat and are turning golden.  Do not allow them to burn, so keep them moving.  As soon as they begin to sound sandy and crisp, remove them from the pan.

4.  Take a large saucepan and fill two thirds full with water, which should be brought to a boil and the pasta cooked according to packet instructions.

5.  In a medium non-stick pan, melt the 20g of butter and add the tbsp of olive oil.

6.  Once the butter is melted, add the flour and stir well for 2-3 minutes.

7.  Take the pan off the heat and gradually add the beer, stirring constantly, until you have achieved a smooth textured thick sauce.  Reserve any beer that may be left over.

8.  Swap to adding the milk gradually, returning the pan to a gentle heat to retain the temperature of the contents and stirring very well to prevent the sauce becoming lumpy, until you have a thick coating consistency.  You may not need all the milk, or you may need a little more.

9.  Add a tiny pinch of sea salt, a good quantity of black pepper, the Dijon mustard, onion granules and nutmeg and stir through.

10.  Add all the cheeses and warm through on a gentle heat until they are all melted and combined thoroughly.

11.  Add the cooked bacon and stir through.

11.  Taste and if necessary add a little more pepper - you can add cayenne if you like the heat that it brings.  Add a little of the remaining beer, just to freshen up that beery flavour.

12.  When the pasta is done, drain well and return to the pan.  Pour two thirds of the sauce onto the pasta and quickly stir through.  Serve swiftly into warmed bowls and add a drizzle more sauce over the top.

13.  Sprinkle with the seasoned crispy breadcrumbs.

Serve with garlic bread or a side salad, or just as it is!

Printable version


7 November 2014

Greek style gorgeousness - Chickaleekaka!

Well, what a thing of great beauty this recipe turned out to be!  I found it on Petit Chef, in a vegetarian version without the chicken (and other bits), here.  I really liked the combination of flavours and was intrigued by the use of the white wine.  However it didn't have enough "oomph" for my menfolk as a main course, yet seemed too heavy for a side dish.  So after a bit of mental juggling with a few protein sources such as ham (which I'm sure would be great, but good ham is hard to find for an affordable price), salmon, smoked haddock or sausage - I decided to continue the theme of delicate flavours and go with chicken.  After all, chicken and wine, chicken and leek, chicken and cheese, all go well together and it certainly isn't going to argue with eggs!

Just baked - and you can see the importance of the cheesy crust.
Yes, it takes a little bit of fiddling around as it's a three-stage dish where cooking and assembly is concerned, but if you start early and leave yourself a bit of time in which to give the ingredients the respect they deserve, it really isn't difficult at all.  I served mine with a tomato, spinach & red kidney bean salad (primarily for me!) and a few garlic butter doughballs (as a bit more carbohydrate for the menfolk).

Evaporating the wine.
This family all have a marked soft spot for a Greek recipe - there's something about the ingredients and the style of cooking that just hits the spot with us.  It must be the rich/healthy combination of a baked dish paired with a side salad, using indulgent ingredients like cheese and eggs, plus juicy tomatoes and healthy spinach.  Put it this way, not one person had an ounce of anything left on their plate, so it must have been good!

I was very interested to see how the wine infused itself into the chicken and suffused the leeks with a subtle but very much "there" flavour of sunshine and fruit which added the necessary acidity to cut through the richness of the Bechamel and cheese.  I added a small amount of thyme for an additional layer of flavour, which worked beautifully and didn't swamp the dill at all.

The additional mustard in the Bechamel was a great idea too, as it gave the mild, creamy sauce just that tiny edge which stopped it from becoming too much.


I can hear you wondering what cook's tips I might have for you about this one.  Well, as it happens, I do have a few!

Now you might wonder why I used skimmed milk, but added double cream.  Well, I wanted a richness through the sauce but not too much and considered that using semi-skimmed milk would mean I had to reduce the amount of cream I used.  Using the skimmed gave a perfect balance between milk and cream that didn't make the sauce too heavy.

However, the biggest tip I have for you is to make the Chickaleekaka (which, by the way, is a combination of "chicken", "leek" and "Moussaka-like-thing") in a dish which you've lined with non-stick silver foil, so that once cooked, you can lift it out of the dish and onto a chopping board.  From there, you can gently peel down the edges of the silver foil and the Chickaleekaka should stay, in one set piece, without collapse.  (The eggs are fundamental in this as they are what cause the lower layer to set).  You can then cut it into neat portions which helps to make it look that little bit more deliciously intriguing - and you don't lose those lovely crusty edges by leaving them in the dish!


A quick word about what size dish you choose might be in order, too.  You need to make the Chickaleekaka in a dish that is deep enough to give you a good 1-2cm of chicken & leek, with a nice deep layer of Bechamel on top.  Use too big a dish and it will be spread too sparsely.  Far better to go small - but deep - than too big and shallow.

My tomato/spinach/kidney bean/cress "hot plate" salad.
As for what would you serve alongside the Chickaleekaka, well I went for a "hot plate" salad, i.e. a salad that could be served on a hot plate.  This consists of items that can stand up to heat - so tomato, baby spinach, red kidney beans and cress were my choice on this occasion, but the possibilities are endless.  Just steer clear of things that wilt quickly like iceberg lettuce, if you're going to be serving it on a hot plate!

I know I'm going to be making this again very soon - and I'd really love to hear what you think of it, if you give it a go too.  So do leave me a message, if you try it!

CHICKALEEKAKA    (serves 4) 

Ingredients :

1-2 tbsp olive oil
2 skinless, boneless chicken breasts, sliced small
500g leeks, sliced small
half a tsp white pepper
a tiny pinch of sea salt
half a tsp of dried thyme
100ml (or thereabouts) dry white wine
20g fresh dill, finely chopped
3 large eggs
250g mature cheddar cheese, grated.

For the Bechamel :
3 tbsp of salted butter
4 tbsp of plain flour
a generous pinch of white pepper
a tiny pinch of sea salt 
350ml of skimmed milk
2 tbsp double cream
half a tsp Dijon mustard
half a tsp of fresh grated nutmeg
20g parmesan cheese, grated
50g mature cheddar cheese, grated.

Method :

1.  Heat the olive oil in a frying pan and once hot, add the chicken.  Spread the chicken across the pan to cook evenly, as it won't take long, being such small pieces.  Toss the chicken a few times to make sure every side is coloured - but don't allow it to turn golden.

2.  Once the chicken is coloured but not cooked through, add the leeks and seasoning.  Continue to fry until the leeks are softened.  You will need to toss and stir regularly to prevent the pan contents from colouring further.

3.  Add the wine and continue to toss and stir until the wine has all but evaporated and the pan is almost dry.

4.  Decant the chicken & leeks into a large pyrex bowl  and set aside to cool for 5 minutes or so.

5.  Once cooled, add the dill, crack the eggs in and add the grated cheese.  Mix and stir until everything is evenly distributed.  Set aside, while you make the Bechamel sauce.

6.  In a medium pan, set the butter to melt and add the flour, salt and pepper.  Allow the flour to cook out gently for 3 or 4 minutes, but don't allow it to brown.

7.  Add a little of the milk and stir it through.  The mix will set up quickly, so take if off the heat and keep adding a little milk, then stirring - you will probably need to swap to a hand whisk - until you have a saucy textured mix which is somewhat wetter than you would require.  Add the cream, mustard and nutmeg and whisk them through, then put the pan back on the heat and keep stirring or whisking as it heats through to simmering point.  If the mix becomes too thick, add a little more milk - but not too much, or it will quickly become too thin.  You're after a consistency reminiscent of thick custard.

8.  Take your baking dish (I used a small roasting dish that I lined with non stick silver foil) and decant the chicken & leek mixture into it, making sure to push it into the corners and level off the top surface.

9.  Pour the Bechamel over the top and again, encourage it to form a smooth layer.

10.  Sprinkle first the parmesan, then the cheddar, over the top so that the surface is entirely coated.  This will form the gorgeous cheesy crust - too little cheese and the crust will be patchy at best.

11.  Place into a pre-heated oven at 180degC/350degF/Gas4 for 30-35 minutes or until the top is a gorgeous golden brown.

12.  Remove from the oven and allow to settle for 5-10 minutes before serving with a side salad.


3 July 2011

Chicken Caesar Salad - lovely when you get it right!

Chicken Caesar Salad - this is one of those dishes that has followed me down the years.

In the days when I worked at Hampton Court Palace, I can remember visiting Blubeckers in East Molesey with my friend Didaskalos (which was his online nickname and yes, he was a teacher) and eating Chicken Caesar Salad there.  I would choose the salad because I knew I would spend the whole lunchtime laughing - and it was the easiest thing to eat, in the circumstances.

Times change and things move on, to where I discovered that Sainsbury's were producing a Caesar Salad kit - and still are, to the best of my knowledge - which held the best Caesar dressing to be found.  I have no idea where they got it from, nor why they couldn't sell it in bottles, as every bottled Caesar dressing just didn't measure up.  I still have yet to find a bottled Caesar dressing that equates to Sainsbury's kit version.  The best one, so far, is Brianna's Homestyle Caesar Dressing - although it is just a tad too cheesy (I know, odd concept, eh?) for my liking.

For last night's Caesar Salad, however, I resolved to have a crack at making my own dressing.  You can imagine how much it had to live up to!  However, I am pleased to report that the dressing detailed below is not only better than Sainsbury's kit one, but it makes huge great lakes of the stuff (which is why you'll see our salad is a bit over-dressed) which bodes well for further salads in the week.

I was dubious about including the pinch of chilli flakes, about including greek yoghurt and about the raw garlic (knowing how prone I am to getting the garlic-itchies!).  The pinch of chilli flakes just appeared to amalgamate into the whole dressing experience somewhat seamlessly, but I fully expect if you don't include them - you'd notice it.  The greek yoghurt added to the creaminess but without making the dressing heavy.  I can imagine that seven tablespoons of mayonnaise would have been icky in the extreme.  As for the garlic - although there was garlic included in every inch of the salad, I escaped the garlic itchies!  There you are, you see - you just never know.

Another really good thing about making your own dressing is the anchovies.  Four for the dressing - and one for me.  Maybe another one for the dressing - and one for me.  Better have another one before I wrap the remainder in cling film, to put in the fridge.  Love anchovies!

The chicken was dealt with really simply.  I trimmed it up and put the three breasts into a bowl with lemon juice, thyme, salt & pepper and olive oil.  Onto a roasting tin and 25 minutes later in a hot oven, they're done.

Hubby was in charge of the croutons, as he'd made a loaf of bread especially with them in mind.  He sliced the bread thickly and rubbed it over with garlic.  Then removed the crusts and cut it into lovely big croutons.  Then into a bowl with dried herbs - chives, basil, oregano and thyme plus olive oil.  Toss out onto the oven tray and into a hot oven for 5 minutes, turn them over and sprinkle with salt, back in for another 5 minutes, turn and salt and back in for a final 5 minutes.  Out onto some kitchen paper to drain and bingo!  You've got your croutons.  Mmmmmn, I could have eaten them with a lovely glass of wine, never mind in the salad!


CHICKEN CAESAR SALAD  (Serves 3 with extra dressing)

Ingredients for the chicken :

3 skinless boneless chicken breast fillets
1½ tbsp lemon juice
1 tbsp olive oil
1 tsp dried thyme
1 garlic clove finely chopped.
 
Ingredients for the croutons :
 
3 slices white crusty bread
quarter tsp dried chives
half tsp dried basil
half tsp dried oregano
half tsp dried thyme
2 tbsp olive oil
sea salt & freshly ground black pepper.

Ingredients for the dressing :

1 garlic clove finely chopped
1 tsp Dijon mustard
½ tsp Worcestershire sauce
1 tbsp lemon juice
good pinch chilli flakes
5 anchovy fillets, finely chopped
3 tbsp good-quality mayonnaise (Hellman's is good)
4 tbsp plain greek yoghurt.

Ingredients for the salad :   

1 head Iceberg or Romaine/Cos lettuce (choice to suit you), leaves separated, washed and dried
25g piece Parmesan cheese, finely grated.

Method :

1.  Chicken :  place the juice, oil, thyme and garlic in a shallow dish. Add the chicken and turn it over in the marinade to coat well. Season with freshly ground pepper and leave for up to 2 hrs.

2.  Salad :  Keep any small inner lettuce leaves whole, tear the larger outer leaves into 2-3 pieces, then put them all into a large bowl full of ice cold water with 6-7 ice cubes.

3.  Croutons : Heat the oven to 200C/fan 180C/gas 6.

4.   Croutons : Slice, then cut the bread into big, rough cubes for the croutons. Then put into a bowl with the herbs plus pepper and olive oil.  Toss until completely covered, then out onto a baking tray and into the hot oven for 5 minutes, turn them over and sprinkle with salt, back in for another 5 minutes, turn and salt and back in for a final 5 minutes.  Out onto some kitchen paper to drain, and reserve.

5.  Chicken : Place the chicken onto a baking tray, then into the oven for 25-30 minutes.  When done, leave to cool slightly then slice.

6.    Dressing : Meanwhile, put the garlic into a mini blender with the mustard, Worcestershire sauce, lemon juice, chilli, anchovies, mayonnaise and yogurt, then blend until smooth - it should be the consistency of double cream. Adjust the taste with lemon juice and pepper. 

7.  Salad :  Drain the lettuce and spin to dry.  Place into a large bowl and pour just under half the dressing over the leaves.  Add the parmesan and carefully toss to coat - it's gentler to use your hands. Pile the leaves onto individual plates, tucking in the croutons and chicken. Drizzle the rest of the dressing over and around, then finish with an extra squeeze of lemon.

Serve.

1 July 2011

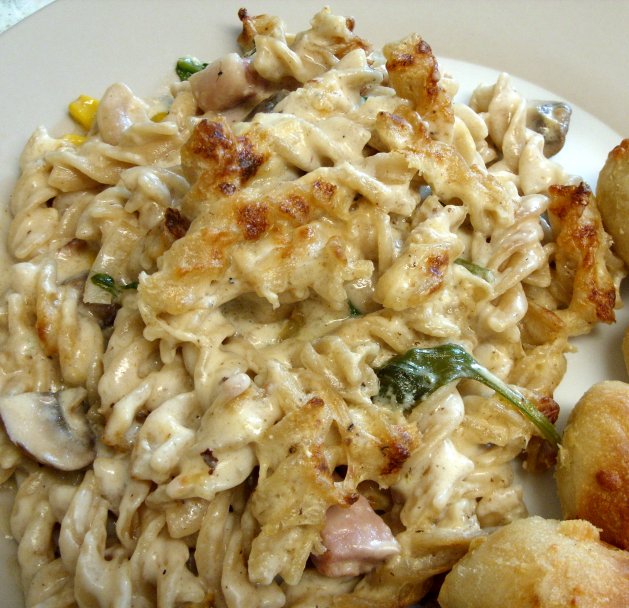
Creamy Ham & Mushroom Pasta Bake

Anybody fancy any comfort food?

I've had this recipe in my "sounds nice" folder, just waiting for a moment when a) I fancied cooking it, and b) I thought everyone else might like it.  It would seem as though today was that day.

I start by assembling the ingredients.  I get them all out to begin with, to avoid having to walk around the kitchen, wearing myself out.  Because my particular disability causes me problems with standing for any length of time, I have what is called a "perching stool" which I drag around the kitchen.  This enables me to "perch" rather than sit and so makes standing back up to go and fetch something a lot easier.  So I carry the tray of ingredients  to my preparation space, where I chop everything that needs chopping.  Anything left over goes back into the fridge.

From there, I move to the cooker and start the cooking.  Fortunately, our cooker is very close to the sink, so I can move between the two without having to do much more than adjust the angle of the stool.

So here I am, The Incredible Bulk, on my stool, cooking  *sigh*


As a consequence, any recipe that involves "chop this : cook that : fry this : boil that : mix this in a bowl : fry this in another pan.. and so on" is not my best friend.  Hence I try to find recipes that I can do all the chopping in one go, that use the least amount of pots and pans - or at least, have a gap between the pots & pans - possibly while something oven bakes.  I can then do the washing up in the gap, which helps with clearing up afterwards.


Some recipes, however, I feel as though I've run a marathon by the time they're on the plate.  Cooking a dessert for eating immediately after the main course is like that.  By the time I've cooked the main course, I've had it where a dessert is concerned.  So any dessert I make has to be able to be produced in advance.

So this creamy ham & mushroom pasta bake was one of the easier ones.  It was a simple matter of dicing up the gammon, spring onions and mushrooms.  Then, while the bacon was cooking, grate the cheese for the sauce.  After that, it was all based in front of the cooker - with the requisite gap for washing up, while the bake did it's thing in the oven.  It didn't stop me from looking like a beetroot by the time it was baked, though!  Well, it was hot in that kitchen!

It's very definitely a comfort food option, in that the creamy cheese sauce goes so well with the gammon, mushrooms and pasta.  The spinach adds the impression that it's a little bit good for you, while the sweetcorn adds a little bit of crunch and interest.  Everyone enjoyed it - and everyone would have it again.  I served it with some dough balls, as I found them in the freezer - which I'm trying to empty a bit, prior to defrosting.  It'd be even nicer with a side salad, though.


CREAMY GAMMON & MUSHROOM PASTA BAKE (Serves 4)

Ingredients :

300g wholemeal fusilli pasta
30g butter
140g thickly cut gammon, diced  
4-5 chestnut mushrooms, halved
bunch spring onions, finely sliced
handful of baby spinach leaves, washed & drained
3 tbsp sweetcorn niblets
2 tbsp plain flour
500ml milk - have some more handy, just in case you need it
100g mature cheddar, grated
20g parmesan, plus extra for sprinkling
sea salt & freshly ground black pepper.

Method :  

1.  Prepare a large pan of salted boiling water and cook the pasta according to pack instructions, then drain and set aside.

2.  Heat oven to 200C/fan 180C/gas 6, then melt a little butter in a deep frying pan and add the gammon.  Cook until beginning to brown, then decant into a large flat ovenproof dish.

3.  Add another small knob of butter and fry the mushrooms & spring onions for a couple of minutes, then scoop out and add to the gammon.

4.  Add the spinach and the sweetcorn to the oven dish and mix them through, to achieve a happy jumble.

5.  Melt the remaining butter in the frying pan, then add the flour.  Stir and cook for a minute, then gradually stir in the milk until you have a lump-free sauce. Increase the heat and bubble the sauce, stirring for a few minutes to thicken. Turn off the heat, stir in most of the cheese, then season to taste.

6.  Tip the pasta onto the happy mixture in the ovenproof dish, then pour over the sauce and mix well in the dish. Scatter over the remaining cheese then bake for 10-20 minutes until golden.

Serve.

30 June 2011

The Artisan Bagel Baker returns!

I dunno, I go out to work for four hours and come back to find the Artisan Bagel Baker has been busy in my kitchen!


Yes indeed, hubby has found his yeast-flavoured baking wings.  Well and truly!

Today - get this - he ventured to produce these four beautiful plain (if plain is a satisfactory description, which I really think perhaps it isn't) bagels ....


along with four beautiful Red Pepper, Olive & Parmesan bagels.  Oh yes, you read that correctly.  Look at this 'ere picture and prepare to dribble, all ye bagel fanciers out there.


*happy sigh*

I was greeted, upon returning home, by the questions "would you like a cup of tea?" and "are you hungry?", which last loaded question I answered with "why, what's on offer?".   So we promptly road-tested one of the Red Pepper, Olive and Parmesan bagels with cream cheese.  Oh and it was T.D.F.  (Easily translated as "to die for").

Apparently, hubby had made the flavoured bagels by creating a tapenade of sweet peppers, green queen olives, parmesan cheese and olive oil - which he then mixed (with some difficulty, apparently) into the bagel dough.  He saved a little bit of parmesan for sprinkling just before they went into the oven.  Gorgeous!

Now, we're going to invite suggestions for bagel flavours.  What flavour would YOU like to see in a bagel?

If you're new to Rhubarb & Ginger and haven't followed hubby's Bagel-baking activities in the past, they all started here.

.

28 May 2011

Bacon & Goat's Cheese Pasta

This is one of my favourite lighter pasta dishes, at the moment.

It has the benefit of the lovely gently flavoured mild goat's cheese (I use the £1.50 soft goat's cheese log from Asda, which I believe originates in France) which melts beautifully and doesn't soak into the pasta, resulting in a claggy, sticky mess as the pasta cools.  Because the goat's cheese has a sharpness, it doesn't cling to your palate and each mouthful goes down as well as the first one did.

I hate pasta in thick cream sauces (particularly cream cheese-based ones) which begin to set as the pasta cools on your plate, resulting in a clagged up lump of pasta pieces that need to be cut with your fork.  Bleaugh.

The recipe originally stated to use Kale, and although I love Kale, hubby has some issues with its leatheriness.  As such, I swapped onto Savoy cabbage - which if you make sure to give it just 3 minutes in the pasta water, is perfectly fine.

So, it's just a brief chopping job, then a two-pan cooking job - and onto your plate.

Couldn't be easier!  Which is why I booked it in for a Monday - after a day at work, I need a meal that's going to come together easily.

Don't be frightened of the goat's cheese - if you get a mild flavoured creamy one, you'll hardly notice the goatiness of it.  It really is streets ahead of plain ordinary cream cheese.


BACON & GOAT'S CHEESE PASTA (Serves 3-4)


Ingredients :


400g penne or fusilli pasta
200g shredded Savoy cabbage
150g streaky bacon, chopped
1 medium red onion, chopped
150g soft mild goat's cheese
grated parmesan to serve.


Method :


1.  Bring a large pan of lightly salted water to the boil.


2.  Cook the pasta according to the manufacturer's instructions, however, 3 minutes before the pasta is due to be cooked, add the cabbage to the pasta water.


3.  In the meantime, dry-fry the bacon pieces in a frying pan until starting to brown, then drain the fat off (into a cup for roast potatoes!).  Remove the bacon to keep warm.


4.  Put the onion into the frying pan with 2 tsp of the bacon fat and fry lightly until softened and transparent.  Return the bacon to the pan.


5.  Add the goat's cheese to the bacon/onion mixture and heat slowly, adding a little milk, to help break the cheese down and make it saucy.  Add seasoning (salt & black pepper) to taste.

6.  Once the pasta & cabbage are done, drain (retaining a little of the cooking water) and replace in the cooking pan.  Add the bacon mixture and lightly fold it through, adding a little of the cooking water if the sauce appears too thick.

Once you're happy with the consistency, serve with a bowl of grated parmesan for sprinkling over.


Yummy!


1 May 2011

Spirali al Forno (or Four cheese & bacon pasta bake)

The original inspiration for this recipe came from one which is attributed to Gino D'Acampo.  Mine isn't exactly the same as his, as his calls for thick ham and different cheeses.  However, I think the spirit of the thing was similar - and the result was really delicious.

I had booked this one in for Thursday last, when I was going to be working.  As it turned out, it got bumped along until Good Friday but it would indeed have been a very good dish to have cooked on a day when you'd been busy all day.

The usual approach I'd had with "pasta & cheese sauce" recipes in the past, has been to make a white sauce and melt the cheese into it.  Not so with this one!  Because it's a conglomeration of four cheeses, you take a pack of cream cheese and gently warm it (subsequently loosening it) through.  Mixed with a little milk, it quickly becomes a creamy cheesy sauce.  Add some gorgonzola, cheddar and ultimately, parmesan - and your dinner has become cheese-tastic without the need for any white sauce making.

The only drawback I found with this method, was that during the eating, the pasta became a little "claggy" as the cheese cooled and set.  I had served it on warmed plates - but I'm thinking that perhaps being served in a warmed bowl where it would maintain its heat better would do the trick.  Of course, then you've got the problem when serving, of keeping the crusty bit uppermost - but I'd definitely prefer that to it going claggy as it cooled!

SPIRALI AL FORNO (Four cheese & bacon pasta bake)  Serves 4

Ingredients :

500g spirali pasta (or penne)
25g butter
200g full fat cream cheese
70g gorgonzola cheese (I used closer to 100g), chopped
70g cheddar cheese (again, I used closer to 100g), grated
100ml milk
a gammon steak, diced
3 tbsp chopped flat leaf parsley
50g grated parmesan
salt & pepper


Method :


1.  Preheat the oven to 180deg C/gas 4.


2.  Place the gammon into a frying pan and cook until starting to brown lightly.  Reserve in a warm place.


3.  Bring a large pan of salted water to the boil.  Add the pasta and cook until al dente.  Drain the pasta and place back in the saucepan.


4.  Add the gammon to the pasta.


5.  In the gammon pan, add the butter, soft cheese and heat through gently.  Add the milk gradually and use a whisk to ensure a lump-free sauce.


6.  Add the gorgonzola and cheddar and mix well with a wooden spoon until melted and creamy.  Check the seasoning (add a good quantity of pepper), add the parsley and pour over the gammon & pasta.


7.  Mix through and place into a baking dish.  Sprinkle with the grated parmesan and put into the oven for 15-20 minutes, or until the top is golden and crispy.


Serve immediately.


.


12 April 2011

Parmesan gnocchi & tenderstem broccoli.

There is chicken there, somewhere!
One of the two recipes that had been carried over until the following week, was a pot roasted chicken accompanied by parmesan gnocchi & tenderstem broccoli.

I was very keen to do this recipe, as I am constantly on the lookout for vegetable side dishes to have with pot-roast chicken.  There's only so many times you can have roast potatoes, lovely as they are.

The great benefit of this recipe was that I could cook the chicken in the morning, then take the meat from the bones and re-heat it for dinner that evening - and the same for the following day.  Oh, and let's not discount the using of the carcass and cooking liquid for stock and/or chicken soup!  The gnocchi recipe seemed to be very easy and wouldn't be too hard on me to produce.

As it was, as a last minute addition, I decided to roast some courgettes and cherry tomatoes to go alongside the gnocchi/tenderstem broccoli dish - and I was very glad of them.  Although the gnocchi dish is delicious, it would have been better served with a robust form of meat such as gammon steaks or roasted gammon.  With the chicken, it tended to muscle the lovely chicken out of the way like a big, burly bouncer would do.  "If yer name's not down on the list (beside the garlic), then you're not comin' in".  As a consequence, it needed the acidity of the cherry tomatoes to provide the balance.  When I do the gnocchi dish again, I'll make sure to do some cherry tomatoes with it unless it's accompanying something with tomato as one of the main players.


Please don't take that as a negative view of this dish, as the softness of the gnocchi provides a lovely counterbalance to the crispness of the tenderstem broccoli, and the freshness of the broccoli provides a counterbalance to the richness of the parmesan.  I'll definitely be doing the gnocchi again, as quite apart from anything else, it's the first gnocchi dish I've ever really liked!


PARMESAN GNOCCHI & TENDERSTEM BROCCOLI  (serves 3)


Ingredients :


a knob of butter
1 garlic clove, grated
teensy pinch of chilli flakes
150ml vegetable or chicken stock (depending on what you're serving it with)
5-6 tbsp creme fraiche (I used a low fat version)
60g parmesan, finely grated
250g tenderstem broccoli, halved lengthways if large
250g gnocchi.


Method :


1.  Heat a large pan of salted water until boiling.  While it's heating :


2.  Heat the knob of butter in a frying pan and cook the garlic and chilli for 2 minutes.


3.  Add the stock, bringing to a boil and continue boiling until reduced by three-quarters.


4.  In the meantime, cook the broccoli until just tender.

5.  Whisk in the creme fraiche and parmesan to the stock, to make the sauce.

6.  Add the broccoli when done and retain the cooking water, to which you should add the gnocchi and cook following pack instructions (around 3 mins).  Drain and add to the broccoli and sauce.

7.  Toss to cover with the sauce and serve.


.

3 April 2011

Asparagus & Prosciutto Risotto - the risotto king strikes again!

In the scheme of things where the menu planning is concerned, Saturday is now the day when hubby cooks.  He likes to cook and more often than not, his dishes are a big success.

This Saturday was a bit of a mystery tour, however.

We set off for the supermarket with the knowledge that we needed to get the ingredients for a risotto, but not what that risotto was going to comprise.  Maybe a seafood risotto, maybe an asparagus risotto - really, it could have wound up being anything.  Hubby was looking for inspiration along the supermarket shelves.

First of all, we checked out what the fishmonger had in the fresh fish Department.  He had some lovely Sea Bass, but they'd have needed filleting.  The bags of frozen seafood - squid, mussels, prawns etc. - were out of our price range at £4 for 400g.  He picked up some Prosciutto as we went through the delicatessen, but nothing else really appealed.

On to the fruit and vegetables we went, where he wandered along looking increasingly disconsolate.  Right up until we spotted the asparagus.  Suddenly, an asparagus and prosciutto risotto took form before his very eyes.  We had vegetable stock already, together with butter, parsley, olive oil and parmesan cheese.

Sorted.


ASPARAGUS & PROSCIUTTO RISOTTO  (Serves 3)

Ingredients :
75g thinly sliced prosciutto
250g asparagus
3 tbsp olive oil
a medium onion or 3 shallots, very finely diced
1 clove garlic, chopped fine
25g butter
300g Arborio or Carnaroli rice
1.5 litres of  vegetable stock
10g fresh chopped parsley
parmesan to taste, grated and shaved

Method :

1.  Bring a saucepan of salted water to a rolling boil and prepare the asparagus by snapping at the weak point (around one third of the way up the stem from the cut end).  Retain the woody ends for use in the stock and blanch the tipped ends for 60 seconds, then plunge into bowl of iced water to stop the cooking process and retain the cooking water.

2.  Prepare the stock with the asparagus water and add the woody ends cut lengthwise.  Keep the stock over a very low heat until required, not allowing it to boil.  Remove asparagus just before use.

3.  Heat the olive oil and butter gently together in a large pan.  Add the onion & garlic until they are soft and transparent, not allowing them to brown.

4.  Slice prosciutto into very thin strips.

5.  Add rice to the onion mix and stir well to coat with the oils, then turn the heat up as hot as you dare - without burning - before quenching the pan with a ladleful of stock which should have had the asparagus pieces removed.  Reduce heat to a simmer.

6.  Add another ladleful of stock and the prosucitto.   Continue adding ladlefuls whenever the mixture runs dry, stirring well and keeping it moving to avoid catching on the bottom of the pan.

7.  Continue in this way until the rice is cooked al dente.  You may find you have stock left over, which is normal as different rices require different amounts of liquid.

8.  Drain the asparagus from the iced water and add them to the risotto, warm them through.

9.  Just prior to serving, add some of the parsley, reserving a small amount for garnish.

Serve in warmed bowls, garnished with shaved parmesan and chopped parsley.

Add a bowl of grated parmesan on the table, for folk to add as they please.

.
 

16 December 2010

Parmigiana di melanzane - or Aubergines with Mozzarella and Parmesan

I first made this dish to accompany a roast chicken - which it did very well.  It occurred to me at the time, that it would be good with a lot of other types of meat and especially greasy types like pork or gammon, or types that tend towards dryness, as with chicken.

However, this time, it was nobody's second fiddle but the star of the show, accompanied by some salad and garlic bread.  The meat eaters in the family would have preferred more carbs with their Parmigiana, but nobody announced that they missed the meat.

If you make use of one of those olive oil sprays when cooking the aubergine, you are able to keep the oil to a minimum.  Although the dish is heaving with cheese, neither of them are very greasy cheeses and so it stays really light.  I think the juiciness of the tomato & basil sauce helps to balance the rich cheese and the aubergine becomes deliciously soft and gently flavoursome.  I really must make this one more often!


PARMIGIANA DI MELANZANE (serves 4 as a main course)

Ingredients :

2 aubergines, topped, tailed and sliced thinly
olive oil spray
sea salt & ground black pepper
300g mozzarella, sliced
115g parmesan (or Grana Padano), grated
3 tbsp panko or crispy breadcrumbs
1 tbsp butter, cut into small pieces.
  
For the tomato & basil sauce :
1 tbsp olive oil
3 banana shallots, chopped finely
2 garlic cloves, chopped finely
400g can chopped tomatoes
1 large vine ripened tomato, chopped
2 tsp tomato puree
1 tbsp tomato ketchup
1 tsp of Worcestershire Sauce
3-4 fresh basil sprigs, torn
1 tsp sugar or honey
sea salt & black pepper to taste.

Arrange the aubergine slices in a single layer on 1-2 baking sheets.  Spray with olive oil and season, then bake in a preheated oven at 200C/400F/Gas Mark 6, for 10-15 minutes, until tender, but not collapsing.

Over a high heat and using a large frying pan, add the olive oil and when up to temperature add the shallots and garlic.  Cook, stirring regularly, for 5 minutes or so until softened.   Add the tomatoes, stir in the tomato puree, ketchup, Worcestershire sauce, fresh torn basil and season with salt and pepper to taste, adding the sugar or honey if it requires a bit more sweetness.  Bring to a lively simmer then lower the heat and gently simmer for about 10 minutes, until thickened.  

Spray an ovenproof dish with olive oil and arrange half the aubergine slices in the base.  Cover with half the mozzarella, spoon over half the tomato sauce and sprinkle with half the Parmesan.  Mix the remaining Parmesan with the breadcrumbs.  Make more layers, ending with the Parmesan mixture.

Dot the top with butter and bake for 25 minutes, until the topping is golden brown.

Remove from the oven and leave to stand for 5 minutes, before slicing and serving.

Printable version

Related Posts Plugin for WordPress, Blogger...