Showing posts with label parsnip. Show all posts

29 December 2017

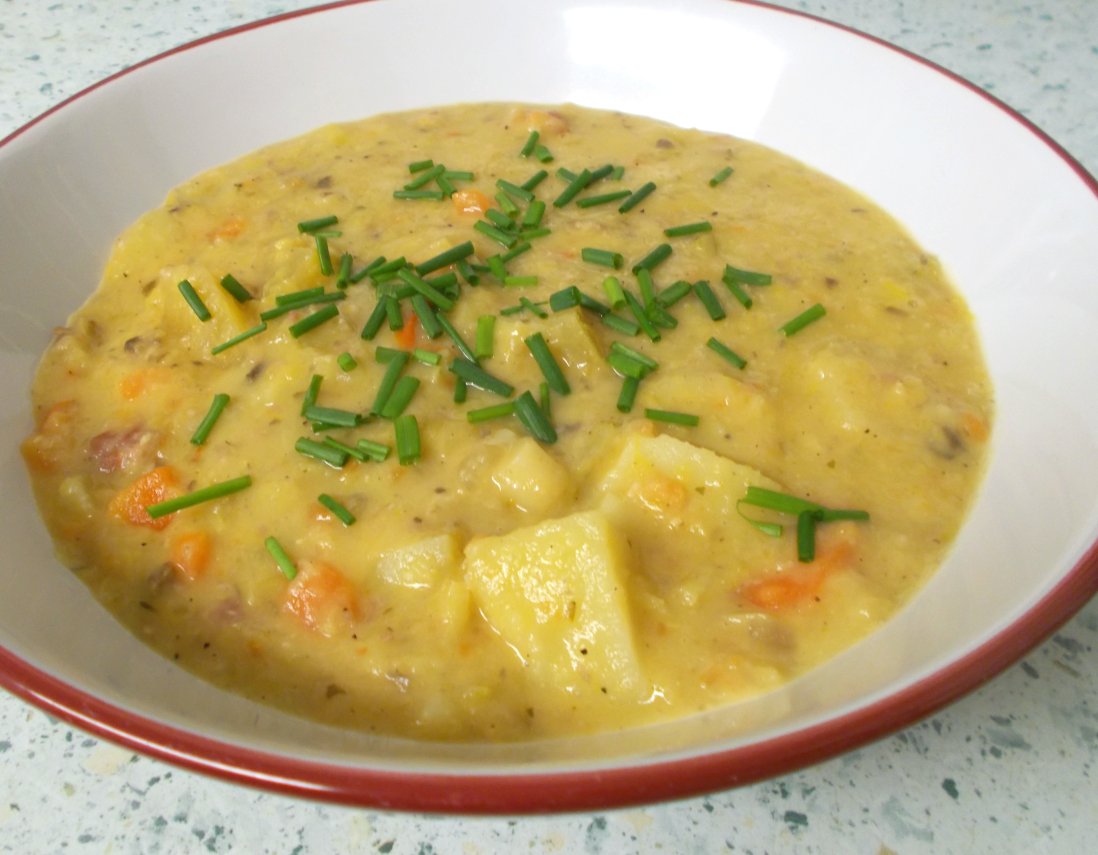
Thick, chunky creamed vegetable soup (with a little bacon)

It's the 29th December, 2017.  We have eaten our own body weight in turkey over Christmas.  It is time to give our digestions a bit of consideration, hence, a vegetable soup.  However, because we're not vegetarians, it's got a wee bit of bacon in it too - just for the flavour input, don'tcha know.

Now for all that I like the brothy kind of soups, I wanted this one to be hearty, thick and worthy of being served as a dinner soup.  Perhaps with some crusty bread, or as it turned out, a gorgeous thin flatbread with mozzarella, basil and olive oil.  Mmmnn, delicious.

Truth be told, you could use just about any vegetables you wanted for this soup.  I will give you the full rundown of vegetable input in the recipe, but you need to follow a few rules, no matter what veggies you use.  Said rules go like this :

a)  chop some veggies very small, so that they cook down and disappear into the vegetable stock.

b)  chop some veggies into bite sized pieces, so that they will be retained and create lovely texture.

c)  start with a tasty oil - coconut, or butter, or rapeseed - and a finely chopped onion.  Do not be tempted to use a bland vegetable oil, or a slightly bitter olive oil.  If you start wrong, you won't ever be able to come back from it.

d)  use the best vegetable stock you can source.  It is the base of your soup and deserves to be delicious.


So there you are.  Not difficult at all, but make sure to set aside a good time to be spent  choppin', cuttin' and a-peelin'.  Not to mention a good hour or so in the preliminary cooking stage and a pause in the middle of however long you've got.  Good soup does not come about in a half an hour.  Well actually it can, but not with this one.


Here comes the recipe!

THICK, CHUNKY CREAMED VEGETABLE SOUP    (Serves 4)

Ingredients :

1 tbsp coconut oil
1 red onion, finely chopped
4 rashers of streaky bacon, finely chopped (optional)
2 tsp ground coriander
a large pinch of sea salt
1 tsp ground black pepper
half a tsp dried thyme
half a tsp dried parsley

Peeled and chopped small :

1 medium carrot
1 large stick of celery, with fluffy green bits if possible
1 large leek
2 chestnut mushrooms
6 sweet cherry tomatoes (halved works for these)
half a medium potato

Peeled and chopped into bite sized chunks :

2 medium carrots
2 large sticks of celery
5 chestnut mushrooms (quartered)
1 and a half medium potatoes
2 small parsnips
a decent sized chunk of swede or turnip

plus :

750ml of strong vegetable stock (I used 1.5 tsp Marigold vegetable bouillon and 1 tsp Essential Cuisine vegetable stock powder)
4-5 tbsp dry split red lentils
3-4 large leaves of Savoy cabbage, ribs removed and leaves sliced
2-3 tbsp double (or heavy) cream
2 tsp cornflour mixed with a drop of water to thick pouring consistency
sea salt & ground black pepper to taste.

Method :

To begin, make sure you are using a pan which can contain the entire contents.  It needs to be BIG and have a lid which fits.  I used my steep sided wok, which worked perfectly.

Heat the oil and add the onion & bacon (if using).  Cook, stirring often, until the onion is transparent and the bacon is beginning to render its oil.  Add the coriander, sea salt, black pepper and herbs and stir through.

Add all the chopped small ingredients and cook on, stirring regularly to turn the pan contents.  Once the leek and mushroom pieces are softened and the whole is beginning to look cooked, add the vegetable stock.

Increase the temperature under the pan and bring the contents to a gentle boil.  Add the bite sized chunks of veggies, the red lentils and the cabbage.  Gently stir through, cover the pan and bring back to a gentle boil.  Cook on for 30-40 minutes, stirring occasionally.

Taste to check the seasoning levels - which should be fairly high as when you add it later, the cream will obliterate a certain level of seasoning.

Remove from the heat, leave covered and go and have a sit down for a couple of hours.

When you return, using a hand blender, blitz a certain amount of the soup to your preference.  I probably made it 50:50 blitzed to chunks which seemed to go down well.

Turn the heat on under the pan and add the cream and cornflour slurry and stir through.  As the soup heats up to a lively simmer, the cornflour will thicken the soup to a consistency where it will coat the back of a spoon - which is what you are aiming for.  If it becomes too thick, add a little water.

Finally, check the seasoning and adjust to your taste.  Serve into warm bowls with crusty bread for dipping.

Printable version

23 February 2015

Rabbit & parsnip pie

Rabbit and parsnip pie.  Insert very big grin here.

Many moons ago, we bought a wild rabbit from a local butcher and it turned out to be the mankiest, smelliest, half cleaned and extremely tough bit of ancient rabbit you could ask for.  Perhaps not surprisingly, that put me off dealing with whole rabbits for quite some time.  However, when Farmer's Choice (Free Range) Ltd offered me a chance to have another go with some quality wild rabbit, how could I say no?  After all, I'd had a rabbit pie quietly baking in my imagination for quite some time.

Now I wanted this rabbit pie to be one that anyone could make, made with ingredients that are readily accessible or that could be in anyone's kitchen.  No wild and wacky ingredients, just good honest rabbit compatible flavours that would make this pie acceptable to most people, might even go as far as demystifying rabbit a little - and who knows, perhaps even rabbitophobes might consider giving it a go.

Beautiful rabbit, dredged in seasoned flour and in the pan
The Farmer's Choice rabbit was beautiful.  Clean as a whistle and smelling as fresh as a daisy, it was no more cringe inducing to handle than a fresh chicken - and even easier to joint up into pieces.

Oh and I must add, my three mobile dustbins were VERY interested in it and were there begging for offcuts within seconds of removing the rabbit from its packaging.  However, they were all out of luck as rabbit has negligible amounts of fat on it and they arrive unzipped, undressed and ready to go.  (The rabbit, that is, not the dogs).

The smell that wafted from the cooker as the rabbit slow cooked in the casserole dish was utterly mouthwatering - and we had to suffer that for two hours.
 
Seared, in the casserole and into the oven for the next 2 hours

Naturally, as a cook it is entirely your responsibility to taste your ingredients as the cooking proceeds ~koff~ and I can confirm that the flavour of the rabbit was sublime.  Everyone says that rabbit is a sweet flavoured meat and I can see that, yes - but it isn't sweetly sweet in a sugary way, it is mild, slightly woodland with a touch of earthy and reminds me very much of the texture of a chicken thigh, but no - it doesn't taste chickeny at all.  It is really lovely and something I would be very happy to entertain regularly on the menu plan.

No spare space for anything other than a bit of gravy
I will admit that this recipe involves a lot of steps.  It took me best part of a day - although I wasn't in the kitchen for the entirety of the day.  First making the pastry, then preparing the meat for the casserole, then a bit of a pause while the casserole did its thing, then it was all go through to the end.  So it isn't a recipe for when you're in a hurry! It would be perfectly possible to split the preparation between two days - make the filling on the first day, then refrigerate it until the following day when you can make the pastry, fill the pie and bake it.  Just remember to get the filling out of the fridge to come to room temperature in good time, or the baking time will be incorrect.

Golden and crisp, a thing of absolute beauty
I'm fairly sure that the ingredients are as economical as possible, with most wild rabbits costing between £5-£7 each (February 2015 prices) and currently £6.71 for a 1kg rabbit from Farmer's Choice (Free Range) Ltd.  Of course, you would need to factor in the delivery charge there, too - but rabbit is still one of those few fairly economical meats.

The pie would serve 5-6 hungry people and go further if children were involved.  So far as I can see, the only expense in the cooking is your time and the power required to fire up your oven.


Now, I have a few Cook's Tips for you.

I have stated to use "strong" stock and by that I mean stock that has rather more stock powder (once again, I thoroughly recommend Essential Cuisine's chicken or vegetable stock) than one would ordinarily use.  In order to gain the intensity of flavour, I made up my chicken stock with 1.5 tsp of stock powder for 500ml of water instead of the customary 1 tsp.  For this reason - and the reduction of the stock for gravy - it is essential to use a low salt stock cube (and Essential Cuisine's stocks are all naturally low salt).  It would be an easy thing to spoil the pie by making the stock too salty. 

My second cook's note is not to work the dough more than is absolutely necessary and certainly do not knead it at all.  The less you work the flour and the smaller the amount of water you use to hold it all together, the lighter the end result will be.  Incidentally, you won't need the egg until much later in the pie making process so keep it standing by!

This was son & heir's first taste of rabbit and he was very happy with it.  Everyone cleaned their plate and gave the dish a big thumbs up.  The leftovers of the pie even stood up well to being microwaved for lunch the following day.  The pastry stayed crisp and the filling was just as yummy.

Rabbits aren't as easy to get hold of as they once were, but if you see some rabbit in the shops - or even better, would like to order one from Farmer's Choice - do consider giving this pie a try.  If I can turn out a fabulous pie like this, anyone can. 


RABBIT & PARSNIP PIE   (serves 5-6)

Ingredients :

1 leek, quartered and chopped
3 tbsp olive oil (each tbsp used individually)
1 wild rabbit, jointed into 6 pieces, or 500g diced rabbit
2-3 tbsp plain flour
half a tsp sea salt
half a tsp black pepper
3 rashers back bacon, diced finely
1 small carrot, peeled & finely diced
1 stick celery, de-strung and finely diced
1 onion, finely diced
3 mushrooms, halved and sliced
2-3 bay leaves
half a tsp dried thyme
1 parsnip, cut into bite sized pieces
500ml strong chicken or vegetable low salt stock
3 semi dried prunes, sliced finely
1 tbsp fresh parsley, chopped finely.

For the pastry :

300g plain flour
100g Atora shredded suet (I use vegetable suet)
100g butter
120ml sparkling mineral water (although tap water will do)
sea salt
an egg, beaten, to glaze.

Method :

1.  Begin by making the pastry.  Place the flour into a large bowl and add the suet, butter and sea salt.  Rub the fat into the pastry by rubbing it between your fingertips, until you have what appears to be a cross between cornflake shapes and breadcrumbs.

2.  Add the water gradually - you may not need the whole amount, or you may need a little more - mixing with a knife and patting and pushing the dough together to form a ball.

3.  Once the pastry has formed a ball, wrap it in cling film and put it in the fridge to rest.

4.  Take a large, deep frying pan and add enough olive oil - up to 1 tbsp - to cook the leek in.  Heat over a moderate heat and add the leek.  The object of the exercise is to cook the leek without any browning or caramelisation.  You want soft leeks with bright green colour still.  Once cooked (around 10 mins) remove from the pan and reserve.

5.  If the rabbit isn't already jointed, cut it into six joints - the two back legs, saddle, ribcage and two front legs.

6.  Place the flour, sea salt & black pepper into a large plastic bag and shake to combine.  Add the rabbit pieces and give a good old shake about, to dredge the rabbit with the flour.

7.  Add another tbsp of olive oil to the pan and heat over a high heat.  Once really hot, add the first three rabbit joints and sear them until golden.  Remove into a casserole dish and retain.  Repeat the process for the next three rabbit joints.

8.  Reduce the heat under the pan and add the bacon.  Cook until the fat has rendered and the bacon is just beginning to colour.

9.  Add onion, carrot, celery, mushrooms and bay leaves and a little (100ml) water to mobilise whatever oil is in the pan and deglaze the pan base, which will steam the vegetables until the water has evaporated, then fry the vegetables.  Aim for a slight colouring and softened vegetables.  Add the thyme and parsnip and decant the vegetables into the casserole dish.

10.  Pour the stock into the frying pan and heat it through until just boiling.  Decant into the casserole dish, cover the casserole and place into a pre-heated oven at 170degC/325degF/Gas 3 for the next 2 hours.

11.  When the two hours are up, remove the rabbit onto a plate and using a slotted spoon, sieve out the vegetables into a bowl.  Decant the remaining stock into a small saucepan and reserve.

12.  Place the stock onto a moderate heat and bring to a boil.  Reduce the quantity until the flavour of the stock is sufficiently intense - you will probably have reduced it by half and it will have thickened somewhat.  You can then spoon any excess oil from the top of the stock.

13.  Remove the meat from the rabbit bones and discard the bones.  Place the chunks of meat into another bowl and add the leek, prunes and parsley along with sufficient of the casserole vegetables to make up the quantities for your pie dish.

14.  Add two or three tbsp of reduced stock to the pie filling and stir gently to combine.  Set aside to cool completely while you roll out the pastry.

15.  Cut the pastry ball into one third/two thirds and re-wrap the two thirds.  Roll out the one third to the correct size to line your pie dish.  Lay it into the pie dish and make sure no air bubbles are between the pastry and the dish.  Trim to size.

16.  Add the cooled pie filling, heaping it towards the centre of the dish.  Press down lightly as you go, you want to have as deeply filled a pie as is possible.

17.  Using the beaten egg, brush a little egg wash around the pastry edge.

18.  Roll out the two thirds piece of pastry to a size larger than the pie dish, that will cover the filling and comfortably meet the edges of the pastry.   Lay the rolled out pastry over the pie and smooth it down to the edges.  Press the pastry lightly over the egg washed edges, then using a decorative knife point, or fork, or any other method of your choosing, press an attractive pattern into the edge which will not only look nice but will secure the two pastry pieces together.  Trim the pastry neatly and remove the excess.

19.  Neatly cut a hole into the top of the pie and give the pastry a good coating with egg wash.  If you're feeling creative, you can now cut some leaves, or a likkle rabbit, out of the excess pastry to decorate your pie with.  Lay the decoration onto the egg washed pastry and give them their own coating of egg wash.

20.  The pie is now ready for baking!  Place into a pre-heated oven at 180degC/350degF/Gas 4 for 45 - 50 minutes or so.  Keep an eye on the pastry in the last 10 minutes, you are aiming for a golden top with discernibly golden pastry sides (presuming your pie dish is transparent, that is!).

Once baked and when you remove your pie from the oven, remember to take a moment to appreciate your creation.  You've taken enough time to bring it to life, a bit of appreciation before you cut it and destroy its natural beauty, is only right and proper.

Serve the pie with seasonal vegetables of your choice and the remaining stock as gravy.

Printable version

2 October 2013

Creamy Parsnip and Squash Bake

The first instalment of summer squash got used to make this fantastic - and soon to be made again - creamy bake of a side dish.

It all came about because I was looking for a simple recipe that would enable me to tell how the squash tasted and how it behaved during cooking.  The recipe was perfect for that and I was able to glean that it held together very nicely, was sweet and didn't dissolve into water once cooked.

I had four lovely little parsnips from thevegibox.com that were waiting to be used in something and I started to think about what hubby particularly likes.  Now it goes without saying that he likes chilli, and Mexican flavours, Spanish flavours, Mediterranean flavours and a whole raft of Indian and Chinese flavours.  However, none of those really matched up with parsnip and squash.  However, creamy flavours did - and hubby loves creamy flavours.  So then a picture came into my mind of Dauphinoise potatoes - but made with parsnip and squash.  Except, the garlic didn't really go.  Aha!  But finely chopped shallot would - and so would thyme and parmesan.  Bingo.


So what meat would go nicely with this combination?  Well, chicken was an obvious choice and I'm always keen to have a roast chicken dinner.  Plus, Vegibox had delivered some more lovely rainbow chard and this would be a perfect opportunity to try some cooked quite plainly and as a side vegetable.

I contemplated what to do with the chicken next.  Yes, I could have just roasted it with a little oil and seasoning, but that was a bit dull and if the bake didn't come off it would be a very disappointing dinner.  Lemon was out because of the cheese and cream in the bake, but I was already using thyme so that was a possibility.  So what goes with cream?  Well, you have mustard cream sauces but I didn't want to use more cream.  What do you use with chicken that would go with mustard and with the cream in the bake?  Honey!  Aha!  Honey mustard chicken!  Perfect.


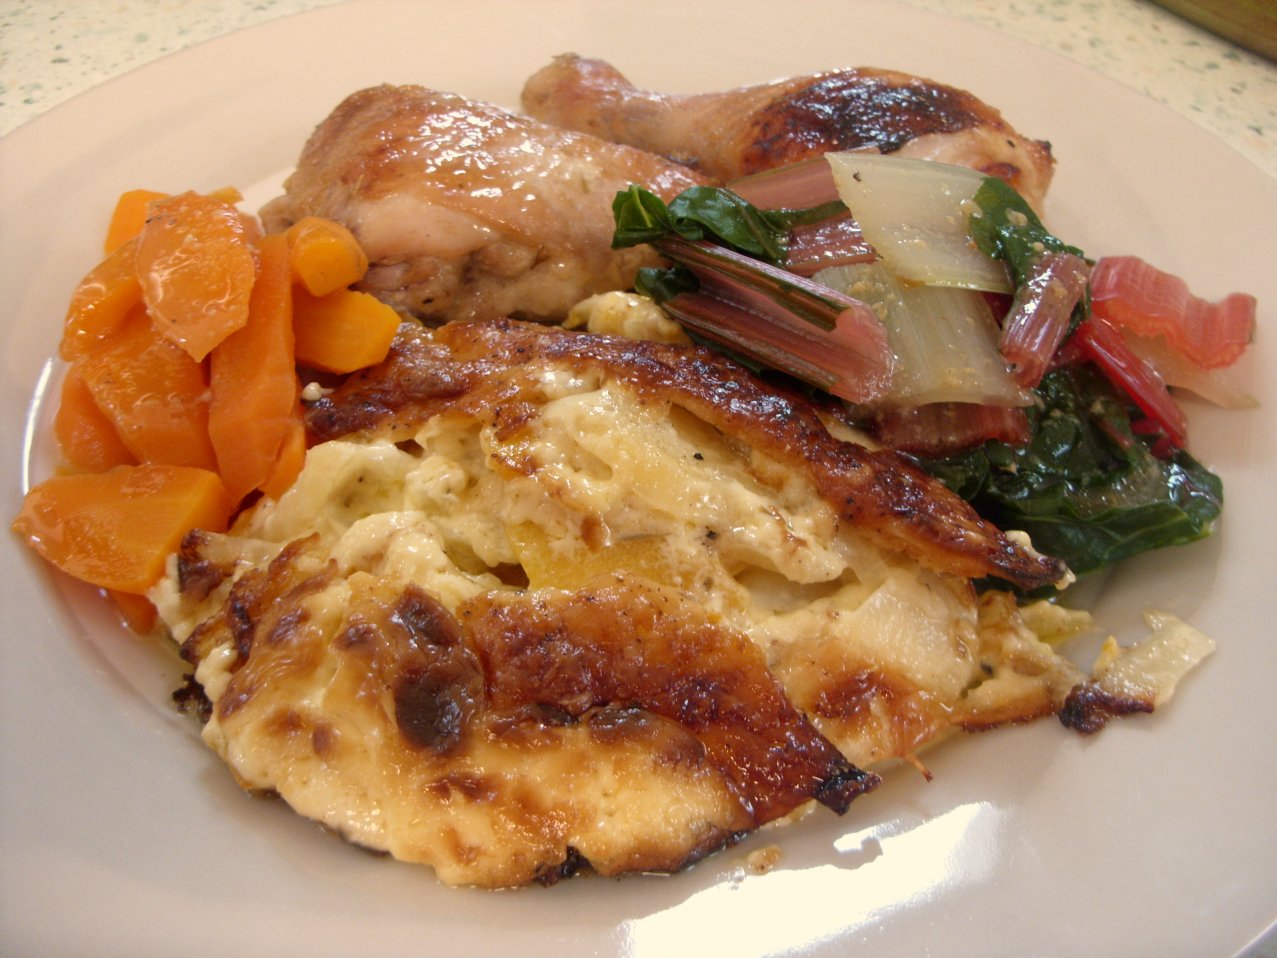
So there we were - the creamy parsnip & squash bake, with honey mustard chicken, rainbow chard and carrots.  Yum.

Now assuming you're rather better with a mandolin than I am, you'll be able to cut your parsnips and squash into evenly sized slices without losing any skin - which is the recommended method.  I lost the edge of my little finger - and this is the not-to-be-recommended method.  Alternatively, you could just use a knife, but be sure to get your slices even widths or they will all take different times to cook.

Owing to the relatively few ingredients required for the bake, it came together really quickly (even with a first aid break) and my Nanna's lovely brown heatproof glass casserole was perfect for it.  I was able to control the browning of the cheese on top by use of the casserole dish lid and it sat very politely waiting to be served when it was done some 10 minutes early.

All that contemplation as to what hubby liked paid off when, after his first few forkfuls, he declared "this parsnip & squash thing is fabulous!".  After my first taste, I had to agree - it was fabulous.  You could still taste the parsnip, but it didn't take priority over the other flavours (as parsnip is wont to do).  The squash was there, adding sweetness and that lovely gentle flavour that is uniquely squash.  The cream, onion and thyme bound the whole ensemble together and the cheese added that richness to the flavour that just finished it off perfectly.


Oh, and for those who are interested in such things - the rainbow chard was really very good indeed!  I used the cooking juices from the honey mustard chicken as a light gravy over the chard and carrots and they went together beautifully.  People who have seen the photographs on Rhubarb & Ginger's Facebook page, have asked me what the "rhubarb looking" thing is - and it is interesting that chard has the same effect on your teeth that rhubarb does!  Rather less than rhubarb in fact, but it is nonetheless still there - that furry, odd feeling.  Its flavour is almost tinny, but in a nice, juicy, veggie kind of way.  I was expecting it to be more cabbage-like in flavour, but in fact it turned out to be much more spinach-like.  Really very acceptable - and it makes rather more sense as to how it can be used in flans and quiches now!

Everyone, without exception, really liked everything on the plate but particularly the creamy parsnip and squash bake.  To the point that, at washing-up time when I discovered a spoonful of it left - cold - in the dish, son & heir and myself were to be seen sharing it.  Well, it was too small to keep!  I think that was testament to how good it truly was.

CREAMY PARSNIP & SQUASH BAKE  (serves 3)

Ingredients :

butter, for greasing & several small knobs for the surface
500g parsnip, peeled and finely sliced
500g butternut squash, peeled and finely sliced
1 banana shallot, finely chopped
1 tsp dried thyme
300ml double cream
25g parmesan cheese
15g strong cheddar cheese
sea salt and freshly ground black pepper.

Method :

1.  Pre-heat your oven to 160degC/325degF/Gas4.

2.  Rub the bottom and sides of a gratin dish with butter.

3.  Place the parsnip and squash slices into the dish and toss together with the shallot, thyme and some salt and pepper.  Arrange the slices randomly but fairly evenly to give a fairly flat surface, in the dish.

4.  Pour over the cream and sprinkle on the cheeses.  Add a dot of butter here and there on top of everything else and give an additional sprinkle of freshly ground black pepper.

5.  Cover the dish and put into the oven to bake for 45 minutes.  Remove the lid and replace into the oven for the remaining 15 minutes, to brown the surface.  The bake is complete when a knife will insert easily into the vegetables.

Serve.

Printable version
 

12 September 2013

Tonight's dinner : I cut my finger - does that make me a cook, now?

There is a train of thought in amongst the Shamanic fraternity that it takes a near death experience (preferably with lightning) in order to make a Shaman.  So, I was wondering whether nearly taking the top of your finger off on a mandolin, qualifies you as a Cook with a capital "c"?

I'll go with a "yes", I think.


I was slicing parsnips and squash (beautiful parsnips and squash from thevegibox.com), to make this creamy parsnip & squash bake.  Poor hubby and son & heir came back from walking the dogs, to find me hyperventilating whilst holding my right hand in the air with my little finger swathed in kitchen paper.  Yes, it did leak - copiously.  However, with the addition of a dressing, a plaster and a latex glove, I soldiered on like the brave likkle Cook that I now am.

Now, this 'ere bake very definitely deserves its own recipe post - so watch this space and it shall appear.  It was utterly delicious, incredibly moreish and comfort food to the Nth degree.  Like so many of my favourite recipes, it was so easy to make too!  (Well, not counting the first aid requirement).

I partnered the bake up with some honey & mustard chicken (gorgeous) together with some  steamed young carrots and rainbow chard from thevegibox.com.  This was our first go with chard as a side veggie and combined with the cooking juices from the chicken, it was really good.  It didn't taste how I was expecting it to - it has a definite spinach quality, whereas I was expecting more of a cabbage quality.  Very nice!

The chicken was rolled around in some runny honey that I'd combined with Dijon mustard, a little dried thyme and a pinch of salt and pepper.  It baked up well and provided some lovely juices that stood in well instead of having to make a gravy or jus.


The whole family enjoyed the meal and there were clear plates all round.  Can't ask for more than that!


17 January 2012

Pesto crusted cod with roast vegetable giant couscous

As you no doubt know, I've been looking for low calorie, healthy recipes with a view to us all trimming a little of the Christmas-induced waistline width.

I am also very keen to include more fish in our diet.  Amazingly, we all like fish - and we just don't make as much of it as we could do, because of the price in the supermarket.  We do have a fishmonger down in Lower Parkstone that we've spotted, but disabled access to the shop is quite difficult.  I think I'm going to have to send hubby in there to have a recce before I try staggering across the road and standing up long enough to view all the fish on offer (and absorb some of the prices!) before attempting to stagger back to the car, without bursting into tears or hyperventilating.  It'd be great to find a fishmonger (or fishmungler, as they're known in this house) because then I won't be restricted to cod, haddock or river cobbler.  I'd absolutely LOVE to get my hands on a crab or two, plus sardines - well, all manner of fish and shellfish!

In the meantime, however, I've been attempting to make something of the frozen fish on offer at the supermarket.  It is, at least, almost affordable in price even if it does require copious amounts of kitchen paper in order to squeeze the water from it!

I had decided to make some oven-baked fish - and cod won the toss, in this instance.  You could just as easily use any other type of firm fleshed white fish - haddock is perfect.


The preparation is really easy - just take a nice pesto and spread a teaspoonful across the top of each fillet or piece of fish.  Then, mix together some grated parmesan and breadcrumbs with a little black pepper and pat onto the top of the pesto.


After some 20-25 minutes in the hot oven, the fish was opaque and the crust crunchy.  Delicious!


I'd originally decided to make a roast vegetable couscous, however during the week I'd found some Mograbiah (or giant couscous) and decided to use some of that instead.


I had diced some parsnips, carrot, onion, courgette, red pepper and a baby aubergine which I roasted in olive oil, together with some thyme and garlic.  I cooked the Mograbiah in vegetable stock and simply tossed it together with the vegetables, a little lemon juice and some chopped mint and parsley.  Of course, you don't have to use Mograbiah - normal couscous would do just fine.  As such, I've written the recipe for normal couscous as it's more easily found in the shops.


The two recipes worked very well together.  Hubby found that the mint was a bit too heavy, however I was perfectly happy with the flavours - but then, I love mint!


Considering that the two recipes were either conceived on the spur of the moment, or with fingers crossed (as to whether the fish would be soggy), I was very pleased with how it came out.  Son & heir ate all his fish but was selective about the couscous.  Hubby would eat it again, but with less mint.  I would eat it again, just as it was!

PESTO CRUSTED COD with ROAST VEGETABLE COUSCOUS   (feeds 3)

Ingredients :

3 fillets of firm fleshed white fish
3 tsp pesto
a handful of breadcrumbs
a handful of grated parmesan
freshly ground black pepper
150g couscous
120ml vegetable stock, boiling
1 parsnip, peeled and diced
1 large carrot, peeled and diced 
1 onion, peeled and diced
1 courgette, diced
1 baby aubergine (or another courgette), diced
1 red pepper, cut into 2cm squares
1-2 tbsp olive oil
1 clove garlic, crushed
1 tsp dried thyme
small handful of parsley, chopped finely
2-3 sprigs of mint, leaves removed and chopped
sea salt.


Method :


1.  Pre-heat the oven to 200deg C (fan)/400deg F/gas 6.


2.  Place the parsnip and carrot cubes into a bowl with the garlic and thyme.  Drizzle with olive oil and add a pinch of sea salt.  Toss to mix thoroughly, then turn out onto a baking tray and put in the oven for 15 minutes.


3.  Add the remaining vegetable cubes to the bowl you've just used (which should still be a little garlicky) and drizzle with olive oil, to wait its turn in the oven.


4.  Place the fish into a baking dish, allowing a little space between the fillets.


5.  Spread a tsp of the pesto over each fillet, then in a small bowl mix the breadcrumbs, parmesan and pepper.  Pat the breadcrumb mix into the pesto, taking care to leave the crumbs loose enough that they will crisp in the oven.


6.  Remove the carrot & parsnip from the oven and add the remaining vegetable cubes to the tray, spreading to an even layer.  Replace to roast for 20-25 minutes.


7.  Put the fish in the oven for the same 20-25 minutes.


8.  In the meantime, in a deep bowl, add the boiling vegetable stock to the couscous.  Cover with cling film and leave to absorb the stock for 10-15 minutes.


9.  Uncover the couscous and fluff up with a fork.

10. Remove the fish from the oven and keep warm whilst you finish off the couscous.

11.  When the vegetables are fully roasted, browned and lovely, add them to the couscous and gently stir through.


12.  Add a squeeze of lemon juice and the chopped parsley & mint.  Taste and add a pinch of sea salt, if necessary.


13.  Serve.

25 November 2011

Lunchtime Soup

You know those days when you're contemplating what to have for lunch and just don't fancy anything that you've got in the fridge?

Well, on one of those days, "Lunchtime Soup" was born.

I could easily have had a sandwich, but as bread is such a no-no with regard to being inflammatory, (one slice of Oat bran bread registering -33) I was feverishly trying to think of something to have that wouldn't upset the apple cart and leave me in pain for the afternoon.

I knew I had a few crumbs of Turkey left from the meat I'd defrosted for use in the Turkey Curry, but I didn't much fancy having Ramen noodles which would have used them up perfectly.  I did, however, feel like having something warm that came out of a bowl.  Something that you knew you'd eaten by the end of it.  Soup!

Now, this was an enticing proposition because I knew I'd be eating it alone - so I could make it just how I wanted.  Hubby isn't a great lover of home-made soups and anyway he already had plans for lunch.

I had a rummage in the vegetable drawer and pulled out the following :

a shallot (which registered +20)
two sticks of Fenland celery (+10)
a parsnip (-12)
a block of swede (-4)
three florets of cauliflower (+18)
one clove of garlic (+107)
a small bunch of parsley (+50)
a handful of leftover roast turkey meat (-17)

plus :

olive oil (to cook the shallot & garlic in - +71)
chicken stock - I used 2 Knorr Chicken Stockpots (-43)
and enough water to cover.


All of which, once you've done the maths, amounts to a total of +200 - which is just wonderful.


So I was able to have - over two days - lunch that not only was good for me, but was low fat, tasted fabulous and soothed my yearning for comfort food!  It would have been even better for me if I'd have had a couple of carrots in the house, but regrettably we'd used them all up.  What makes this even better, is that the soup ingredients were all leftovers - all except the cauliflower, which I'd bought to make a Skinny Cauliflower Cheese with.


I reckon I've hit dieting Nirvana.  Food that is not only good for you (in whatever way you want it to be good for you), but comes as an added bonus on top of your normal planned menus.  Can't be bad!

If you'd like to re-create this lovely yumminess at home, here's what I did (but you can add or remove any part of it, substitute veggies, or use veggie stock - the world is your oyster!) :


LUNCHTIME SOUP  (serves 2)


Ingredients :

1 tbsp olive oil
1 banana shallot, chopped fine
1 clove garlic, chopped fine
2 sticks celery, de-stringed and chopped fine
1 medium parsnip, peeled & sliced finely
a small block of swede, peeled & diced finely
3 florets of cauliflower, each cut in half


600ml chicken or vegetable stock - I used 2 Knorr Chicken Stockpot
a few offcuts of cooked meat taken from a roasted joint
a small bunch of parsley, chopped.

Method :

1.  Heat the olive oil gently in a saucepan and add the shallots.  Cook over a medium heat until they are softened but not browned.


2.  Add the garlic and continue to cook for another minute or so.


3.  Add the remainder of the vegetables, except the parsley, and cook on a greater heat for 3-4 minutes.


4.  Add the stock and bring to a boil.


5.  Reduce to a simmer and cook until the vegetables are very nearly at the desired tenderness, then add the cooked meat.  Make sure the meat has heated through and the soup is back up to temperature, during which the vegetables should have attained the desired tenderness.  Try not to stir too briskly, or you'll break up the pieces of meat.


6.  Add the parsley and stir to combine.  Cook for another minute, then serve.


.

5 August 2011

Cheesy Parsnip Flan - perfect for al fresco eating

Not that we ate al fresco on the night we had the flan, but it would seem like a very civilised thing to do.  Maybe once we've got a table and chairs for our new patio!

I've had some success with tarts and flans since I bought the new flan/quiche dish and - owing to an oversight on the shopping front - had two packs of ready-rolled shortcrust pastry in the freezer, doing nothing.

So, I began to think about what I could put into a pastry case.  Sweet flans are relatively easy - and pretty much off limits at the moment.  Hence, I began to ponder on what went with what, savoury-wise.  Smoked haddock immediately sprang to mind, but have you seen how much it has gone up in price just lately?  I can only think that it's out of season - and as I like to eat seasonally (where possible) I rejected that on both those grounds.

Chorizo was the next on the list.  I don't know why Chorizo keeps on coming to mind, considering I don't really like it.  It's one of those things that I think I'll like, but when it comes to it, it's just to strong on the paprika.  I suppose it could be the type of Chorizo I buy and maybe I should source some from elsewhere and see if I like it better.  I wonder if Spring Fields butchers does it?  I'll have to find out.

So anyway, that was out for obvious reasons.

I'd recently done a Quiche Lorraine, so that ruled bacon out - unless I could find a flan topping that was so far from Quiche Lorraine as to be unrecognisable.

However, before I could come across a flan topping that used both chorizo and bacon (well there's bound to be one!), my mind travelled down the celeriac lines (remember the Cheesy Celeriac Slice?), and after a quick dalliance there, it hopped over to parsnip.  I pondered on whether if you cooked your parsnip pieces (just boiling them), then riced (or mashed) them and added oodles of sharp cheddar, some cream (just a small amount), maybe some mustard (Dijon or English?), before topping up the whole thing with some beaten egg - whether you'd wind up with something good?


Well, funnily enough, you do!  In fact, you wind up with something that is so good, it quite defies belief.

It isn't as deep as a quiche's middle, and the parsnip gives it a totally different kind of texture.  The cheese and the parsnip go together quite ridiculously well.  I had been worried that the parsnip would stamp all over the cheese, but so long as you make sure you've got a good flavoursome sharp mature cheddar, it'll be fine.  Incidentally, at the last minute, I added a teensy bit of Grana Padano just to add another dimension to the cheesy flavour.

Again, this is another dish that is so easy to do, it'd be a great one to prepare with your kids (if you've got some - if not, then borrow some just for this).  You'd better issue them with their own little piece of cheese to munch though, or all your recipe cheese will disappear!

We ate it with some gorgeous chutney from the Isle of Wight Garlic Farm, that my parents had brought back for us.  The pair of them were made for each other.

CHEESY PARSNIP FLAN  (feeds 4 hungry people)

Ingredients :

A piece of shortcrust pastry, enough to line your quiche dish
200g of cooked parsnip, cut into chunks
175g strong cheddar cheese, grated
75g grana padano or another cheese of your choice, also grated
3 large eggs
100ml double cream
1 tsp Dijon mustard
freshly ground black pepper.

Method :

1.  Pre-heat your oven to 180deg C//350deg F/Gas 4.

2.  Line the quiche dish with the pastry, then crack one of the eggs into a bowl and give it a light whisk with a fork.

3.  Brush some beaten egg onto the surface of the pastry and prick with a fork.  Line with non-stick baking paper and baking beans, then blind bake for 15-20 minutes.

4.  Remove the beans and baking paper and leave to one side while you prepare the filling.

5.  Into a large bowl, either mash the parsnip pieces or put them through a ricer.  You are aiming to have a smooth paste of parsnip.

6.  Add all but a handful of the cheeses to the parsnip.

7.  Crack the remaining two eggs into the bowl with the original egg and add the cream,  mustard and some freshly ground black pepper.  Whisk them up until they are nicely combined.  There is no need to add salt, as the cheeses will take care of that.

8.  Add the eggs to the mustard and cheese and stir gently to combine.  Pour onto the pastry case and smooth the surface, giving it a final flourish with the remaining cheese.

9.  Put back into the oven to bake for around 35-40 minutes, or until browned all over and firm to the touch.

Serve with a lovely piquant chutney and some salad.

19 June 2011

Back to the Beef Stew - the changing face of Saturday's dinner!

Such a shame those dumplings were so nasty!
You remember how I was intending to make a beef stew with horseradish dumplings on Saturday, but then along came Martin with his intriguing sounding Red Dragon Beef pie?

Well, I'm afraid I had to go back to the beef stew because I couldn't find the Aduki (or Azuki) beans in time to have them soaked, cooked and ready to go.  I did find them, eventually, at Makka's Food Store in Parkstone (don't know why I didn't look there first, to be honest!).  So, I'm all set for this weekend and we'll have another go at it next Saturday.

So, that meant going back to the beef stew and horseradish dumplings.  Which was fine, except I then needed to send faithful Hubby out to fetch a parsnip and a swede.  Thus armed - and with 800g of beef brisket from Spring Fields butchers - I set about making my stew.

I love making stews because they always come out differently, depending on what ingredients you include.  This time, I didn't want to include flour as a thickener.  I thought I'd use red lentils and pearl barley.  The lentils just disappeared, which was lovely as they just added to the thickness and earthiness of the gravy.  The pearl barley just did what pearl barley does and became plump and yummy.  Unfortunately, Hubby isn't so keen on pearl barley and I can really only get away with using it in something like a stew, where it goes down along with everything else and doesn't really get in the way.  The stew came up beautifully thick and with a clarity to the gravy that just doesn't happen when you've used flour.  So I was happy with that.

It looked so good, too!
The beef, as ever, was lovely and wonder of wonders, I didn't over cook the parsnip.  In fact, I do believe some pieces were actually slightly under cooked!

However, I have to take issue with Olive Magazine's rendition of a horseradish dumpling.  The dumplings I made, according to their recipe, were not only a tad wet (which, on its own, would have been forgivable as I don't roll the dumplings but drop them straight into the stew in a kind of free-form pattern) but adopted a really odd kind of sweetness, which I imagine came from the fact that Horseradish Cream was used (as per their recipe).  Put it this way - I won't be attempting horseradish dumplings again, any time soon.  I shall stick to my good old herby dumpling mixture which always works a treat.

As a consequence, I haven't included dumplings in the recipe here.  I don't want to have you thinking that I've tried and tested the recipe and approve of it.

BEEF STEW  (serves 4-5)

Ingredients :

A tbsp of olive oil
800g beef brisket, trimmed of all fat and cut into chunks
sea salt & freshly ground black pepper
1-2 onions, chopped
1 clove of garlic, grated
2-3 carrots, peeled and diced
half a swede, peeled and diced
a beef oxo cube
water, to cover
1 tbsp tomato ketchup
1 tbsp tomato puree
1 tsp marmite or bovril
a pinch of dried sage
a glug or two of Worcestershire Sauce
4 tbsp dried red lentils
2 tbsp dried pearl barley
2-3 potatoes, peeled and diced
1 parsnip, peeled and diced.

Method :

1.  Pre-heat the oven to 160deg C.

2.  Heat the olive oil in a frying pan and, when hot, add half the beef and sear on all sides.  When seared, decant into a deep pan or casserole dish.  Repeat with the remaining beef.


3.  Add the onion to the pan and reduce the heat.  Allow the onion to cook for around 5 minutes or until it is softened and transparent.  In the last few minutes, add the grated garlic.  When cooked, decant into the casserole dish.


4.  Add the carrot and swede to the casserole dish.


5.  To the frying pan, add enough water to approximately cover the contents of the casserole dish and begin heating it as you add the oxo cube (crumbled in), the tomato ketchup, tomato puree, marmite (or Bovril), sage and Worcestershire sauce.  Allow to come to a boil, then decant into the casserole.

6.  Add the lentils and pearl barley and stir to combine.

7.  Cover and place the casserole in the oven and cook for 90 minutes.

8.  Remove from the oven and add the potato and parsnip.  If you are adding dumplings, you may need to add a little water to increase the gravy level.  Check the seasoning and give a good stir to combine, then replace in the oven for another 60 minutes.

9.  Serve!

.


20 February 2011

Chicken in Cider - the "nearly rabbit".


I really wanted to find a rabbit from the butcher, this week.  Unfortunately, neither of our local butchers had rabbits (Spring Fields only stocked rabbits from China – what’s with that?) so I was left pondering on chicken versus pork as a satisfactory stand-in.

As it turned out, I forgot to take the chicken out of the freezer in time, so we got another 5 chicken breasts for £5 and put two of them in the freezer for next week.  Far easier than pondering further on what cut of pork to use!

I can quite see how this recipe would be really suited to cooking a rabbit, as the chicken was nice, but rabbit would have lent a rather more earthy flavour to the ensuing sauce.  However, a gold star for excellence must be awarded to the Cider I used.  It was Sheppey’s Dabinett Cider, a single variety cider that at £1.54 for a 500ml bottle wasn’t the cheapest choice, but equally it could have been worse.  However, for flavour, it really was perfect.  In fact, by the time hubby and I had had tasties, there was little more than the required 350ml left!

I certainly didn’t miss the rabbit, as the chicken made for an excellent stand-in and we didn’t have to contend with son and heir’s distaste for rabbit.   He’s having problems getting past the “fluffy bunny” aspect, you see, but considering he’s just 12 it’s understandable.

One thing to bear in mind with this recipe is that it requires overnight marinating – so you need to have a plan in place and not forget to take the chicken out of the freezer, like I did. 

Poulet au Cidre

CHICKEN IN CIDER (serves 3)

Ingredients :

3 skinless chicken breasts
9 prunes
350ml dry cider
a large onion, sliced
1 tsp wholegrain mustard
2 bay leaves
salt and pepper
2-3 tbsp plain flour (more = thicker sauce, less = thinner sauce)
2 tbsp olive oil
10g butter
1 large parsnip, peeled and cut into chunks
small can red kidney beans, drained

Method :

1.  Put the chicken pieces into a large bowl with the prunes, cider, onions, mustard, bay leaves and 250ml water.  Season and stir gently to mix, then cover tightly and refrigerate overnight.

2.  The following day, pre-heat your oven to 180deg C/350deg F.

3.  Remove the chicken breasts and pat dry with kitchen paper.  Whilst the oil and butter heats up in an ovenproof casserole dish, toss the chicken in seasoned flour.  Then fry until brown and remove to keep warm.

4.  Sprinkle any remaining flour into the casserole and stir round.  Pour in the marinade, reserving the prunes.  Add the parsnips, return the chicken to the dish and bring to the boil, covered.

5.  Once at boiling point, put into the oven and bake for around 40 minutes.

6.  Add the prunes and the beans, cover again and bake for a further 15-20 minutes or until everything is tender.

Serve with mashed potato and green beans.

.


Related Posts Plugin for WordPress, Blogger...