Showing posts with label shallots. Show all posts

1 March 2014

BBQ meatloaf - man pleasing food!

This meal was born from a desire to create a "man pleasing dinner".  The notion was that having had a healthy, vegetable inclusive fish dinner the night before - and another vegetable inclusive meal to come on Sunday (tomorrow) - the menfolk might like a man pleasing dinner to keep them interested.

In fact, this meal contained the subject of this blog entry - the meatloaf - together with a fantastic cornbread (which is dealt with in the next blog post) and baked beans.

Now I don't know about your menfolk, but my menfolk like meat.  No, in fact, they like MEAT.  *chuckle*  I can understand this, as I'm a bit of a carnivore myself and do sometimes get a terrible hankering for a big lump of roast beef in which to sink my gnashers.

Quite a long way up on their "man pleasing foodstuffs" list, but below meat, is a good barbecue sauce.   We've discovered Kraft's Bulls Eye BBQ sauce, which is currently doing a pretty good job in that connection.  If anything, I find it a tiny bit sweet - but the menfolk love it and that's the main thing.

I can't claim to have invented this form of meatloaf, as like with a lot of things, I spotted a photograph on the internet that piqued my interest.  That of a meatloaf with a coating of barbecue sauce - and it looked good.


Now I have written previously about my attempts to make a firm meatloaf that doesn't require a spoon with which to serve it.  Hubby has a term for these soggy meat loaves - that of "meat porridge".  It describes the texture quite succinctly.

Fortunately for us, I discussed the problem of meat porridge with my pal Melanie (a Brit who has been in Canada for the last mumblymumble years) and who claimed to have solved the conundrum.  She decreed her meat loaves to be firm and positively perky.  Hence, I have paid attention to Mel's tutelage and gone down my own road with the flavourings - but followed the basic recipe quite closely.

Lo and behold - what do we have here?  Only a firm, sliceable, serve with a spatula and no spoon in sight, delicious meat loaf!  Thanks, Mel!

If you also have problems with meat porridge, it is well worthwhile having a read of her treatise on the subject at her blog, Rutabaga Dreams.

I had been pondering on what to use as flavourings and couldn't really come to any firm conclusions.  I knew I had to be aware of how much salt was being included - as additional sauces can often bring quite a slug of salt with them.  So salt wasn't a problem unless I overdid it.  The basic meats were two thirds beef, one third pork and a lone rasher of bacon (that had no other home to go to).  Now onion was a given - but in fact, I used two shallots for their sweetness.  The breadcrumbs were made from a combination of white and brown Polish Bakery bread - which can only be surpassed by home made bread, in my view.  I also added a little tomato ketchup, some Worcestershire sauce, some Mic's Chilli Inferno hot sauce, a teaspoonful or so of freshly ground black pepper, some dried parsley and something that you may not have at home - a teaspoonful of Essential Cuisine's mushroom stock powder.  Add an egg, mush it all together and into a loaf tin it goes!


Baking the meat loaf (at 180degC) is a simple matter of making sure it is inside another roasting tin, to catch any drips that may escape the loaf tin, then fishing it back out after 30 minutes.  Very carefully, tip the liquid away then coat the top of the meat loaf generously with your favourite barbecue sauce.  Back into the oven it goes for another 30 minutes and you're done.

The flavourings really are up to you.  You can go Italian with sun dried tomatoes, oregano and garlic, or Mexican with chillies and beans, Indian with curry spices - really, so long as you follow the "no ingredients that will leach liquid" (like tomatoes, mushrooms, courgette etc.) and include the breadcrumbs and an egg, I see no reason why your meat loaf shouldn't be as sliceable as mine turned out to be!

The menfolk both gave the meat loaf - in fact, the whole dinner - a big thumbs up, so I'd say that's job done!

BBQ MEAT LOAF   (serves 3-4)

Ingredients :

3-4 slices of dry bread, blitzed into crumbs
pinch of sea salt
half a tsp of freshly ground black pepper
half a tsp of dried parsley
500g minced lean beef
250g minced lean pork
1-2 rashers of bacon, chopped fine
1 dessertspoonful of tomato ketchup
1 tsp of hot sauce (to taste - use more if you like more)
2 tsp of Worcestershire sauce
1 tsp of stock powder of your choice (most, but not all, of a stock cube will do)
1 egg
3-4 tbsp BBQ sauce.

Method :

1.  Place all the ingredients barring the BBQ sauce into a large bowl.  Using your hand, scrunch and mix the ingredients until they are all evenly spread throughout the mix.

2.  Take a one pound loaf tin and line it with silver foil (non-stick silver foil, if you can get it, is wonderful for this!).

3.  Pack the meat mixture into the loaf tin, pressing it down firmly.

4.  Place the loaf tin inside a bigger roasting tin and into a pre-heated 180degC/350degF/Gas 4 oven for 30 minutes.

5.  At the end of the time, remove the meat loaf from the oven and carefully drain the liquid away.  (Be very careful not to let your meat loaf fall into the sink, as happened to me on one stellar occasion).

6.  Coat the surface of the meat loaf in BBQ sauce and replace into the oven for another 30 minutes.

7.  When the time is up, remove from the oven and from the loaf tin.  Carefully peel the silver foil back all around the meat loaf, but be careful of the hot liquid that will be contained therein.  Let the loaf rest for a couple of minutes - no longer than 3-4 - then slice and serve.

Printable version

4 August 2013

Lemon & poppyseed sauce for chicken - that's different!

Well now it's not often that I post up a recipe for just a sauce, so maybe that gives you an indication of how much I rate this particular sauce.

What makes it so special?  You may well ask - and it'd be a good question.  I reckon it is the juxtaposition (phew, big word!) of the lemon against the soured cream against the savoury shallots against the big textural input of the poppyseeds.  It's just like nothing I've ever had before.

I found the recipe for the sauce in the latest edition of the BBC Good Food magazine again (there's going to be a few of those cropping up - it was a great edition!) and once again it isn't out on the website yet.  I'm sure it will be there eventually, but until then, you can find it here.


Both myself and the original recipe used it to accompany roasted chicken pieces with roasted root vegetables, which was great.  I also added some mashed potato - which went down very well with myself and son & heir, but not so well with potato-hating Hubby.  We've resolved to use sweet potato for him in future, as they would go so well with this sauce.

I have also just finished off the remainder of the sauce by putting it over some noodles with sweetcorn added.  It was certainly different - and very nice.  I think I'd have preferred peas, but we have a glut of sweetcorn, so that got used instead.  It didn't matter, I reckon you could eat yesterday's newspaper with that sauce and it'd taste good.


It is simplicity itself to make - and if you think ahead and bake or roast your meat and vegetables, then that will leave you the time to concentrate on cooking the sauce.

One cook's note is to make sure not to reduce it too far, because as soon as it hits the plate it begins to thicken - most mysteriously - so you need it to be verging on the point of being too thin before you serve it.

I used our beautiful Amalfi lemons for it, which gave it a slightly sweeter note than perhaps using normal lemons would have done, but either way I'm sure it would be fab.  The shallots gave it that savoury edge, with the lemon creating flavour and tang, the paprika gave wonderful colour and broadened the fruity flavour.  Of course, the honey sweetened the whole thing, the chicken stock (I used my favourite Essential Cuisine chicken stock powder) gave it body and the poppyseeds provided that amazing textural element as well as a very different flavour.


The original recipe included some fresh parsley which I left out as I had run out.  I have to say that I didn't miss it, so feel free to add some in or leave it out as you wish.


I can imagine that this sauce would be lovely with just about any fish or meat other than smoked types.  You would need to be careful over what sort of vegetables you put with it - I doubt that plain boiled cabbage, cauliflower or brussels sprouts would go so well.  However, carrots, peas, parsnips, beetroot - all the sweeter flavours of vegetable complement its tanginess perfectly.  Something fairly bland like mashed potato or rice (vegetable rice would be very good) would be perfect as it mops up the sauce and gives a different texture to that provided by the poppyseeds.

Just don't make or eat this sauce if you're dining with your boss, or are on an important date - those poppyseeds, they hang onto your teeth!


LEMON & POPPYSEED SAUCE   (serves 4-5)

Ingredients :

1 tsp rapeseed or olive oil
1 shallot, finely chopped
1 tbsp poppyseed
1 tsp sweet paprika (not smoked)
200ml chicken stock
1 tbsp clear honey
zest of 1 lemon
juice of half a lemon
150ml soured cream
sea salt & freshly ground black pepper.

Method :

1.  Heat the oil in a small saucepan and add the shallot.  Cook over a gentle heat, taking care not to allow the shallot to brown.  Once the pieces are turning transparent, add the poppyseeds and a teensy pinch of sea salt.  Continue cooking until the shallot is completely transparent (around 5-7 minutes).

2.  Add the paprika, chicken stock, honey, lemon zest and juice and stir well to combine.

3.  Bring to a lively simmer and cook until the liquid has reduced by half.

4.  Remove from the heat and add the soured cream.  Stir through until completely combined and taste for seasoning.  Add a little more salt and a good quantity of freshly ground black pepper.

5.  Continue to cook on a gentle simmer until the sauce has again reduced a little and the consistency is that of double cream.

Serve with roast chicken and vegetables such as peas, carrots, roasted sweet potato etc., instead of gravy.

Printable version 

25 October 2012

Old fashioned Buttermilk Chicken & Bacon in the Slow Cooker

No those aren't burned carrots - they're purple!
I have had it in mind for ages now, to try and re-create a Chicken Casserole flavour from my youth.  I have carried the memory of this flavour down through the years and always intended to find my way back to it, eventually.

The casserole used to be cooked by my Mum and was very obviously chicken, but with some quite largish pieces of smoked bacon (that I used to pick out and enjoy eating), in a light coloured but very tasty sauce.  I had a vague memory that she also used a bouquet garni - but got sidetracked along the line and went for thyme and tarragon in the end.

I don't remember when we used to have this meal - I suspect it was probably one of my Mum's weekday repertoire as I remember it so well.  I can remember there being just one problem with the dish, in that every so often you'd find a small piece of crumbly matter in the gravy which I always took to be very well-cooked chicken marrowbone.  I can remember it used to make my stomach heave - but the rest of the casserole was so tasty, it was worth chancing coming across one of these little lumps.

I was very determined not to have anything resembling chicken marrowbone in my dish!

Well, I'm not sure that I made it back to that flavour totally - but the dish that I wound up with is just so lovely that it will stand as a recipe on its own.

I dare say that I'm not alone in finding chicken terribly expensive all of a sudden?  We've had to stop buying just chicken breasts for our chicken dinners these days and have opted for one breast with a combination of leg portions, or thigh portions, to make up the remainder.  I have even been known to buy a whole (small) chicken and joint it, for use in dishes like this.  Yes, I have finally managed to joint a chicken without getting cross with it.  My wonderful poultry shears have made all the difference.  I just use them to cut out the backbone, then it is an easy job to separate out the leg and wing pieces and fillet out the breasts.  I should apologise to the poor chickens that I mangled, whilst learning this process!

Being cooked in the slow cooker, of course the chicken is just so succulent and tender.  The pieces of chicken breast stay incredibly moist and the leg meat just collapses and adds to the gorgeous melange.  I made sure, when I originally cut up the leg portions, to run the cut ends of the bones under the tap and so get rid of any loose bits and pieces.

Having the whole shallots is great too - I was so glad I didn't chop them up - as they become soft squishy bundles of sweet oniony, chickeny loveliness.

I was glad that I'd opted to put a tablespoonful of the fresh tarragon in to cook at the beginning of the process as that lent a very mature flavour to the gravy.  Adding the fresh tarragon at the end just brightened up the flavours and helped the dish look appealing.

The buttermilk is an interesting addition, don't you think?  It was far lighter than adding yoghurt or creme fraiche, and took the gravy down a very slightly tangy route that was helped along by the squirt of lemon juice.  What could have wound up a very heavy, muddy flavoured stew wound up being light, tangy and full of different flavours.

Just look at those carrots - they're certainly different!

I served the chicken with some "Rainbow Carrots" as Asda so romantically called them - there were purple, yellow, white and the classic orange in the pack and they were fun to have, along with some broccoli and green peas.  Just be aware, when peeling the purple carrots, that like all purple food they will stain anything they come into contact with - including the white carrots!  Still, it all made for a lovely colourful and healthy-looking dish.

Hubby agreed with me that the dish had a flavour that took you back to the Seventies and beyond.  It was a flavour that you'd very definitely had before, but the difficult was putting your finger on where and when!  Son and heir thoroughly enjoyed the dish and (hopefully), we'll have created a "flavour of yore" that, you never know, he might find himself searching for in his own kitchen in years to come.

My Mum reads the blog, so I'd be very interested if she was to cook this and let me know what she thinks!  Of course, it doesn't have to be cooked in a slow cooker, put into a low oven (150degC or so) for 2-3 hours would probably do the same job.

Oh, and if you're having problems finding Buttermilk in your supermarket, don't worry - just add a teaspoonful of lemon juice to 280ml of milk and stir gently.  Within seconds, you'll have a Buttermilk equivalent.  Easy - and probably cheaper!


BUTTERMILK CHICKEN & BACON  (serves 3)

Ingredients :

1 tbsp rapeseed or olive oil
1 boneless chicken breast and 2 leg portions
9 rashers of smoked back bacon, cut into chunky pieces
150g shallots, peeled & kept whole
250g baby new potatoes
1 tsp dried thyme
150ml white wine
300ml hot chicken stock (I used Essential Cuisine's chicken stock powder)
280ml buttermilk
a squeeze of lemon juice
1-2 tbsp fresh tarragon, chopped
sea salt & freshly ground black pepper
1-2 tbsp cornflour.

Method :

1.  Cut the chicken breast into three equally sized pieces and separate the leg portions out into drumstick and thigh pieces - trim off any loose pieces of skin and fat.

2.  Heat the oil in a large frying pan and brown the chicken for around 10 minutes (although the breast pieces won't take as long, so you can include them when you've turned the leg pieces), until it has gained a lovely golden colour.  Remove and put into the slow cooker, which you can now turn onto low.

3.  Put the bacon pieces and the whole shallots into the frying pan and cook until the fat has reduced from the bacon and the shallots have gained a little colour.  Put the lot into the slow cooker.

4.  Add the white wine to the pan and frizzle for a moment to reduce the alcohol in the wine.  Then add the stock, thyme and one tbsp of the tarragon.  Once the liquid is up to heat, decant into the slow cooker.

5.  Cut any large baby new potatoes into two and add them to the slow cooker.  Replace the lid and turn the slow cooker up to high.  Forget about it, for the next 4-6 hours.

6.  When the chicken is falling from the bone, with a slotted spoon remove it from the slow cooker onto a plate and remove the bone and gristle and discard them.  Cover the meat with silver foil and keep in a warm place while you deal with the gravy.

7.  Remove the potatoes from the slow cooker and put them with the chicken under the silver foil.

8.  To the gravy in the slow cooker, add the buttermilk and lemon juice and stir well.

9.  Taste for seasoning and add a pinch of salt and some freshly ground black pepper, to taste.

10.  If the gravy is thinner than your preference, take 1-2 tbsp of cornflour in a small bowl and slake with a little water, until you have a runny paste.  Pour half of this mixture into the slow cooker, whisking like fury to make sure no lumps appear.  If the consistency still requires more thickening, add the last half and whisk again.

11.  Finally, add the remaining tbsp of fresh tarragon and stir it in.

12.  Serve the chicken and potato mixture with the gravy poured over, along with some steamed vegetables.

Printable version


13 October 2012

Pasta Carbonara - far too lovely to be healthy!

Blame for this one, quite firmly, lies with son & heir.

You see, every week we ask him whether he has any requests for the menu plan.  Ordinarily, he immediately responds with "pizza", closely followed by "steak and chips".  However, on this one instance, he suggested Pasta Carbonara - which was so unusual, that we just had to reward his suggestion by following through and making the dish.

Well, you couldn't not!  I mean to say, we'd asked for the suggestion hadn't we?  It would have been rude to have turned it down flat (much as we do for the "steak and chips" suggestion - but we'll skip lightly over that fact).

Now it had been over a year since I'd made a Carbonara - and this was because of hubby's egg sensitivity.  The last one I'd made, he just couldn't cope with both the raw egg taste and the knowledge that what he was eating was basically, raw egg.  Albeit raw egg mixed with cream, bacon and parmesan - and thrown over hot pasta which was supposed to cook the egg.  I was always dubious about that - and hubby's reaction confirmed my suspicion that the "hot pasta" didn't do a terribly good job.  Plus the fact that the cold cream/egg mixture always took the heat out of the pasta and everything wound up a little bit cool.

So, having agreed to a Carbonara, I started to worry about hubby's reaction to it - and how I might get around the raw egg problem.

Now I'm no genius, as it took a good three or four days of worrying, before I hit on the solution.  A bain marie.

Using a bain marie would not only solve the raw egg problem, but also solve the cold pasta problem!  Aha!

What you do - and you're probably way ahead of me now - is get the shallot and bacon cooked off in a frying pan, then when a separate pan of salted water boils, dunk in the pasta.  Get a small pan going, with a little bit of water inside, simmering away.  Place a large bowl over the top - making sure the water doesn't touch the bowl.  Into the bowl, add the cream, eggs, parmesan and black pepper - and whisk gently but consistently while the gentle heat cooks the eggs without turning them into scrambled and the whole beautiful emulsion gets slowly warmed through.  The end result is a simply gorgeous, slightly foamy, warm mixture that coats the hot pasta perfectly - and it remains that way, i.e. hot!

The worth of this new (well, it's new to me) process for making Carbonara was summed up by hubby, who declared he had never - get that, "never" - had a better tasting, more unctuous, positively sinful Carbonara.  Now that, is truly high praise.

We aren't all that keen on spaghetti and, since the arrival of Mafalda Corta pasta in our local supermarket, haven't looked back.  I've used this shape of pasta in lots of other dishes recently and it was most acceptable in this Carbonara.  Because of the ruffles that each flat noodle length has along its edge, the pasta is able to pick up the coating sauce without leaving any behind - which makes for a very satisfying mouthful.

The dish was made all the better by our fabulous butcher's bacon.  The rashers are huge - and not only that, but are thick too.  Just perfectly robust for a good bacon hit in amongst the richness of the cheese, cream and egg.

If only it wasn't so bad for you, it'd become a staple on the menu plan.  However, with the use of copious amounts of butter, cheese and cream, it can only be a "once in a blue moon" dish.  Oh, but what a dish!

I'm sure a blue moon is imminent - so stock the fridge up with bacon, cream, eggs and parmesan.  You know you want to!


PASTA CARBONARA (serves 3)

Ingredients :

375g pasta (I used Mafalda Corta)
knob of butter
2 shallots, finely chopped
1 garlic clove, minced
9 rashers of back bacon, trimmed of fat and chopped fairly small
2 whole eggs, plus 1 yolk
220ml single cream
40g parmesan cheese, finely grated
freshly ground black pepper.

Method :

1.  Heat a frying pan over a medium heat and add the bacon pieces.  Cook until the fat has rendered out, then add the butter and shallots before the bacon can brown.

2.  Cook on a gentle to medium heat until the shallots are softened and transparent, but don't let them brown.

3.  Set aside to keep warm, but not cook any further.

4.  In a large saucepan of salted boiling water, add the pasta and cook for 9-11 minutes or until tender, with a slight bite.  Once done, drain and return to the pan.

5.  While the pasta cooks, heat a small amount of water in a small saucepan until simmering.

6.  Into a large, preferably pyrex, bowl add the eggs, cream, parmesan (leaving a small amount to sprinkle over the finished dish) and a good amount of freshly ground black pepper.

7.  Place the bowl over the simmering water in the small saucepan, making sure the water doesn't touch the underside of the bowl.  Whisk and stir, whisk and stir, until the mixture is demonstrating signs that the cheese has melted into the warmth of the liquid ingredients and the whole emulsion is becoming slightly foamy.

8.  Once the pasta is done, decant into a large serving bowl and add the sauce.  Toss the pasta in the sauce, ensuring every piece of pasta is covered - and finish with a sprinkle of the remaining parmesan cheese.

Serve.

Printable version


1 October 2012

Small batch chutney making : Spiced Rhubarb Chutney

Ever since Ruby our rhubarb plant, started to get really (no, really) big, hubby has been saying "we should make some rhubarb chutney".

Now I had a go at it, waaay way back when, which wasn't all that successful.  It tasted fine at the time, but I always know when something hasn't been as successful as it first seemed, because a) nobody eats it beyond the first day and b) nobody asks for it again.

So I'd been on the lookout for an "interesting" rhubarb chutney, but to no avail.  Everything just seemed like ordinary chutney, or was a "something else and rhubarb chutney", which would meant that the rhubarb took a back seat instead of being the star of the show.


Rhubarb, shallots, vinegar & spice - just starting to cook
As the year progressed, I was running out of time.  Ruby had burgeoned and been cropped twice and her growing year was coming to an end.  Then, sudden high winds overnight (no chortling, please - not THAT kind of "high winds"), left her battered, bruised and in desperate need of cropping.  Oddly, her daughter (Ruby 2) was left untouched by the gusty conditions, so we've got more rhubarb to come yet.

Cooking down and smelling amazing!


Hubby took the mighty kitchen knife and went out there last week and cropped a vast amount of rhubarb from Ruby.  We gave huge amounts to a neighbour and kept a small mountain for ourselves.  So far, that mountain has made this Spiced Rhubarb Chutney and a delicious Spiced Rhubarb Fool (yes, I'm big on spice at the moment).

I have no idea what to do with the remainder of the mountain, except make some more chutney, perhaps!

You see, this chutney is good.  No, it's very good.  The rhubarb is, without doubt, the star of the show and the mixed spice has served to warm it up beautifully.  The combination of the shallot, garlic and cider vinegar has had an amazing effect upon the tang and sharpness of the rhubarb.  Instead of being rendered a savoury version of a rhubarb jam, this is very definitely a tastebud tingler of a chutney.

The recipe had been in my hands all along.  I'd been given a book - The Complete Book of Preserving by Marye Cameron-Smith - a long time ago, by the lovely Laura Cousins.  I'd looked through it at the time, but it has since sat on the shelf doing nothing.  So when faced with a mountain of rhubarb, my thoughts became rather more focused and I suddenly remembered the book.  A quick peek inside led me to the Rhubarb Chutney recipe, which was so simple it just begged to be made.

It is, however, a very British chutney.  It's not the kind of chutney that you would have alongside a curry, for instance.  It is very definitely best with some salty, strong cheddar cheese - and in fact, when taste testing this batch (before it was cold, even), we'd got through a good percentage of our block of cheese.  Yup, it was that good.  I'm sure it would be fabulous with a pork pie, or some sausage rolls, too.

Because we don't have oodles of empty jars, nor oodles of empty cupboard space for the filled jars, I went for the "small batch" approach, in the same way as my jam making.  Being just a scaled-down version of the original recipe which made 6 pounds of the stuff (yes, I had to get the calculator out - my maths just isn't up to being able to work those sorts of sums out - and even then, I had to ask how many grams there was in a kilo), I saw no reason why it shouldn't work - and it did.

Next time, I'm going to make rather more and - ssssh! Don't tell! - use them as Christmas presents for those people who have everything and you just can't think of what to get them.  As hubby commented, well, money can buy just about everything - but it won't buy you this chutney!


Oh, and as a "cook's note" - I used the ultra-deliciously-gorgeous Maille Cider Vinegar.  If you should decide to have a go at this one, I heartily recommend you use it too - and why not have a teaspoonful neat while you're at it.  Your saliva glands will go into overdrive, but it's an experience that just has to be sampled.  I drink it by the tablespoonful now, as it seems to do good things for my arthritis.


SPICED RHUBARB CHUTNEY  (makes one large jarful)

Ingredients :

230g fresh rhubarb, sliced
38g shallot, sliced finely
a tiny grate of garlic (one third of a clove and no more!)
1 heaped teaspoonful of mixed spice
pinch of sea salt
85ml cider vinegar
85g granulated sugar.

Method :

1.  Into a small stainless steel pan, put the rhubarb, shallot, garlic, spice, salt and half the vinegar.

2.  Bring to a boil and simmer until the rhubarb is very soft.  I added a teensy tablespoonful of water as my rhubarb was resisting softening and the pan was running out of juice.

3.  Add the sugar and remainder of the vinegar and stir gently until chutney has thickened.

4.  Decant into a container and leave to cool.

Store in the fridge.

Printable version

16 January 2012

Coq au vin - truly, a special recipe.

If ever you are looking for a dish to make for that "special" meal, this is the one.

Again, I found it in the Good Food Magazine, however because it was billed as a "lighter" version (420 cals as opposed to 818 for the "full fat" equivalent) I had some reservations over it.  Three forkfuls in and those reservations had been shot down in delicious flames.

This was very definitely one of those happy accidents.  I wasn't planning on making a restaurant quality dish, but restaurant quality it sure is.

I will admit to tinkering around with the ingredients list, mostly because it was billed as serving six and should have contained chicken legs, thighs and breasts.  I was only interested in serving three - and two of my diners aren't keen on chicken legs and thighs, so our Coq au vin was breast meat solely.  However, it didn't appear to miss the added flavour that chicken legs will bring.

I also skipped on the brandy.  We do have some, but just a little - and didn't want to lose it in a recipe.

As for the bouquet garni, well I cheated and used a Schwartz ready-made one.  Ah yes - and the mushrooms.  The recipe said to pan fry them and add them at the serving moment, but I couldn't see the point in losing the lovely flavour they could bring to the sauce.  Hence, I added them raw at the beginning and let them absorb some of the lovely wine.  To say they then acted as little flavour bombs, is putting it mildly.  They were delicious!

I have reflected all these changes in the recipe, below.

Another interesting point (well, it was interesting to me, anyway!) was the use of the "thickener" for the sauce.  I'd often seen a paste of butter and flour being used as thickener by various t.v. chefs, but hadn't ever used it myself.  This one was 2 tbsp plain flour, a tsp of butter and a small amount of olive oil.  Whisked into the sauce in small increments, it made a perfect thickener, with no flouriness or globby lumps, that I'll remember to use in other recipes.

I served the Coq au vin with some leeks, Chantenay carrots, Tenderstem broccoli and peas, all of which had been braised in vegetable stock with a clove of sliced garlic.  With some mashed potato for son & heir, the dish was as healthy as it could get.

COQ AU VIN  (serves 3)


Ingredients :


1 tbsp olive oil
3 rashers smoked streaky bacon, chopped finely
8 shallots, peeled
150g button mushrooms
3 skinless chicken breasts
1 garlic clove, grated
400ml red wine
100ml good quality chicken stock (I used Knorr Chicken Stock Granules)
1 tsp tomato puree
1 bouquet garni (I used Schwartz)

For the thickener :

2 tbsp plain flour
1½ tsp olive oil
1 tsp softened butter.


Method :


1.  Heat the oil in a large heavy based saucepan or flameproof casserole.  Tip in the bacon and fry until crisp, then remove and drain on kitchen paper.


2.  Add the shallots to the pan and fry - stirring often - for 5-8 minutes until well browned all over.  Remove and set aside with the bacon.  Repeat the process with the mushrooms.


3.  Add the chicken breasts to the pan (you may need a little more oil) and fry for 5-8 minutes until golden.  Scatter in the garlic and fry briefly, then pour in the wine making sure to scrape the bottom of the pan and de-glaze all those lovely flavoursome bits into the sauce.


4.  Add the stock, tomato puree and bouquet garni.  Season with salt and pepper and return the bacon and shallots to the pan.


5.  Lower the heat to a gentle simmer and cook for 50 mins to an hour.


6.  Lift the chicken and vegetables from the pan and remove to keep warm whilst you thicken the sauce.  Remember to remove the bouquet garni!


7.  Mix the ingredients for the thickener together in a small bowl and bring the sauce to a gentle boil.  Whisk teaspoonfuls of the thickener in to the sauce until it reaches the desired consistency - that of thickened double cream.


8.  Replace the chicken & vegetables in the sauce and make sure they are all well covered.  Serve.


Printable version
.

25 November 2011

Lunchtime Soup

You know those days when you're contemplating what to have for lunch and just don't fancy anything that you've got in the fridge?

Well, on one of those days, "Lunchtime Soup" was born.

I could easily have had a sandwich, but as bread is such a no-no with regard to being inflammatory, (one slice of Oat bran bread registering -33) I was feverishly trying to think of something to have that wouldn't upset the apple cart and leave me in pain for the afternoon.

I knew I had a few crumbs of Turkey left from the meat I'd defrosted for use in the Turkey Curry, but I didn't much fancy having Ramen noodles which would have used them up perfectly.  I did, however, feel like having something warm that came out of a bowl.  Something that you knew you'd eaten by the end of it.  Soup!

Now, this was an enticing proposition because I knew I'd be eating it alone - so I could make it just how I wanted.  Hubby isn't a great lover of home-made soups and anyway he already had plans for lunch.

I had a rummage in the vegetable drawer and pulled out the following :

a shallot (which registered +20)
two sticks of Fenland celery (+10)
a parsnip (-12)
a block of swede (-4)
three florets of cauliflower (+18)
one clove of garlic (+107)
a small bunch of parsley (+50)
a handful of leftover roast turkey meat (-17)

plus :

olive oil (to cook the shallot & garlic in - +71)
chicken stock - I used 2 Knorr Chicken Stockpots (-43)
and enough water to cover.


All of which, once you've done the maths, amounts to a total of +200 - which is just wonderful.


So I was able to have - over two days - lunch that not only was good for me, but was low fat, tasted fabulous and soothed my yearning for comfort food!  It would have been even better for me if I'd have had a couple of carrots in the house, but regrettably we'd used them all up.  What makes this even better, is that the soup ingredients were all leftovers - all except the cauliflower, which I'd bought to make a Skinny Cauliflower Cheese with.


I reckon I've hit dieting Nirvana.  Food that is not only good for you (in whatever way you want it to be good for you), but comes as an added bonus on top of your normal planned menus.  Can't be bad!

If you'd like to re-create this lovely yumminess at home, here's what I did (but you can add or remove any part of it, substitute veggies, or use veggie stock - the world is your oyster!) :


LUNCHTIME SOUP  (serves 2)


Ingredients :

1 tbsp olive oil
1 banana shallot, chopped fine
1 clove garlic, chopped fine
2 sticks celery, de-stringed and chopped fine
1 medium parsnip, peeled & sliced finely
a small block of swede, peeled & diced finely
3 florets of cauliflower, each cut in half


600ml chicken or vegetable stock - I used 2 Knorr Chicken Stockpot
a few offcuts of cooked meat taken from a roasted joint
a small bunch of parsley, chopped.

Method :

1.  Heat the olive oil gently in a saucepan and add the shallots.  Cook over a medium heat until they are softened but not browned.


2.  Add the garlic and continue to cook for another minute or so.


3.  Add the remainder of the vegetables, except the parsley, and cook on a greater heat for 3-4 minutes.


4.  Add the stock and bring to a boil.


5.  Reduce to a simmer and cook until the vegetables are very nearly at the desired tenderness, then add the cooked meat.  Make sure the meat has heated through and the soup is back up to temperature, during which the vegetables should have attained the desired tenderness.  Try not to stir too briskly, or you'll break up the pieces of meat.


6.  Add the parsley and stir to combine.  Cook for another minute, then serve.


.

7 November 2011

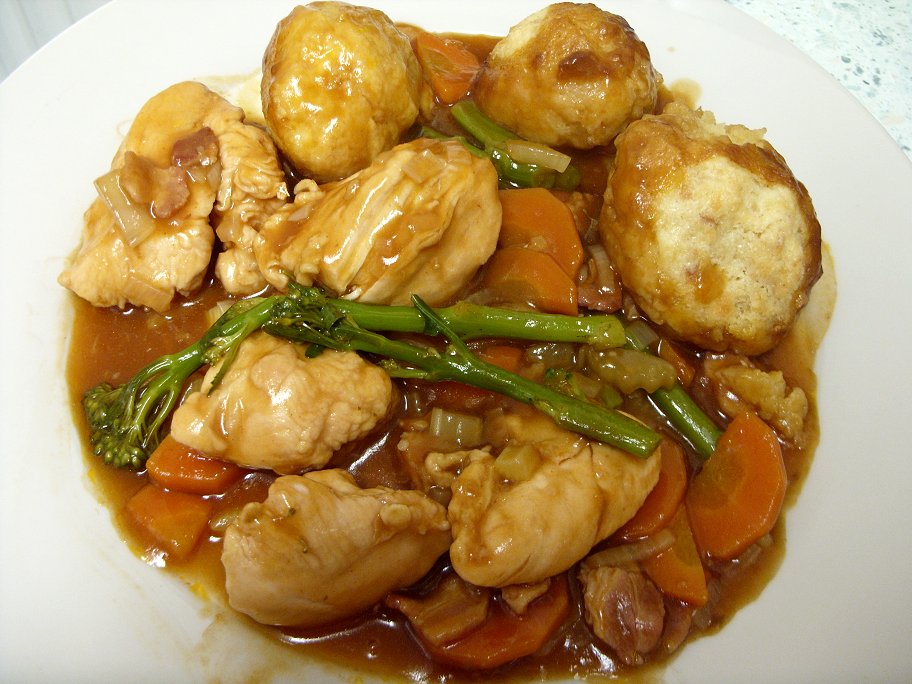
Chicken & Tenderstem® Broccoli Casserole with Cheesy Dumplings

This casserole, from Jo Pratt via the Tenderstem® Broccoli website, is just perfect autumnal comfort food.  Perfect for those days when a Beef Stew would be too much, yet you're wanting something one-pot for ease.  Something that's rich with flavours and vegetables, yet that bit naughty with its cheesy dumplings.

I'd found myself "going off" of chicken just recently.  I suppose it's not that surprising when you consider how much chicken we've eaten over the last 12 months.  You only have to look at the Recipe Index to see that!  I'd started to not want to do the trimming of the raw chicken breasts and was slightly revolted by the smell of raw chicken.


Hence, I'd given myself a bit of a rest from chicken for a few days.  I am pleased to say that when it came to trimming up these chicken breasts, I had no such qualms.  All of which is good, because it was beginning to colour my enjoyment of chicken dishes.


I hadn't really left myself enough time to prepare this dish and was flapping a bit in the early stages.  I seem incapable of working out how long I need, if I don't have a clock face to work it out from.  Now I know I've got number blindness, but really, that seems a bit much!  However, I shall just have to grab a clock the next time I am trying to work out how long I need for preparation, as rushing through it because you're scared it's going to be late, just isn't on.


However, it is testament to the ease with which the casserole came together, that it wound up only 20 minutes late instead of an hour.  The last 10 minutes of that were probably superfluous, as I was just making doubly sure that the dumplings were done.


We all thoroughly enjoyed the meal, although I wasn't as wedded to the idea of the cheesy dumplings with the chicken as the chaps were.  They were very appreciative of their cheesiness, but I wonder how much of that was just because they were dumplings - and my chaps do love a dumpling!


One note for future reference, was that the gravy wound up being in excess of what was wanted and also rather on the thin side.  In fact, for speed, I broke out the gravy granules and threw a spoonful of those in to thicken the gravy.  In future, I think I would reduce the amount of stock involved to begin with - and have reflected that in the recipe below.  The only other changes were that I used chicken breasts instead of chicken thighs - so go ahead and use thighs if your family like them and omitted the herbs from the cheesy dumplings.  The only reason I had for doing so, was because I am totally fed up with Thyme at the moment.  I seem to be putting it in every-flipping-thing, so decided against it in this instance.  I've included it in the recipe though, so it's up to you whether you want to include it or not.


Having made the casserole, I think that I might include some mushrooms for the next time around.  They would improve the vegetable quota without affecting the texture or flavour all that much.  Likewise, you could also add some cubes of swede, or pieces of parsnip, if you wanted to increase the vegetable quota.


The casserole wasn't a great one from an Inflammation Factor point of view (being chicken), so I just did my best with it in that I had less chicken and fewer dumplings, but more carrot and Tenderstem® broccoli.  Hopefully that will have evened the score up a bit!


CHICKEN & TENDERSTEM® BROCCOLI CASSEROLE WITH CHEDDAR DUMPLINGS

(serves 3)

Ingredients :

2 tbsp olive oil
200g smoked streaky bacon, diced
3 chicken breasts, cut into chunks
2 heaped tbsp plain flour
sea salt & freshly ground black pepper
3 banana shallots (or equivalent amount of any other kind of shallot)
2 sticks of celery, sliced
2 medium carrots, peeled & sliced
1 bay leaf
1 tbsp tomato puree
400ml chicken stock
200g Tenderstem® broccoli, each stalk cut into 2

For the dumplings :

100g self-raising flour
100g white breadcrumbs
140g butter, cubed
100g mature cheddar, grated
1 tsp dried thyme
2 medium eggs, lightly beaten
sea salt & freshly ground black pepper

Method :

1.  Pre-heat the oven to 180deg C/fan 160deg C/gas mark 4.

2.  In a large casserole, heat 1 tbsp of the oil and add the bacon.  Fry until golden and slightly crunchy, then remove from the casserole and reserve.

3.  In a plastic bag, toss the chicken in the seasoned flour.  Picking out the chicken, reserve the flour and add the chicken to the casserole and fry until browned all over, then remove and reserve.

4.  Add another tbsp of oil, then add the shallots, celery and carrot and cook until the shallots have softened.

5.  Add the remainder of the flour to the casserole and cook for a minute or so.

6.  Add the chicken stock and stir to combine.

7.  Return the bacon and chicken to the pot, then add the bay leaf and tomato puree.  Stir to make sure everything is combined and well mixed.

8.  Bring to the boil, cover with a lid and put in the oven for 30-40 minutes.

9.  While the casserole is in the oven, make the dumplings.

10.  Place the flour, breadcrumbs and butter into a food processor and whiz to a crumb-like consistency.  Add the cheese, thyme, eggs and seasoning and pulse whiz to bring it all together.

11.  Take spoonfuls and form them into dumplings.  You should have enough for around twelve.

12.  When the casserole has had 30 minutes in the oven, remove and stir in the Tenderstem® Broccoli.   Sit the dumplings on top and return to the oven for 10-15 minutes uncovered, until the dumplings are cooked.


Inflammation Factor (approx) : -494 (-165 per person).
Related Posts Plugin for WordPress, Blogger...