Showing posts with label cheese. Show all posts

11 August 2017

Cheese making post no. 1 : Cream Cheese

This marks the beginning of a new venture for Rhubarb & Ginger - cheese making!  Not your actual cheddar (although I don't rule anything out!), that's a bit advanced for me just yet. No, I'm starting with soft cheeses.

You see, for my recent birthday my hubby bought me all the extra paraphernalia I needed for cheese making - cheesecloth, a digital thermometer, some vegetable rennet and the very important book of recipes. The book came from Lakeland and is written by Gerard Baker, a chef who I have seen on t.v. on occasion but who has more recently been on active duty as a chef and lecturer in Antarctica!

Home made cream cheese with smoked salmon & cucumber panino
So, getting back to the cheese.  I chose this recipe for Cream Cheese to start with as it seemed fairly simple and I could pretty much guarantee that so long as the cheese at the end of everything was good, the menfolk would eat it. All of which is fairly critical as I suspected we were going to have quite a bit to wade through!

The process itself is really very simple, which is nice.  You do need some particular items in order to make clean, untainted cheese - such as stainless steel pots, pans, a colander and cutlery, glass bowls, cheesecloth and a digital thermometer to ensure that the milk mixture reaches the right temperature. You also need to ensure that everything is absolutely spanking clean and free from all chemicals, so rinse - rinse everything copiously with clean water.

My first go - edible but unexceptional
Now I will admit that this was my second go at making cheese - the first one was a bit of a failure.  However, it was worth the failure as it taught me a lot about how to heat the milk, what quantities I can easily cope with and what to expect from the curds themselves. I shall pass on as much as I can in this blog post, so that your first go will be rather more successful.

So, the initial process is to heat the 500ml of whole, full fat milk and 500ml of single cream (light cream in the USA, table cream in Canada) together in the one pan. You're not heating it very much, just to 29°C, so the easiest way (avoiding the possibility of burning the milk on the bottom of the pan) is to employ a Bain Marie style arrangement with a pyrex bowl containing the milk/cream mixture sat on the top of simmering water in a pan underneath. This way, if the contents heat too quickly or too much, it is easy to remove from the heat.  In fact, my milk/cream zoomed up to 34° at the speed of light and I had to place the bowl in a sink of cold water to bring it back down to the right temperature.  Ah well, live and learn.

Home made cream cheese with smoked salmon and cress
oven bottom muffin
It was important to reduce the temperature as the next step was to add the live yoghurt (I used Yeo Valley yoghurt and very nice it was too!) and had the milk/cream been too hot, it would have killed the live cultures within it.  So, in goes the 200ml yoghurt and half a teaspoonful of diluted rennet.  Make sure to stir gently but regularly so that the rennet is mixed in quickly and effectively as it begins working quickly.  One of the things I learned in my first attempt with rennet was that my rennet - it is vegetable rennet - is very weak.  As a result, I used twice the amount required.  You will only know how your rennet performs by using it, unfortunately.

Following 30 minutes of exercising of what little patience I possess, I took a look inside the bowl.  Honestly, the satisfaction of finding a bowl full of coagulated curds and whey is quite ridiculous and almost as good as the next stage of cutting the curd.  It is worthwhile popping your (very clean) little pinky finger into the curd to check whether it splits cleanly before cutting the curd.  If it doesn't break cleanly, leave it for another 15 minutes or so until it does.


The next stage, cutting the curd, is my favourite bit.  ~shrug~  I have no idea why. Anyway, find yourself a super-clean, fine bladed, stainless steel carving knife type of knife and cut the curds into squares (well, rectangles in fact, but they look like squares from the surface!).  Believe it or not, this helps to release the whey from the curd.

A word about cheesecloth.  If you're using a new piece of cheesecloth, it is essential to give it a good rinse through to ensure that any loose threads have been cleared before using it in anger.  I usually do this bit before doing anything else and leave it sat on the side in a dish.

So the next bit is to line your stainless steel colander with cheesecloth and place it over a big bowl.  Then gently spoon the cut curds into the cheesecloth. About now, you should start feeling a little bit like a cheese maker.  *chuckle* Immediately, you will see the whey begin to drain from the curds - which is what you're after.  If you're in the U.K., you can probably leave the cheese out of the fridge for the next six or seven hours as it drains.  However if you live somewhere hot, it's best to put it in the fridge.  Good luck with finding room for a large bowl and colander in the fridge.  We had to play some serious fridge tetris to get ours in!  Take a look at it from time to time and drain off the whey.  I kept mine and drank it with a little cherry syrup added.  Major lushness.

You will need to put the cheese into the fridge overnight (complete with colander and bowl), however at around the 8 hour mark, it is worthwhile very gently turning the sides of the curd to the middle, just to ensure that the centre of the curds get to drain properly.  I did this just before it went into the fridge.  Sneak a flavour now too - isn't it divine?


The following day, simply peel the cheesecloth away from the cheese curds and spoon them into a storage bowl with good fitting lid.  Hey presto - your cream cheese is ready for use.  Break out the smoked salmon and celebrate, you're a cheese maker!

The yield you will get depends entirely on the degree of milk solids in your milk products.  I'm afraid I can't tell you how much mine made because we'd eaten a third of it before I remembered I should have weighed it.  I guess if you think of a standard 180g pack of Philadelphia cream cheese, I must have made approximately four of those - so around 700-800g in total.

What all this fuss has been about - home made cream cheese!

Another thing is your milk.  Without doubt, raw milk is the best.  However, finding it is like finding rocking horse poo.  So don't be worried about using homogenised, pasteurised milk - it's what I used.  So long as the cream is accompanying the milk, the cream molecules will be able to help the homogenised cream molecules work in the required fashion for cream cheese.

I suppose I'd better provide a smaller, more concise version of the above recipe, *chuckle*, but I'd recommend if you're new to this process, you read all the above before getting cracking.

CREAM CHEESE   

Ingredients :

500ml whole, full fat milk
500ml single cream
200ml live plain yoghurt
0.5 tsp rennet, diluted in 15ml warm water.

Method :

To begin with, rinse a large piece of cheesecloth through and place to one side in a bowl.

Place a large pyrex bowl over the top of a saucepan containing a small amount of simmering water.  (Or use a double boiler, if you're lucky enough to have one)  Add the milk and cream to the bowl and slowly bring to a temperature of 29°C (84°F) stirring gently all the time.

Remove from the heat and stir the yoghurt into the milk mixture.  Mix the rennet with the water and stir them into the milk mixture, making sure to stir right through to the bottom of the bowl.

Set the bowl aside in a warm place for 30 minutes.  The milk should have coagulated into curds and whey.  Test the curds by inserting your pinky finger to break the curds.  If they break cleanly, proceed to the next step.  If a bit of a ragged break, leave the curds for another 15 minutes.

Take your knife and gently cut the curds in a chequer board pattern, so as to create squares.

Line a stainless steel colander with the rinsed cheesecloth and set it over a large bowl.  Gently spoon the curds into the centre of the colander.  You will see the whey begin to drain.  Set the cheese aside to drain, checking it from time to time and emptying the bowl of whey.

At the end of some 8 hours (or overnight), gently fold the cheese from the sides to the middle, so as to help the draining process.  Place the whole lot (colander, bowl and all) in the fridge overnight or until the curds have virtually stopped draining.

Spoon the drained curds into a super-clean, lidded storage container and plan your lunch.

Printable version

22 May 2016

Quick cheesy scrambled eggs

This is one of my "hit and run" style of blog posts, that covers something I've made for myself - either breakfast, or lunch - that was too good not to share.

This quick cheesy scrambled egg in a toasted pitta bread breakfast is one such.  I didn't have my "proper" camera to hand, so snapped a picture with my camera phone.  This is why it's not a great picture - but it's enough to give you the idea.

It's a simple enough concept - an egg, scrambled, with grated cheese melted in and put into a pitta bread.  However, it's not a stovetop job, it's a microwave job.

Super-easy, super-quick and you're left with a mug, a fork and a knife to wash up.  As you can see, I didn't even bother to dirty a plate.   Perfect.  

QUICK CHEESY SCRAMBLED EGGS   (serves 1)

Ingredients :

1 large or very large egg
a small handful of grated cheese (I used Red Leicester, but any hard cheese is good)
a small knob of butter
1 tsp cream, if you've got it (not essential)
small pinch of sea salt and black pepper
Plus :
whatever you're serving it with - pitta bread, toast, bacon, whatever you like.

Method :

Crack the egg into a robust and microwave safe coffee mug.

Add the seasoning and cream (if you're using cream) and whisk them together with your fork.

Add the butter and grated cheese and stir lightly.

Place into the microwave and give it 30 seconds on full power.  Remove and give the contents a good old whisk with your fork again.

Replace and give it 15 seconds on full power.  Remove and whisk again.  Now, depending upon the power of your microwave, your egg will either be ready, or you'll need to give it small increments (say 5-10 seconds) further cooking until it reaches the consistency you like.

I recommend you remove it from the microwave when the egg is still a little bit underdone, as it will continue to cook even once it's on the plate!

In the meantime, you can have toasted a pitta bread, or made some toast, or if you're going very a la carte, even made some bacon earlier.  Serve up the egg with an extra sprinkle of sea salt and black pepper if you like that - and dig in!

Printable version

18 May 2016

Cheesy Ham and Potato bake - a trip back in time

Oh I only wish I could show you how excited I am by this dish - and how completely stuffed but happy I was by the time I'd eaten it.  You see, it took me back to years ago when I would spend a week at my cousin's house and then she would spend a week at ours.  Happy days!  My aunt would cook dinners like this - comforting, kids' dinners of potatoes and cheese.


A Facebook friend was responsible for the inspiration for this dish, though.  She posted photographs of a very similar thing, but with sliced potatoes instead of chunks, that instantly reminded me of this sort of meal and how much I liked it.  Her recipe was very much made for adults though, being a version of scalloped potatoes and using garlic, much more double cream and some creme fraiche.

So I looked at various recipes and tried to recall the way my Aunt's dinner looked and tasted - and this is the result.  No, it won't win any awards for gastronomy but I suspect it could win a few where reminiscence is concerned!

It really is simplicity itself.  Par-boiled potatoes are mixed with diced ham, sliced spring onions and a good, thick and cheesy sauce seasoned with English mustard powder and nutmeg.  Cover with cheese and bake in the oven.  I love dishes that have a great payoff for minimum effort - and this is definitely one of those.

You can tinker about with the recipe as much as you like, to your own preference, too.  Add peas or sweetcorn, use a cooked supermarket ham hock for the meat instead of sliced ham - just shred the meat before you add it.  Add the chopped chives to the cheese sauce.  Maybe adultify it a little by adding garlic granules to the sauce.  All manner of tinkering about could go on!


I served mine in two ways - I served mine simply with a baked tomato.  For my son, I cooked some sausages and gave him some raw tomato that had been tossed with chives as growing boys need their protein and he doesn't like cooked tomato.  Oh boy, it was so good!


CHEESY HAM & POTATO BAKE   (Serves 2-3)


Ingredients :

4-5 medium sized potatoes, peeled and diced into half inch pieces
4 spring onions, sliced
10-15g salted butter
2 tbsp plain flour
300ml skimmed milk (you may not need it all)
100ml double cream
1 tsp plain Philadelphia cream cheese
a scant pinch of sea salt
a good pinch of ground black pepper
a quarter tsp of grated nutmeg
1 tsp English mustard powder
250g of mixed cheeses, grated (I used Gouda and mature Cheddar)
200g thick sliced ham, cut into half inch pieces
30g of grated cheese (I used Red Leicester)
chopped chives to serve.

Method :

Place the potato dice into a saucepan with salted water and bring to a boil. Cook for 1-2 minutes until just slightly softened, then drain and tip the potato into the baking dish.

Slice the spring onions and add them to the potato in the baking dish.

In a non-stick pan, melt the butter and once melted, add the flour and stir well. Cook over a moderate heat for 1-2 minutes, then add a little milk and remove the pan from the heat. Stir the milk into the butter/flour mixture until lump free, then return to a reduced heat and add a little more milk. Stir that in and add the cream, cream cheese, seasoning, nutmeg and mustard powder and stir through.

As the sauce heats, make sure to keep stirring to prevent it from catching on the bottom of the pan. You need a fairly thick sauce at this stage, you can always add more milk once the cheese is melted, if necessary.

Add the mixed grated cheese and remove from the heat as it melts. You need the sauce to be fairly thick, but still of pouring consistency. When you are happy with the sauce, plate it on one side.

Add the ham pieces to the potato/onion mixture and stir through. Pour the cheese sauce over and give a light stir, just to make sure the sauce is right the way through the potatoes. Sprinkle with the remaining cheese and place into a pre-heated oven at 180degF/350degC/Gas 4 for 45 mins or until the potatoes are soft and cooked through.

Sprinkle with chopped chives for colour and serve.

Printable version


12 September 2013

Tonight's dinner : I cut my finger - does that make me a cook, now?

There is a train of thought in amongst the Shamanic fraternity that it takes a near death experience (preferably with lightning) in order to make a Shaman.  So, I was wondering whether nearly taking the top of your finger off on a mandolin, qualifies you as a Cook with a capital "c"?

I'll go with a "yes", I think.


I was slicing parsnips and squash (beautiful parsnips and squash from thevegibox.com), to make this creamy parsnip & squash bake.  Poor hubby and son & heir came back from walking the dogs, to find me hyperventilating whilst holding my right hand in the air with my little finger swathed in kitchen paper.  Yes, it did leak - copiously.  However, with the addition of a dressing, a plaster and a latex glove, I soldiered on like the brave likkle Cook that I now am.

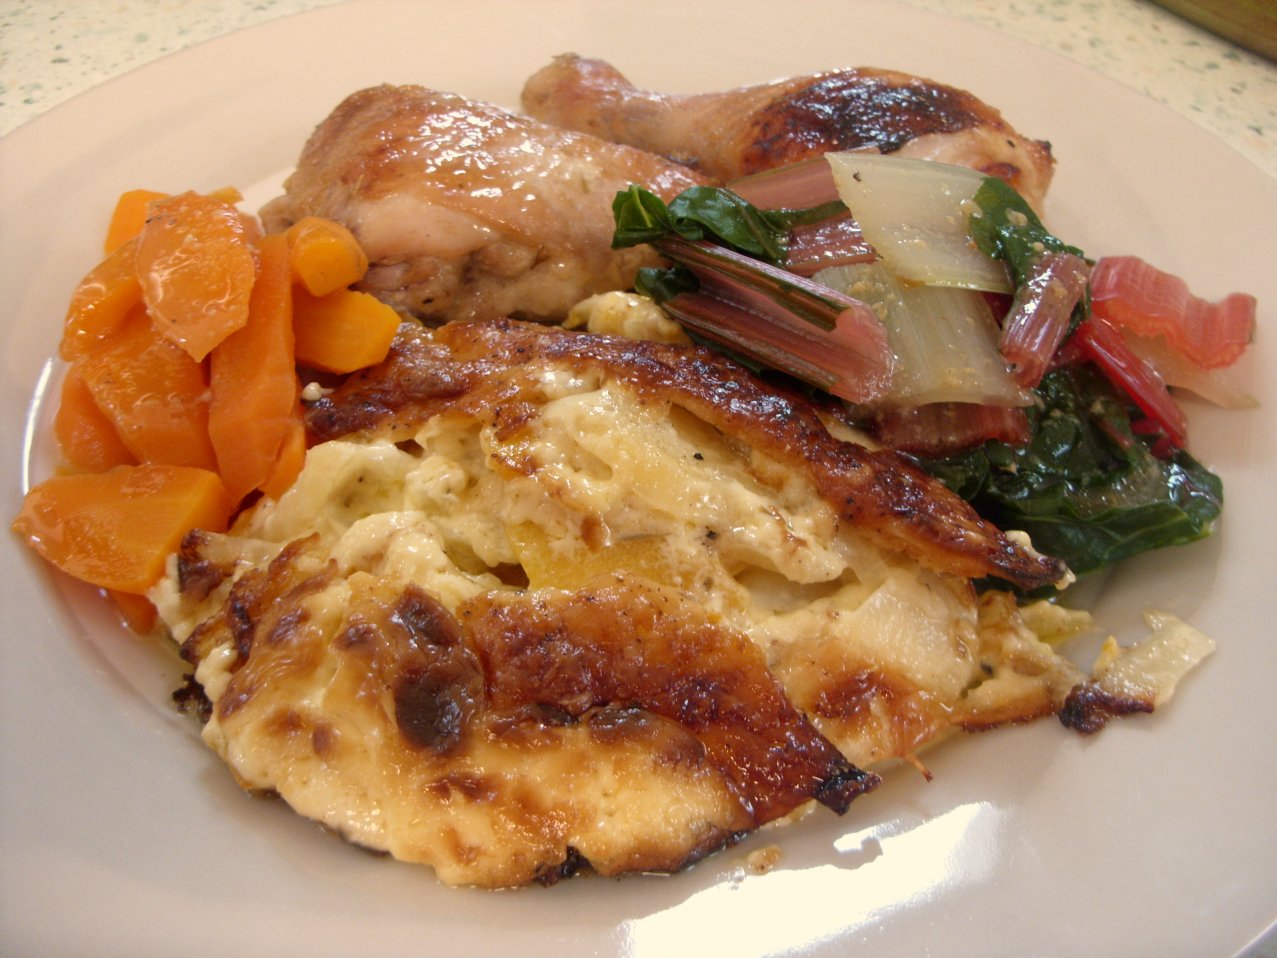
Now, this 'ere bake very definitely deserves its own recipe post - so watch this space and it shall appear.  It was utterly delicious, incredibly moreish and comfort food to the Nth degree.  Like so many of my favourite recipes, it was so easy to make too!  (Well, not counting the first aid requirement).

I partnered the bake up with some honey & mustard chicken (gorgeous) together with some  steamed young carrots and rainbow chard from thevegibox.com.  This was our first go with chard as a side veggie and combined with the cooking juices from the chicken, it was really good.  It didn't taste how I was expecting it to - it has a definite spinach quality, whereas I was expecting more of a cabbage quality.  Very nice!

The chicken was rolled around in some runny honey that I'd combined with Dijon mustard, a little dried thyme and a pinch of salt and pepper.  It baked up well and provided some lovely juices that stood in well instead of having to make a gravy or jus.


The whole family enjoyed the meal and there were clear plates all round.  Can't ask for more than that!


19 February 2012

Swiss Eggs - a naughty, but utterly irresistible, lunch

Swiss Eggs.  Aaaah, how just those two little words can carry me back in time to when I was a teenager living with my parents & brother near Epsom.

I can remember some "lunches of note" such as bacon & tomatoes on toast, cold roast chicken & sweetcorn relish sandwiches and cheese on pickle on toast.  However none of them has the sheer power of a food memory that the Swiss Eggs do.

My memory fails me where the first taste of this lunchtime paragon is concerned, but I can well remember grating the cheese and filling the little dishes as my Mum breaks the eggs to go in them.  Then she would add the little splosh of milk and I would do the sprinkling of Worcestershire sauce and pop the little knobs of butter on top.

Into the oven they went, while we toasted and buttered some bread and sat waiting for the oven to work its magic.  As the twenty minutes passed, the smells of hot Worcestershire sauce were replaced by melting, baking cheese.  Oooooh, the anticipation!

I went through all that again today, except in a different order as I was the Mum and son & heir was the progeny I was making them for.  There is something beautifully cyclic about these types of cooking moments - moments that I can only hope that son & heir will carry forward to his family, as and when.

It has to have been some ten years or more since I last had Swiss Eggs.  Hubby is egg sensitive, so I don't make them for him - and it seemed too much to fire up the oven just for me.  Owing to the thermo nuclear temperature that the ramekins achieve, it has taken this long for me to trust son & heir's tender fingertips - and not least, his tongue - with the correct handling of one.

Today was the day - and, almost in celebration, I pushed the boat out a bit and substituted some cream for the milk.  The cheddar was lovely Lake District Cheddar and the eggs free range.  The anticipation was the same, as I sat in the kitchen appreciating the fragrances issuing from the oven, but even that was eclipsed by that first spoonful.

Oh dear god.  Let it not be ten years before I make these again.  They are, truly, divine.

SWISS EGGS  (makes 1)

Ingredients :

Enough grated cheddar to half fill a good sized ramekin
2 fresh eggs
a tablespoonful of cream (milk would do)
four spots of Worcestershire sauce
freshly ground black pepper.

Method :

1.  Pre-heat the oven to 180degC(fan)/350degF/Gas4.

2.  Place half the grated cheese into the bottom of a ramekin.

3.  Crack the two eggs into the ramekin, on top of the cheese.

4.  Cover the eggs with the remaining cheese.

5.  Pour the cream (or milk) over and season with the pepper and four spots of Worcestershire sauce.

6.  Place into the oven for 20 minutes, or until the eggs have risen and the cheese is bubbling.

7.  Serve with buttered toast, in a quiet place, where you can be alone with your lunch - because you're not going to want to share it!

5 August 2011

Cheesy Parsnip Flan - perfect for al fresco eating

Not that we ate al fresco on the night we had the flan, but it would seem like a very civilised thing to do.  Maybe once we've got a table and chairs for our new patio!

I've had some success with tarts and flans since I bought the new flan/quiche dish and - owing to an oversight on the shopping front - had two packs of ready-rolled shortcrust pastry in the freezer, doing nothing.

So, I began to think about what I could put into a pastry case.  Sweet flans are relatively easy - and pretty much off limits at the moment.  Hence, I began to ponder on what went with what, savoury-wise.  Smoked haddock immediately sprang to mind, but have you seen how much it has gone up in price just lately?  I can only think that it's out of season - and as I like to eat seasonally (where possible) I rejected that on both those grounds.

Chorizo was the next on the list.  I don't know why Chorizo keeps on coming to mind, considering I don't really like it.  It's one of those things that I think I'll like, but when it comes to it, it's just to strong on the paprika.  I suppose it could be the type of Chorizo I buy and maybe I should source some from elsewhere and see if I like it better.  I wonder if Spring Fields butchers does it?  I'll have to find out.

So anyway, that was out for obvious reasons.

I'd recently done a Quiche Lorraine, so that ruled bacon out - unless I could find a flan topping that was so far from Quiche Lorraine as to be unrecognisable.

However, before I could come across a flan topping that used both chorizo and bacon (well there's bound to be one!), my mind travelled down the celeriac lines (remember the Cheesy Celeriac Slice?), and after a quick dalliance there, it hopped over to parsnip.  I pondered on whether if you cooked your parsnip pieces (just boiling them), then riced (or mashed) them and added oodles of sharp cheddar, some cream (just a small amount), maybe some mustard (Dijon or English?), before topping up the whole thing with some beaten egg - whether you'd wind up with something good?


Well, funnily enough, you do!  In fact, you wind up with something that is so good, it quite defies belief.

It isn't as deep as a quiche's middle, and the parsnip gives it a totally different kind of texture.  The cheese and the parsnip go together quite ridiculously well.  I had been worried that the parsnip would stamp all over the cheese, but so long as you make sure you've got a good flavoursome sharp mature cheddar, it'll be fine.  Incidentally, at the last minute, I added a teensy bit of Grana Padano just to add another dimension to the cheesy flavour.

Again, this is another dish that is so easy to do, it'd be a great one to prepare with your kids (if you've got some - if not, then borrow some just for this).  You'd better issue them with their own little piece of cheese to munch though, or all your recipe cheese will disappear!

We ate it with some gorgeous chutney from the Isle of Wight Garlic Farm, that my parents had brought back for us.  The pair of them were made for each other.

CHEESY PARSNIP FLAN  (feeds 4 hungry people)

Ingredients :

A piece of shortcrust pastry, enough to line your quiche dish
200g of cooked parsnip, cut into chunks
175g strong cheddar cheese, grated
75g grana padano or another cheese of your choice, also grated
3 large eggs
100ml double cream
1 tsp Dijon mustard
freshly ground black pepper.

Method :

1.  Pre-heat your oven to 180deg C//350deg F/Gas 4.

2.  Line the quiche dish with the pastry, then crack one of the eggs into a bowl and give it a light whisk with a fork.

3.  Brush some beaten egg onto the surface of the pastry and prick with a fork.  Line with non-stick baking paper and baking beans, then blind bake for 15-20 minutes.

4.  Remove the beans and baking paper and leave to one side while you prepare the filling.

5.  Into a large bowl, either mash the parsnip pieces or put them through a ricer.  You are aiming to have a smooth paste of parsnip.

6.  Add all but a handful of the cheeses to the parsnip.

7.  Crack the remaining two eggs into the bowl with the original egg and add the cream,  mustard and some freshly ground black pepper.  Whisk them up until they are nicely combined.  There is no need to add salt, as the cheeses will take care of that.

8.  Add the eggs to the mustard and cheese and stir gently to combine.  Pour onto the pastry case and smooth the surface, giving it a final flourish with the remaining cheese.

9.  Put back into the oven to bake for around 35-40 minutes, or until browned all over and firm to the touch.

Serve with a lovely piquant chutney and some salad.

26 July 2011

There's nothing plain, about this Quiche Lorraine!

Didja see what I did there?  *chuckle*

I took a sudden fancy for Quiche Lorraine.  Yes, I know, there are a billion different quiches out there that are far more exciting and interesting in their ingredients than plain old Quiche Lorraine, but I was feeling a bit de-tuned in the ingredients line at the time.

I wanted something savoury, that could be accompanied by saladI was also fairly keen to use my new quiche dish again.

The plan (which worked to perfection) was to make sure that the ingredients were the best I could achieve, bearing in mind finance and availability.  So that meant shop-bought pastry (because my last attempts at rolling out pastry were a trial, putting it mildly), beautiful Burford Brown eggs (for their unctuous richness and glorious colour), our local butcher's back bacon (because it is by far the best bacon available around here) and some gorgeously strong, salty mature cheddar cheese.

Add to that a pot of cream and some lovely cherry tomatoes and you have all the makings for a superb Quiche Lorraine.

To make extra-sure that the bottom of the pastry was cooked (I have some history with soggy bottoms), I put the pastry back into the oven for five minutes without the baking beans, when I blind baked it.  I'll have to remember to do this more often, as it certainly solved the "soggy bottom" problem.  The bottom of this pastry was as crisp as you could want - even the next day, when I polished off the last slice cold from the fridge.

QUICHE LORRAINE (Serves 4-5)

Ingredients :

1 pack pre-prepared shortcrust pastry, to fit an 8" quiche dish
1 pack back bacon, trimmed of fat
4 eggs
200ml double cream
freshly ground black pepper
a quarter tsp of nutmeg
150g gruyere or mature cheddar cheese
4-5 cherry tomatoes, sliced.

Method :

1.  Pre-heat the oven to 180deg C/356F/Gas 4.

2.  Roll out the pastry so that it fits neatly into the quiche dish, with sufficient up the sides to hold the mixture in.  Place the pastry gently into the quiche dish and trim any excess.

3.  Scrunch up a piece of baking paper that will fit easily into the pastry dish.  Smooth it out and put on top of the pastry.  Next, fill the pastry case with baking pellets or beans - to prevent the case from bubbling up as it bakes.

4.  Bake for 20 minutes, then remove the paper and baking beans and bake again for another 5 minutes or until the pastry has gained a lovely golden hue.

5.  Remove the pastry case from the oven and set aside to cool whilst you make the filling.

6.  Cut the bacon into small squares and place into a dry frying pan.  Fry until each piece is beginning to caramelise, but before the pieces become crispy.  Set aside to cool slightly.

7.  Crack the eggs into a large bowl and give them a good whisk.  Add the cream, nutmeg and salt & pepper and whisk to combine.

8.  Take the pastry case and add the bacon to it.

9.  Grate the cheese and add three quarters of the mixture on top of the bacon, then give it all a little mix - making sure the bacon is evenly spread.

10.  Pour the egg mixture into the case and give it a very gentle stir around, to make sure it has got under all the cheese.

11.  Next, sprinkle the top with the remaining cheese and lay the slices of tomato over it, in an appealing pattern.

12.  Give the tomatoes a sprinkling of freshly ground pepper and place the quiche into the oven for 30-40 minutes, or until the top is risen and golden.

Allow to cool before serving at room temperature with a side salad.

.

14 September 2010

Product Review : Lake District Mature Cheddar

Now I know that most food bloggers are supposed to buy their cheese from terribly posh shops and bring it home wrapped in proper cheese paper.  Unfortunately, I'm not that sort of food blogger.  Not that I'd turn down a trip around a posh cheese shop, you understand, or the opportunity to bring some home in proper cheese paper, but until that day I'll have to put up with what's on special offer at the Supermarket.


What was on special offer at our Supermarket today, was Lake District Mature Cheddar.

I sincerely hope that it remains on special offer for quite some time to come, because it is simply divine.

If you forgive it for being packaged in a common or garden plastic bag (which to be quite honest, how else would you imagine it to be packaged and remain at a reasonable price) that has rendered it a tad sweaty, it has stomped it's way up there to second on my list of desirable strong Cheddar cheeses.  I'm afraid in first place has to remain Coastal Cheddar from Ford Farm which is worthy of a handful of superlatives in describing it.

Lake District Mature Cheddar looks promising as you extract it from it's sweaty home.  It is interestingly cracked, which speaks of a crumbly nature.  It looks creamy, but with those tell-tale flecks of salt that just make your mouth water.

However, the majority of its stomping up my cheese chart happens when you pop some into your mouth.  Instantly, you get the tang of the salt, with the creaminess that soothes your palate.  Then you're hit with a sweetness yet an intense savouriness that leaves your tastebuds dancing, trying to work out which one is the more prevalent - you just have to have some more.

Goodness, if ever there was a cheese to eat with biscuits then this is it.  Also, I'm going to be doing a Macaroni Cheese towards the end of the week - oh boy, it's going to be good.  :)


To learn more about the Lake District Mature Cheddar, call in at "The Land of Milk & Bunny".

10 September 2010

Impossible Quiche - made possible!

I well remember first hearing of the famed "Impossible Quiche" and thinking that it couldn't be possible.  Which is, I suppose, what you're meant to think when faced with just the name and the idea.  The dish is apparently and somewhat incorrectly, attributed with being able to "make its own pastry", which is of course a misnomer.  It does indeed form a crust - but it is simply nothing like pastry.  It is more a cross between a frittata and a pastryless quiche.

Delicious any way you want to serve it, but particularly with a mixed salad and a few fries, it makes a perfect meal for those lovers of the bacon/cheese/egg trinity.  One added - and fairly important - benefit, is that it registers right up there on the Yummy List for children!  A recipe that can do that - and regularly - is worth its weight in gold. :)


Regarding the quantities, do check that they will fit into the container you're intending on baking them in and as regards the vegetable component - anything goes.  Don't feel you have to stay with sweetcorn and spring onion as courgette, tomato, mushroom - whatever your family likes best, will do fine.  So long as the item will cook in the allotted time, it's a goer.

IMPOSSIBLE QUICHE  (Serves 5-6)

Ingredients:

1.25 cups milk
0.5 cups self raising flour
3 small eggs or 2 medium or large eggs
1 cup grated strong cheddar cheese
chopped pre-cooked bacon (I also use smoked turkey rashers)
3-4 spring onions, chopped
half a tsp of dried parsley
a handful of sweetcorn kernels (optional)
salt & pepper.

Method :

Put the flour, parsley, salt & pepper into a large bowl and make a well in the centre.

In another bowl, whisk together the milk and eggs.

Pour the liquids into the flour and whisk steadily, pulling the flour down from the sides of the bowl into the mixture.

Add the remaining ingredients (and no, there is no need to pre-cook the onion) and stir to combine.  Save a little of the cheese (or grate a bit more!) to sprinkle over the top.

Decant into a greased baking dish and bake in a moderate oven (I use 180deg) for around 25-35 mins or until golden on top. Pierce the centre with a skewer or knife to test. If the egg mix is still soft, put it back in for another 5 minutes or so.

When done, remove from the oven and leave for 5-10 minutes to settle.  Then run a knife around the edge, after which it should be relatively easy to cut portions and remove.


31 August 2010

It's just one of those phases we go through ...

Do you find that you go through phases with the food you choose to eat? I do. For definite. I’d love to know what causes the swap from one phase to the next, because I really can’t put my finger on a reason – other than my singular lack of success at combining tomato and chilli, as per recent attempts.

This week seems to have been all about chicken and cheese. Not necessarily combined though, you understand. I see you looking somewhat relieved. *chuckle*

Well, we started off the week with a Smoked Cod Rarebit with baked cherry tomatoes. Now, apart from it winding up rather over-sauced, this was an all-round success that will be repeated at some point.

It’s also extremely easy to do, as you begin by melting butter, adding garlic, tossing the tomatoes in the garlic butter, before adding them to an oven-proof dish. Then you wilt some spinach in the remains of the butter, add a teensy bit of nutmeg and put on top of the tomatoes. Place some fillets of smoked fish (cod, in my case) on the top of the spinach and make up a thick, roux-based white sauce, to which you add some wholegrain mustard and some grated cheese. Pour this over to cover the fish and bake in a moderate oven for some 30-45 mins (depending on how thick your fish is) and serve.

I was even able to avoid the tomatoes for my son, who hates cooked tomato, buy only placing them into two-thirds of the dish.

From there, we progressed to Chilli Meatballs with Cheesy Nachos. Now I do understand that in no way can this be classed a dish that is remotely good for you. However, it does come into the category of “got to be done” and now we’ve done it, we’re satisfied. Until next time. *wink*

For Friday’s dinner, I had chosen “One-pot Chicken & Bacon Stew”, which looked to be far more difficult than it actually was. You can find the recipe for it here.

Considering everyone had clean plates at the end of the meal, I’d call that a success. Well, as it was involving chicken, bacon, white wine and cream, how on earth could it have failed to succeed? That combination Is almost guaranteed to impress.

However, all this was put into the shade by a muffin recipe. Well may you raise your eyebrows, but this is no ordinary muffin recipe but one for the lovely Brunch Muffins.

Now, again, how could anything involving bacon, cheese and spring onions not win anyone’s heart? Especially when the end result is fist-shaped and portable. Perfect Sunday morning food for boys, men and blog-writing mothers, alike.

Again – like most of the best recipes – it is dead easy.  You simply take 360g of self-raising flour, half a tablespoon of sugar, half a teaspoon of salt and combine them in a large bowl.

Take 100ml of vegetable oil, 2 large eggs, 300ml buttermilk or semi-skimmed milk and a grind or two of black pepper and combine them in a large jug.

Fry off 100g of diced streaky bacon until it’s starting to go brown, then 5-6 chopped spring onions until they’re softening.

Add the liquids to the flour mixture and whisk or beat until smooth, then add 70g grated mature cheddar cheese together with the bacon and onions and mix well.

Decant into six large muffin cases, sprinkle another 10g of cheese over them and bake in a moderate (190deg fan) oven until brown and a skewer comes out clean.

Then, fend off the hungry hordes until they are cool enough to eat (the muffins, that is, not the hordes) and arm yourself with tomato ketchup for the “can’t eat bacon without ketchup” members of the family.

My thanks go out to Lucinda Overington, for the Brunch Muffins’ recipe – without whom our Sunday mornings would have been markedly less enjoyable.

(First published 31.8.10 Bournemouth Echo "Taste" Pages)

24 August 2010

Smoked fish & cherry tomato rarebit

You see what I mean, by over-sauced!
Although delicious, this did turn out a wee bit over-sauced.  Next time I make it, I'll follow the reduced quantities I've set out below.

Serves 3-4

Ingredients for the sauce :

30g butter
40g plain flour
a dash of worcestershire sauce
400ml whole milk
75g strong cheddar, grated
1 heaped tsp wholegrain mustard

Ingredients for the fish :

25g butter
1 clove garlic, grated
250g cherry tomatoes, halved
120g fresh spinach, washed
pinch of freshly grated nutmeg
400g undyed smoked haddock or cod, skin removed
25g strong cheddar, grated

Method :

Preheat the oven to 190C/fan 180C/gas 5.

To make the rarebit sauce, melt the butter in a heavy based saucepan and stir in the flour.  Cook, stirring, for one minute.  Remove the pan from the heat and slowly whisk in most of the milk until combined.  Keep some milk back, so as to keep the sauce as thick as possible. Add the Worcestershire sauce, then return to the heat and slowly bring to the boil, stirring or whisking constantly, adding a little milk as you go until the sauce is unctuous and thick.  Simmer for 2 minutes, then remove from the heat and add the mustard and cheese.  Season with pepper and set aside.

For the fish, melt the butter in a large, high sided non-stick frying pan, add the garlic and cook until just coloured.  Immediately add the tomatoes and toss them with the garlic butter, cooking just enough to heat through.  Remove the tomatoes with a slotted spoon and place into a shallow baking dish (a lasagne dish is perfect).  Spread them evenly.  Replace the pan on the heat and add the spinach.  Cook over a high heat until just wilted (will only take seconds), then tip into a colander and press to remove all the liquid.  Replace into the pan and add seasoning plus the nutmeg.  Arrange over the tomato layer, then cover with the fish fillets.

Spoon the rarebit sauce over the fish fillets so that they are completely covered, then sprinkle with grated cheese.

Bake in the oven for around 30-45 mins until brown and bubbling and the fish is cooked through.  You can check this by inserting a knife into the fish, whereupon the flesh should flake easily.

Serve straight from the dish, with new potatoes and peas.
Related Posts Plugin for WordPress, Blogger...