Showing posts with label lunchtime recipe. Show all posts

25 July 2012

Lean on Turkey challenge no. 3 - Roast Turkey Mufaletta!

No, that's not a made-up name (like the Petuba Canneloni was) but an actual, real, honest-to-goodness recipe.

The latest Lean on Turkey challenge was to cook a summer turkey meal for just £10 and in so doing, demonstrate how turkey is a great meat for summer cooking that's suitable for the whole family.

I had seen Rachel Allen preparing a Mufaletta on t.v. some time ago, so when hubby began to describe a dish that he'd seen on a Pinterest board, I knew exactly what it was he was talking about - and liked the idea straight away.  I felt sure that summer had to arrive in England soon (and I was right - it is absolutely roasting out there today) and picnics would be hurriedly assembled, before it can rain again!


To explain, a Mufaletta is basically an entire loaf of bread which has had the middle crumb removed and then stuffed with a selection of different meats, salads and cheeses - anything you fancy, basically!  You then wrap it in clingfilm and put it in the fridge for some 3-4 hours with a heavy weight on its head.  This compresses the layers and - amazingly - when you come to cut it, everything holds together beautifully and the flavours are just mind blowing.

We compressed ours with a marble slab and "A Social History of Great Britain", which seemed to do the job perfectly.

So, what did our Mufaletta have in it?  Well, firstly I gave the entire inside of the loaf (once it was empty, of course!) a light drizzle with our favourite Rapeseed oil and smoothed it into the bread crumb with the back of a teaspoon.  I then seasoned with sea salt and freshly ground pepper.

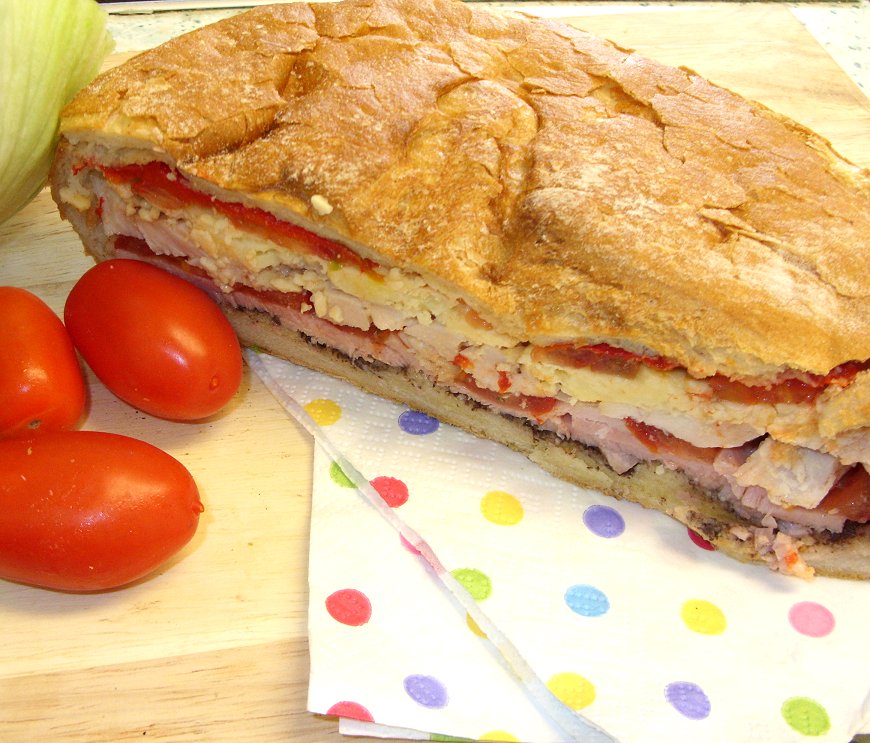
The very bottom layer was a green olive tapenade, then going up through the layers, we had thick cut ham, sliced tomato, chunks of thick cut roast turkey breast, redcurrant jelly, Applewood smoked cheese slices, more sliced tomato, with slices of oven roasted red and yellow pepper to finish.

The filling had rather overflowed the top level of the loaf, but once I'd put the lid back on and it was compressed, it all fitted beautifully.

In retrospect, I think I'd include a layer of something like rocket leaves for that nice peppery crunch as you bite through - but it was completely fabulous all the same.  Both my two chaps loved the Mufaletta and gave it a very definite thumbs up of approval.

You would think that all those different flavours would just amalgamate into a globular, undefined whole - but quite the opposite occurred.  As you worked your way through, you would find that the first bite was an amazing mix of flavours, but then individuals would appear - the first being the smoked cheese, then tomato, then turkey and so on.  The best bit, for me, was when you would hit upon a bit that had the redcurrant jelly.  It - not surprisingly - went so well with the cold roasted turkey breast, the cheese and the ham.  To have a little burst of intense sweetness amongst all that savoury, was really delightful.

As a picnic dish, you just can't ask for more.  It would travel perfectly, all wrapped up in its cling film and just require a sharp knife to cut it once you got down to eating.  A fork is optional - depending on whether you mind eating with your fingers or not.  Surely, though, a picnic is all about eating with the fingers?  I had no problems marshalling my fallers and stuffing them into the action department - all done with decorum, of course!

As for the price, the entire Mufaletta came to £9.83 - and we shopped at Asda and Sainsbury's for the ingredients, so you will find that prices vary.  Where items like the oil are concerned, I have priced out the amount we used, rather than the entire bottle :


ITEM
COST

£
Loaf of crusty bread
1.50
Rapeseed oil
0.10
Olive tapenade
1.00
Thick cut ham
2.00
Tomatoes
0.55
Roast turkey breast (from the Deli)
2.10
Redcurrant jelly
0.55
Applewood smoked cheese
1.28
Red & Yellow Peppers
0.75
TOTAL
 £ 9.83


As for ease of preparation, well it doesn't get a lot easier!  The trickiest part is not removing too much of the crumb of the bread, so as to leave enough to soak up the juices from the tomatoes etc., without being soggy.  I made sure that I didn't go down as far as the crust anywhere and would say that the amount of bread we had in there was about perfect.

After that, it's a simple matter of deciding which meats would go with which accompaniment and layering them up in even layers.  With the redcurrant jelly, I gave it a good mix in the jar first, to ensure it was nicely spreadable, and plopped three or four teaspoonfuls onto the turkey and spread them around with the back of the teaspoon.  This meant that as it fell between the pieces of turkey it became random in its delivery when being eaten - which made for the above mentioned hits of sweetness that worked so well.
I also made sure that the tomatoes were seasoned well before being included, as I find that a little sea salt and freshly ground black pepper can transform the flavour of a vine ripened tomato into something very special.

I'd say that, from the start to putting the finished article in the fridge, probably took me around 15-20 minutes - which is probably about the same as making a few rounds of ordinary sandwiches!

We ate ours sitting on the patio enjoying the first of these few days of sunshine, for which it was just perfect.

ROAST TURKEY MUFALETTA   (serves between 4-8, depending on slice size!)

Ingredients :

1 red pepper
1 yellow pepper
a loaf of crusty bread (8" across, round loaf preferably)
Rapeseed or extra virgin olive oil for drizzling
sea salt & freshly ground black pepper
3-4 tsp green olive tapenade
120g thick cut honey roast ham
2 vine ripened tomatoes
130g roast turkey breast (from the deli - ask for it to be cut in one thick slice)
3-4 tsp redcurrant jelly
200g Ilchester Applewood smoked cheese slices.

Method :

1.  Pre-heat your oven to 180degC/350degF/Gas 4.  While the oven is heating, cut the peppers in half and remove the stalk and pips.  Place them onto a baking tray and drizzle with oil.  Season.

2.  Cook the peppers for 30 mins or until they are softened and collapsed.  As soon as you remove them from the oven, place them into a plastic bag and seal.  After some ten minutes or so, you should be able to peel the tough skins off, leaving the flesh in one piece.  Set them aside to cool completely.

3.  Take the loaf of bread and cut the top off, sufficiently far down that it forms a good "hat", but not so far down that you don't have much room for the filling.

4.  Pull the crumb of the bread out of the middle of the loaf and the "hat", leaving a half to a quarter of an inch of bread inside of the crust.

5.  Drizzle with a little rapeseed or olive oil ("hat" included) and smooth over with the back of a teaspoon.  Season.

6.  Begin the layers by smoothing on the olive tapenade, then layer in the ham.  I found to work in a spiral was the easiest way.

7.  Next, cut the two tomatoes into thin slices and season them.  Place one tomato into the loaf as the next layer.  Reserve the other tomato.

8.  Take the turkey slice and break it into roughly bite sized pieces.  Scatter them on top of the tomato, for the next layer.  Press down gently to compact the layers slightly.

9.  Add the teaspoonfuls of redcurrant jelly in different places, then smooth over with the back of a teaspoon.  It doesn't matter if some areas wind up with more than others - this adds to the randomness of the flavours.

10.  Lay on the cheese slices (again, I found a spiral pattern worked well), the last tomato and finish with the pepper slices.

11.  Give the contents a little drizzle of rapeseed or olive oil and place the "hat" on top.

12.  Wrap the loaf, in its entirety, in cling film and place into the fridge under a very heavy weight for some 3-4 hours.

13.  Take to somewhere lovely, and serve!


.

14 May 2012

Lunchtime quick soup - Asparagus & Fenugreek!

Last Saturday, when lunchtime was on the horizon, I was feeling soupy.  Not any old soup though.  I've been through several soup phases just lately - there was the Mulligatawny, the Heinz Tomato with chilli and the Chicken noodle.  This time, however, I wanted home-made.

I think what contributed to this was the knowledge that, in the fridge, was a bag of offcuts from the asparagus we've been using in various dinners.  We always keep them as they are so useful in stock or soup, giving a touch of class wherever they go.

So there I was sat on the side of my bed, watching the birdies on the feeders arguing over who was sitting where, when the recipe for this soup struck me.

It struck me so forcibly, that I had to go and get my notepad and pen just in case I forgot the recipe before I reached the kitchen.

The best thing about this soup is that it is made entirely from vegetables that were surplus to requirements, or that had been left from another dish.  I love it when I can make a bonus dish without having to buy anything new for it.

The second best thing about this soup, was that it used fenugreek - which is my new favourite ingredient.  It's dried fenugreek, which is also known as Kasoori Methi and is very often used in curries.  The name "fenugreek" apparently translates from the Latin for "greek hay" - which I love, as new mown hay is exactly what it smells of, to me.  It even tastes like new mown hay - which I know, because I ate some and having baled a few tonnes of the new mown stuff in the past, I must have eaten my fair share of it by now - if only in dust form!

The soup was delicate, yet light and flavoursome whilst being robust enough to make a perfect lunch on a cool, damp, yet not too cold, day.   Considering it was green - and I expect you know how difficult it is to convince a teenager to eat his greens - I was amazed when son & heir emerged from his lair and complained that we'd eaten it all.  We hadn't - there was more than enough for him left in the pan - and he polished it off with every indication of having thoroughly enjoyed it.

The very next time we have some offcuts of asparagus, I'll be making more.

ASPARAGUS & FENUGREEK SOUP   (feeds 3-4)

Ingredients :

2 rashers of back bacon, chopped finely
a tsp of olive oil
a small onion, chopped finely
a medium potato, diced finely
2 sticks of celery, trimmed, washed and diced finely
a rounded tsp of dried fenugreek
400-500ml of chicken stock
3 handfuls of asparagus offcuts (or 100g of spears), chopped finely
sea salt & black pepper
low fat creme fraiche.


Method :


1.  Put the bacon pieces into the bottom of a large saucepan and cook slowly, until the fat has rendered out and the bacon is beginning to crisp.  Remove and set aside, leaving the fat in the pan.


2.  Add the onion pieces and fry gently - without colouring - until the onion is transparent and beginning to soften.


3.  Add the potato, celery and fenugreek and stir well.  Continue to sweat the vegetables for another 5 minutes or so, until everything is heated through.


4.  Add the hot chicken stock and the asparagus pieces.


5.  Bring to a lively simmer and cook for some 5 minutes, or until the vegetables are all tender.


6.  Using a hand blender, blitz until smooth.


7.  Add the bacon pieces and creme fraiche and stir through.  Do not allow the soup to boil from this point onwards.


8.  Season to taste, and serve.


Printable version


.

19 February 2012

Swiss Eggs - a naughty, but utterly irresistible, lunch

Swiss Eggs.  Aaaah, how just those two little words can carry me back in time to when I was a teenager living with my parents & brother near Epsom.

I can remember some "lunches of note" such as bacon & tomatoes on toast, cold roast chicken & sweetcorn relish sandwiches and cheese on pickle on toast.  However none of them has the sheer power of a food memory that the Swiss Eggs do.

My memory fails me where the first taste of this lunchtime paragon is concerned, but I can well remember grating the cheese and filling the little dishes as my Mum breaks the eggs to go in them.  Then she would add the little splosh of milk and I would do the sprinkling of Worcestershire sauce and pop the little knobs of butter on top.

Into the oven they went, while we toasted and buttered some bread and sat waiting for the oven to work its magic.  As the twenty minutes passed, the smells of hot Worcestershire sauce were replaced by melting, baking cheese.  Oooooh, the anticipation!

I went through all that again today, except in a different order as I was the Mum and son & heir was the progeny I was making them for.  There is something beautifully cyclic about these types of cooking moments - moments that I can only hope that son & heir will carry forward to his family, as and when.

It has to have been some ten years or more since I last had Swiss Eggs.  Hubby is egg sensitive, so I don't make them for him - and it seemed too much to fire up the oven just for me.  Owing to the thermo nuclear temperature that the ramekins achieve, it has taken this long for me to trust son & heir's tender fingertips - and not least, his tongue - with the correct handling of one.

Today was the day - and, almost in celebration, I pushed the boat out a bit and substituted some cream for the milk.  The cheddar was lovely Lake District Cheddar and the eggs free range.  The anticipation was the same, as I sat in the kitchen appreciating the fragrances issuing from the oven, but even that was eclipsed by that first spoonful.

Oh dear god.  Let it not be ten years before I make these again.  They are, truly, divine.

SWISS EGGS  (makes 1)

Ingredients :

Enough grated cheddar to half fill a good sized ramekin
2 fresh eggs
a tablespoonful of cream (milk would do)
four spots of Worcestershire sauce
freshly ground black pepper.

Method :

1.  Pre-heat the oven to 180degC(fan)/350degF/Gas4.

2.  Place half the grated cheese into the bottom of a ramekin.

3.  Crack the two eggs into the ramekin, on top of the cheese.

4.  Cover the eggs with the remaining cheese.

5.  Pour the cream (or milk) over and season with the pepper and four spots of Worcestershire sauce.

6.  Place into the oven for 20 minutes, or until the eggs have risen and the cheese is bubbling.

7.  Serve with buttered toast, in a quiet place, where you can be alone with your lunch - because you're not going to want to share it!

. 
Related Posts Plugin for WordPress, Blogger...