Showing posts with label parsley. Show all posts

8 June 2019

Lemon & Black Pepper Chicken - super tasty, with a definite zing!

What a very pleasant surprise this meal turned out to be.  I really wasn't expecting much from it and hence only took a couple of pictures.  You'd have thought I'd know better by now and would take more pictures just in case, but no.

The recipe is incredibly simple - just pan fried chicken breast in a sauce made with slices of lemon, crushed fresh garlic, some chicken stock, lemon juice, runny honey and a whole heap of black pepper. How often it is that the most simple recipes turn out to be the best!

I particularly enjoyed the lemony sauce with the Jersey Royals and the Sweetheart (or Hispi) cabbage. Mmmnnn, but that was sooo good. I'd been craving cabbage, so that might be why, but son & heir agreed the combination was very tasty and a second opinion is always helpful. Feel free to pair the recipe up with whatever accompaniments you fancy - after all, it's your dinner so why not please yourself.


Uncharacteristically, let's head on directly to the recipe and gird your loins for a zingy, fresh tasting chicken sensation.

LEMON & BLACK PEPPER CHICKEN (serves 2)

Ingredients :

1 tbsp olive oil
2 individual skinless, boneless chicken breasts
a pinch of sea salt
half a lemon, sliced thinly
half a lemon, juiced
one clove of garlic, crushed
as much fresh ground black pepper as you want - I used a teaspoonful
1 tbsp runny honey
200ml chicken stock - I used a combination of Knorr stock granules (half tsp) and chicken Bovril (half tsp)
2 tsp approx finely chopped fresh parsley
2 tsp Bisto best chicken gravy granules.

Method :

Heat the olive oil in a good sized frying pan until sizzling hot. Gently add the chicken breasts and sprinkle with a little sea salt. Leave the chicken to brown - you're aiming for it to have an all over golden tan, so don't keep fidgeting it about or it won't sear. Turn the chicken to sear the other side and add the lemon slices to the pan.

In a small bowl, combine the lemon juice, crushed garlic, black pepper, runny honey and chicken stock. When both sides of the chicken are golden, pour the mixture over the chicken into the pan. Allow the sauce to heat through and bubble, reduce slightly and thicken. Turn the chicken from time to time, to keep it basted in the sauce and ensure it is cooked through.

Reduce the heat to medium and include the parsley.  Allow a moment or two for the parsley to heat through and add the gravy granules if necessary, to thicken the sauce to your personal taste.

Serve with the lemon slices on top, with a little chopped parsley as garnish and vegetable accompaniments of your choice.

Printable version

30 November 2018

Pork And Apple Pie - think a lighter textured pork pie!

The moment I saw this recipe in the Take a Break - My Favourite Recipes magazine, I knew I had to give it a go.  I've done a couple of variations on a pork and apple pie already - Kentish Pie and Ham & Apple Pie - both of which are really popular with the family, so I reckoned this would also be a hit.  Little did I know just how much of a hit it would prove to be!  It's hard to say which way I like it best - room temperature, or direct from the fridge.  All I know is that it is delicious and especially good with mustard or piccalilli!

Of course, apart from the delicious flavour of this pie and the lightness of the gorgeous pastry, one of the very best things about it is just how simple it is to make.  I suppose it all hinges on your using a tasty sausagemeat for it as you won't get good things back if you don't put good things in to begin with!  I picked a 72% pork sausagemeat, which was seasoned with sage, nutmeg, mace and black pepper.  Inevitably, I tinkered about with the quantities, plus I used smoked back bacon, which inevitably has more flavour than unsmoked and more meat than fat, I swapped the leek for a small red onion because hubby hates leek and also added more sage until my nose told me there was enough.


Contrary to the original recipe, I pan fried the bacon before adding it to the filling mix as I was a bit nervous about it discharging too much water in the cooking.  I also baked the pie in a loose bottomed sandwich tin (the recipe states to bake it free form on a baking tray) basically because my crimping is rubbish and I would have hated for it to have come apart during the baking or got washed away by all the water from the bacon.


All of my tinkering about with the recipe worked perfectly, resulting in a nicely shaped, full of filling, golden baked pie that will grace our Boxing Day buffet table very nicely thank you.  It will be lovely with the pickles and salad that accompanies the cold meats and cheeses and make a fabulous centre piece for the table.


Many thanks to Laurie Burley of Cornwall for sending in her delicious pie recipe to the magazine - I know it has instantly become a family favourite!

PORK AND APPLE PIE   (serves 6)

Ingredients :

For the pastry :

225g plain flour
140g cold diced butter
a pinch of sea salt
a quarter tsp of black pepper
1 tsp English mustard powder
2 egg yolks kept separate - one for the pastry and another for glazing
2 tbsp or thereabouts, of cold water (I used carbonated mineral water).

For the filling :

400g of your favourite pork sausagemeat
100g smoked back bacon, finely diced
1 sharp eating apple (I used a Braeburn), peeled, cored and finely diced
1 small red onion, finely diced
2 heaped tsp finely chopped fresh parsley
1 tsp dried sage
half a tsp ground black pepper.

Method :

Using a food processor (you can opt to rub in the butter, if you prefer), put the flour, diced butter, sea salt, black pepper and mustard powder in to the bowl and whizz for as long as it takes to get to tiny breadcrumb stage.  Add the one egg yolk and half the water and blitz again.  You are aiming for the crumbs to clump together and form a mass.  You may need to add the remainder of the water and continue blitzing until the clumps form.  Don't add too much water too soon, or you will potentially end up with a too wet mixture.  Some loose mixture is acceptable as it will all come together in the cling film.

Spread a large piece of cling film out across the worktop and tip the contents of the processor on top.  Fold the cling film over the top and gently press and pat the pastry together so that it forms a cohesive whole.  Then fold each end up to seal and place into the fridge for a minimum of 15 minutes.

Pre-heat the oven to 190degC/375degF/Gas 5.

Heat a frying pan and add the diced bacon.  Dry fry until all the moisture has evaporated and the pieces are beginning to turn golden.  Set aside.

Taking a large bowl, add the sausagemeat, cooked bacon, diced apple, diced onion, chopped parsley, dried sage and pepper.  Using your hand, squish and mix the ingredients together until everything is evenly distributed.  Try not to massage the mixture into a lump, but keep the texture light and broken up.

Reclaim your pastry from the fridge and roll out half of it to line an 8" sandwich tin - a loose bottomed one helps to get the pie out at the end of baking.  Trim the pastry off neatly and level with the top edge of the tin.

Place the sausagemeat mixture gently into the pastry case and distribute it evenly, making sure to not press down too hard.  Remember, you want to keep the texture light.  Level off with the top of the tin.

Taking your egg intended for glazing, brush a little egg around the inside edge of the small amount of pastry above the level of the meat.

Roll out the second piece of pastry and place over the top of the tin to create the pie's lid.  Ease the pastry down onto the top of the meat filling and press lightly to create a seal around the edge where the egg wash is.  Trim off neatly and crimp the edges in a pretty pattern.

Cut a cross into the centre of the pastry and turn back each quarter of the cross, to allow the steam to escape whilst baking.  You can decorate the surface with pastry leaves or whatever you want, at this stage.

Finally, egg wash the surface of the pastry and place into the oven for 30 minutes.  When the time is up, reduce the oven temperature down to 170degC/325degF/gas 3 and bake for another 15-20 minutes or until a knife inserted into the centre of the meat sends back some resistance, indicating that the meat is cooked, and the pie is lovely and golden in colour.

Remove from the oven and cool for 10-15 minutes on a wire rack.  While the pie is still quite warm, remove from the tin (this is where the loose bottomed tin comes in SO handy) and gently place back onto the wire rack to cool.

Serve at room temperature with pickles and salad, or chips and baked beans.  The pie is just as good served directly from the fridge, to have with pickles and salad or to take on a picnic.

Printable version

31 August 2018

Lincolnshire sausage & sun dried tomato quiche - feeds a crowd!

If there's one thing that my menfolk are guaranteed to eat, it's a slice of quiche.  As I have now conquered my (stupid, as it turns out) tendency towards a soggy bottom (don't bake the tin on a baking tray - the two layers prevent the pastry from cooking properly.  So simple, but it took me years to work it out!) making quiche has become a regular occurrence in our house.

The good thing about quiche is that there are so many different variations of filling.  Yes, there's the good old bacon & cheese that always gets the thumbs up, but really you can put just about anything into a quiche so long as it's not wet, or will cook wetly.  (Courgette, I'm looking at you here).

In this instance, I was looking for something that would provide a man-pleasing filling.  Now my hubby has always loved Lincolnshire sausages, whereas I have been rather less than complimentary about them.  It's not as though I actively dislike them, it's just that there are other types of sausage that I find more appealing.  Stop giggling at the back!  I did think, though, that their herby character would go nicely in a quiche and tomato seemed a natural bedfellow for them.  Of course, it just isn't quiche if it doesn't have some cheese in and/or on it, so some mature cheddar was a given.  Now our son has a serious dislike of cooked tomato (he picks the tomato off the top of his quiche, strange child), which is where the sun dried tomato comes in.  Perfect.

The filling made up to be a good, deep fill with lots of character and substance, just what I was after.  You could certainly feed a crowd with this one, as mine very nicely cut into six decent sized portions, served with salad and chips for the menfolk.  I now have half a quiche (three portions) which should keep the wolf from the door for us all at lunchtime tomorrow, as well.

Oh and incidentally, as a means of making six sausages go adequately around three people, you can't beat it!

LINCOLNSHIRE SAUSAGE & SUN DRIED TOMATO QUICHE   (serves 6)

Ingredients :

400g Lincolnshire sausages, removed from their skins
approx. 300g shortcrust pastry (sufficient for an 8" sandwich or flan dish, approx. 1" deep)
3 extra large eggs
150ml soured cream
a half tsp of ground black pepper
a quarter tsp of sea salt
70g mature cheddar cheese, grated
6 pieces of sun-dried tomato (I used the ones in oil), sliced
1 tbsp fresh parsley, chopped fine
1 medium tomato, sliced finely into 5 slices.

Method :

Your first job is to cook the sausages.  Pre-heat your oven to 180degC/350degF/Gas 4. Remove the sausage skins and pinch off small pieces of sausage meat, forming them into balls.  1 sausage will make around 5 balls.  Place onto a foil-lined tray and give them a light coat of cooking spray.  Place into the middle of your oven for around 20 minutes until cooked through and just beginning to brown.  Once cooked, set aside to cool a little.

Next, you need to part-bake the pastry case.  If you are using pre-rolled pastry, keep it on the baking paper and roll it out a little bit thinner than it arrives.  Cut a piece that is significantly bigger than the baking dish or tin you will be using.  Keeping the pastry on the baking paper, gently sink it into the tin making sure there are no bubbles under the pastry and it is pressed gently into the corners.  Carefully remove the baking paper and trim off the majority of the excess with a sharp knife, but leave a decent overhang to cope with any shrinkage.

Replace the baking paper and lightly smooth it across the base.  Pour in your baking beans in an even layer and place the tin centrally into the oven for 20 minutes.  You can use this time to make the filling.

Break each of the eggs into a cup and pour them into a large bowl.  Doing this ensures that if one of your eggs is off or even slightly dodgy, you don't lose the lot!  Add the soured cream and whisk together.  Next, add the black pepper, sea salt, two thirds of the grated cheese and the parsley and stir until everything is combined.

Remove the pastry case from the oven and gently lift out the baking beans by holding the greaseproof paper.  Set the baking beans aside to cool down.

Tip the sausage balls into the pastry case and sprinkle over the pieces of sun dried tomato.  Pour in the egg/cream mixture and sprinkle over the remaining grated cheese.  Add the five tomato slices in an attractive pattern.

Gently place the quiche into the oven and bake for 30-35 minutes, until the filling has risen, turned golden and feels fairly firm when pressed in the middle.

Remove from the oven and place onto a cooling rack for 5-10 minutes.  You can now trim back the overhanging spare pastry and if you are using a loose bottomed tin, remove the quiche from the tin and place it back onto the cooling rack.  Serve whilst still a little warm or at room temperature, with a crunchy garden salad.

Printable version

1 November 2017

Manchego chicken Alfredo - super quick, two pot supper

This bowl of chickeny, cheesy, garlicky and creamy delight could almost be called a one pot supper, but regrettably the pasta needed to be cooked in its own pan - hence it became a two pot deal.  However, that in no way slows it down, oh no.  The sheer simplicity of the ingredients makes this as speedy a dinner to produce as any you could wish for.

With no onions to chop, no veggies to peel or slice, the only preparation that's required is to peel and chop some garlic, cut some chicken in half, grate some cheese and chop a bit of parsley.  I certainly can't claim that's in any way difficult - and oh boy, does it pay off by way of flavour!  Alfredo de Lelio, you sure knew what you were doing when you put the original dish together, all those years ago in 1892.


However, I suspect Mr de Lelio would be horrified to learn that I have removed the quintessentially Italian Parmesan cheese from the recipe and submitted, instead, a Spanish replacement - the gorgeous Manchego hard cheese.  Being a sheep's cheese, Manchego has a very different flavour to Parmesan, but equally there are similarities in both texture and colour plus they both melt in a similar way.

Son and heir is passionately opposed to Parmesan - he can't bear the after taste it brings with it, so consequently I was committed to finding a replacement for it or not indulging in pasta Alfredo at all.  I was intending on using Grana Padano, but having recently used some Manchego in cheese scones with every success, I decided to give it a go and I'm so glad I did.

So there we are.  A bit of a different spin on pasta Alfredo, but super tasty and super quick to make, too.  If, perchance, you can't find any Manchego but like the sound of the recipe and don't have anyone at home passionately opposed to Parmesan, then by all means use Parmesan.  You won't be harming the recipe at all, you'll simply be returning it back to its roots.

I only have one Cook's Tip for you, which is that when you drain the pasta make sure to keep some of the pasta water close by.  If (as sometimes happens), the sauce becomes too gloopy and thick, simply add a little of the pasta water.  Far better to use that than add more cream, or milk, or have to mix up some chicken stock.

Onwards to the recipe!

MANCHEGO CHICKEN ALFREDO   Serves 2

Ingredients :

250g small, open style pasta such as Conchiglie shells
1 tbsp rapeseed or olive oil
2 tbsp butter
2 boneless, skinless chicken breasts, halved horizontally
sea salt & black pepper, to taste
2 cloves garlic, chopped finely
200ml dry white wine
250ml single cream
50ml double cream
half a tsp good quality chicken stock powder (or half a chicken stock cube)
125g Manchego cheese, grated finely
2 tbsp fresh parsley, chopped.

Method :

Bring a good quantity of salted water to the boil in a large saucepan and cook the Conchiglie shells to manufacturer's recommendation, draining once cooked.

In a large frying pan, heat the rapeseed oil and melt the butter over a high heat.

Season the two halves of each chicken breast with both sea salt & black pepper and carefully place into the frying pan.  Fry the chicken until it is a deep golden brown on both sides and cooked through.

Remove the pan from the heat and decant the chicken onto a warmed plate.  Cut the chicken into even sized slices and reserve to keep warm.

Replace the pan onto a reduced heat and add the garlic.  Stir and cook gently until the garlic is softened and lightly golden.  Add the wine (and a little bit extra for luck is definitely allowed) and allow to bubble and reduce by one third.

Add the single and double creams along with the chicken stock powder and stir gently to combine.  Once the sauce has heated through, is bubbly and slightly thickened, add the grated cheese, most of the parsley, the hot, drained pasta and sliced chicken.  Toss everything in the sauce until all is well combined.  Taste for seasoning and add more pepper if necessary.

Serve into warmed bowls with a sprinkle of the reserved parsley on top as garnish.


25 October 2017

Scarborough Fairly Meatloaf - parsley, sage, rosemary and thyme!

You may not be altogether surprised to hear that the name of this meatloaf is one of my own devising. Of course, it's because the herbs involved are parsley, sage, rosemary and thyme. LOL

You see, I was after a midweek, no frills, relatively plain, good and savoury, tasty meatloaf that could be served with some denomination of potato dish and a selection of vegetables. A meat & three veg. meatloaf, if you like!

I used beef and pork mince in a two thirds/one third combination because the pork mince just serves to lighten the texture of the beef. Adding loads of extra flavours - mustard, herbs, onion & garlic granules - helped pep up the savouriness and my now indispensable method of draining off the cooking juices halfway through the cooking time as ever, resulted in a good firm loaf. I do so hate meatloaf that you could serve with a spoon. Gak!


Now you might be wondering why I used the onion & garlic granules instead of adding fresh onion and fresh garlic. Good question! I find that fresh onion has to be almost grated or minced, so as not to leave small pieces of quite firm, almost crunchy, onion behind in the mix. Some people might like that, but I'm not a fan. Grating or mincing the onion just serves to increase the liquid in the mix, which I pour off at half time anyway so its not a good method.

It's a similar thing with garlic. I'm allergic to raw garlic, so it has to be incredibly finely chopped to wind up cooked sufficiently for me. Hitting on a piece of semi raw garlic is so overpowering to the other flavours, that again, it's just not a good method for me. However, if I add onion and garlic granules - which are simply dehydrated and finely minced - I get all the benefit of the flavour and none of the drawbacks. It's a personal taste thing. If you like to find onion or garlic in your meatloaf, or have the time and energy to pre-cook and caramelise them, then by all means go ahead and use fresh!


Oh and I'm also assured that this meatloaf is fairly epic when used, cold, as part of a sandwich. Happy days!

SCARBOROUGH FAIRLY MEATLOAF   (Serves 5)

Ingredients :

1 bread crust, blitzed into breadcrumbs
500g reduced fat beef mince
250g pork mince
1 large egg
1 heaped tsp wholegrain mustard
1 tbsp Worcestershire sauce
pinch of sea salt
pinch of ground black pepper
1 tsp onion granules
half a tsp garlic granules
1 tbsp fresh parsley, chopped fine (dried parsley would work too - use 1 tsp)
1 tsp dried sage
1 tsp dried rosemary
half a tsp dried thyme
1 tsp beef stock powder or 1 tsp Bovril.

Method :

Pre-heat your oven to 180degC/350degF/Gas 4.

Place all the ingredients into a large bowl and mix together well, using your hands.  Try not to over-mix or the meatloaf will become tough, but ensure all the ingredients are distributed well across the mix.

Line a 1lb loaf tin with silver foil and pack the meatloaf mix in well.  I find it best to put half in and press into the corners, pushing it well down and ensuring all air bubbles are out, before adding the second half and repeating the process.

Using your fingertips, create a small space along the edge of the mix between the loaf tin and the ingredients - a gutter, effectively!  This will help when it comes to draining off the excess liquid, later.

Place onto the middle oven shelf and bake for 30 minutes.

Remove the meatloaf from the oven and carefully drain off any accumulated liquid.  Take care not to let the loaf slip from within the tin, into the sink!

Place back into the oven for another 30 minutes.

Remove from the oven and, using the silver foil, pull the meatloaf from inside the loaf tin.  Place onto a chopping board and carefully unwrap.  Cut the meatloaf into slices and serve with mashed potato and seasonal vegetables of your choice.

Printable version

18 March 2017

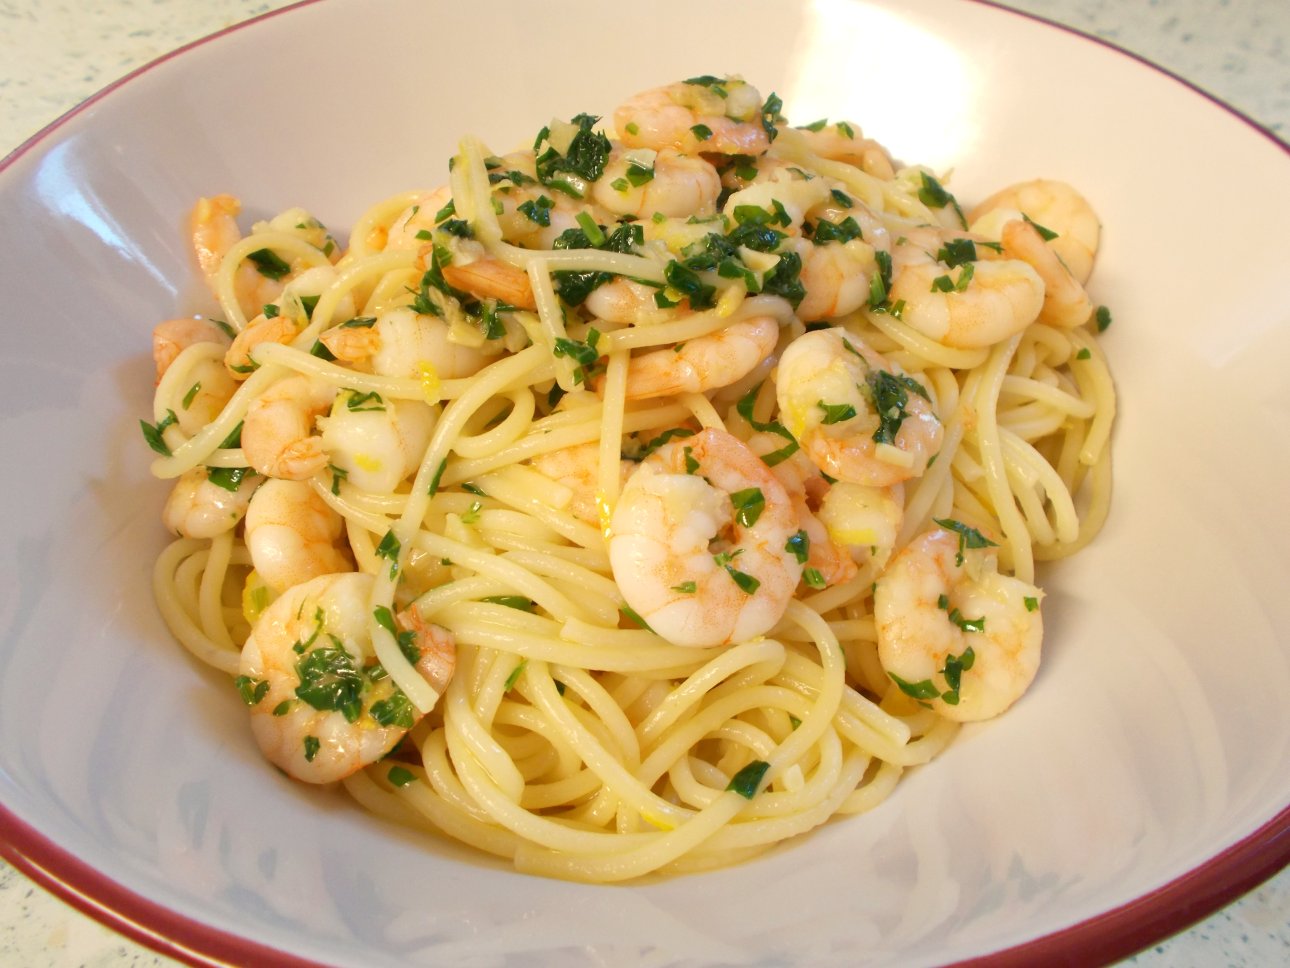
Simple garlic butter prawn spaghetti

Well, this one was a real unexpected surprise.  I wasn't supposed to be cooking this recipe at all and in fact, can't remember why I wasn't cooking the intended one.  Whatever the reasons were - and it could be any number of them! - I decided to go for this because it looked simple and sounded like it could be rather good.

Yes, it's certainly simple - both in number of ingredients, cooking process and method - and as for "rather good", well that's a bit of an understatement.  It turned out to be very good indeed.

The recipe originates with the BBC Good Food website and I could just direct you straight there, however, it occurred to me that if we ever lost that site, I'd lose a very useful and tasty recipe.  So here it is, with thanks to BBC Good Food for the original.

There is only one Cook's Tip for this recipe - and that is, if you are using cooked King prawns (or Tiger prawns), then literally just heat them up in the pan.  Don't cook them, as they are already cooked and will become tough and hard if heated for too long.  They just need to be brought up to a good temperature so as to avoid any risk of encouraging bacteria by half-hearted warming and that's all.


This dish certainly doesn't have big, bold flavours.  However, if you're into garlic butter, lemon and prawns, then you will love it.  The spaghetti gives it that comfort food thing and the lemon prevents the butter from becoming too rich.  I'd have it again tomorrow, I liked it that much!

SIMPLE GARLIC BUTTER PRAWN SPAGHETTI    (serves 2)

Ingredients :

250g dried spaghetti
sea salt
20g salted butter
2 cloves of garlic, chopped finely
a pinch of ground black pepper
250g cooked King prawns
zest of 1 lemon
15g fresh parsley, chopped.

Method :

Firstly, bring a large pan of salted water to the boil.  Add the dried spaghetti and cook to manufacturer's recommendation.

In the meanwhile, melt the butter in a frying pan over a gentle heat and add the chopped garlic.  Sweat, as opposed to fry, the garlic ever so ever so gently until the pieces are softened, adding the black pepper along the way.  Then, add the prawns, the lemon zest and the parsley and increase the temperature just slightly, sufficient to heat the prawns through without cooking them and without frying the pan's contents.

Drain the pasta and add to the prawn & garlic pan.  Toss the pasta in the garlicky butter and serve into warmed bowls, sharing the prawns out evenly.

Printable version

24 May 2016

Chicken with mushrooms - the name belies the flavour!

It sounds so simple that it is hard to believe it could be so tasty.  However, never underestimate the power of a tablespoonful of vinegar to the flavour of a dish!

I was looking for a simple, no frills, mid week chicken dish that could be served with a couple of different vegetables, to balance up the low veggie dishes that were already on the menu plan.  As ever, when feeling a lack of inspiration, I turned to my recipe bible - www.bbcgoodfood.com.  Flicking through the dozens of recipes, I recognised one that I'd liked on a previous occasion but hadn't got around to cooking yet - the chicken with mushrooms.  For all that the name sounds singularly uninspiring, the photograph alongside looked really quite enticing.  Nice golden fillets of chicken with mushrooms and green peas in a light and not creamy, sauce.  It looked perfect for the job.


I had to make some alterations to the original recipe though, as I wasn't going to pay for pancetta (so I used Asda's misshapes smoked bacon for cooking), nor a bottle of white wine vinegar that I might not use again for months (so I used sherry vinegar, which I had already got).  

I also didn't bother with dirtying a bowl by dredging the chicken with flour (which would probably have stuck to the pan and burned anyway) and solved the problem of a too-thin sauce by adding just two teaspoonfuls of Bisto Best roast chicken gravy granules.  All three of these changes worked perfectly, so hence the recipe appears in its altered form in this blog.  If I didn't write down what I did, I just know I'd forget when it came to the next time!  However, if you want to stick to the named ingredients in the original recipe, you go right ahead - it's fine by me.

The keys to this recipe's deliciousness are as follows :

a)  the cooking of the chicken.  You must make sure that your chicken gains a lovely golden hue before you add liquid.  This is the real foundation of your dish's flavour.

b)  the bacon.  Don't be tempted to leave out the bacon.  The flavour profile needs it's intense savouriness and saltiness - but be careful about the addition of sea salt, just a tiny pinch!

c)  the vinegar.  The addition of the vinegar gives a lovely tang of acidity to the sauce.  Not as much as sweet and sour, but enough to give it a lift above a straight gravy.

d)  the late addition of the fresh parsley.  Don't be tempted to chuck it in early.  The sauce needs the freshness of the just wilted parsley.

e)  the reduction of the liquid in the sauce.   Don't be tempted to hurry it along and serve before the sauce has had a chance to reduce by half to two thirds.  It makes SUCH a difference to the intensity of the flavour!  Taste the sauce as you go along and you will see what I mean.


This is one of those recipes that is as good a mid week family dinner as it is a relaxed dinner with friends.  The flavour is so much more than its title!

CHICKEN WITH MUSHROOMS (serves 2)

Ingredients :

1 tbsp olive oil
3 rashers thick cut smoked back bacon, diced
2 large eschalion shallots or 4-5 small shallots, chopped
150g button mushrooms, halved
2 chicken breasts, each cut in half lengthways to create 2 thinner fillets
sea salt
freshly ground black pepper
250ml warm water, containing 1 low salt chicken stock cube
1 tbsp sherry vinegar
2 tsp Bisto Best chicken gravy granules
1 tbsp fresh parsley, finely chopped
50g frozen peas.

Method :

Heat the oil in a deep frying pan, then add the bacon and shallots. Cook over a moderate heat until the shallots are softened, all the liquid has left the bacon and it has begun to turn golden.

Add the button mushrooms and continue to fry, stirring regularly, until the mushrooms have begun to soften.

Remove the bacon, shallots & mushrooms from the pan using a slotted spoon and reserve to keep warm.

Increase the heat under the pan and add the chicken breast fillets and season with sea salt & freshly ground black pepper. Leave them undisturbed to gain a lovely golden colour, then flip them over, season and cook the other side in identical fashion.

Once both sides are deliciously golden, return the bacon, shallots & mushrooms to the pan.

Add the water, stock cube (broken into pieces) and vinegar and stir gently until everything is combined. Bring to a steady simmer and cook for a further 15 or so minutes, turning the chicken half way through.

Once the liquid has reduced by half, remove from the heat and allow to cool slightly then add the gravy granules and stir quickly to prevent them clumping. Return the pan to the heat and cook, stirring, until the sauce has thickened.

Add the fresh parsley and frozen peas and taste the sauce to check the seasoning. Add a little more if necessary. Bring back up to simmering point, turn the chicken once and cook until the peas are tender but have not lost their fresh green colour.

Serve with new potatoes and seasonal vegetables.

Printable version


12 September 2015

Herby lamb and pea pie

I love this pie.  Now I know I sound like I love every recipe I make - which I do - but I just love this pie a little bit more.

I've had my issues with pies over the years and yes, granted, this one is just a top-only pie and not a top-and-bottom version so that's easier.  However, it hasn't always been the pastry that has been a problem, but the filling too.

Mostly, to be honest, it has been the gravy or sauce where I've failed.

However, in the Game Pie and with this lovely example here, I got the gravy right.  None of the "gravy like water", where it has been diluted in the cooking.  Equally, none of the "gravy like glue".  No, just a perfectly thick, covering, tasty, unctuous pie gravy that means every forkful will be as delicious as the last and with no resorting to gravy granules.

So I'm pleased.

The pie itself had been simmering on a low heat in my head for a couple of weeks, while I worked out what "interesting" departure from a usual lamb pie I would use.

Mint and Rosemary - home grown, don'cha know!
I was convinced that it would be the juniper berries that I bought for the game pie, right up until - with a stroke of inspiration - I remembered the pomegranate molasses.  Even when I was cooking the filling, I had the juniper berries sat there beside the pomegranate molasses, as I really wasn't sure which one to choose.  Ultimately, I had a little taste of the way the sauce was going, then a little taste of some of the molasses on a teaspoon.  The combination of the two was just so good, I didn't consider the juniper any further.

Lamb often needs something a little bit sweetly acidic to complement its own earthy sweetness and this is why redcurrant jelly does the job so well.  So, if you don't want to invest in a bottle of pomegranate molasses just for this pie (although why not try it drizzled lightly over strawberries and Greek yoghurt - it's otherworldly), add a teaspoon or more of redcurrant jelly instead.  The difference the pomegranate made to the sauce was just incredible, bring it alive in a subtle but definite kind of a way.

Another departure from the norm, is cooking the lamb in pale ale.  So often, you will find lamb cooked in wine - usually red, but I wanted to use something different.  I also wanted to keep to a "country kitchen" kind of a theme, which ale suited so much better than wine.  My plans for the pie didn't suit a very strong, hoppy kind of ale, but a lighter, milder flavour - so a pale ale was fine and the English Pale Ale (from Marstons brewery) that I chose was perfect for the cause.  If you're in a place where Pale Ale doesn't come easily, choose as light a beer as you can find without venturing into lager territory.

Now one other very important thing regarding this pie is that it takes a fair old while from beginning to end, if you want to do it properly.  So it's definitely something that you don't want to attempt when you've only got a couple of hours to spare.

Having said that, however, you can devoted two days to it and cook the filling the day before, so stretching out the effort and making it a little easier to cope with.  Plus, it means you'll be ahead of the game on the day.

Now, as for Cook's Tips, as ever I have a few for you :

Ordinary frozen peas will do if you don't have petit pois.  Nobody's going to quibble over the size of a pea.

You might be surprised that I don't recommend dusting the meat with seasoned flour, rather than adding the flour later.  Well, what I'm avoiding is the burned flour on the base of your pan.  Maybe it's just me, but it so often happens that way - and I didn't want any acrid burned flavours in my softly flavoured lamb.

Now, when you add the ale/flour mixture, if lumps do form (and it often happens), don't panic over it - just break them down into pieces that are as small as possible with the whisk and think no more of it, as they will finally dissolve during the baking.

Even if you've never made pastry before, do give this pastry a go.  It really is so easy to make!  There's no fiddling about with it, no kneading, very little mixing and so long as you add the water in one go to begin with (the 50ml), mix it lightly, add a little more, mix it lightly (just two or three passes of the knife) and keep the water to as little as possible - just enough to keep it together, you can't go wrong.  It really is SO good and suits this pie perfectly.


My last advice to you is to read the recipe a couple of times before you embark upon the bake.  It is always good to have a good idea of what you're doing, before you do it!

I do so hope you enjoy the process of making this pie and that the end result is as successful for you, as mine was.  I shall be crossing my fingers for you!  (Which makes it very difficult to type, but I'll persevere - as it's you). 

HERBY LAMB AND PEA PIE   (serves 4)

Ingredients :

1 tbsp olive oil
450g diced lamb or lamb neck fillet, diced
sea salt
freshly ground black pepper
1 onion, chopped finely
2 garlic cloves, chopped finely
1 medium carrot, diced finely
2 leeks, halved and sliced
500ml pale ale (I used Marston's English Pale Ale)
200ml water
1 heaped tsp tomato puree
1 lamb stock cube (low salt, preferably)
1 tbsp fresh rosemary, chopped
1 tbsp fresh mint, chopped
1 tbsp fresh parsley, chopped
1 tsp pomegranate molasses
2 tbsp plain flour
3 tbsp petit pois.

For the pastry :

150g plain flour
50g Atora vegetable suet
50g salted butter
a pinch of sea salt
50 ml cold water as a minimum.

Method :

In a deep frying pan, heat the olive oil until smoking hot.  Gently add the lamb and spread it out into one layer.  Season with a light pinch of salt and a good pinch of black pepper.  Leave it to cook, only moving it once the pan side has begun to caramelise, then turn it.  Leave until the lamb has browned, then remove the meat to a bowl using a slotted spoon to retain the oils in the pan.


Add the onion, garlic and carrot to the pan and fry until the onion is transparent.  Do not allow it to caramelise or burn.

Add the leeks and reduce the heat slightly.  Return the lamb to the pan and stir through.  Fry the leeks until softened, then decant the pan contents into a casserole dish. 


Add all but 150ml of the pale ale to the pan and bring to a boil.

Reduce the heat to moderate and add the water, tomato puree, lamb stock cube, rosemary, mint, parsley and pomegranate molasses.  Stir through and allow to simmer whilst you mix the remaining ale with the plain flour.


Remove the pan from the heat and add the ale/flour mix.  Whisk through as you are adding, to prevent lumps forming.   Place back onto the heat and stir well as the gravy thickens.

Pour the gravy into the casserole dish and stir through.  Cover the casserole and place into a pre-heated oven at 170degC/325degF/gas3 for 90 minutes.


Once the time is up, remove the casserole from the oven and set aside to cool.

(It is at this stage, if you are making the pie in two instalments, that it would be possible to refrigerate the filling until the following day.  Just remember to bring the filling back up to room temperature before you bake the pie).

Make the pastry for the pie, by placing the plain flour, vegetable suet, salted butter and sea salt into a large bowl.  Rub the butter into the mixture until you have a cross between breadcrumbs and cornflake shapes.

Make sure to stir the pastry with a knife and under no circumstances knead the pastry dough.  Add just enough water to bring the pastry together - just stir a few times with your knife, then pat and push the remainder of the flour into the ball.  Wrap the ball in cling film and leave in a fridge to rest for a minimum of 30 minutes.

Once the meat filling is cool, add the petit pois and decant into the pie dish.


Paint the edge of the pie dish with egg yolk.

Roll out the pastry until it is just slightly larger than the pie dish, then lay it on top of the dish, making sure it meets the edge all the way around.

Press down lightly on the edge, to seal the pastry.  Trim off any excess.

Cut several holes in the centre of the pastry to let out any steam (otherwise the pastry will detach in places) and egg wash with the remainder of the egg yolk.

Place into a pre-heated oven at 180degF/350degC/gas4 for 35 minutes, until the pastry is golden and crisp.

Serve with roasted parsnips, Savoy cabbage and baby corn - or vegetables of your choice.

Printable version

24 March 2014

Knock your socks off Bacon & Herb Stuffing

Why - on earth - haven't I made my own stuffing before now?

I reckon it's a combination of stuffing being one of those things that just floats around as an "also", an "add on" to a roast dinner and also my own bad experience with it as a youngster.  You see, my Mum would often stuff (good old Paxo, the stuffing of choice for the millions) our Sunday chicken, which I remember vividly because I would be vaguely revolted by the colour of the stuffing that had sat in the (apologies) blood while the chicken was roasting.  As a consequence, when the recommendation came out that you didn't stuff your chicken any longer owing to E-coli scares - and my Mum stopped - I wasn't unhappy about it.

So we got out of the habit of eating stuffing.  It became something that we had at Christmas with the turkey - and only in the shape of stuffing balls that were baked in the oven.


When it came to making my own roast dinners, to include stuffing on the menu was just one step too many for a long time.  Well, making a roast dinner is quite an undertaking one way and another.  There's the timings, the vegetables, the roast potatoes, the gravy - everything has to be ready on time and it's a whole lot more complicated than making a spaghetti bolognese!

In fact, I didn't really bother with stuffing (the associations between sage & onion stuffing and hideous discoloured soggy breadcrumbs being too much to bear) until hubby came along and professed an undying love for the dish.  By then, I'd managed to get a small grip on the mechanics of making a roast dinner - particularly a roast chicken - and it wasn't too difficult to mix up a packet of stuffing and bung it in the oven to cook alongside the rest.  I didn't waste any love or attention on it though - and didn't particularly enjoy it on my dinner, either.  Well - sage and onion again, you see.

It wasn't until I joined a couple of Facebook groups and saw other people were making home made stuffings, that I began to foster an interest in doing it myself.

This was a slow burning interest though, I have to admit.  I'm fairly sure that those early days of sage and onion were still colouring the picture of "stuffing" that I had in my memory.  I still hadn't put the idea that I could venture away from sage & onion, together with the concept of "stuffing".  Now everyone knows that home made is very often better than shop bought packet mixes, but I was particularly slow on the uptake where this was concerned.

However, once it had dawned on me - and I noticed that I had half a packet of bacon sitting doing nothing one Sunday morning - the old grey matter got to work.

It was the perfect moment - I had a gorgeously huge, fat chicken to be roasted.  I had my lovely oven dish to use.  I had bacon.  I had a good quantity of Polish Bakery bread to use for breadcrumbs and I had a profusion of both fresh and dried herbs in the house.  Never had a moment been so propitious!


I didn't use a recipe - after all, people have been stuffing things for years by using whatever they had to hand.  Yes, dear reader, I winged it.  In a BIG way - and (pretty much) got away with it.

Even having put the stuffing together and knowing a) what was in it, plus b) how they went together, I still wasn't particularly keen on the idea.  Oh I was interested in how it would come out and concerned that everyone would like it, but I wasn't anticipating liking it much myself.  Oh, how wrong I was.  I not only liked it, I loved it.  I could have eaten the stuffing and dropped the chicken from my dinner - which is truly remarkable.

However, the stuffing came into its own the following day when I put together a cold roast chicken, stuffing and sweetcorn relish sandwich.  Oh .. my .. word.  Shoot me now, I'm all over happy.


I have one cook's tip for you with regard to this stuffing, which is not to use salt unless you are absolutely convinced that the bacon does not carry any of its own.  Because the bacon becomes considerably reduced by the double cooking process, the saltiness of it is intensified.  Additional salt just isn't necessary - particularly if you are using smoked bacon.

So, on the reckoning that where I came from others might follow and if you're one of those who was put off stuffing by - well, let's not go into it again, eh? - then find some lost bacon and give this a go with your next roast chicken.  Then tell me you don't like stuffing.  *grin*

KNOCK YOUR SOCKS OFF BACON & HERB STUFFING   (serves 5-6)

Ingredients :

1-2 tbsp rapeseed or olive oil
1 onion, finely chopped
freshly ground black pepper
4-5 rashers of lean back smoked bacon, finely diced
3 slices crusty bread, slightly stale, chopped into chunky breadcrumbs
2 tbsp fresh parsley, finely chopped
1 tbsp fresh chives, finely chopped
1 tsp dried oregano
half a tsp dried thyme
half a tsp dried rosemary
1 large egg.

Method :

1.  Heat the oil in a frying pan and cook the bacon and onion together until the onion is softened and beginning to turn golden.  Add a pinch of black pepper, stir to combine then leave to cool slightly.

2.  Once cooled, stir the breadcrumbs into the bacon & onion pan making sure to absorb the bacon fat.

3.  Decant the contents of the bacon pan into a large bowl and add the remainder of the ingredients, including the egg.

4.  Stir well to combine - until the egg cannot be traced.

5.  Decant into an oven proof dish, level the surface and place into a pre-heated 180degC/350degF/Gas 4 oven for 25-30 minutes or until the surface is baked crispy.

Serve with your favourite roasted meats and vegetables, or cold the following day in a sandwich.

Printable version


Related Posts Plugin for WordPress, Blogger...