Showing posts with label garam masala. Show all posts

23 February 2017

Chicken Jalfrezi - a lighter but still tasty version!

Over the last few months, my hubby has slowly taken agin the curry pastes that are widely available for home made curries.  He's begun to find them very one-dimensional but more importantly to him, they don't taste of curry. Now this curry flavour is a very definite thing that we have yet to quite pin down, but this Jalfrezi got the closest to it in any curry for a long time.  We're still not quite there, but as I liked this recipe a lot for its flavour and use of fresh vegetables, I thought I'd pass it on to you all.

This recipe doesn't result in a heavy, thickly sauced curry but one that is a lot lighter in texture and without the pools of oil that characterise so many curries these days.  Oh and I'm really not sure how much of a Jalfrezi it really is, but I'm hoping that it is close at least.  As it uses curry powder, my first word of warning is to make sure you are using a good curry powder.  One which has a number of different flavours to it is by far and away the best.  I have yet to find - and yes, I will admit that perhaps there is one somewhere - a supermarket own brand curry powder that would even remotely fit the bill. My favourite curry powders come from our local ethnic shop, where I'm hoping that the curry powders on offer are close to the "real thing", but are certainly a long way from bland.


Secondly, make sure to use tomatoes that have flavour.  Vine ripened are the best of the supermarket choices, but it is worthwhile throwing in a few cherry tomatoes just to boost the profile a bit.

Lastly, make sure to leave yourself enough time.  Once the tomatoes get cooking, you need time for them to cook down, then time for the juice to reduce and intensify the flavour.  If you take the pot off the heat and think it's finished too soon, you'll just have a vaguely spicy tomato stew and not a curry.  So, give yourself and your curry time to chuckle, burp and spit tiny blobs of curry into random spots in your kitchen, you'll be glad you did even if the clean up is tricky.  (Of course, I could have got out the splatter guard which would have made sure no blobs escaped, but I was comfy and would have had to have moved.  What can I tell you?  ~shrug~).

From first putting the coconut oil into the wok, to calling everyone to attention in order to get them sat down and ready for the meal, my curry took around 50 minutes (with a good 30 minutes of chopping beforehand).  So it's not an earth-shattering amount of time, but if you only have half an hour, you're going to be in tomato stew land.  So leave sufficient time.

I really liked this curry.  Hubby wasn't so enthused, but I've already told you about the quest for curryness that we're on there.  When cooking it, I was concerned that it didn't have enough curry character, but as our son came home from college and immediately knew it was curry for dinner, I'm assuming it was just that my nose had got used to the aromas.  It tasted good right from the off and really came together in the last 10 minutes, once the liquid had reduced and the proper curry sauce texture arrived.  It was amazing the difference that reduction made to the overall flavour.

So, enough blathering and on with the recipe!

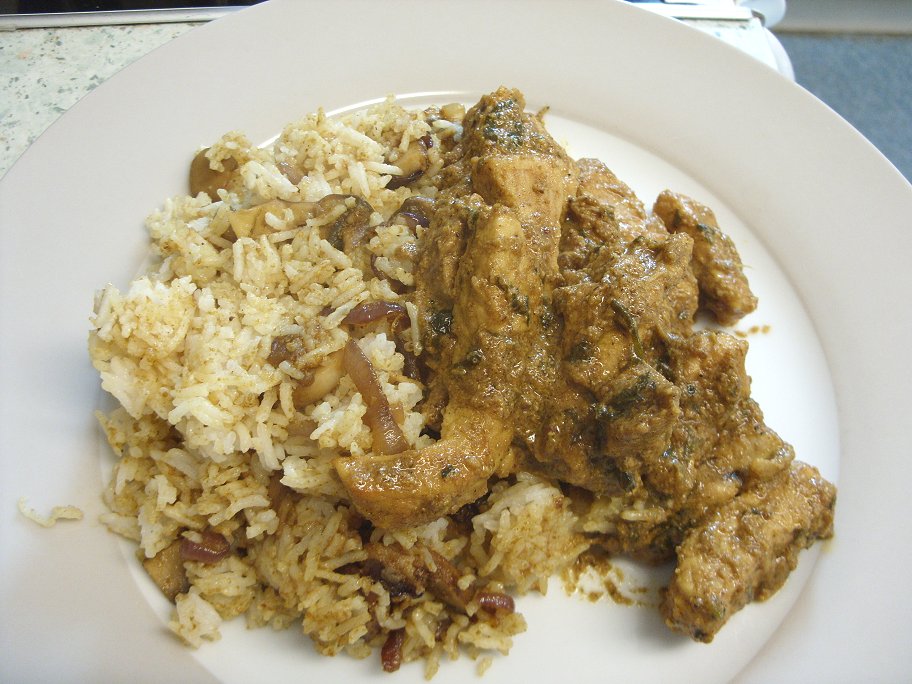
CHICKEN JALFREZI  (serves 4)

Ingredients :

2 red peppers, one roughly chopped into chunks, the other sliced
1 large onion, half roughly chopped into chunks, the other half sliced
4 large garlic cloves, peeled and roughly chopped
1 tbsp coconut oil
3 boneless, skinless chicken breasts, sliced
a pinch of sea salt
4 heaped teaspoonfuls curry powder
1 heaped teaspoonful garam masala
a quarter of a teaspoonful of ground black pepper
2 very large sweet tomatoes, chopped
6 cherry tomatoes, quartered
1 tsp chicken stock powder (or 1 stock cube)
150ml hot water
1-2 tsp runny honey (optional)
10g butter (optional)
15g fresh coriander, chopped (reserve a little for garnish)
cooked white rice to serve.

Method :

Begin by placing the chunks of red pepper, the chunks of onion and the garlic into a food processor and blitz until a purée is achieved.  Set this aside.

Next, heat the coconut oil in a large saucepan or wok until really quite hot and gently add the sliced chicken breasts and sprinkle with the sea salt.  Spread the pieces across the pan and leave them to achieve a little colour, then turn and do the same again.  The slices do not need to be cooked through at this stage.

Using a slotted spoon, remove the chicken to a bowl and reserve.

Add the sliced red pepper and sliced onion to the wok and cook, covered, for 5-6 minutes stirring half way through, until they have gained a little colour and begun to soften.

Add the puree to the wok, along with the curry powder, garam masala and black pepper.  Stir well to combine and fry, stirring occasionally, until the juices are released and the mix has dried out considerably.  This should take around 10 minutes if your wok heat is high enough.

Add the chopped tomatoes and stir through, along with the chicken stock and the water.  Once combined, add the chicken pieces and stir through.  Now this is where the patience is required.  You need to have the pan hot enough that the tomatoes will cook and release their juices, then the juices (and the chicken stock) will reduce and the full flavour be created.  You will start with a quite considerable quantity in the pan, but once everything has cooked down and reduced, the sauce will thicken and the liquid will evaporate.

Marginally before the sauce reaches its final few minutes, taste for the salt level and add a little more if necessary, but remember that there will be a little salt in the butter that if you're using, should be added now.  Taste also for acidity and add the honey to your preference to correct that.  If you consider there's no sweetening required, then don't use the honey.

Once everything is combined and happy to be there, the sauce is thick and there are no pools of water on the surface of the curry, then you're ready to serve.

Serve with plain white Basmati rice and sprinkle with the reserved chopped fresh coriander as garnish.

Printable version

23 August 2013

Chicken & Sweet Potato Curry

It had been a while since I'd made a curry from scratch when I decided to do this one.

Oh for sure we'd had curry, but they were usually "quickie" versions using a curry paste from a jar, as opposed to concocting the spicing myself.  I thought it was probably about time I had another go at it, before I forgot how to do it altogether!

Chicken was the obvious - and most forgiving - choice of meat to use.  You'd have to go some to let the meat spoil a curry using chicken, whereas with a prawn curry you can wind up with it being too thin and watery with leathery prawns and a beef curry is rife with problems such as the beef not being tender enough.  So, in order to concentrate on the spicing and not have to worry about the meat, chicken was the best option.

I'd decided to use sweet potato as the vegetable input.  It had been a while since we'd had sweet potato and it was an apparently good choice with chicken, as I'd seen a number of recipes for it in my travels.  I know that hubby likes a sweet curry, because his choice from the takeaway is often one of the sweeter curries, such as Pathia or Dhansak.  Anyway, sweet potato is very good for you, so I didn't need any further encouragement than that.
Hubble, bubble, curry on the way!

I didn't have any particular direction in mind for this curry, other than "sweet" and "not coconutty".  We've been having a lot of curries that utilised coconut milk and so I was keen to get away from that style - for a change.

As a result, I sort of built this curry as I went along.  Now I know - from bitter experience - that this can often result in disaster.  However, this time, I managed to rein in my more random impulses to put a bit of this in or a bit of that in - and kept it logical.  In the back of my mind I had my friend Jasvinder Singh's Facebook page - The Food Court - playing back to me all the curries he has posted to it, their methods and spices particularly.  I honestly think that I have learned an enormous amount from him as regards spicing curries, not to mention what I've learned from watching Yotam Ottolenghi's bold spicing of his food.


Interestingly, I knew this was going to be a great curry from a very early stage.  In fact, I think it was as early as the cooking the onions.  The combination of onion frying in groundnut oil with the addition of the cinnamon sticks, just smells so fabulous.  Each additional ingredient just made it better, until a taste confirmed that yes - this was going to be a great curry.


The nice thing about this curry is that you can decide just how chilli hot you would like it to be by reducing or increasing the chilli, or how thick you like the sauce by cutting out the reduction part.  Any type of vegetable would do well with it, too.  No need to keep to sweet potato.  Chuck any little homeless vegetables in there and it will give them a very good job to do.


In fact, so good was this curry that hubby was heard to declare that it was nicer than any of the takeaway curries we've had since being in Dorset.  In your face, Heart of India!  *chuckle*  All of which is an amazing accolade of course, except that it now means it's going to be even more difficult to convince him to go for an Indian takeaway - and that's difficult enough as it is!

CHICKEN & SWEET POTATO CURRY   (serves 3-4)

Ingredients :

3 tbsp groundnut oil
1 onion, thickly sliced and 1 onion, chopped finely
2 cinnamon sticks 3" long
pinch of sea salt & freshly ground black pepper
3 cloves garlic, finely chopped
1 hot red chilli, chopped (including seeds)
1 tbsp tomato puree
2 heaped tsp ground cumin
2 heaped tsp ground coriander
half a dessertspoon of Madras curry powder
half a dessertspoon of Garam Masala
1 tsp paprika
2 heaped tsp ground turmeric
2 small sweet potatoes, cubed small
3 chicken breasts, sliced and chunked
500ml chicken stock (I used Essential Cuisine chicken stock powder)
1 dessertspoonful of Kasuri Methi (fenugreek) leaves
2 tsp sugar
3 tbsp full fat plain yoghurt
10g butter.

Method :

1.  Add the  groundnut oil to a large wok or deep frying pan.  Heat until a slice of onion causes the fat to pop and spit, then add all the onion and stir fry until lightly golden brown.  Part way through, stir in a pinch of salt and freshly ground black pepper plus the two cinnamon sticks.

2.  Reduce the heat, and add the garlic and chilli, continuing to stir fry for another minute.

3.  Add the tomato puree, ground cumin, ground coriander, curry powder, Garam Masala and paprika.  Stir through and continue to cook until the moisture has all left the tomato puree mixture and the oil is visible around the edges.

4.  Add the ground turmeric and stir through, then increase the heat and add the sweet potatoes and chicken pieces.  Continue to cook until the chicken has turned opaque but isn't cooked through.

5.  Add the chicken stock and gently stir until completely combined.  Add the fenugreek and stir through, then leave to reduce and develop the curry sauce.  Stir every five minutes or so, to ensure nothing is sticking to the bottom of the pan.

You should see the sauce turn from a fairly watery mixture, to a thickened and proper curry looking sauce, albeit still slightly thin.  The content will have reduced by just over half and the sauce should be coating the sweet potatoes and chicken nicely.

6. Taste for sweetness and salt - the sweet potato will be pretty much cooked by now and releasing its sweetness into the sauce.  Add sugar if necessary until you achieve the kind of sweetness you like and if necessary add a pinch more salt.

7.  Stir in the plain yoghurt and mix in quickly.  Don't panic if it appears to split, as it will melt into the sauce in the last few minutes of cooking.  Add the butter and allow to melt.  Continue stirring and simmering - and reducing - the sauce (as the addition of the yoghurt will have liquified it a little) until you are happy with its consistency.

Serve with some steamed white rice.  

Printable version


22 February 2013

Hot Punjabi King Prawn Curry - and it is hot, too!

Sometimes, a recipe just works so well and is so tasty, that it needs to be blogged ahead of the queue.  This is one such.

I found this recipe in the latest BBC Good Food magazine and you can find the original recipe - which deals with raw King Prawns as opposed to cooked King Prawns - if you click here.  The recipe apparently comes from a lady called Jagdish Kaur who hails from the Punjab'n de Rasoi cafe in Edinburgh.  I liked the recipe as it looked awfully easy to make (which is always a good thing) and had interestingly few ingredients.  So many curry recipes have ingredient lists as long as your two arms, that it was intriguing to find one working along such minimalist lines.


I won't deny that the notion of using three live chillis and some dried chilli flakes caused several ominous gyrations of my stomach, but the "Taste Team Comment" indicated that the heat was agreeable.  However, in the interest of self preservation I changed one of the chillis to a milder red version and removed all the seeds from it.


I also included a little fish stock - in my case, the lovely Essential Cuisine fish stock and have reflected these changes in the recipe below.  I think that adding just water to a recipe is often missing a golden opportunity to inject a little more flavour.  I accept that, in some curry recipes, the addition of stock would be inconsistent with the integrity of the style.  However, in this instance it worked very well.

In fact, we very nearly didn't have the curry at all.  I completely forgot about marinating the prawns on the night before and again first thing the next morning.  Even worse, we had a breakdown in communications and only got one bag of prawns out of the freezer, needing to defrost the remaining pack at the last minute, in a sieve, under the tap!  So, it may be worth bearing in mind that the marination of my prawns only took place for around a half an hour!  Oops!


The actual cooking of the recipe lived up to my expectation and was easy peasy.  I think it took longer to chop up the onions, tomatoes and coriander, than it took to do the cooking.

One cook's note that is worth bearing in mind, is that once the water is added it is worthwhile cooking the sauce until all the water has evaporated and the sauce is really thick - which is contrary to how the original recipe goes.  The reason for this is because as soon as you add the yoghurt and prawns, the yoghurt is going to melt to a certain degree and - no matter how well you've dried the prawns - they're going to release moisture.  If you haven't reduced the sauce to begin with, you're going to land up with a really dilute sauce which if you then try to reduce, you'll end up with rubbery prawns and split yoghurt.  Not good!  So make sure your sauce is reduced as far as it can go, before you add the marinated prawns.


Very definitely a hit with the family, I'll be making this again - perhaps with chicken next time.  Hubby declared it the best curry he'd had in many a long year (which is enormous praise, especially considering he was concerned about it turning to "pond water").  Son and heir didn't say anything, just sat stolidly moving his spoon from plate to mouth until it was all gone.  I think he liked it.  For me, I loved the flavours that were bright and fresh - and although the chilli effect made my nose run and the tip of my tongue hurt, I'd have it again tomorrow - and you don't get to say that about every recipe you make!

HOT PUNJABI KING PRAWN CURRY   (serves 3-4)

Ingredients :

For the marinade

600g cooked, peeled king prawns
6 tbsp full fat natural yoghurt
2 green chillies, finely sliced, with seeds
half a tsp of sea salt. 

For the curry

2 tbsp sunflower oil plus 2 tbsp rapeseed oil
half a tsp of cumin seeds
2 medium onions, finely chopped
1 tbsp finely chopped garlic
1 tsp turmeric
1 red chilli, finely sliced
2 tsp Garam masala
2 medium tomatoes, roughly chopped
half a tsp of sea salt
half a tsp of fish stock powder, or half a fish stock cube
half a tsp of dried red chilli flakes
2 tbsp fresh coriander leaves, finely chopped.

Method :

1. For the marinade: Rinse and drain the prawns.  Pat them dry and put into a non-reactive bowl.  Add the yogurt, chillies and ½ teaspoon of salt.  Mix well, cover and marinate overnight in the fridge.

2. For the curry: Pour the oil into a deep sided wok or frying pan and set it over a medium heat.

3. Once the oil is hot, spoon in the cumin seeds, swirl and brown for 10 seconds.  Add the onions and sauté for about 10 minutes, or until golden all over.

4. Add the garlic, reduce the heat to low and stir and fry for 2 minutes.  Mix in the turmeric and stir for 1 minute.

5. Add the red chilli, increase the heat to medium and stir for 1 minute.  Mix in 1½ teaspoons of the Garam masala and stir for 1 minute.

6. Add all of the tomatoes, a pinch of sea salt and the chilli flakes.  Cook until the tomatoes have broken down, then add 120ml boiling water and the fish stock powder or cube.  Stir to combine.  Allow the curry to boil and reduce until all the extra liquid has gone and the sauce is really thick.

7. Stir in the prawns and their marinade plus the chopped coriander and cook over a high heat until they are heated through.

8. Sprinkle the remaining Garam masala over the top and stir.


Serve.

Printable version

5 June 2011

From the Gurkha section of the British Army Cookbook : Fried Pork Curry with sauce

There now, that's an intriguing title for a blog post!

The lovely Willie turned up at my work the other day, clutching a brown envelope in which was a copy of the Gurkha section of the British Army Cookbook for me.  Now this on it's own would have been interesting enough, but of course, I had to try at least one recipe from it - and if that recipe went off well, maybe more.

I have huge respect for the Gurkhas, having spent time in their vicinity when Dad (who was a Royal Engineer, Warrant Officer Class 1)  - and the whole family - was stationed at the same place as them in the past.  I can always remember feeling very safe when there were Gurkhas around.  My impression of them was that they were incredibly cheerful little chaps who had a fearsome reputation as a Soldier, and an unshakeable moral code.

So that lent a little connection to the recipes I had before me.

The booklet is fascinating and leads me to believe that there is little a Gurkha won't eat, just so long as it is combined with a curry in some form or another.  For example, Liver Curry, Curried tinned vegetables, Omelette with curry and Scrambled Eggs Gurkha style which involves eggs, onions, tomatoes, chillies, mustard leaves, ginger and Garam Masala.
Having eaten the Pork curry we had last night, I can tell you that the Gurkha digestion has to be one of the most impressive out there.

One thing that you quickly come to realise, when reading through the booklet, is that "a curry" is not one thing.  There are as many curries out there as the imagination can rustle up.  It seems to me as though the definition of "a curry" is "a substance that has been cooked in hot (as in chilli-hot) and fragrant spices" and that's about where you have to leave it.

With some of the curries I have cooked in the past, (not all), Hubby's complaint has sometimes been that "it doesn't taste of curry".  With this Gurkha cookbook, this is something that Hubby had to throw over his shoulder and forget about.  Not all curries taste of curry.  Whilst undoubtedly being "a curry", the meal we had last night could in no way be described as "tasting of curry".   In fact, it tasted as though lemon was involved quite heavily - yet there wasn't a lemon in sight.  An education for the tastebuds!


The first challenge I had was to scale down the recipe quantity-wise, as it was in two grades - the first for 10 people, the second for 50.  Well, they ARE feeding an army, when all is said and done.  I mean, how do you scale down a pinch of nutmeg?  So it took some intuitive knowledge of how each ingredient tasted and the effect it was likely to have on the whole.  One big change from the original recipe is that I increased the amount of Garam Masala from 1 tsp (approx) to 3 tsps.  We particularly enjoy the flavour of Garam Masala and I couldn't imagine that the 1 tsp sprinkled over the top (which was what was recommended) was going to do it for us.


Once I'd got into the cooking of it, I can remember thinking to myself how much I enjoy cooking curries.  I think it's the randomness of the result, dependent upon just how much of each spice you use and how you deal with them.  After all, curry spices put "raw" into a stew-like substance will taste totally different to those that have been fried before the wet ingredients are added.  Same ingredients, just a different way of dealing with them that ends in a completely different flavour.  Fascinating stuff.


Oh yes - and I have to make mention of the beautiful pork that I got from Spring Fields butchers.  I asked for their six pork steaks for £2.99 and came away with so much pork that I put two of the steaks in the freezer for another time.  Cut from the loin, they had that stripe of fat along their back, but otherwise were completely lean.  I trimmed the fat off and roasted it, saving the rendered fat for the roast potatoes again and gave the crispy pieces to the dogs, who couldn't stop licking their lips.  Amazing value for an amazing product.


GURKHA FRIED PORK CURRY WITH SAUCE  (feeds 3)


Ingredients :


500g of lean pork, sliced into strips
half a tsp of cayenne pepper
half a tsp of sea salt
4-5 tbsp low fat plain yoghurt

a large thumb-sized piece of ginger, peeled and grated
large knob of butter
5-6 black peppercorns, crushed in a pestle & mortar, or freshly ground
half a tsp of turmeric
2 tbsp fresh coriander, chopped
3 tsp Garam Masala
pinch of ground nutmeg
Water as necessary.


Method :


1.  Place the pork into a large bowl and sprinkle with the cayenne pepper and salt.  Mix to combine.


2.  Add the yoghurt and ginger and mix well to ensure everything is well coated.  Cover and leave to marinade for as long as you've got - to a maximum of 2 hrs.


3.  Pre-heat the oven to 200deg C.  

4.  Melt the knob of butter in a deep frying pan and once it's sizzling, add the pork with all the marinade.  Add the turmeric and black pepper and keep on stirring until it has reached a boil.


5.  Decant into a warmed casserole dish, cover and cook for an hour.


6.  Remove from the oven and add the coriander, then drizzle some 2-300ml of water down the sides of the casserole dish.  Add the Garam Masala and give everything a jolly good stir (and don't panic at the fact that it looks remarkably like pond water).  Replace, uncovered, in the oven for 15 minutes.


7.  You can take two routes with this curry from hereon in.  Either leave it in the oven to reduce, or take it from the oven and pour back into the deep frying pan and boil to reduce, which is what I did.  I think this is the preferred method, as it puts you much more in control of what the sauce looks like, as with judicious stirring, it does improve in texture.  Once the sauce has stopped resembling pond water and started to look like a sauce, you're done.  Add the pinch of nutmeg, give a last stir - taste to check the seasoning and adjust if necessary.


8.  Serve with mushroom rice.


.


2 June 2011

Chicken Jhalfrezi - not only a healthier version, but delicious too.

Well, I finally got around to cooking the Chicken Jhalfrezi that Asda prevented me from cooking last week.  This week, they delivered all the required ingredients and I was able to set to following on from our tour of the New Forest and get currying.

I had been a bit nervous of this recipe, as I know how suspicious hubby can be of curry recipes that purport to be "lighter" or "healthier" than your average butter-rich, nut-laden, creamy curry.

However, this one had a nice mixture of ingredients that looked as though they would go well together - and I had a brand new pack of Garam Masala.  I know that these spice mixes can get a bit dull as you get towards the bottom of the pack, plus this was from a new manufacturer.  It turned out to be much sweeter and more fragrant than the Garam Masala we'd had last time - and was absolutely perfect for this dish.

The original recipe - from Mallika Basu (who I'm afraid I've never heard of) - asked for chicken thighs, but as neither hubby nor son are terribly impressed by chicken thighs, we went for the more agreeable skinless and boneless breasts.  I can't say we missed the extra flavour that the thighs bring.

The recipe suggested just naan bread as an accompaniment, but I knew that wouldn't go down terribly well as we do like a bit of rice (and rice is a lot cheaper than providing naan bread for everyone, particularly as we like Peshwari naan over the plainer variety).  So, I cooked up a small portion of basmati rice and we shared two Peshwari naans between the three of us.  In truth, however, we didn't need the bread as the rice was ample.

I really enjoyed this dish.  I used watercress as the salad greens - largely because I love the stuff and know that it is incredibly good for you.  However, hubby's comment that baby spinach would have been equally good, was valid and I will probably give that a go next time.  There is most definitely going to be a next time, as the flavour of the Jhalfrezi was so light and tangy that it went extraordinarily well with the lemon juice & salt dressed salad greens.

I am never happier (well, maybe that's a bit of a push, but I'm pretty darned happy) than when I have been able to serve something up to the family that I know was a) economical, b) nutritionally good for them and c) tastes fantastic.  This one scores on all three counts.

CHICKEN JHALFREZI (feeds 3)

Ingredients :

3 skinless boneless chicken breasts, cut into small strips
3 tbsp low fat natural yoghurt (I used Greek)
1 tbsp tomato puree
1 tsp turmeric
half a tsp chilli flakes
2 tbsp freshly squeezed lemon juice
2 medium onions
1 large tomato (or two medium vine tomatoes)
2 green peppers (one large, one small will do for 3 people)
1 tbsp vegetable or olive oil
half a tsp of grated garlic or garlic paste
1 tsp grated ginger or ginger paste
2 heaped tsp Garam Masala
25g fresh coriander, roughly chopped.

Method :

1.  Place the chicken in a bowl and add the yoghurt, tomato puree, turmeric and chilli flakes, plus the lemon juice.  Mix well, cover and leave to marinate.

2.  Whilst the chicken is marinating, peel and slice the onions, then slice the tomatoes and green peppers into 1cm slices.

3.  Warm the oil in a wok set over a high heat.  Once it is hot, fry the onions and green pepper for 2-3 minutes until softened, then add the garlic and ginger and fry until aromatic.

4.  Next, add the chicken with its marinade and stir vigorously for 5 minutes or until the meat is sealed evenly.  Add the tomato slices and continue to cook for another 5 minutes or so.

5.  Finally, add the Garam Masala and mix through.  Cover the wok and cook for a further 2 minutes until the chicken is cooked through.  Continue to cook until the sauce is greatly reduced.

6.  Stir in the coriander, taste to check the seasoning and serve on a bed of watercress or spinach dressed in lemon juice and salt.


10 May 2011

Sunday roast? Naaaah - it's a beef curry for us!

Hubby suggested we have a "proper" beef curry - and I liked that idea.  I liked it a lot more when I saw that the only day I could commit that kind of time in the cooking, was Sunday.  I was looking for an excuse to not do a roast dinner for once!

Much as I love roast dinners, I was ready for a break - and making a curry was the perfect answer.

Having used Brisket of beef in two or three recipes just lately, I knew that Brisket would not only be the perfect cut of beef for the curry, but had the depth of flavour that would be required to stand up against the spice.  There then ensued a lengthy discussion about how much Brisket to buy, to make a princely curry with enough beef in large chunks.  We generally reckon that 400g of something is enough to make a dinner for three of us, however we were after a "princely" curry and 400g just didn't feel like enough.  I was swithering between 500g, 600g and 700g - but hubby beat that by suggesting 800g!  In the end, commonsense won and we opted for 650g - which turned out to be the perfect amount.

As usual, Brisket doesn't need a lot of trimming but I popped the trimmed bits of fat into a small roasting tray and cooked them alongside the curry, so that the fat would render down.  I'm collecting the liquid fat in a container which I keep in the fridge, so that the next time I'm cooking roast potatoes, I'll have some lovely dripping to use.  The dogs love the beefy crunchies that are left, too.

I cooked the Brisket for 2 hours in the oven - after flash frying to brown the meat - and then for another half an hour, once I'd added the baby corn.  The pieces were as tender as could be, without an ounce of fat in evidence.  The long slow cooking definitely agrees with the curry spices, too, allowing them time to amalgamate and the sauce time to thicken beautifully.

I ate the leftovers today, two days later - and I can confirm that the curry definitely improves over time.  So, if you've two days where it can sit in your fridge - it won't do it any harm!

BEEF & BABY CORN CURRY  (Serves 3-4)

Ingredients :

A knob of butter
a tablespoon of olive oil (or vegetable oil, if you prefer)
2 onions, sliced
650g beef Brisket, trimmed of all fat and cut into cubes
sea salt & black pepper
3 cloves garlic, grated
a thumb-sized piece of fresh ginger, grated
a red chilli, chopped fine
2 small potatoes, peeled and diced finely
1 tsp dried Sage
2 tsp Garam Masala
4 tsp Madras curry powder
1 tsp ground Cumin
half a tsp ground Coriander
half a tsp finely ground Black Pepper
2 tomatoes, diced finely
400g tin of cherry tomatoes (or chopped tomatoes, but cherries have a better flavour)
1 beef Oxo cube
water
1 tbsp tomato puree
8 baby sweet corn, broken into thirds
a large bunch of fresh coriander, chopped fine.


Method :


1.  Heat the butter and oil in a deep sided frying pan and cook the onion, on a medium heat, until it is turning golden brown.  It is good if some of the smaller pieces of onion are a darker brown, as this all adds to the flavour.  Remove from the pan and set aside to keep warm.


2.  Turn the heat up high and once the pan is hot, sizzle the meat in order to brown it.  It is good to obtain some caramelisation on some pieces - you definitely don't want it to braise, so brown in two batches rather than overfill the pan.  Season the meat just before it is finished.  Place the meat into the casserole dish and put to keep warm.


3.  Pre-heat your oven, to 160deg C.


4.  Reduce the heat to medium and replace the onions into the pan - it is worth doing it this way around, as the meat takes on some of the onion flavour and the meat juices are amalgamated into the onions - and add the garlic, ginger, chilli, potatoes and sage and allow to cook through.  It is important not to burn the garlic, but to have everything beginning to soften.


5.  Reducing the heat again, add the Garam Masala, curry powder, Cumin, Coriander and Black pepper.  Stir through and allow to cook for 1-2 minutes.


6.  Add the chopped tomatoes, stir through and allow to cook for another 1-2 minutes.  They should be small enough that they are beginning to soften.


7.  Add the tinned tomatoes, crumble over the Oxo cube and add enough water (I used the tomato tin) to achieve a good wet saucy mixture.  Add the tomato puree and give everything a good stir.


8.  Decant the sauce into the casserole dish and stir so that the meat is well covered and everything is combined.


9.  Cover and place into the oven for 2 hours.


10.  When the 2 hours are up, remove from the oven and give a good stir.  Add the baby corn and make sure they are below the sauce level.  If the sauce is looking a little thin, put back into the oven uncovered.  Otherwise, cover and replace in the oven for another 30 minutes.


11.  Just before serving, stir through three quarters of the chopped coriander - and save a quarter for sprinkling over.


Serve with white rice and a good dollop of thick plain yoghurt.


.

14 April 2011

Spicy chicken with Mango Salad

I should, really, be entitling this one "Spicy chicken with mango salad (providing your grocery delivery contains a ripe mango)".  However, let's assume that mine did - and I'll tell you about it anyway.

Sorry about the dappled light - it was a pleasant evening!
This is one of those "had it before, last summer, liked it, decided to have it again" dishes.  Except (there always is, isn't there?) there is a difference this time, in that because we now have a shiny new non-stick (and it IS non-stick) frying pan, I decided to pan fry the chicken.  Last time I cooked the chicken in the oven, which results in a bit of a different finish.  Still nice, but it doesn't have the lovely crunchy crust of garam masala and curry powder that the chicken breast develops while it is cooking in the pan.

I also found it a lot easier to decide when the chicken was "just" done, which left it lovely and moist.  With oven cooking, you're at the mercy of the cooking time given by the recipe and the vagaries of your own oven.  You can't keep on checking it, because every time you open the oven door you're letting all the lovely heat out and so the chicken slows down the cooking process.  More often than not, it results in a very slightly overcooked chicken.  With pan frying, it was perfect.

True honours must go to the lime and sour cream dip/accompanimentNow I love lime and will eat it raw given the chance, so I have a suspicion that I enjoyed it rather more than the chaps did.  In fact, son & heir wouldn't touch it following on from a taster on the end of a piece of naan bread.  Hubby used the prescribed amount to accompany his chicken and dress his salad and agreed that it went very well with both - and as a dip for the somewhat surplus to requirements naan bread that was recommended by the recipe.  As for me, I took the remainder of the naan bread and the lime dip and ate it later on when I was watching t.v., it was that nice!


As I say, I really don't know what the naan bread was supposed to bring to the dish and definitely wouldn't have it again.  If you're desperate to have some carbohydrate input into the dish, a potato salad or maybe potato wedges would have been nicer.

One point of difference between the photograph and the recipe is the way we dealt with our cucumber.  In order to save hubby's sore mouth (where he'd bitten himself the night before) we sliced the cucumbers far more thinly than prescribed.  I don't think it mattered, but you may have wondered why!


The dish received a mixed reception from the chaps, in that hubby thought the chicken was rather one-dimensional and wouldn't be rushing to have it again, although equally he wouldn't say no if we did.  Son & heir hated the lime dip (~sob~) but liked the chicken.  Personally, I liked all of it and would very happily have it again tomorrow.  So this leads me to think that perhaps it's something of a "girl's dish", rather than something that appeals to big rufty tufty chaps.


SPICY CHICKEN WITH MANGO SALAD (serves 3)


Ingredients :


3 skinless, boneless & trimmed of all fat, chicken breasts
a drizzle of olive oil
1-2 tbsp garam masala (depending on the size of the chicken)
1-2 tbsp madras curry powder (as above)
sea salt
freshly ground black pepper
1 large ripe (ha!) mango
half a cucumber, pips removed and sliced into chunks diagonally
half a small red onion, sliced finely
a few Romaine lettuce leaves, shredded
a handful of fresh coriander leaves
4 tbsp sour cream
grated zest and juice of half a lime


Method :


1.  In a large plastic bag, add the chicken, the olive oil, garam masala, curry powder, salt and pepper.  Seal the bag and massage the mixture together until the chicken has been liberally coated.  Put to one side to briefly marinade.


2.  Mix the sour cream together with the lime zest and juice, season and mix thoroughly.
Put to one side in the fridge to stay cool.


3.  Heat a griddle or frying pan until hot.  Add the chicken and cook each side for 6-10 minutes over a low to moderate heat, allowing a crust to form.  Try not to flip from side to side, as it takes the contact between the pan and the chicken to really cook that crust.  You will find that the chicken becomes ever so slightly charred in places, which all adds to the flavour, but don't overdo it!


4.  While the chicken is cooking, prepare the salad by peeling and slicing the mango into thin wedges.  Place in a large bowl and add the cucumber pieces, lettuce, onion and coriander and toss together.  Season.


5.  To serve, pile the salad onto plates and slice each chicken breast into three.  Place with the salad and serve a dollop of the lime/sour cream mixture by the side.


Tuck in!


.

5 November 2010

Chilli Chicken Curry with Courgettes

The recipe for this curry has changed quite a bit since I first decided to include it on the menu list for this week.  The first big change came when I reviewed the recipe and noticed that it included potato.  This is a big no-no, as hubby has decreed that potato is the no-legged spawn of the devil and if he eats another one, it will be far too soon.  So, I try to avoid the little chaps - which is tricky as I'm a complete potatophile.  So that explains why they keep on appearing!

So anyway, the potato was out and I wanted to find something that would be nice to include in a curry, but wouldn't cost the earth.  Enter one courgette (zucchini).  So that was change no. 1.

Change no. 2 came about in the supermarket today when we discovered that a huge pack of fresh curry leaves were less than a pound in price.  Because the recipe I'm using on Sunday - the Spicy Lentils - include curry leaves we got them.  This, of course, meant that I could play with them for the first time ever, in tonight's curry before committing them to the Ottolenghi recipe on Sunday.

Change no. 3 came about when I realised that the curry recipe I had dealt in chilli powder, rather than fresh chillis - which are always my preferred route.  So chilli powder was out and fresh chilli was in.

Change no. 4 came about when I realised that we had no brown sugar in the house with which to sweeten the tomatoes.  Rather than use the relatively flavourless granulated sugar, I opted for honey instead.

Change no. 5 came about when, after tasting the sauce, I realised that it was a little "light" and needed something to give it a richness and depth.  After a bit of pondering, I opted for two tablespoons of double cream.

So hence, the recipe we wound up eating bore very little resemblance to the one I intended to start out cooking.  Still, the end result was worth it.  Chillibob declared that it was very, very close to "the perfect curry" - and that is quite some accolade from him!


CHILLI CHICKEN CURRY (feeds 3)

Ingredients :

To make the paste :
2 medium onion , quartered
1 cm root ginger, quartered
2 garlic cloves, halved and green shoot removed
1 red chilli, quartered and seeds removed.

A knob of butter
tbsp olive oil
a courgette or 2 baby aubergines
1 tsp cumin seeds
14 curry leaves
½ tsp turmeric
230g can chopped tomatoes
500g boneless skinless chicken breasts, cut into 3cm chunks
½ tsp garam masala
2 tbsp chopped fresh coriander
2 tbsp double cream
2 tsp runny honey

METHOD : 

Slice the courgette into fairly chunky slices, melt the butter in a deep frying pan and add the oil, heat until the courgettes sizzle when you put them in and fry until browned, then set aside.

Meanwhile, make the paste by blitzing in a food processor the onion, ginger, garlic and chilli to a fine paste.

Fry the cumin seeds and curry leaves in the leftover oil from the courgettes for a few seconds.

Add the onion paste and brown over a medium heat.

Add the chicken and brown (or “white”) for a few minutes.

Sprinkle in the turmeric and garam masala.

Add the tomatoes and fry for 5 minutes. Add a little water to promote the creation of the sauce.

Season and allow to simmer for 30 mins or so.  Add the honey to taste and the double cream, continue to simmer for as long as it takes for the sauce to reduce to your liking.

Finally, and at the very last minute, add the courgettes and the coriander and stir through.

Serve with white rice.
Related Posts Plugin for WordPress, Blogger...