Showing posts with label lime. Show all posts

14 April 2018

Grilled Curry Chicken Skewers (well, they almost made it onto the skewers!)

Isn't it funny how I go for weeks not blogging a thing, then all of a sudden I have a mad rush of blood to the head and bingo, there's three blog posts in quick succession.  I have no idea why it happens, but it certainly seems to!

Now, these almost kebabs were so blinking tasty that they just had to be committed to blogdom straight away.  You won't have any idea the tussles I have had with yoghurt marinated chicken, but they have been almost on an epic scale of disappointment.  Hence, having had a taste of these little babies and realised that I'd reached nirvana, I just knew I had to write down the recipe and write it down fast - before it sank without a trace.

Now by rights, I should have laced these pieces of chicken onto kebab skewers and grilled them that way.  However, I discovered at the last minute that the majority of my little wooden skewers had left home, so they just went onto the baking tray and were grilled like that.  I don't think it harmed them any - in fact, I know it didn't.

Usually - and by "usually" I mean "in the past" - my attempts at yoghurt marinated chicken have been pallid at best and watery at worst.  However, in this new and exciting dawn, I am so excited to report that they were neither pallid, oh no, nor were they watery!  Well, they did exude a little water when being cooked, but that soon burned off.

They were deliciously spicy hot, with the warm curry spices singing along in harmony with the tang of lime juice and intense fruitiness of the tamarind.  The acidity of both yoghurt and lime juice had tenderised the chicken and the use of garlic granules meant there were no horrid lumps of half cooked garlic in the mix.  The slight charring on each piece brought out the best in the Tandoori spices and that spoonful of hot curry powder meant you were left in no doubt as to the worth of the sweet & fruity salad, along with the buttery rice.

I am seriously chuffed - maybe even "chuffed as nuts" as Dave Myers (he of Hairy Bikers fame) often says - with this recipe.  I might even need to cook it again, just to make sure it wasn't a fluke.  LOL  So if you give the recipe a whirl, do let me know how you get on with it!

Oh and incidentally - if you put your chicken onto the skewers, they'd be just brilliant cooked on a barbecue!

GRILLED CURRY CHICKEN SKEWERS   (serves 2)

Ingredients :

4 dessert spoonfuls of full fat unflavoured Greek yoghurt
juice of half a lime
2 tsp rapeseed oil
1 tbsp tamarind sauce
4 heaped tsp tandoori curry powder
1 heaped tsp hot curry powder
half a tsp of ground turmeric
1 tsp of dried garlic granules
a pinch of sea salt
pinch of ground black pepper
2 large skinless and boneless chicken breasts, sliced across the grain.

Method :

Firstly, in a large bowl, make up the marinade by stirring together all the ingredients except the chicken breast slices.

Add the chicken slices and stir gently, ensuring that the marinade reaches every piece.

Cover with cling wrap and set aside in the fridge for a minimum of 4-5 hours.

To cook, cover a baking tray with silver foil and spray with a little cooking spray.

Using tongs, remove each piece of chicken from the marinade (taking as much of the marinade with each piece as wants to come) and lay it in a blob on the baking tray, leaving a little space in between each piece.  Alternatively, lace each piece onto a bamboo skewer that has been previously soaked in water (to stop it going up in flames) - not too tightly - and lay the skewer on the baking tray.

Distribute any leftover marinade over the pieces that need a little more coverage.

Grill, under a hot grill (or a hot broiler, if you're American), until each piece has begun to char slightly.  You don't want to have a lot of charring, just a few spots on each piece's high points.  Turn the pieces and grill again.

Serve with buttery savoury rice and a fresh, fruity salad.

Printable version

13 April 2018

Fully Loaded Nachos - the turkey version!

I'm a bit of a novice at the Fully Loaded Nachos game, however I do love them!  This evening's version was so good, its recipe definitely requires blogging.  Well, I say "recipe" but in truth it's more of an assembly job than a recipe!

Along with the luscious goodies that are included in this turkey version, I also contemplated adding things like beans - red kidney or cannelini - sweet corn, fresh coriander, avocado and sliced red chilis.  All the kinds of things that you might find in a Mexican dish.  While I can see all of those things working, I'm glad I didn't add everything because it would have been far too much - so hark to my word of caution that Fully Loaded, whilst encouraging heaps of ingredients, can easily become too much to eat!  As it is, these nachos came in at around 725 calories per portion which required some jiggery pokery of the other meals, in order to fit it in without exceeding my daily calorie limit!


Anyway, the best thing about this meal is that you can include or exclude whatever you like.  So long as there are nacho chips and cheese, whatever else you add is entirely up to you.  My recommendation is that you use this recipe as help regarding how you make the dish, but free wheel about what you include.


Oh and it's worth knowing that these are like iron filings to a magnet for teenagers.  They just can't resist!  :D

FULLY LOADED (TURKEY) NACHOS   (serves 2)

Ingredients :

1 tbsp rapeseed oil
1 small red onion, chopped finely
half a bell pepper (any colour), diced
250g turkey mince
a pinch of sea salt
a pinch of freshly ground black pepper
sufficient barbecue sauce to coat
half a tsp of hot smoked paprika
150g or thereabouts, of nacho chips
100g of grated cheddar cheese
100g of grated Mexicana cheese
2 small tomatoes, sliced finely
sliced jalapeno peppers, to taste
100g approx of tomato salsa
150ml of sour cream
2 spring onions, finely sliced on the diagonal
crispy fried onion bits (optional)
fresh lime wedges.

Method :

Pre-heat your oven to 180degC/350degF/Gas 4.

Heat the rapeseed oil in a frying pan and add the onion, bell pepper pieces, salt & black pepper.  Cook over a moderate heat until the onion is softened and the bell pepper has begun to soften.  Move the vegetables to one side, increase the heat to high and add the turkey mince.  Fry until the mince has changed colour by 90% and stir in the vegetables.  Continue to fry until all the liquid has gone and the mince mixture is beginning to caramelise.

Reduce the heat to moderate and add the barbecue sauce & smoked paprika.  Stir everything together and cook until you have a fairly dry mix, which should only take a few moments.

Remove from the heat and set aside.

Take two baking trays and cover each with a sheet of baking paper.

Arrange a handful of nacho chips in the centre of each sheet, in a relatively flat layer.  This is the "plate" upon which the dish will be built - so don't take it too broad or you'll use too many chips, or too high or you won't fit the end result in the oven!

Next, sprinkle on a quarter of the cheese onto each bed of chips.

Then, heap on a quarter of the mince mixture onto each bed of cheesy chips.

Arrange the tomato and jalapeno slices across the mince mixture.

Dollop on the salsa, dividing between the two batches of chips.

Take another handful of chips and heap them on top of everything, on both trays.

Add the remaining quarters of the mince mixture, balancing it on top of the piles.

Sprinkle everything liberally with the remaining cheese, again dividing it between the two trays.  You can even add more jalapenos at this stage, if you're keen!

Carefully place the two trays into the oven for 10-15 minutes.  Keep an eye on them at half time, as you don't want the chips to burn.

When the cheese is melted and the mince is sizzling, remove the trays from the oven and have some warmed plates waiting.

Taking the baking paper, make it into a chute and slide the nachos onto the warmed plate.  They should go in one fell swoop, so be brave!

Add dollops of sour cream, sprinkle with the sliced spring onion and crispy onions, if you're using them and add the two wedges of lime, for squeezing at the table.

Prepare to accept the grateful and adoring thanks of the masses.  

Printable version

21 July 2017

Fish Willies - yes, you read that right

Yes, you read correctly - Fish Willies. *chuckle*  Now I haven't a clue what this used to be called by Antony Worral-Thompson when he first conceived the idea, but in the intervening years and within our family, it has come to be known as "Fish Willies" and so it shall stay.

A very simple confection of citrus, bacon and fish, it's as easy to assemble as it is to cook and will go with any number of different accompaniments.  I've served them with steamed vegetables, new potatoes and a parsley sauce through salad to couscous and they were as good with them all.

Fish Willies, but this time with Prosciutto instead of bacon
When I came to make the Fish Willies this time, I couldn't believe my eyes that the recipe wasn't up on Rhubarb & Ginger yet.  This dish has been part of the family's favourites for quite literally years, so why I haven't blogged it before now is anyone's guess!  As a tried and tested favourite, this definitely makes the grade.

Quickly into the COOK'S TIPS, it is much better to buy a big chunky piece of cod loin that you can cut into fingers, than try and cobble together two thinner pieces. Trying to keep two slippery pieces of fish together while you wrap them in bacon, well, there are easier ways to waste your time.   Anyway, make sure not to wrap any more than one layer of bacon around the fish or you will find the bacon doesn't get time to cook as the fish cooks so quickly.

The original recipe used lemon in the marinade, but I prefer lime.  However, if you have lemon and don't have lime, then fear ye not - either will work!


As something a bit different to do with some cod, this really hits the spot.  So, without any further ado, onwards!

FISH WILLIES   (serves 3)

Ingredients :

500g skinned cod loin or haddock fillet, cut into 12 fingers
6 rashers of smoked streaky bacon, cut in half to make shorter pieces
zest of half a lime
juice of 1 lime
1 tbsp extra virgin olive oil
a pinch of ground black pepper
1 tbsp fresh dill, chopped finely.

Directions :

Pre-heat the oven to 180degC/350degF/Gas 4.

Mix the lime zest and juice, olive oil, black pepper and fresh dill together in a large bowl.

Add the fingers of fish and turn them until they are liberally covered in the marinade. Set aside for 10-15 minutes to allow the flavours to penetrate the fish.  Don't leave it too long to marinade, as the citrus will start the fish cooking.

Wrap each fish piece in one of the halved slices of streaky bacon. Place on a wire rack, leaving a little space between each, over an oven tray.

Once all the fish is wrapped, spoon the remaining marinade over each Willy and place into the oven for a minimum of 15 minutes.  Check them after this to make sure the bacon is cooked.  You'll have to gauge this for yourself, but make sure not to over cook the fish!

Serve with your choice of accompaniment.

Printable version

21 June 2017

Chicken Satay Salad - a long way from ordinary!

We're currently going through something of a heatwave here in the U.K. - June 2017 - and salads are definitely in. However, because I wanted to try and make salad eating something good as opposed to something yawn-inducing (oh come on, you know it can be!), I've been experimenting with some rather out of the box kinds of salads and this one is by far the best we've tried (so far!).

The original inspiration came from the good old BBC Good Food website, as very often happens.  Their version of the salad can be found here and from that you'll be able to see that I've added a little and taken away a little from the original, but it is still very close.  


Yes, it requires a little bit of work before time with marinating the chicken but I also recommend that you wash your lettuce and put it in an inflated freezer bag in the fridge to crisp up.  Doing this makes all the difference to a crisp, crunchy salad.

When you get down to preparing dinner, it really is just a matter of chopping and building the salad, then spending a moment or two grilling the chicken, slicing, garnishing and hey presto - dinner is on the plate.  It really is as easy as that.

I've divided the recipe up into three sections, to make it easier to see what should be used for what.  I hope that proves helpful.

As for Cook's Tips, the only recommendation I have for you is that you chop up the salad before cooking the chicken.  You can always put the salad back into the fridge while the chicken is cooking, so as to keep everything fresh and crunchy.  Then, once the chicken is done it can rest and cool a little while you quickly plate up the salad items.


I can see that this is going to be a regular fall-back salad for blisteringly hot days.  My menfolk thought it was delicious and professed themselves keen to see it again very soon!

CHICKEN SATAY SALAD   (serves 3)

Ingredients :

For the chicken

3 boneless, skinless chicken breasts
2 tbsp light soy sauce
2 tsp curry powder of your choice (I used a medium)
half a tsp of ground cumin
2 garlic cloves, chopped finely
2 tsp runny honey.

For the sauce

1.5 tbsp peanut butter (crunchy or smooth, it's up to you, but a sugar free version is good)
2 tbsp sweet chilli sauce
juice of 1 lime
cold water, as required.

For the salad

a selection of salad leaves (I used Romaine and Iceberg lettuces)
a large vine tomato, halved and sliced
cucumber, sliced thickly and halved (two slices/four halves per person)
small seedless green grapes (5-6 per person)
half a red onion, sliced finely
cooked beetroot wedges (four per person)
mustard & cress
fresh parsley, chopped
3 tbsp dry roasted peanuts.

Method :

At least one hour before you are due to begin cooking, marinate the chicken.

Place the soy sauce, curry powder, cumin, garlic and honey into a large bowl and mix well.

Taking each chicken breast, run your knife horizontally through from the thickest end to the thinnest, creating two thin fillets.  Plate the fillets into the marinade and stir well, to ensure every little bit is coated.  Cover with cling film and refrigerate until required.

When it is time to cook, begin by mixing up the satay sauce.  In a medium sized bowl, add the peanut butter, sweet chilli sauce and lime juice and stir together.  Continue to stir, adding small amounts of cold water, until you have a dropping consistency.  Set aside.

Next, build each salad onto the plate starting with the salad leaves.  Create a small mound of these in the centre of the plate.

Divide the slices of tomato between the three plates, placing the tomato around the outside of the leaves.

Dot the salad leaves with cucumber half slices, then the grapes, then sprinkle the red onion over.

Add the beetroot wedges to the side of the plate.

Sprinkle everything with the mustard & cress.

Next, lay each fillet of chicken onto a foil lined baking sheet and cook under a hot grill (or broiler, if you're in the USA) until just cooked.  Turn the chicken over and cook the other side the same way.  This should only take 6-7 minutes each side.  Check the chicken is cooked through, by cutting into the thickest part and if you can see any sign of pinkness in the juices, put it back under the grill until the pinkness is gone.

Slice the chicken and lay it on top of the salad, while the chicken is still warm.

Drizzle spoonfuls of the satay sauce over the chicken and into the salad - be generous, as the sauce is divine.  

Garnish with a sprinkle of fresh parsley and the dry roasted peanuts.

Settle down somewhere cool - and tuck in!

Printable version

10 May 2017

Prawn Pad Thai - my new favourite thing!

And when I say "my new favourite thing", I'm talking about it being right up there alongside Nasi Goreng and Shepherd's Pie. Now THAT is high praise indeed.

I don't mind admitting that I was a wee bit intimidated by this recipe.  You see, I had attempted a Pad Thai a very long time ago - before I started blogging, so around seven or eight years ago - and it was a singular failure. Having just cooked the dish again, I can see that first go didn't work because I didn't understand the first thing about any of the ingredients. However, without the benefit of getting a good one under my belt, I was a bit worried that it would fail again.

Coming out the other side of having completed an outstandingly successful rendition of Pad Thai, I now haven't a clue what I was worried about as it was incredibly simple to make.  However, you do need to have your mise en place done before you begin to cook, as you cook at such a pace that you really have no time in which to turn around and chop a spring onion, for instance.  That, and overcooking the noodles in a big way, are much of the reason why the first one didn't work.


Having everything chopped, squeezed, measured out and ready to go is essential.  You almost need to put everything in order, the cooking goes that quickly.  However, once you've got everything ready, the cooking is fabulously simple and the results spectacular.

I've seen lots of different Pad Thai recipes, some ask for tamarind, some for coconut milk.  This one doesn't ask for any of those things, it keeps things clean and simple with just fish sauce, oyster sauce and gorgeous lime juice to stitch all the other flavours together.


I used John Torode's recipe from BBC Good Food as the guide for this recipe but several things are different and because of that things happen in a slightly different order, so I decided to blog the recipe so as not to lose it. The original recipe is here if you are curious.  I think my version just simplifies things a little bit further.

The only Cook's Tip I have for you is what I have already stated - get your chopping, peeling and squeezing done before you start cooking!

So, onwards to major, serious, deliciousness and clean, wholesome eating.

PRAWN PAD THAI   (serves 2-3)

Ingredients :

200g rice noodles, the white, vermicelli style
2 tbsp olive or coconut oil
2 eggs, beaten
pinch of sea salt & black pepper
2 large garlic cloves, chopped
1 tsp granulated sugar
1 tbsp fish sauce
2 tbsp oyster sauce
1 large lime, juice only
6 spring onions, sliced diagonally
1 red chilli (leave the seeds in for additional heat)
200g beansprouts
15g coriander, chopped to include the stems
250g cooked coldwater prawns, drained
100g dry roasted peanuts, chopped slightly.

Method :

To begin, set a saucepan of water to boil.  Once boiling, add the rice noodles and remove from the heat.  As soon as the noodles have softened, but before being fully cooked - around a minute and a half - drain well and run under cold water to stop the cooking process.  Set aside to drain fully.

Add a pinch of sea salt & black pepper to the beaten egg and stir through. Heat the oil in a wok over a moderate heat and once the oil appears to shimmer slightly, add the beaten egg and stir gently to form an omelette. Reduce the heat to low, so as not to burn the underside of the omelette and once formed and set, remove from the pan with a slotted spoon so as to keep the majority of the oil in the pan, onto a plate to keep warm.

Still over a gentle heat, add the chopped garlic to the wok and stir fry it very gently until the pieces have turned a gentle golden colour.  Don't rush this process, or the garlic will burn and become bitter.  Slow and steady wins the day.

Next, add the sugar, fish sauce, oyster sauce and lime juice, along with the spring onions, chilli, beansprouts and three quarters of the coriander. Increase the heat to moderate and stir regularly as the onions soften and cook.  This should take no more than around 4-5 minutes.

Add the cooked prawns, the drained noodles and a third of the peanuts and stir and toss to combine and heat through.  Keep the contents of the pan moving, so that nothing catches on the underside and the noodles combine well with the other ingredients.

Once well mixed, serve into warmed bowls and garnish with the remaining peanuts and chopped coriander.

Tuck in and enjoy!

Printable version

18 September 2015

Watermelon & lime marmalade

I'm a bit in the habit of posting photographs of a particularly yummy breakfast or lunch to the Jenny Eatwell Facebook page.  Well, I like to share.  What can I tell you?  Having done so of hubby's new brew of Watermelon Rind & Lime Marmalade, quite a few people have shown just as much interest in it as we did when we first saw the recipe, here : http://food52.com/blog/13793-stop-throwing-out-the-best-part-of-the-watermelon .  The recipe has had quite a journey, having originated with Olia Hercules' cook book Mamushka, then been slightly adapted by Food 52's Kristen Miglore, before coming to roost with us!

A typical Facebook breakfast post - duck egg & marmalade.
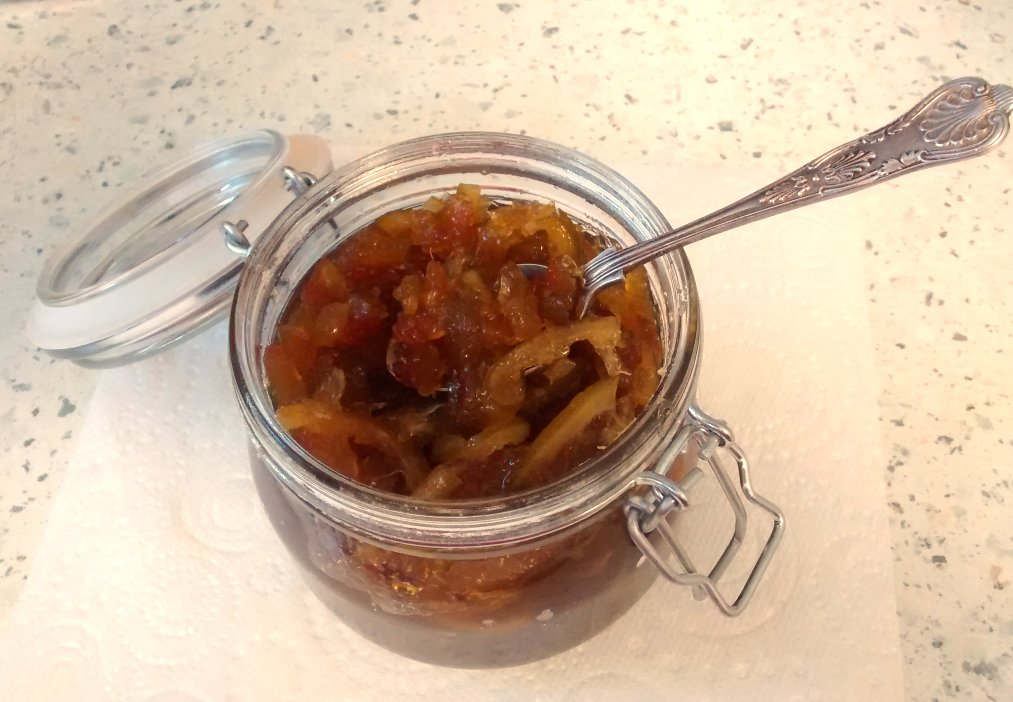
The words "watermelon rind" caught my attention to begin with, as it begs the question "the green bit?".  Apparently not, however.  You peel off the green bit and use the white bit that's in between the fleshy layer and the outer green rind.  So, truth be told, it should be called "Watermelon pith and lime marmalade", but that doesn't sound very appealing.

So having established we're talking about a semi-edible bit of the watermelon, my attention is next caught by the idea of pairing it with lime.  I love lime.  Anything lime gets my vote, instantly.

Well hubby was so intrigued, it became one of those "it has to be done" things.  So he did and I love it.  It has a really strong, bitter flavour that is akin to Frank Cooper's Vintage orange marmalade, which I love.  However, hubby finds the lime peel to be sliced too thick and the melon pith to be cut too small.  I do agree with him that slicing the lime ultra-thin, maybe just zesting some of the peel and leaving the watermelon pith a lot bigger, would have altered the balance of power between the two flavours, bringing the watermelon to the fore.  The watermelon undergoes quite a transition in the cooking process, becoming glassy and almost crystalline in structure, winding up looking like little square sweeties.  It tastes divine, but does have a tendency to be knocked sideways by the lime, currently.


Once I've eaten this batch (because I'm the only one who likes it), we're going to give it a go with the thinner lime zest and bigger watermelon pith - just to see what happens.  I can't say whether it'll work - but even if it doesn't, you'll still have a fantastic marmalade for your toast!


The fallback position of "hmmn, it's just the same" is fine by me!

WATERMELON & LIME MARMALADE  (Makes two 450ml (3/4 pint) jars)

Ingredients :

500g watermelon pith (sweet red flesh removed, green skin removed), diced
300g golden caster sugar
4 limes, halved and thinly sliced (or quartered and finely sliced).

Method : 

Mix all the ingredients together in a container (plastic or glass, preferably), cover with cling film, and leave in the refrigerator overnight.

Using a non-reactive saucepan, pour in the ingredients and cook gently over a low heat until the sugar is all dissolved.

Bring to a boil and cook at a lively simmer for 50 minutes or until the watermelon skin turns translucent.

The marmalade should reach setting point (where a small amount dropped onto a cold surface will develop a skin as it cools) before you remove from the heat.

Once at setting point, pour into 2 warm sterilized 450-ml (3/4 pint) jars, seal and cool.

The marmalade should be stored in the refrigerator and should keep, unopened, for several months.

Printable version

28 February 2014

Zesty glazed salmon on butter bean mash - the week's unexpected hit!

I love butter beans and I don't mind who knows it.

Now I do know that there are folk out there for whom a butter bean is the epitome of disgusting - strange folk who need to have their eyes opened to the beauty of the butter bean when engaged in the most delicious of things - butter bean mash.

However, I am getting a bit ahead of myself, so let's back up a bit and do a bit of explaining.

I have been looking for carbohydrate alternatives.  It is just too easy to say "hmmn, pork chop.  What shall we have with it?  Oh, new/roast/mashed/dauphinoise/boiled/chipped/Hasselback (and ever onwards) potatoes".  There are so many different types of potato dish that you can choose from!  However, I think I might have exhausted my range of all known potato types and have probably cycled through them all a number of times.

So it was time to try some creative alternatives.

With that in the back of my mind, I was doing my usual thing of browsing the foodie internet for possible dinner ideas.  One dinner ingredient that we all enjoy but we just don't eat enough of, is fish.  Having discovered that Asda's range of frozen fish is compatible with several different methods of cooking, I was particularly after a fish recipe when all of a sudden there appeared a recipe that solved the two requirements in one.  Sara Buenfeld's Sizzling Salmon with Bean Mash, on BBC Good Food.

Mmmmn ... butter (or Lima) beans
Salmon - tick!  Butter beans - tick!

Even better, from a balanced meal point of view, it included wilted Rocket in the mash and the fish was grilled (albeit with a sweet mustard glaze).  Add a couple of likely looking veggies and that is dinner sorted - completely without recourse to a potato.

However, I had temporarily forgotten - in my butter beany enthusiasm - that hubby "isn't keen" on the beautiful creamy giants of the bean world.  For that, read "have yet to sample them in anything that makes them even palatable, never mind edible".  Humm.

I knew that I'd never sampled butter bean mash and I knew that I'd had it recommended to me by more than one person - and more than one of those more than one people were like hubby in their dislike for the ordinary butter bean.  However, they reported that butter bean mash was a definite thumbs up.  My caution went for a fly around in the wind and I put the dish on the menu plan.  *gulp*

Now the naughty boy has been teasing me all day with various comments about the three (THREE!) tins of organic butter beans I'd had him buy in the shopping this morning, but I held out, stood firm and went for it.


Do you know, he likes it!  No, in fact, I'd say he really rather liked it (which is a bit more than your average "like" - in case you were wondering).  We've just finished dinner and having gone from a plaintive "Well if I don't like it, what am I going to eat?" to "This is delicious!  ~suspicious look from me~  No, seriously delicious!", I call that a very definite win.

Son and heir left a little of his mash, but then I did give him rather more - hollow legs and all that.

The salmon was lovely with the lime/honey/mustard glaze and took minutes to cook under the grill.  The butter bean mash was simplicity itself, even with my changing the order of cooking around a little bit to include sauteing the garlic in the butter for a minute or two, so that I didn't get a reaction to it.  They are right in the original recipe when they say that the mash requires a good wallop of seasoning to bring out the flavours - I seemed to be endlessly adding pepper, but once you reached sufficient, you realised why.  The creme fraiche is a master stroke, as it loosens the flouriness of the beans and combines with the butter to make an overall creaminess.  Just so tasty!


I served the fish and mash with some broccoli and carrots that I drizzled with the cooking juices.  Everyone was happy with the quantity of food on the plate and I am quietly cock-a-hoop that it was as much of a success as it turned out to be.

I most definitely recommend this one.  It's a keeper!

ZESTY GLAZED SALMON on BUTTER BEAN MASH   (serves 3)

Ingredients :

3 salmon fillets, skin removed
zest and juice of 1 lime
2 tbsp runny honey
1 heaped tbsp wholegrain mustard
3 x 400g tins of butter beans, rinsed
25g butter
1 garlic clove, crushed and chopped finely
4-5 tbsp creme fraiche
50g rocket
sea salt and freshly ground black pepper.

Method :

1.   Place the salmon fillets face upwards on a heatproof flat tray.

2.  Into a bowl, combine the lime zest, lime juice, honey, mustard and a good pinch of salt.

3.  Spoon a little of the mixture onto the face of each salmon fillet, then turn each upside down and leave to marinate for a few minutes while you prepare the mash.

4.  Drain the beans and place into a flat bottomed bowl.  Using a potato masher, mash until the beans are quite broken up, but still retain some texture.

5.  Place the butter into a saucepan large enough to take all the butter beans and put it on a low heat to melt.  Add the garlic and cook very gently - do not allow it to brown - for a few minutes.

6.  Once the raw garlic smell has dissipated add the crushed butter beans, a large pinch of sea salt, a whole heap (to taste) of freshly ground black pepper and the creme fraiche.  Vigorously mix the combination together - a wooden spoon is good for this as you can crush any randomly whole butter beans as you go.  Heat the contents of the pan until bubbling.

7.  Spoon a little more glaze over the fish fillets and place under a hot grill for 2-3 minutes.

8.  Turn the fillets and spoon the remaining glaze over them, then return them to the grill until done.  The cooking juices should be bubbling and hot.

7.  Just before you are due to serve, add the rocket to the butter bean mash pan and stir through.  You are wanting the rocket to have just wilted and not be cooked.

8.  Serve with steamed broccoli and carrots, with the cooking juices from the fish drizzled over.

Printable version

21 February 2013

Allspice chicken and mango rice - suddenly, we're in the Caribbean!

I'm often drawn towards recipes for traybakes.  They always look so good, with beautifully golden roasted chicken pieces nestling amongst gorgeous roasted vegetables that have just begun to caramelise.  However, my efforts haven't always been successful in the traybake department.

As such, I was bearing this in mind when I found myself drawn towards the recipe for Mango chicken, bean & rice bake in the latest BBC Good Food magazine.  There were the golden roasted chicken pieces, as cosy as can be beside chunks of glowing mango, on a bed of fluffy rice and shiny red kidney beans.

Looking at the ingredients, they seemed to fit what we like - but in a different way to normal.  There were Indian curry ingredients there (chilli, coriander, ginger, onion, rice) with Caribbean influences (allspice, mango and kidney beans).  The recipe even called for lime - which as you know, I have quite a few of just at the moment!

After 30 mins cooking - all chutneyed up and ready to go back in!

I had a little word with hubby about whether he felt he could cope with chicken thighs in this instance.  He's a chicken breast man, ordinarily, you see.  I felt that the chicken thighs would give more flavour to the rice (as they sit on the rice to cook) than ever chicken breast would - plus thighs could cope better with the hour and a half they would be in the oven!  He wasn't convinced, but decided to take it like a man - and have a strategic sandwich afterwards if it all goes to worms.

Making the marinating mix was a breeze - a simple matter of chopping everything into bits and chucking it into the food processor, then whizzing, mixing and we're done for a day.


In fact, for all that the recipe is three main processes - marinating, 30 mins cooking then another 35-40 mins cooking, it really is incredibly easy to do.  Once again, it is a one-pot dish (unless, like me, you decide to add something like red cabbage & apple as a side dish - but that's up to you!) and they really are the easiest things in the world to make.

I have a couple of cook's notes for you though :

1.  If you can, following the 30 minutes cook under silver foil and before the next batch without the silver foil, remove the centre pieces of chicken and give the rice a bit of a stir there.  I found that at the very middle of my dish, the rice was still fairly under done and a bit of a stir at a judicious moment, would have solved that.

2.  If you have anyone who is - like hubby - a bit phobic about "globby bits", remove the skin from their chicken before marinating.  The skin is delicious eating - but not for certain people - and to remove it before serving will mean that they lose all the effects of the marination on the chicken, plus the mango chutney.

3.  Don't be tempted to put too much mango chutney onto the chicken.  I have reduced the amount to half a teaspoonful from a full teaspoonful, as it made the chicken rather too sweet.
So munchable!

4.  The marinade was full of flavour, but if you like the chilli heat do leave the seeds in.  I removed them from our chilli - and rather wished I hadn't by the end of it!

Hubby didn't have need of his emergency sandwich, he enjoyed the new combination of flavours and found the chicken agreeably tender (and free from the dreaded "globby bits", thanks to some careful trimming!).  He did make the comment - and I think he's quite right - in that pineapple would have been a good substitute for the mango.

Son and heir wasn't so keen on the clove-like allspice flavour that is prevalent all the way through the dish, but I think that is simply a matter of being unfamiliar with that particular flavour.  I really liked the dish and agreed, to some extent, with son & heir's lament about the allspice, so I have reduced it from one and a half teaspoonfuls to just the one teaspoonful, in acknowledgement of its dominance - which was a bit too much, I felt.  However, I really liked how sitting on top of the rice - initially in a stock bath - made the chicken incredibly tender.  It was literally falling off the bone.  Lovely!


Considering how differently this turned out to how I was expecting, it was a very interesting and remarkable dinner that is very well worth repeating.  I may well experiment with using chicken breast next time - and cook the rice in the oven without the chicken on board for the first half hour.  Interesting!  I'll let you know what happens.

ALLSPICE CHICKEN AND MANGO RICE   (feeds 4)

Ingredients :

1 small onion, roughly chopped
1 tsp finely grated ginger
2 garlic cloves
1 red chilli, seeds removed if necessary, roughly chopped
small handful of coriander - including stalks - chopped roughly
2 tsp thyme leaves
zest and juice of 2 small limes
1 tsp ground allspice
2 tbsp sunflower oil
8-10 chicken thighs, skin left on but trimmed of fat
300g long grain rice
400g tin kidney beans, rinsed and drained
500ml chicken stock
1 ripe mango, peeled, stoned and cut into small cubes
150g mango chutney.

Method :

1.  Marinate the chicken up to a day, or as little as an hour, before you want to cook it, by putting the onion, ginger, garlic, red chilli, coriander, thyme, lime, allspice and oil into a food processor and blitzing until a paste has been formed.  Pour the paste onto the trimmed chicken thighs in a large bowl and mix until the chicken has been coated.  Cover with cling film and leave in the fridge to marinate.

2.  Heat your oven to 180degC/350degF/Gas4.

3.  Rinse the rice in a sieve under the cold water tap until the water runs clear.  Then place the rice into a large high sided flat baking dish (a lasagne dish is perfect).  Add the kidney beans and a pinch of salt and level out the surface.

4.  Remove the chicken from the marinade onto a plate and stir the stock into the remains of the marinade in the bowl.  Pour the stock over the rice and beans.

5.  Sprinkle the mango pieces onto the top of the rice mixture and place the chicken pieces on top again.

6.  Cover the dish with silver foil and bake for 30 minutes.

7.  Remove the foil from the dish and increase the oven temperate to 220degC/425degF/Gas 7.  Spoon a half a teaspoon of mango chutney onto each chicken piece and return the dish to the oven for a further 35-40 minutes to brown the chicken and cook the rice.

8.  Before serving, remove the chicken pieces and fluff up the rice with a fork.

Serve.

Printable version
 

4 May 2012

Smoky Chicken with warm corn & potato salad

This is one of those "disgustingly good for you" recipes that I was talking to Marcus about in the previous post's comments.

However, not only is it disgustingly good for you, it is quite simply delicious.

The original recipe (from a BBC Good Food Magazine, but you can see it on the website as well) states that per portion, this meal is only 343 calories.  Now add a little extra for the salad leaves that I included to make it a bit more of a main course and less of a lunch and it is still extraordinarily healthy.

It is a funny thing, but up until very recently I really didn't like smoked paprika very much at all.  Then, after a period of not having the "good stuff" and making do with a lesser grade of smoked paprika, we got a tin of the proper thing again - and bingo! I like it.  Weird.

However, for this recipe, it stated that sweet smoked paprika was required.  Well we couldn't find any of that for love nor money around here, so I improvised by using a half a teaspoon of the hot smoked and half a teaspoon of just plain paprika.  It tasted fabulous, so obviously worked fine!

Have I told you, recently, how much I love this griddle pan?
Another area where I made a change to the original recipe was in its use of olive oil.  It stated to use just "olive oil", but I felt that a distinction between plain old olive oil (suitable for frying etc.) and extra virgin olive oil (better for salad dressings, as it has a much better flavour) would be a help.  So I used plain old olive oil for the chicken coating, as it is cheaper and more suited to being used in a hot environment.  The more expensive extra virgin olive oil, I saved for the salad dressing.

The Jersey Royals were just perfect for this salad.  Unfortunately, I had to quarter them in most cases as they were so big.  However, this didn't seem to make any difference and the flavour appeared to be just the same.  I only wish I'd have thought to add a little sprig of mint in the cooking water!

Considering how simple the ingredients and their cooking methods are, this is a quite outstanding dish both for flavour and appearance.  I was extremely pleased by how it looked on the plate - and it certainly made son & heir's eyebrows disappear into his hairline, which I can only think was a good thing.  He ate everything except the salad leaves which took dire threats of no ice cream for dessert to make disappear - but then, we can put that down to his natural resistance to anything green, rather than the flavour!

For anyone looking for an extra-light meal that delivers on just about every front possible, this is definitely a winner.


SMOKY CHICKEN WITH WARM CORN & POTATO SALAD  (serves 3)

Ingredients :

Enough Jersey Royal potatoes for 3 people (I quartered mine, as they were so big)
2 large Corn on the cob
a mint sprig (optional - to go in the cooking water)
a small red onion, thinly sliced
juice of 1 lime
1 tbsp olive oil
1 tbsp extra virgin olive oil
2 garlic cloves, crushed and chopped finely
half a tsp hot smoked paprika
half a tsp paprika
3 skinless, boneless chicken breasts, each cut through to make two thin escalopes
small bunch of coriander leaves, chopped
salad leaves (I used spinach, watercress & rocket).

Method :

1.  Bring to the boil a saucepan of salted water big enough to hold all the potatoes and corn.

2.  While you wait for the water to boil, in a salad bowl mix together the red onion with the lime juice and the extra virgin olive oil.

3.  In a smaller bowl, mix the plain olive oil with the garlic, paprika and some seasoning.  Add the chicken and stir until each piece of chicken is completely coated in the mixture.

4.  Add the potatoes and corn cobs to the boiling water and cook until both are tender, making sure that the potatoes are cooked all the way through.  Drain well and keep warm.

5.  Heat a griddle pan and griddle each piece of chicken for 3-4 minutes on each side, until cooked through.  You will probably need to do this in batches, to save overcrowding the pan, which will cool it too much and result in your chicken braising instead of griddling.

6.  Once the chicken is done, add the potatoes to the bowl with the onions.  Take the corn cobs and cut the niblets off them by standing each cob on its thick end and running a sharp knife down from top to bottom.  Add the corn to the potatoes.  

7.  Add the chopped coriander to the corn, along with a little seasoning, and stir through gently, so as not to break up the potatoes.

8.  Serve the potato mixture on top of a bed of salad leaves, placing the chicken pieces on top of the lot.

Printable version
.
Related Posts Plugin for WordPress, Blogger...