Showing posts with label smoked paprika. Show all posts

12 August 2014

Chicken and chorizo Jambalaya

Before we go any further, I have to put my hands up and admit that the bulk of this recipe came from the Slimming World online recipe book - and you can see the original recipe here.

However, having got that out of my system, I can tell you that my version of the recipe is heaps better.  LOL  No, seriously!

Okay, it doesn't accord with the Slimming World ethos - but then it was never meant to.  What I was after, was to take a recipe that had been produced with slimming in mind - and gee it up a bit with additional flavours and textures.  The end result should be that it remains a healthy meal, but has all the good things that an ordinary (a.k.a. not diet) meal would have, such as variety, flavour, texture and substance.

Well, blow me down with a feather, but it only worked.


I'm not sure how much of a "Jambalaya" it was - never having had a strictly traditional Jambalaya - but it had rice, tomatoes and chicken, not to mention heat from spice and full bodied character.  What a result.  Even better was that I liked it - which doesn't happen often with Cajun or smoked paprika dishes.  It has been a while since we've had anything with chorizo in it - and I've found myself lusting after meatballs in tomato sauce with chorizo sizzling alongside, which I took as a hint that maybe I'd come round to the idea.  While I was slicing up the chorizo - as is required of the chef - I had a little taster to establish just how spicy/hot the flavour was.  I could easily have carried on and eaten best part of the entire sausage, it was that good.  Who knows, maybe my taste buds have matured where smoked paprika is concerned!

I knew that hubby would require his Jambalaya to taste Cajun - so added the pinch of red chilli flakes, the smoked paprika and ordinary sweet paprika.  I also wanted the dish to be substantial, so added the cherry tomatoes and mushrooms.  The biggest change was the addition of the chorizo.  I just couldn't imagine a Jambalaya type dish without something big to hold it all together - and the Quorn sausages in the original recipe just wouldn't do it for me.  Not to mention that I think Quorn is disgusting.  (Sorry Quorn manufacturers!).

The final dish was really tasty - and worked out to just under 500 calories per portion - so I didn't do too much damage to the original recipe with my additions!  Whether on a diet or just plain hungry, I recommend this one to you.  It'll keep the wolf from the door, that's for sure.


Now there's a couple of "cook's tips" for you :

-  make sure you start off with an enormous, deep, frying pan.  I used my 22" Ceracraft pan and only just managed to get everything into it.  If you have something deeper but that is reliably non-stick, I'd advise using it!

-   you need your pan to be non-stick, as when it comes to the point of putting the lid on and letting it chuckle for a while, it does have a nasty habit of trying to burn the underside of the food.  Hence, a non-stick pan helps no end with reducing the likelihood of any burning - but do remember to stir and turn the contents regularly!

- using a powder chicken stock is by far and away the better approach.  A chicken stock cube will do the job, but in 200ml of water it can have problems dissolving.  A teaspoonful of chicken stock powder, however, can go into the pan with 200ml of water without any trouble whatsoever.  I recommend Essential Cuisine's chicken stock powder - it's only £3.99 a tub - and the tub last for ages.

So there we have it!  This dish would be perfect for cooking in advance, then heating up in the microwave for Bonfire Night.  I can just imagine being out in the garden with the fireworks, keeping my hands warm around a mugful of this Jambalaya and oohing and aaahing in between forkfuls.  Perfect.


CHICKEN & CHORIZO JAMBALAYA  (serves 4)

Ingredients :

1 tbsp olive oil
1 onion, finely chopped
2 boneless, skinless chicken breasts, finely sliced
100g chorizo sausage
a pinch of red chilli flakes
2 sweet peppers, your choice of colours, deseeded and roughly chopped
1 courgette, quartered and diced

4 cherry tomatoes, halved
2 large mushrooms, sliced
1 tsp dried thyme

1 tsp sweet smoked paprika
half a tsp paprika
zest and juice of half a lemon
400g can chopped tomatoes
250g long grain
rice 
200ml low salt chicken stock
sea salt and freshly ground black pepper

a handful of fresh parsley, chopped.

Method :

1.  Heat the oil in a huge deep frying pan (it needs to be big, because there's a lot to fit into it!) and fry the chopped onion until softened, with a pinch of sea salt to bring out the moisture.

2.  Increase the heat under the pan and add the chicken, chorizo and chilli flakes. Cook until the chicken has lost all evidence of pinkness.

3.  Add the thyme, smoked paprika and paprika and stir to combine.

4.  Add the peppers, courgette, cherry tomatoes, mushrooms, lemon juice and zest. On the same high heat, cook but stir gently so as not to break up the vegetables, until the vegetables have begun to soften and reduced in size.

5.  Add the tinned tomatoes, stock cube and 200ml of water. Stir to combine and bring to the boil.

6.  Add the rinsed rice, stir through and bring back to the boil. Place a lid on the pan and reduce the heat to a simmer.  Cook gently - stirring occasionally to prevent any burning underneath the mixture - until the rice has cooked and is tender.  Taste for seasoning and adjust if necessary.

7.  Sprinkle with chopped parsley and serve.

Printable version


23 February 2013

Simple Slow Cooker Beef Goulash, but with loads of flavour

You know me, I like recipes that are simple.  Not just because they are easy to make (and that's an undeniable truth), but because a few good ingredients, combined with care, seem to make such excellent dishes.

I spotted this Goulash recipe on the goodfoodchannel.co.uk website and was immediately attracted to it because of the shortness of its ingredients list.  Now I know there are those amongst you who will tut and say "it's not authentic!", but the way I see it, Goulash has been made for so many years by so many different ethnicities of people, that it's probably like my favourite Cottage Pie, in that there are many ways of producing what amounts to the same thing.

So let me say from the word go, that with this recipe I wasn't looking to make an "authentic" Eastern European Goulash, but a Goulash-style beef stew that would fill empty corners and warm the cockles of our hearts.  After all, with the snow that's been blowing around our garden, our hearts have needed their cockles warming from time to time!


Now because the recipe uses beef and because of hubby's dislike of even remotely chewy meat, I decided to use the slow cooker.  As a result, the recipe has been somewhat re-written with that in mind, but the ingredients stayed (almost) the same.  The original recipe can be found here if you are interested but don't want to use a slow cooker, otherwise, read on!

Alongside the Goulash, I serve white rice and garden peas - I just added the frozen peas to the rice saucepan with 5 minutes to go.  If you're going to do the same, allow the full five minutes as the ice of the peas reduces the heat of the boiling water and you need time for it to regain a full boil in order to finish cooking both peas and rice.


I also served some roasted carrots, beetroot, radishes and onion.  These had been tossed in sunflower oil and seasoned with sea salt and freshly ground pepper before being added to a moderate oven for 35-45 minutes' roasting.  It was the first time I'd ever roasted fresh beetroot and I was jolly impressed by the flavour, which - perhaps not surprisingly - went very well with the Goulash.  None of us were impressed by the roasted radishes though, as the roasting appeared to concentrate the cabbagey flavour in them, rather than the sweetness or pepperiness.  I don't think we'll be doing roast radishes again, somehow!

Along with the lemon soured cream - which made a pleasant change from plain soured cream and provided a lovely acidity which balanced both the Goulash and the sweetness of the roasted vegetables, the whole combination made a very acceptable Sunday dinner.  I know that I was completely stuffed by the end of it - and didn't start to get peckish again until breakfast time the next morning.  All of which, I consider a real result.

Hubby declared himself rather underwhelmed by the flavours, however I suspect he was anticipating a more pronounced smoked paprika flavour.  Smoked paprika is one of his favourites, yet I'm not so keen on it and had tamed the recipe by the use of 1 teaspoonful of sweet smoked paprika along with 1 teaspoonful of hot smoked paprika.  Although the original recipe doesn't say what type of smoked paprika to use, I know that hubby was expecting more of the hot version - which could account for his being underwhelmed.  He enjoyed the meal - loved the roasted beetroot - and was perfectly satisfied with the Goulash, just expected rather more from it than it delivered.  Son and heir thought the Goulash was "lush" and the lot disappeared - including the roast beetroot, which was a major surprise.

Personally, I really liked the end result of this recipe.  It didn't compromise on flavour and the use of fresh tomatoes instead of tinned tomatoes was a real revelation to me.  I think I'll be swapping those two in future recipes - which will be interesting, no doubt!  The red peppers were definitely there, but didn't overwhelm the flavour profile (for once).  So often, when you use red pepper in a dish, it becomes the predominant flavour.  I think because they were chargrilled peppers from a jar instead of fresh red peppers - and only 50g of them - it made all the difference.

All in all, a great cockle-warmer!

SLOW COOKER BEEF GOULASH    (serves 4)

Ingredients :

750g beef brisket, trimmed of fat and cut into chunks
1 heaped tbsp plain flour
sea salt and freshly ground black pepper
4 tbsp rapeseed or sunflower oil - or any combination of the two
2 onions, diced
2 cloves garlic, finely chopped
3 tomatoes, seeds removed and roughly chopped
50g chargrilled red peppers from a jar, rinsed if in vinegar, sliced into strips
1 tsp hot smoked paprika
1 tsp sweet smoked paprika
400ml beef stock (I used Essential Cuisine beef stock)
1 tbsp fresh parsley, chopped
zest of half a lemon
1 tbsp lemon juice
1-200ml soured cream.

Method :

1.  In the morning of the day you're planning on eating the Goulash, place the flour and seasonings into a large plastic bag, then add the beef cubes.  Seal the bag and give it a good shake to toss the beef in the seasoned flour.

2.  Pour the oil into a large frying pan and place over a moderate heat to bring up to temperature.  Test whether the oil is hot enough, by touching one corner of a piece of beef to the oil.  If it frizzles and fries, the oil is ready.  Add (gently!) the beef to the frying pan and reserve any remaining flour.

3.  Brown the beef to a stage where it is just beginning to caramelise, on at least three sides.  Using a slotted spoon, decant into the slow cooker, leaving any surplus oil behind.  Switch the slow cooker on, using the "low" setting if you're wanting to take all day about cooking the Goulash, or "high" if you've only got 4-5 hours.

4.  Add the onions and fry, stirring frequently, until softened and golden.  Add the garlic and turn the heat down.  Cook for another couple of minutes, taking care not to let the garlic burn.

5.  Add the tomatoes and continue to fry, until the tomato pieces have softened and begun to break up.  Add the paprika and the leftover seasoned flour and stir to combine.  Cook for another minute or so.

6.  Add the beef stock gently, stirring all the time to combine it with the pan's contents easily and not wind up with lumps.

7.  Add the sliced peppers and stir to combine.  Bring back up to a simmer, then decant the lot into the slow cooker and give everything a good stir.

8.   Cook for the requisite time (4-5 hours on high, or 9-10 hours on low).  An hour or so before you are due to serve, taste for seasoning and adjust if necessary and if the sauce is rather too thin, cook with the lid half on/half off for an hour, to reduce the liquid.  However, if you're doing this, you need to keep an eye on it!

Serve with the parsley sprinkled over and the lemon soured cream beside.

Printable version


24 November 2012

Chicken Paprikash - easier than I thought!

I have made various paprika chicken dishes over the years, with - it has to be said - a mixture of success and failure.  As a result, I've become a bit nervous of the types of recipe that involve tomatoes (particularly tinned), chicken and paprika.

However, just lately I've seen a few recipes for Chicken Paprikash float past my consciousness and had found myself being drawn in to the idea once again.  After all, my paprika pork recipes seem to be successful, so there really was no reason why a chicken version wouldn't work.

Particularly now I've the right paprika.

Now, because nobody tells you - I shall pass on the wisdom of my years of getting it wrong.  

It seems as though buying paprika is one of those things that is fraught with misadventure.  In the past, I've had your usual supermarket-gleaned small pots of paprika, graduating to a small pot of smoked paprika.  They were okay - but I seemed to be missing out on the rich roasty toasty flavours that I see reported in food magazines and spoken of on food t.v.  So I began to consider (we're going back a number of years here) whether my little pots of paprika were really quite up to the job - and maybe there was a more "authentic" type of paprika that offered the flavours I was missing.

We kept our eyes open for different types and began to see recipes requesting the use of "sweet" and "hot" paprika.  Aha!  So there was different types available!  Why does nobody tell you that?  Why did it take me a number of years to establish that there are as many types of paprika in the world as there are recipes?  Well, that's the way it seems - I suspect there may be a few more recipes than types of paprika, in reality.  Only a few, mind.


So our first score was with a tin of smoked paprika.  This was before I realised that there was such an animal as a "sweet smoked" paprika.  I also didn't notice that there was a heat rating on the tin.  Ours was the hottest, at 3 chillies.  So that explained why, when I used three teaspoonfuls of paprika in a recipe once, it tasted appalling.  You see?  Nobody tells you these things.

After a period of some months spent looking, we eventually sourced some of the sweet smoked paprika - and tranquillity was once more restored in our recipes.

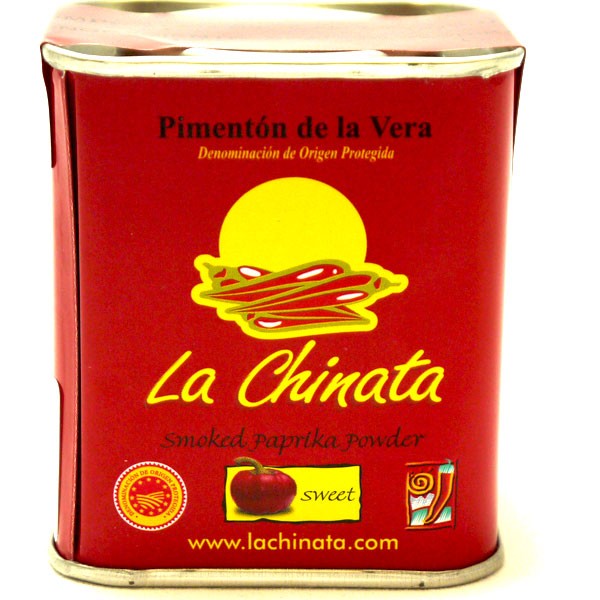
Now, note please that I said "tin".  If your paprika doesn't come in a tin, unless you've bought it on the continent somewhere, I suspect that you're being short changed in your paprika use.  So, if you too have some little jars of paprika quaking nervously in your spice cupboard, I suggest you give them a ceremonial heave-ho into the bin and source some La Chinata Paprika - but watch out for the chilli rating, to establish which one you've got!

So anyway, I've digressed.

I had been looking at the various recipes that floated past my consciousness and picking out the bits that I liked, rejecting the bits that we wouldn't like and pondering over the gaps.


It seems as though Chicken Paprikash is a particularly American recipe - although I may be wrong in that.  (NOTE!  See comment at the end of this posting, regarding the origins of Paprikash!).  I gather that there are two ways of eating it - one where the sour cream is included in the recipe and the other where you eat it with sour cream alongside.  I decided to go with the "sour cream alongside" version, although I will admit to hedging my bets with regard to that until it was almost ready to serve.  I reckoned that if the paprika or tomato was too strong, I'd just use the cream to calm it all down a bit.


As it was, the recipe - my version of the recipe - came together remarkably easily and didn't need calming down at all.  It's wonderful when you've got the right ingredients to begin with - god bless those little tins of paprika.

One of hubby's favourite vegetables is the sweet pepper (capsicum pepper) and so he was very happy to have both red and green versions in evidence.  The tomato cooked down beautifully and didn't become so acidic that it made the whole thing uncomfortable to eat and even the chilli flakes blended very happily into the whole, leaving their warmth and tangy spiciness as evidence of their presence.

I was really very pleased with the way this one turned out - it could so easily have degenerated into a disaster, but instead was a resounding success.


23 January 2018

I've just been contacted by my Hungarian friend Kate, who tells me the following :

"Chicken paprikash is a Hungarian dish. And there is no other "paprikash" dish we have (aka pork, etc). And what makes it "paprikash" is the authentic proper Hungarian paprika you use. Not smoked. Never smoked. (This is not a criticism! It is just a misconception peeps have that in Hungary we have smoked paprika. We don't. That is a Spanish thing. Hungarian paprika is not smoked. Ever.)

Anyway, I digress...  the other thing that really caught my eyes was chicken breast as meat. No. Nope. No how, not ever, nuh-huh!!! 😁😁😁 Chicken paprikash is traditionally made with either a combo of thighs and drums, or legs, or just thighs. Dark meat is where it's at!!"

❤"  
So there we are then!  The wrong end of the stick has been duly grasped and waved around, then corrected.  LOL  Hence, what we have here is very much "my version" of a true Paprikash.

CHICKEN PAPRIKASH   (feeds 3)

Ingredients :

2 tbsp rapeseed oil
2 onions, peeled and finely chopped
1 garlic clove, finely chopped
3 skinless, boneless chicken breasts cut into large chunks
1½ tsp dried oregano
1½ tsp sweet smoked paprika
½ tsp hot smoked paprika
½ tsp finely ground black pepper
pinch of sea salt
400ml can of chopped tomatoes
2 heaped tsp of tomato puree
a pinch of red chilli flakes
1 tsp sugar
1 yellow capsicum pepper, cored, de-seeded and chopped into large chunks
1 green capsicum pepper, cored, de-seeded and chopped into large chunks
100ml soured cream.

Method :

1.  In a large bowl, place the chicken chunks, the oregano, both types of paprika, black pepper and sea salt, plus half the garlic.  Stir to coat the chicken in the spices and leave to one side.

2.  To a deep wok or frying pan, add the rapeseed oil and the onions.  Fry on a moderate heat for 5 minutes or so, until the onion is transparent, softened and turning golden.

3.  Add the garlic and fry for another minute or so, stirring.

4.  Remove the onions and garlic onto a plate with a slotted spoon.

5.  Increase the heat under the frying pan and add a little more rapeseed oil, if necessary.

6.  Once the pan is very hot, add the chicken chunks and fry until caramelised on two sides.

7.  Reduce the heat to moderate, and add the tinned tomatoes, the tomato puree, chilli flakes, sugar and capsicum pieces, along with the onion/garlic mixture.  Mix well to amalgamate and cover with a lid (or a baking tray, in my case!).  Simmer for 30 minutes, stirring occasionally.

8.  Once the capsicum is tender and the chicken is cooked through, remove from the heat and add two thirds of the soured cream.  Stir through.

9.  Serve with white rice and a dollop of soured cream on the side.


4 May 2012

Smoky Chicken with warm corn & potato salad

This is one of those "disgustingly good for you" recipes that I was talking to Marcus about in the previous post's comments.

However, not only is it disgustingly good for you, it is quite simply delicious.

The original recipe (from a BBC Good Food Magazine, but you can see it on the website as well) states that per portion, this meal is only 343 calories.  Now add a little extra for the salad leaves that I included to make it a bit more of a main course and less of a lunch and it is still extraordinarily healthy.

It is a funny thing, but up until very recently I really didn't like smoked paprika very much at all.  Then, after a period of not having the "good stuff" and making do with a lesser grade of smoked paprika, we got a tin of the proper thing again - and bingo! I like it.  Weird.

However, for this recipe, it stated that sweet smoked paprika was required.  Well we couldn't find any of that for love nor money around here, so I improvised by using a half a teaspoon of the hot smoked and half a teaspoon of just plain paprika.  It tasted fabulous, so obviously worked fine!

Have I told you, recently, how much I love this griddle pan?
Another area where I made a change to the original recipe was in its use of olive oil.  It stated to use just "olive oil", but I felt that a distinction between plain old olive oil (suitable for frying etc.) and extra virgin olive oil (better for salad dressings, as it has a much better flavour) would be a help.  So I used plain old olive oil for the chicken coating, as it is cheaper and more suited to being used in a hot environment.  The more expensive extra virgin olive oil, I saved for the salad dressing.

The Jersey Royals were just perfect for this salad.  Unfortunately, I had to quarter them in most cases as they were so big.  However, this didn't seem to make any difference and the flavour appeared to be just the same.  I only wish I'd have thought to add a little sprig of mint in the cooking water!

Considering how simple the ingredients and their cooking methods are, this is a quite outstanding dish both for flavour and appearance.  I was extremely pleased by how it looked on the plate - and it certainly made son & heir's eyebrows disappear into his hairline, which I can only think was a good thing.  He ate everything except the salad leaves which took dire threats of no ice cream for dessert to make disappear - but then, we can put that down to his natural resistance to anything green, rather than the flavour!

For anyone looking for an extra-light meal that delivers on just about every front possible, this is definitely a winner.


SMOKY CHICKEN WITH WARM CORN & POTATO SALAD  (serves 3)

Ingredients :

Enough Jersey Royal potatoes for 3 people (I quartered mine, as they were so big)
2 large Corn on the cob
a mint sprig (optional - to go in the cooking water)
a small red onion, thinly sliced
juice of 1 lime
1 tbsp olive oil
1 tbsp extra virgin olive oil
2 garlic cloves, crushed and chopped finely
half a tsp hot smoked paprika
half a tsp paprika
3 skinless, boneless chicken breasts, each cut through to make two thin escalopes
small bunch of coriander leaves, chopped
salad leaves (I used spinach, watercress & rocket).

Method :

1.  Bring to the boil a saucepan of salted water big enough to hold all the potatoes and corn.

2.  While you wait for the water to boil, in a salad bowl mix together the red onion with the lime juice and the extra virgin olive oil.

3.  In a smaller bowl, mix the plain olive oil with the garlic, paprika and some seasoning.  Add the chicken and stir until each piece of chicken is completely coated in the mixture.

4.  Add the potatoes and corn cobs to the boiling water and cook until both are tender, making sure that the potatoes are cooked all the way through.  Drain well and keep warm.

5.  Heat a griddle pan and griddle each piece of chicken for 3-4 minutes on each side, until cooked through.  You will probably need to do this in batches, to save overcrowding the pan, which will cool it too much and result in your chicken braising instead of griddling.

6.  Once the chicken is done, add the potatoes to the bowl with the onions.  Take the corn cobs and cut the niblets off them by standing each cob on its thick end and running a sharp knife down from top to bottom.  Add the corn to the potatoes.  

7.  Add the chopped coriander to the corn, along with a little seasoning, and stir through gently, so as not to break up the potatoes.

8.  Serve the potato mixture on top of a bed of salad leaves, placing the chicken pieces on top of the lot.

Printable version
.

10 April 2012

Smoky Pork & Bean Wraps - scrumpalicious!

We've done a very good line in swerving various recipes for various reasons, this week.  As a result, very few of those planned recipes have happened on the day they were supposed to - but this one got moved, moved again, then happened on the right day in the end.

All the "do we, don't we" was down to two things.  Firstly, we kept forgetting to buy a tin of smoked paprika - even though we'd gone to the shop specifically for that very thing - and secondly, because of son & heir's social engagements.

Having finally decided to do the Wraps on the Saturday evening, this necessitated another trip to a shop to buy the darned smoked paprika and some more pork mince, as we had another mouth to feed.

This time, we managed to leave the shop with the smoked paprika!  I swear, it's the onset of age.  Either that, or we've got too many things to think about and keep getting distracted.  Can't just be a bad memory.  :: shakes head ::  Oh no, definitely not.  What was I talking about, again? 

The "real thing"
Do you know, I reckon that 99% of alternative supplies of smoked paprika could very easily be disposed of, as none of the ones I've ever tried (mostly because I couldn't get the tin of "real thing") are just house dust by comparison.  The smell of the real thing is just so powerful - it promises so much by way of flavour, all of which it delivers.  In fact, hubby had a camp fire in his patio fire bowl on the Saturday night (with the sleepover boys all gathered around, feeling grown up and manly as they tended the fire and talked guitars), and that fire smelled almost exactly the same as the paprika did.  Maybe they were chucking teaspoonfuls on the fire - I hope not.  *chuckle*

Anyway, I'm supposed to be talking about dinner, aren't I?  See?  Easily distracted.

Well, this meal was another very satisfactorily easy to prepare one.  The original recipe came from ye good olde BBC Good Food Magazine, but they don't seem to have included it in the recipes on the website yet.

As ever (you should come to expect this now), I changed the recipe a little to fit rather better with being able to drain off the fat from the meat and because our guest hasn't got our fortitude where chilli is concerned, I used just a tablespoon of the barbecue sauce, then cooked the filling through to the finished product and decanted enough for one portion out into a separate pan.  I then included the three remaining tablespoonfuls of barbecue sauce into the rest of the mix for us.

The barbecue sauce I used, was one of Levi Roots' products - his famous "Reggae Reggae" BBQ/Jerk Sauce.  I've not used this before and blimey but it's good!  To say it is frisky is an understatement - our poor guest was even a little over-challenged by the one tablespoonful in his wraps.  We are all great chilli hounds, so the friskiness of the sauce was very welcome for us.

I also used Tarantella tomato passata, which is just streets ahead of other passatas for flavour (in my opinion).  I know I've rattled on about Tarantella products before, so I won't bore you again now - but if you can find them, try them.

These wraps don't quite measure up to "The best Enchiladas evar!", but I can tell you, it was a close run thing.   It was interesting to have a wrap filling made with pork mince - which naturally goes so well with the spices, tomato and barbecue sauce.  I don't doubt it would have been nice made with any kind of mince (turkey comes to mind, for economy), but the pork mince gave it a particular texture that invited you to "get your teeth into it" in a most satisfying way.


If like our guest, you aren't so good with chillies, then I suggest you get a mild barbecue sauce, as there isn't much spicy heat involved other than that.  However, if you're a chilli hound - definitely go with the Reggae Reggae sauce, you won't regret it!


SMOKY PORK & BEAN WRAPS    (makes 8-10 wraps or 8 wraps and 2 lunches!)


Ingredients :


750g pack of pork mince
1 tsp vegetable oil
1 red onion, chopped
2 tsp smoked paprika
2 tsp ground cumin
400ml passata
5-6 tbsp barbecue sauce
400g red kidney beans, drained and rinsed
small bunch of coriander, chopped
8 corn wraps.


Method :


1.  Dry fry the mince in a large frying pan or wok, until all the meat has changed colour and the fat has rendered out.  Remove the meat with a slotted spoon and keep it warm.  Drain away the fat and discard.


2.  Add the oil and the onion and cook over a medium heat until softened but not browned.


3.  Sprinkle over the spices and stir well, cooking for one minute more.


4.  Add the passata and barbecue sauce along with 4 tablespoonfuls of water.  Add the minced meat back to the pan along with the beans and some seasoning and stir until thoroughly mixed.


5.  Allow the mixture to simmer and reduce, until the sauce is clinging to the meat and not pooling around the meat.  You will need to stir at regular intervals, to prevent the mixture catching on the bottom of the pan and burning.

6.  At the last minute, stir in the coriander and serve by taking a warmed wrap, then placing on some shredded lettuce, then some soured cream and enough of the meat filling that the wrap will comfortably hold.  Roll it up, put it on a plate along with some tomato salsa and some potato wedges.  Yum!


.

10 March 2012

Bockwurst & Bean Pasties : a Germano-Mexicano-Cornwallo fusion!

Okay, so - think of a Cornish Pasty.  Now instead of the usual filling, when you bite into this pastie, you get a rich combination of baked beans, red kidney beans, black eyed beans and pinto beans, plus slices of Bockwurst, all carried by a gently barbecued, tomatoey sauce that has a hint of chilli warmth.

Doesn't sound quite so odd now, does it?  Or does it?

I'll be perfectly honest with you and say that I was extremely dubious about this one.  Extremely dubious.

To begin with, it committed the most heinous of crimes which is to include something else with a Bockwurst other than a kartoffelsalat.  Now that is a cardinal sin, in my book.

Secondly, it put Bockwurst with baked beans.  Now that is getting way too close to "Heinz Beans & Sausage" territory for me.  Not that I dislike said beans and sausages, I just have to be in the right mood for them - and it rarely happens.

Thirdly, it involved a barbecue sauce.  Now I'm not the best person to be faced with a barbecue sauce.  Take Macdonalds barbecue sauce - I dislike it intensely.  Hubby loves it.  I have yet to enjoy any of the "cook-in" sauces that involve barbecue and actively dislike Heinz barbecue baked beans.  So maybe you can understand my caution.

However - and prepare to be as amazed as I was - I really liked these pasties.  I know!  Who knew, eh?

In making the contents of the pasties, I took a large can of the abomination that is Heinz Barbecue Beans and added a half a can of chilli bean mix (not one that was in sauce).  I heated this combination up and included a knob of butter (which hubby reliably informs me, creates a "refried beans" type of texture), a half a teaspoon of smoked paprika, a good quantity of freshly ground black pepper and a flat teaspoon of chilli powder.

Once all those flavours had married up, I added the Bockwurst slices and hoped for the best.

The end result tasted (amazingly) as though I'd added a heaped teaspoonful of ground cumin - but I hadn't, honest!  In the saucepan, I continued to be extremely dubious about the wisdom of this combination but hubby seemed content with the flavours (although he did comment that I'd been a bit heavy handed with the cumin!  See?  I told you it tasted like I'd added some!).

So, once it had all cooled down a bit, I sallied forth and put the pasties together.

Ready for baking - awsome egg colour!
As you'll see from the "ready to bake" photograph, the egg yolk that I used to glaze them with was an amazing colour!  You honestly would think that I'd used a Burford Brown or other exotic breed of egg, but no.  The egg came from the box of 24 free range eggs of mixed sizes that all the other (normally coloured) eggs came from.  The shell gave no indication that it would be so glamorous, either.  I can't wait to see whether there are going to be any others like that in the same box!

The pasties baked up beautifully and we served them with some shop bought potato wedges, for simplicity's sake.

It's only a shame that I forgot to get a photograph of the filling for you to see, which would have given you a far better idea of how the combination worked.  I'd made sure that the sauce was quite thick before using it as a filling, so there wasn't runny sauce escaping everywhere.  The pastry seemed to mute the barbecue flavour a tad, but the Bockwurst was still able to be heard, in amongst all the other flavours.

On the whole, I'd make these again.  Maybe not on a regular basis (after all, just look at the amount of pastry involved!) but when we've got a Bockwurst glut, they'll definitely feature.

Oh, and speaking of pastry - have you seen how much the price of pastry has escalated just recently?  Unreal!  We found the two packs of puff pastry that were required in the money off section for 60p each as they were about to go out of date - the same amount in frozen pastry would have cost a quite ridiculous £2.25.

I can't help but think we're going to have to learn how to make rough puff in the future!

BOCKWURST & BEAN PASTIES  (makes 3-4, depending on size)

Ingredients :


1 x 390g can of Baked Beans in barbecue sauce
half a 400g can of mixed beans in water, drained
a knob of butter
half a tsp of smoked paprika
a good quantity of freshly ground black pepper (to taste)
a flat tsp of chilli powder
5 Bockwurst sausages, sliced
1kg puff pastry
an egg, separated, yolk retained - for glazing.

Method :

1.  Into a small saucepan, empty the barbecue beans.  Add to them the half a can of mixed beans and stir to combine.

2.  Begin to warm the beans through, on a low heat.

3.  Add the knob of butter and the smoked paprika, black pepper and chilli powder and stir gently to combine.

4.  Add the sliced Bockwurst and continue to heat and stir.

5.  Do not let the mixture boil, but if it appears very juicy, simmer until the consistency is correct as a pasty filling.

6.  Allow to cool while you sort out the pastry.

7.  Pre-heat your oven to 180degC/350degF/Gas4.

8.  Divide the pastry up into four (or however many you want) evenly sized pieces, then roll each out until 2mm thick.  You will probably find it easiest to do the next few stages individually, rather than try to deal with them all at once.

9.  Cut a circle out the size of a tea plate (I use a tea plate and press it into the pastry to give me the shape).


10.  Brush a little egg around the edge of the pastry, then place spoonfuls of the filling into the centre.


11.  Quickly fold one side of the pastry over the filling and press down around the edges to create a join and prevent any filling from escaping.


12.  Either run a fork around the edge, pressing down, so as to "cement" the join, or crimp the edges as you would for a Cornish pasty and cut two lines into the top, to let out the steam.

13.  Place onto a baking tray and brush each pasty with some egg wash.

13.  Bake for 30-40 minutes, or until the pastry is puffed and golden.

Serve.

19 November 2011

King Prawn Frittata

Isn't it pretty?
There we were, on Monday afternoon, pondering what we could have for Tuesday's "Pizza day".  Son & heir will be happy busily working his way through a pizza, which leaves us room to make and have something that is likely to make his hair stand on end in horror, should he find it on his plate.

We were both trying to think along the lines of "what would be good for Jenny's Anti-inflammatory diet", which rules out the likes of pasta, potatoes and bread.  Some cheese is good, some cheese is bad, likewise for meat.  Beef & fish (especially oily fish) are good, chicken is not so good.

How the thought process goes, is that we focus in on what we "feel like" - what we're hankering towards at the time.  We were both agreed on fish - and I suddenly remembered the King Prawns that we'd used in a risotto recently.

Well, that got hubby's brainbox going and before you could say "Frittata" (or "Fritatatatatatatata", as it has become known), he'd thought up the most delightful recipe.

We mused over the inclusion of chicken along with the prawns (after the style of a Paella), but threw that idea out in the end as being just a bit too confused.

We also pondered on using tomato along with the red pepper, but that got ditched because raw tomato isn't good from an anti-inflammatory point of view - and these tomatoes would be cooked lightly.  However, do experiment with tomato if you feel like it - I'm quite sure some halved or quartered cherry tomatoes would be lovely included in the mix.

We used just ordinary free-range hen's eggs, but if you were wanting to pimp your Frittata for guests, I can recommend using the lovely Burford Brown hen's eggs.  The colour is amazing in these eggs and would look terrific against all the beautiful colours of the Frittata.

Hubby served the Frittata alongside a few of the leftover watercress & spinach leaves, dressed in a balsamic vinaigrette and with some gorgeous mozzarella (a good cheese for the A-I diet) torn over the top.  So simple, yet quite amazingly good for you.

KING PRAWN FRITTATA  (serves 3)

Ingredients :


10 spears of asparagus cut into 1cm lengths
2 tbsp olive oil
1 medium onion, peeled & roughly diced
1 red pepper cut into 1cm diamonds
1 rasher streaky bacon sliced very finely
3 large mushrooms, diced
1 tsp smoked paprika
250g King Prawns, bisected lengthways (reserving 6 prawns for garnish)
100g frozen peas, defrosted
4 large or 5 medium eggs
1 tbsp milk
sea salt & freshly ground black pepper

a small handful of baby spinach, rocket and watercress.

Method :

1.  In a small pan, blanch the asparagus in boiling salted water for 3 minutes before refreshing in a bowl of iced water.  Set aside.

2.  Heat the olive oil in a large flat bottomed frying pan and gently cook the onion, red pepper and bacon until soft.  Add the mushrooms and cook until tender.  Stir in the smoked paprika and allow to cook out before adding the sliced prawns, asparagus and peas.

3.  In a medium bowl, beat the eggs and the milk together, with some seasoning.

4.  Turn the heat under the frying pan to maximum, before adding the beaten eggs and sprinkling with the green leaves.  Fry for two or three minutes before placing the frying pan under a hot grill to cook the top of the fritata.

5.  Remove from the grill once the surface of the fritata is golden and bubbling.  Use a small knife to open the centre of the fritata to check that no liquid egg remains.  If so, then return to the grill for 30 seconds or so until soft, but not liquid.

6.  Transfer from the pan onto a chopping board and cut into wedges.

7.  Serve with a mixed green salad with torn mozzarella pieces and a balsamic vinaigrette.

.

15 July 2011

Spanish style chicken & prawns

For absolutely ages, hubby has had a yen to make a paella-style dish.  Of course, he'd have absolutely loved to have made true paella, but I fear that's beyond our purse at the moment.

I've got to say, though, that the dish he made last night - Spanish style chicken and prawns - is so "after the style of" a paella, that he got as close as he could have done.

He'd obviously spent some time thinking about how he was going to approach the cooking of the dish, having decided to marinade the chicken and cook it separately, so as to preserve the flavours of the marinade.  He absolutely achieved that, as the chicken was discernibly flavoured differently to the rice.  This made for interest in a dish which could very easily have been one overall flavour.

He used pepperoni sausage, as we had some left over from some Calzones he was going to make last week.  I think I probably preferred the pepperoni, as the paprika from the chorizo, together with the two paprika's used in the dish could very easily have been too much for me.  I seem to have become quite paprika-sensitive in my old age!

We were both agreed that it would have finished it off perfectly to have had a sprinkling of chopped parsley to serve - so you may want to add that if you try this dish.

One thing that is worth saying about the meal, is that Son & heir started it suspiciously but was very soon tucking in and polished off the lot!  So that was a seal of approval as regards its kid-friendliness.


It is now March 2015 and I have just made the dish again.  (See photograph above).  It was a late addition to the menu plan, as son & heir's lady love was coming for dinner.  Everyone declared the dish was delicious, son & heir gave it the best accolade by having two enormous platefuls!

SPANISH STYLE CHICKEN & PRAWNS  (serves 4)

Ingredients :

2 tbsp olive oil, used separately
2 chicken breasts, sliced into small pieces
half a lemon, juiced
freshly ground black pepper
half a tsp smoked paprika
sea salt
a small knob of butter
1 large spanish onion, chopped
1 red pepper, de-seeded and chopped
1 yellow pepper, de-seeded and chopped
4 mushrooms, sliced
1 red chilli, de-seeded and chopped very fine
2 clove garlic, chopped fine
100g skinless chorizo, cut into small half moons
1 tsp dried oregano
1 tsp of paprika (not smoked)
300g long grain rice, rinsed in warm water until the water runs clear
1 litre chicken stock (2 stock cubes are fine)
pinch of saffron
2 handfuls of frozen peas, defrosted
200g prawns, defrosted
1 large de-seeded tomato, chopped.

Method :

1.  Place the chicken into a bowl and squeeze over the juice of half a lemon.  Add a few grinds of fresh pepper and the smoked paprika.  Stir and marinade for half an hour.

2. Add the olive oil to a frying pan and fry the chicken until golden brown all over.  Remove from heat and set to one side to keep warm.

3.  Add the knob of butter and more olive oil to the pan and saute the chopped onions, chopped pepper, sliced mushrooms, chopped chilli and garlic until soft.

4.  Add the chorizo pieces and cook for several minutes, until they have begun to release their oils.  Return the chicken to the pan.

5.  Add dried oregano and paprika, then add the rice and stir until coated with the seasoned oil.

6. When the rice is hot, add the chicken stock and saffron and stir through.

7.  Cook until the rice has absorbed almost all the liquid and add the peas.  Cook until the peas have warmed through.

8.  Add the prawns and tomato.  Stir and cook until the rice is tender and everything is heated through.

Serve.

Related Posts Plugin for WordPress, Blogger...