It's been a funny old day today. The weather has been chilly and wet, so not a day to do very much.
I was contemplating the menu plan for next week with hubby which inevitably involves taking a mental roundup of what vegetables we have left in the fridge. I mentioned that I had quite a few plums that needed using up in some way and before I knew it, I was in the kitchen making a plum and rhubarb (which two sticks of rhubarb from the garden) compote for dessert!
That then progressed to slicing the kernels from one of the ears of corn in the fridge, to put into my small saucepan with just enough water for an Ainsley Harriott Cup a Soup - Wild Mushroom, in this case. Once the kernels were cooked, just stir in the cupasoup mix, decant into a bowl and off you go for lunch.
Over lunch I got to thinking about this evening's dinner which was supposed to be a braised chicken dish. However, it sounded fairly unremarkable upon second thoughts and I began pondering on how I could make it less "brown" and more interesting.
Inevitably, whenever I'm thinking about what to add to a meat dish to create flavour, my mind travels to the wine rack. In this case, it settled upon the bottle of Marsala wine which I hadn't used in quite a while. Marsala goes so well with chicken - and I'd used it in the past with my Velvety Marsala Chicken, with great success. I didn't have any cream, so it would need to be a non-creamy version. However, I did have a leek - and chicken and leek is just one of those classic combinations. So, chicken, leek, Marsala wine ... add a few mushrooms for depth of flavour and we're sorted. Lovely!
Lovely was indeed what it turned out to be. I browned (or should that be "goldened"?) the chicken in the frying pan, then cooked the shallots, garlic, mushrooms and leek in the leftover butter/groundnut oil. Then I deglazed the pan with the Marsala, added some chicken stock, parsley, freshly ground black pepper and a couple of teaspoonful of Bisto's Best Chicken gravy granules to thicken and add flavour. Decant the whole lot into a casserole dish and cook, uncovered, in the Beastie combi oven at 200degC for 50 minutes with a pause half way through to give it all a stir.
Served with buttery mashed potato, cabbage, cauliflower, carrots, swede and Brussels sprouts, it was a perfect Sunday dinner.
Hubby then disappeared into the kitchen to create his new masterpiece, the rhubarb & plum sundae. Take a sundae dish and spoon in some home made (and cooled) rhubarb & plum compote. Crumble in some broken (well, I knew they'd come in handy for something) meringue nests, add a large dollop of Cornish ice cream, more compote, broken chocolate digestive biscuit, more compote and a swirl of whipped cream - and the crowning glory of a cherry on the top.
As a spur of the moment, made up on the spot, Sundae (Sunday!) dessert, it was a triumph. Not one ingredient was bought in specifically for it, they were all either growing in the garden or surplus to requirements in the fridge or cupboard. Now THAT is the kind of thing that makes me proud.
13 October 2013
Tonight's Dinner : Marsala chicken with leeks, plus Rhubarb and plum sundaes!
9 October 2013
Bacon & Orzo Stuffed Mushrooms and Peppers
![]() | |
| Pepper on the left, mushroom on the right. |
I came to the conclusion that it was simply a matter of not stuffing things with the correct stuffing for my family's taste. You see, I like "juicy" stuffings such as a bolognese style mince concoction for marrow, which as the marrow cooks inevitably becomes all watered down. Now I'm fine with that, but the rest of the family aren't. It's taken me a while to get to grips with that, as I thought the objection was in the flavour of the stuffing, not the texture. I know, sometimes I can be really dense.
Now I wanted to stuff peppers and tomatoes, but hubby correctly pointed out that tomatoes stood a very good chance of going the same way as the marrow (i.e. watery) and anyway, son & heir isn't keen on cooked tomato. He suggested Portobello mushrooms instead and as I'm ALWAYS in the market for a mushroom, that made a lot of sense to me.So what would go well with long red peppers and mushrooms? Well, bacon immediately sprang to mind, with shallot to help the savouriness and sweetness along. I didn't want to use breadcrumbs, as I was very wary of the sogginess that can sometimes accompany a breadcrumb stuffing. Thinking of things that hubby likes, brought to mind orzo. It is very rice-like (although is actually a tiny pasta) and rice is another good stuffing ingredient. I hadn't seen orzo used in too many stuffing mixes (and there may have been a reason for that) but it seemed like a good idea.
Now what could I use to provide some cohesiveness in this stuffing? I didn't want to use egg but I did want something that would stick everything together a bit. Thinking along the lines of what does son & heir like, produced mozzarella cheese. If I dice a ball of mozzarella, it would melt and do that "sticking it all together" thing in an unobtrusively cheesy fashion. Perfect. Add a few herbs and seasoning and we're in business.
Ah, but what about the tops? You need something to make a crunchy top, without cooking the heck out of the orzo and making it inedible. Hmmn. A slice of mozzarella would do that, but it doesn't carry much flavour. What about if I grate some cheddar on top, then top that with the mozzarella slice? Yes! That'd do it.
In this way, the recipe was born.
I decided to leave the peppers without the mozzarella slice, just to see whether the cheddar would have been sufficient. However, in the tasting, I think the addition of the mozzarella was a very good thing as it melted over the lot and provided a great "cap" that kept the moisture in the stuffing while the stuffed vegetable cooked. The peppers weren't dry, but the cheese would have kept them from being that little bit less "cooked" if you get my drift.The orzo was great as stuffing ammunition and I'll definitely use that again. The mushrooms were by far the best end result as the mushroom itself provided enough body to support the stuffing. The peppers were a bit thin - could have done with being a bit meatier - and cooked up to being a little bit papery. Still, the flavour was great!
I served the stuffed mushrooms and peppers with a simple sweet potato mash (into which I added a little nutmeg and lots of butter) and some peas. Apart from the paperiness of the peppers (I'd use round peppers instead of long ones next time), everyone really liked this dinner. Just goes to show that life isn't too short to stuff a mushroom - you just have to get the stuffing right!
BACON & ORZO STUFFED MUSHROOMS AND PEPPERS (serves 3)
Ingredients :
6 rashers of smoked back bacon, finely chopped
1 tbsp rapeseed oil
2 small shallots, finely chopped
1 tbsp fresh parsley, finely chopped
half a tsp dried basil
freshly ground black pepper
50g orzo
2 balls mozzarella cheese, 1 finely diced, 1 sliced thickly
2 red peppers
3 Portobello mushrooms
a handful of mature cheddar, grated.
Method :
1. Place the bacon into a dry frying pan that has been heated to a moderate heat and fry the bacon until the moisture has totally evaporated and the fat has begun to render out. Once the bacon begins to caramelise and turn golden, remove to a bowl using a slotted spoon, to retain as much of the bacon fat as possible in the pan.
2. Add the shallots to the pan and reduce the heat slightly. Cook, stirring regularly, until softened and beginning to take on colour. Add them to the bacon in the bowl and allow to cool while you cook the orzo, according to the manufacturer's instructions. Once cooked, spread evenly out on a plate, to cool.
3. Once everything has cooled but is not cold, add the parsley, basil and a good pinch of freshly ground black pepper to the bacon/shallot mixture and stir to combine.
4. Add the orzo, taking care not to "drown" the bacon mixture with orzo. You need to have a 50:50 sort of mix, which may result in your having some orzo left over, which you can make into a little pasta salad for your lunch.
5. Add the one ball of mozzarella that has been finely cubed to the bowl and make sure to give the stuffing a good stir so that all the flavours have as good a chance to combine as possible.
6. Slice the pepper in half so that it will lay flat on a baking tray. Remove the seeds and pith from the inside of the pepper, but keep the stalk base intact or your stuffing will all fall out.
7. Remove the stalk from the mushroom by carefully cutting it free. You don't want a huge hole in the middle of your mushroom! Turn the mushroom over and cut a cross into the crown, which should go right through. This will allow any excess liquid to escape. Place it, frill side up, onto the baking tray.
8. Now divide the stuffing mix between all the mushrooms and pepper halves, pressing it firmly into each.
9. Place a sprinkle of cheddar cheese onto each - a little more on the peppers than on the mushrooms.
10. Place a round of mozzarella cheese on top of the cheddar on the mushrooms - you can add mozzarella to the peppers too, if you like.
11. Place into a pre-heated oven at 180degC/350degF/Gas 4 for 40 minutes.
Serve with sweet potato mash and peas.
Printable version
Quick lunch : sausage & vegetable pot
Lunch - two sausages, each broken into three pieces and fried, then removed from the pan and three mushrooms and half a sliced courgette went in to cook. Once softened, a huge handful of curly kale went in, a shake of Worcestershire sauce, a pinch of sea salt and a tablespoonful of double cream. Toast a pitta bread, return the sausages to the pan for the last 30 seconds, then decant into a bowl and eat with a huge smile on your face.
Oh yes.
Oh yes.
2 October 2013
Creamy Parsnip and Squash Bake
The first instalment of summer squash got used to make this fantastic - and soon to be made again - creamy bake of a side dish.
It all came about because I was looking for a simple recipe that would enable me to tell how the squash tasted and how it behaved during cooking. The recipe was perfect for that and I was able to glean that it held together very nicely, was sweet and didn't dissolve into water once cooked.
I had four lovely little parsnips from thevegibox.com that were waiting to be used in something and I started to think about what hubby particularly likes. Now it goes without saying that he likes chilli, and Mexican flavours, Spanish flavours, Mediterranean flavours and a whole raft of Indian and Chinese flavours. However, none of those really matched up with parsnip and squash. However, creamy flavours did - and hubby loves creamy flavours. So then a picture came into my mind of Dauphinoise potatoes - but made with parsnip and squash. Except, the garlic didn't really go. Aha! But finely chopped shallot would - and so would thyme and parmesan. Bingo.
So what meat would go nicely with this combination? Well, chicken was an obvious choice and I'm always keen to have a roast chicken dinner. Plus, Vegibox had delivered some more lovely rainbow chard and this would be a perfect opportunity to try some cooked quite plainly and as a side vegetable.
I contemplated what to do with the chicken next. Yes, I could have just roasted it with a little oil and seasoning, but that was a bit dull and if the bake didn't come off it would be a very disappointing dinner. Lemon was out because of the cheese and cream in the bake, but I was already using thyme so that was a possibility. So what goes with cream? Well, you have mustard cream sauces but I didn't want to use more cream. What do you use with chicken that would go with mustard and with the cream in the bake? Honey! Aha! Honey mustard chicken! Perfect.
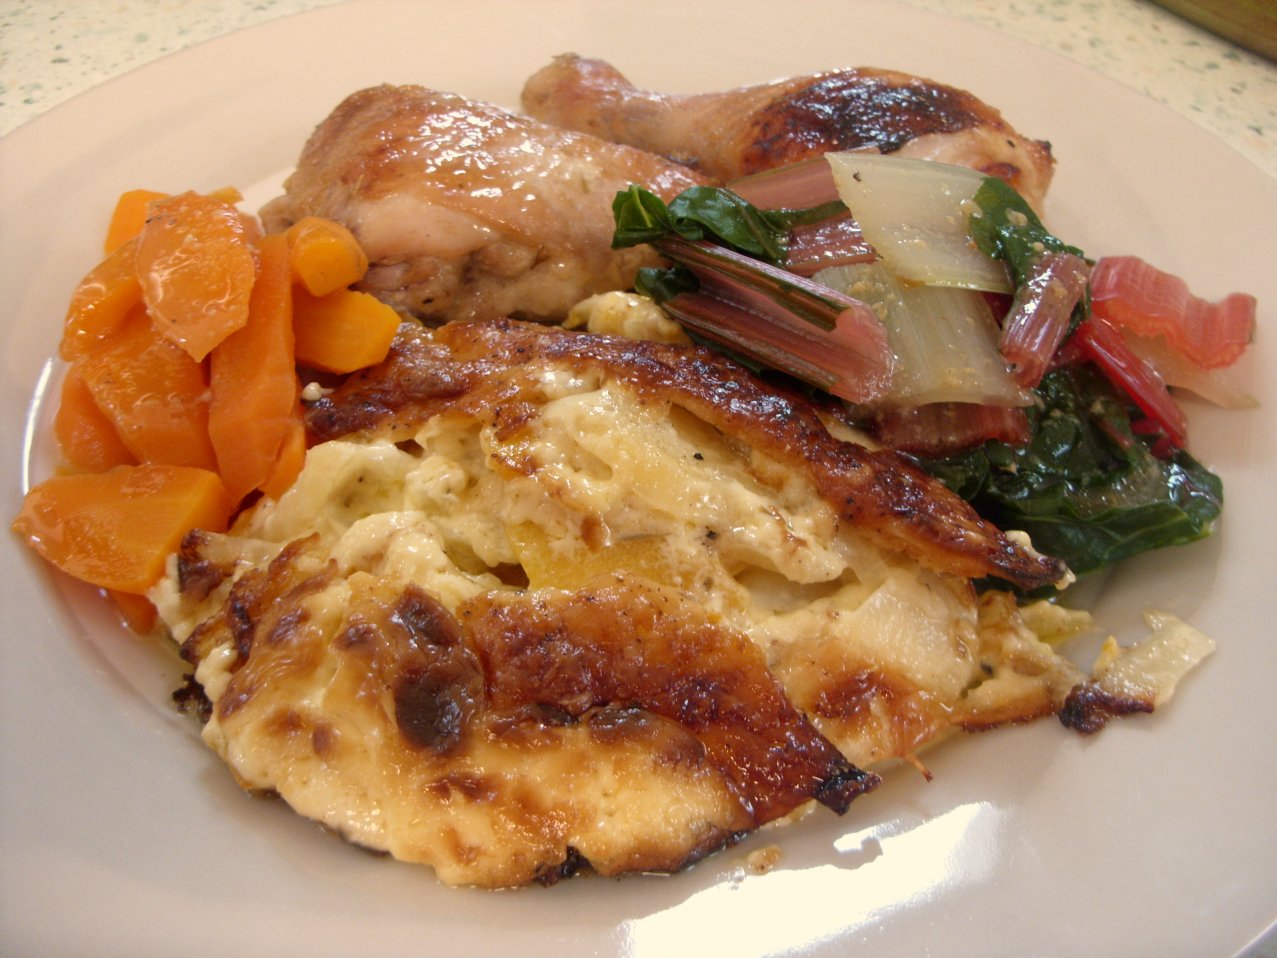
So there we were - the creamy parsnip & squash bake, with honey mustard chicken, rainbow chard and carrots. Yum.
Now assuming you're rather better with a mandolin than I am, you'll be able to cut your parsnips and squash into evenly sized slices without losing any skin - which is the recommended method. I lost the edge of my little finger - and this is the not-to-be-recommended method. Alternatively, you could just use a knife, but be sure to get your slices even widths or they will all take different times to cook.
Owing to the relatively few ingredients required for the bake, it came together really quickly (even with a first aid break) and my Nanna's lovely brown heatproof glass casserole was perfect for it. I was able to control the browning of the cheese on top by use of the casserole dish lid and it sat very politely waiting to be served when it was done some 10 minutes early.
All that contemplation as to what hubby liked paid off when, after his first few forkfuls, he declared "this parsnip & squash thing is fabulous!". After my first taste, I had to agree - it was fabulous. You could still taste the parsnip, but it didn't take priority over the other flavours (as parsnip is wont to do). The squash was there, adding sweetness and that lovely gentle flavour that is uniquely squash. The cream, onion and thyme bound the whole ensemble together and the cheese added that richness to the flavour that just finished it off perfectly.
Oh, and for those who are interested in such things - the rainbow chard was really very good indeed! I used the cooking juices from the honey mustard chicken as a light gravy over the chard and carrots and they went together beautifully. People who have seen the photographs on Rhubarb & Ginger's Facebook page, have asked me what the "rhubarb looking" thing is - and it is interesting that chard has the same effect on your teeth that rhubarb does! Rather less than rhubarb in fact, but it is nonetheless still there - that furry, odd feeling. Its flavour is almost tinny, but in a nice, juicy, veggie kind of way. I was expecting it to be more cabbage-like in flavour, but in fact it turned out to be much more spinach-like. Really very acceptable - and it makes rather more sense as to how it can be used in flans and quiches now!
Everyone, without exception, really liked everything on the plate but particularly the creamy parsnip and squash bake. To the point that, at washing-up time when I discovered a spoonful of it left - cold - in the dish, son & heir and myself were to be seen sharing it. Well, it was too small to keep! I think that was testament to how good it truly was.
CREAMY PARSNIP & SQUASH BAKE (serves 3)
Ingredients :
butter, for greasing & several small knobs for the surface
500g parsnip, peeled and finely sliced
500g butternut squash, peeled and finely sliced
1 banana shallot, finely chopped
1 tsp dried thyme
300ml double cream
25g parmesan cheese
15g strong cheddar cheese
sea salt and freshly ground black pepper.
Method :
1. Pre-heat your oven to 160degC/325degF/Gas4.
2. Rub the bottom and sides of a gratin dish with butter.
3. Place the parsnip and squash slices into the dish and toss together with the shallot, thyme and some salt and pepper. Arrange the slices randomly but fairly evenly to give a fairly flat surface, in the dish.
4. Pour over the cream and sprinkle on the cheeses. Add a dot of butter here and there on top of everything else and give an additional sprinkle of freshly ground black pepper.
5. Cover the dish and put into the oven to bake for 45 minutes. Remove the lid and replace into the oven for the remaining 15 minutes, to brown the surface. The bake is complete when a knife will insert easily into the vegetables.
Serve.
Printable version
It all came about because I was looking for a simple recipe that would enable me to tell how the squash tasted and how it behaved during cooking. The recipe was perfect for that and I was able to glean that it held together very nicely, was sweet and didn't dissolve into water once cooked.
I had four lovely little parsnips from thevegibox.com that were waiting to be used in something and I started to think about what hubby particularly likes. Now it goes without saying that he likes chilli, and Mexican flavours, Spanish flavours, Mediterranean flavours and a whole raft of Indian and Chinese flavours. However, none of those really matched up with parsnip and squash. However, creamy flavours did - and hubby loves creamy flavours. So then a picture came into my mind of Dauphinoise potatoes - but made with parsnip and squash. Except, the garlic didn't really go. Aha! But finely chopped shallot would - and so would thyme and parmesan. Bingo.
So what meat would go nicely with this combination? Well, chicken was an obvious choice and I'm always keen to have a roast chicken dinner. Plus, Vegibox had delivered some more lovely rainbow chard and this would be a perfect opportunity to try some cooked quite plainly and as a side vegetable.
I contemplated what to do with the chicken next. Yes, I could have just roasted it with a little oil and seasoning, but that was a bit dull and if the bake didn't come off it would be a very disappointing dinner. Lemon was out because of the cheese and cream in the bake, but I was already using thyme so that was a possibility. So what goes with cream? Well, you have mustard cream sauces but I didn't want to use more cream. What do you use with chicken that would go with mustard and with the cream in the bake? Honey! Aha! Honey mustard chicken! Perfect.
So there we were - the creamy parsnip & squash bake, with honey mustard chicken, rainbow chard and carrots. Yum.
Now assuming you're rather better with a mandolin than I am, you'll be able to cut your parsnips and squash into evenly sized slices without losing any skin - which is the recommended method. I lost the edge of my little finger - and this is the not-to-be-recommended method. Alternatively, you could just use a knife, but be sure to get your slices even widths or they will all take different times to cook.
Owing to the relatively few ingredients required for the bake, it came together really quickly (even with a first aid break) and my Nanna's lovely brown heatproof glass casserole was perfect for it. I was able to control the browning of the cheese on top by use of the casserole dish lid and it sat very politely waiting to be served when it was done some 10 minutes early.All that contemplation as to what hubby liked paid off when, after his first few forkfuls, he declared "this parsnip & squash thing is fabulous!". After my first taste, I had to agree - it was fabulous. You could still taste the parsnip, but it didn't take priority over the other flavours (as parsnip is wont to do). The squash was there, adding sweetness and that lovely gentle flavour that is uniquely squash. The cream, onion and thyme bound the whole ensemble together and the cheese added that richness to the flavour that just finished it off perfectly.
Oh, and for those who are interested in such things - the rainbow chard was really very good indeed! I used the cooking juices from the honey mustard chicken as a light gravy over the chard and carrots and they went together beautifully. People who have seen the photographs on Rhubarb & Ginger's Facebook page, have asked me what the "rhubarb looking" thing is - and it is interesting that chard has the same effect on your teeth that rhubarb does! Rather less than rhubarb in fact, but it is nonetheless still there - that furry, odd feeling. Its flavour is almost tinny, but in a nice, juicy, veggie kind of way. I was expecting it to be more cabbage-like in flavour, but in fact it turned out to be much more spinach-like. Really very acceptable - and it makes rather more sense as to how it can be used in flans and quiches now!
Everyone, without exception, really liked everything on the plate but particularly the creamy parsnip and squash bake. To the point that, at washing-up time when I discovered a spoonful of it left - cold - in the dish, son & heir and myself were to be seen sharing it. Well, it was too small to keep! I think that was testament to how good it truly was.
CREAMY PARSNIP & SQUASH BAKE (serves 3)
Ingredients :
butter, for greasing & several small knobs for the surface
500g parsnip, peeled and finely sliced
500g butternut squash, peeled and finely sliced
1 banana shallot, finely chopped
1 tsp dried thyme
300ml double cream
25g parmesan cheese
15g strong cheddar cheese
sea salt and freshly ground black pepper.
Method :
1. Pre-heat your oven to 160degC/325degF/Gas4.
2. Rub the bottom and sides of a gratin dish with butter.
3. Place the parsnip and squash slices into the dish and toss together with the shallot, thyme and some salt and pepper. Arrange the slices randomly but fairly evenly to give a fairly flat surface, in the dish.
4. Pour over the cream and sprinkle on the cheeses. Add a dot of butter here and there on top of everything else and give an additional sprinkle of freshly ground black pepper.
5. Cover the dish and put into the oven to bake for 45 minutes. Remove the lid and replace into the oven for the remaining 15 minutes, to brown the surface. The bake is complete when a knife will insert easily into the vegetables.
Serve.
Printable version
30 September 2013
Introducing : The Beastie! My new combi oven.
![]() |
| Yes, this is my kitchen. |
No, I wasn't planning on buying one of these. Not at all. However, I got chatting to two Facebook friends (hiya Marj, hiya Charliebigcat Milkbowl!) about how using the big oven on our cooker was becoming increasingly difficult because of the pain involved with getting down to it. They both commented that they couldn't cook without their Combi ovens - and it went on from there.
Of course, I didn't think it would be remotely possible to buy one of these in the short term as we aren't all that flush with the cash. To have a couple of hundred pounds sitting around just waiting to be used on an oven just isn't where we're at. However, I went along to the Argos website to have a look at just how much we'd need for one.
Lo and behold, there was the DeLonghi, reduced from £199 to £99 - and I suddenly remembered that I had £50 of birthday money sitting in a side account. We went out the following day and bought it.
My word what a Beastie it is. It has so many different functions! Grill and microwave. Convection oven and microwave. Grill and convection oven. Microwave on its own. The only thing it doesn't do, is the washing up, regrettably. Of course, we needed to have a complete re-arrangement of one side of the kitchen to get it in, but eventually we settled on a position for it - and it sits there, all shiny and new.
The funny thing is, you think you're quite a good cook right up until you have to use a new oven. Suddenly, all the rules you've been used to go right out of the window and it's a whole new world. A whole new, exciting, bright and shiny world.
So, I think I've got my head around microwaving. Perhaps even cooking bacon by using the microwave and grill function. The convection oven has taken a bit of getting used to - example a) being the batch of Bacon & Cheese Muffins that just didn't bake right because the silicone muffin "tin" is a tad too wide for the oven and I had to remove the rotating plate to stop the "tin" bumping into the walls. Wrong! Twirling around is apparently essential to achieving an even bake. Well, it would have been good if the manual had have told me so, but never mind, I know now. We ate the muffins, even so. Well - waste not want not.
I'm a lot more comfortable with it now - here's this evening's dinner of BBQ Sausages with Baked Sweet Potatoes and corn on the cob. The Baked Sweet Potatoes took 1 hour using just the combi oven on 200degC. I gave them 25 minutes on their own, then put the shelf in and the sausages in over the sweet potatoes for another 35 minutes. The corn on the cob was from the Vegibox and was just gorgeous. I cooked that on the cooker hob in a saucepan. No bending, no pain (other than from getting to the freezer) and happiness all round. That's got to be worth the £45 it cost.
14 September 2013
Pumpkin Pie!
![]() |
| Yup, I think I've cracked it this time! |
Now you know what I'm like when I'm making something for the first or even second, time. I don't stick to just one recipe, I read a dozen or so and decide to make something that uses bits from each. It doesn't always work, but looking at today's attempt (above), yup, I think I've got this recipe sussed.
![]() |
| Just look at the glorious colour - it's like the sun came out! |
The bake was easy peasy - it made the flat smell utterly gorgeous - and the filling set up beautifully into a mousse-like texture that was light and fluffy. One thing I will say, is that your pumpkin will vary as to how moist it is. As such, I recommend that you keep the milk back until you've added the pumpkin to the filling mixture and use the milk to let it down to a suitable consistency. This might take more, or very often considerably less, than the milk you've set aside for it. Far better to do it that way than land up with a filling that's just pumpkiny milky water!
Oh my goodness though - the flavour. Oh wow! Now I know why the Americans go so potty over pumpkin pie. It's only a shame that it has taken so long to find out. The nutmeg, the cinnamon, the soft, yielding unctuousness that just coats your tongue and says "everything is okay now" in motherly tones. I know it is a Greg Wallace-ism, but it really does give you a great big, warm, fluffy, cinnamon scented hug. Which is odd, considering I served it cold.
For today's pumpkin pie, I made the shortcrust pastry base - I'd cut a finger last time, so employed a shop bought pastry case which really wasn't deep enough. So today I was able to choose a pie dish that enabled a much better depth of filling. To a man - and one woman - we all took our first bite and chewed for approximately three seconds before rolling our eyes heavenwards and saying "mmmnnnhhhh" in that "oh, this is gooooood!" kind of way. In fact, it isn't good - it transcends good. It is amazing.
Go get yourself a pumpkin and make yourself a pie. You have to. You just simply have to.
PUMPKIN PIE (serves 6)
Ingredients :
750g pumpkin, peeled and cut into chunks
140g granulated sugar
half a tsp salt
half a tsp freshly grated nutmeg
1 tsp ground cinnamon
2 large eggs, beaten well
25g salted butter, melted
40ml semi-skimmed milk
225g equivalent of shortcrust pastry
Icing sugar to decorate.
Method :
Place the pumpkin chunks into a saucepan and cover them with boiling water. Place onto a moderate heat and simmer until tender. Drain and leave the chunks to cool.
Roll out your pastry and line a pie dish with it, cover with baking parchment and fill with baking beans. Bake at 180degC/350degF/Gas 4 until part baked, for around 20 minutes. Once baked, simply set aside and increase the oven temperature to 200degC/400degF/Gas 6.
When the pumpkin chunks have cooled, place into a food processor (or use a blender) and render them down to a smooth puree.
In a separate large bowl, combine the sugar, salt, nutmeg and cinnamon, then whisk in the eggs and melted butter.
Add the pumpkin puree to the bowl and gently stir it through until combined. Add a little milk (or rather more, if your mix appears to be quite dry) until you have a pourable consistency.
Pour the filling into the part baked pastry shell and bake for 10 minutes, then turn the oven down to 180degC/350degF/Gas 4 and bake for another 35-40 minutes, or until the filling is set. You may have to rotate the pie half way through, to get an even bake.
Allow to cool, dust with icing sugar and serve chilled, with cream or ice cream.
Printable version
![]() |
| My second and rather more successful attempt |
![]() |
| Today's pie - a better depth of filling |
Go get yourself a pumpkin and make yourself a pie. You have to. You just simply have to.
PUMPKIN PIE (serves 6)
Ingredients :
750g pumpkin, peeled and cut into chunks
140g granulated sugar
half a tsp salt
half a tsp freshly grated nutmeg
1 tsp ground cinnamon
2 large eggs, beaten well
25g salted butter, melted
40ml semi-skimmed milk
225g equivalent of shortcrust pastry
Icing sugar to decorate.
Method :
Place the pumpkin chunks into a saucepan and cover them with boiling water. Place onto a moderate heat and simmer until tender. Drain and leave the chunks to cool.
Roll out your pastry and line a pie dish with it, cover with baking parchment and fill with baking beans. Bake at 180degC/350degF/Gas 4 until part baked, for around 20 minutes. Once baked, simply set aside and increase the oven temperature to 200degC/400degF/Gas 6.
When the pumpkin chunks have cooled, place into a food processor (or use a blender) and render them down to a smooth puree.
In a separate large bowl, combine the sugar, salt, nutmeg and cinnamon, then whisk in the eggs and melted butter.
Add the pumpkin puree to the bowl and gently stir it through until combined. Add a little milk (or rather more, if your mix appears to be quite dry) until you have a pourable consistency.
Pour the filling into the part baked pastry shell and bake for 10 minutes, then turn the oven down to 180degC/350degF/Gas 4 and bake for another 35-40 minutes, or until the filling is set. You may have to rotate the pie half way through, to get an even bake.
Allow to cool, dust with icing sugar and serve chilled, with cream or ice cream.
Printable version
12 September 2013
Tonight's dinner : I cut my finger - does that make me a cook, now?
There is a train of thought in amongst the Shamanic fraternity that it takes a near death experience (preferably with lightning) in order to make a Shaman. So, I was wondering whether nearly taking the top of your finger off on a mandolin, qualifies you as a Cook with a capital "c"?
I'll go with a "yes", I think.
I was slicing parsnips and squash (beautiful parsnips and squash from thevegibox.com), to make this creamy parsnip & squash bake. Poor hubby and son & heir came back from walking the dogs, to find me hyperventilating whilst holding my right hand in the air with my little finger swathed in kitchen paper. Yes, it did leak - copiously. However, with the addition of a dressing, a plaster and a latex glove, I soldiered on like the brave likkle Cook that I now am.
Now, this 'ere bake very definitely deserves its own recipe post - so watch this space and it shall appear. It was utterly delicious, incredibly moreish and comfort food to the Nth degree. Like so many of my favourite recipes, it was so easy to make too! (Well, not counting the first aid requirement).
I partnered the bake up with some honey & mustard chicken (gorgeous) together with some steamed young carrots and rainbow chard from thevegibox.com. This was our first go with chard as a side veggie and combined with the cooking juices from the chicken, it was really good. It didn't taste how I was expecting it to - it has a definite spinach quality, whereas I was expecting more of a cabbage quality. Very nice!
The chicken was rolled around in some runny honey that I'd combined with Dijon mustard, a little dried thyme and a pinch of salt and pepper. It baked up well and provided some lovely juices that stood in well instead of having to make a gravy or jus.
The whole family enjoyed the meal and there were clear plates all round. Can't ask for more than that!
I'll go with a "yes", I think.
I was slicing parsnips and squash (beautiful parsnips and squash from thevegibox.com), to make this creamy parsnip & squash bake. Poor hubby and son & heir came back from walking the dogs, to find me hyperventilating whilst holding my right hand in the air with my little finger swathed in kitchen paper. Yes, it did leak - copiously. However, with the addition of a dressing, a plaster and a latex glove, I soldiered on like the brave likkle Cook that I now am.
Now, this 'ere bake very definitely deserves its own recipe post - so watch this space and it shall appear. It was utterly delicious, incredibly moreish and comfort food to the Nth degree. Like so many of my favourite recipes, it was so easy to make too! (Well, not counting the first aid requirement).
I partnered the bake up with some honey & mustard chicken (gorgeous) together with some steamed young carrots and rainbow chard from thevegibox.com. This was our first go with chard as a side veggie and combined with the cooking juices from the chicken, it was really good. It didn't taste how I was expecting it to - it has a definite spinach quality, whereas I was expecting more of a cabbage quality. Very nice!
The chicken was rolled around in some runny honey that I'd combined with Dijon mustard, a little dried thyme and a pinch of salt and pepper. It baked up well and provided some lovely juices that stood in well instead of having to make a gravy or jus.
The whole family enjoyed the meal and there were clear plates all round. Can't ask for more than that!
11 September 2013
Today's dessert : Strawberry & Rhubarb Pie
I first made a Strawberry and Rhubarb Pie around 3 or so years ago. I hadn't heard of the combination prior to this and it was due to the glowing recommendations of my friends from across the pond (USA & Canada, that is) that I tried it out.
Well, since then it has become a yearly favourite. When Ruby is at her peak (and you never know, we may even get two of them this year as RubyTwo is almost as big as her Mum now) we find a punnet of the last few English strawberries and get to it.
Hubby found one such punnet in the supermarket the other day (on special offer, so even better!) and I set to with pastry and egg wash, this morning.
The flavour from Ruby's rhubarb and gorgeous English strawberries is quite sublime, however there has been a leetle problem in the past, in that the fruit generated far too much juice. This time, I combined a couple of spoonfuls of cornflour with the fruit and hey presto - problem solved.
I am pretty confident that this year's pie is by far the best I've ever made. The recipe is available from http://jennyeatwellsrhubarbginger.blogspot.co.uk/2011/06/strawberry-rhubarb-pie-why-havent-i.html and I have updated it to include a couple of new processes that ensure a crisp bottom layer of pastry.
![]() |
| Ruby in her second year - she's 6ft tall now! |
If you have rhubarb growing - or know someone who does, do make this pie. It really is something very special.
10 September 2013
Tonight's Dinner : An oldie - Slow Cooker Split Pea & Ham Soup
Well. I don't think that was half bad. We bought the gammon join for Sunday's dinner (remember? Gammon with Piedmontese Peppers?) then we had Ham Egg & Chips last night and this evening, we finished off the £7.50 piece of gammon with a home made Split Pea and Ham Soup. Roughly £2.50 per meal over the three days for the meat content. Very nice too.
The soup was an absolute dream to make, it was so easy. I didn't follow anyone's recipe in particular, but read several different recipes (not all of which were for Pea and Ham soup!) for inspiration and just winged it after that. What made it so easy was the use of my slow cooker (or crockpot) - although if you don't have one of these paragons, you can easily make the same soup on the cooker top in less time with a little more stirring and watching of liquid levels.
I used my favourite Essential Cuisine stock - 1 tsp vegetable stock powder and 1.5 tsp veal stock powder in 1 litre of water. Now Essential Cuisine stock is naturally low in salt, but if you decide to use stock cubes - do beware of the salt content and definitely use a low salt version.
Hubby declared it to be "proper gorgeous, proper delicious", which I take to be high praise. Son and heir decided it was a little too salty for his taste (which was odd, as I hadn't used any salt at all!). I thought it was quite the nicest pea and ham soup I'd had in a very long while. We ate it with some nice Cheese & Pickle crusty bread from Asda.
SLOW COOKER SPLIT PEA & HAM SOUP (serves 3)
Ingredients :
1 onion, chopped finely
2 sticks of celery and a few celery leaves, chopped finely
2 medium carrots, peeled, halved lengthways and sliced thinly
1 medium potato, diced finely
2 rashers of back bacon, diced finely
1 tbsp of finely chopped fresh parsley
2-3 bay leaves
1 litre very hot stock of your choice (see note above)
250g dried, unsoaked, yellow split peas
freshly ground black pepper
a large knob of butter
6 slices of ham leftover from a gammon joint, cut into fine shreds.
Method :
1. Place all the ingredients except the pepper and the butter into the slow cooker and stir to combine.
2. Turn the slow cooker to High and cook for 5 hours, or Medium and cook for 6-7 hours.
3. Half way through the cooking time, remove the lid and give the contents a stir.
4. Add a good pinch of black pepper and stir through, then replace the lid.
5. At the end of the cooking time, mash the contents roughly with a potato masher. Do not use a blender, as it will turn your soup into a puree.
6. Add the shredded ham and stir through.
7. Remove any bay leaves you can find and add the butter. Allow it to melt and stir it through, then taste for seasoning and add more freshly ground black pepper if necessary.
Serve, with a little of the shredded ham and some freshly ground black pepper on top for garnish and crusty bread for dipping.
Printable version
The soup was an absolute dream to make, it was so easy. I didn't follow anyone's recipe in particular, but read several different recipes (not all of which were for Pea and Ham soup!) for inspiration and just winged it after that. What made it so easy was the use of my slow cooker (or crockpot) - although if you don't have one of these paragons, you can easily make the same soup on the cooker top in less time with a little more stirring and watching of liquid levels.
I used my favourite Essential Cuisine stock - 1 tsp vegetable stock powder and 1.5 tsp veal stock powder in 1 litre of water. Now Essential Cuisine stock is naturally low in salt, but if you decide to use stock cubes - do beware of the salt content and definitely use a low salt version.
Hubby declared it to be "proper gorgeous, proper delicious", which I take to be high praise. Son and heir decided it was a little too salty for his taste (which was odd, as I hadn't used any salt at all!). I thought it was quite the nicest pea and ham soup I'd had in a very long while. We ate it with some nice Cheese & Pickle crusty bread from Asda.
SLOW COOKER SPLIT PEA & HAM SOUP (serves 3)
Ingredients :
1 onion, chopped finely
2 sticks of celery and a few celery leaves, chopped finely
2 medium carrots, peeled, halved lengthways and sliced thinly
1 medium potato, diced finely
2 rashers of back bacon, diced finely
1 tbsp of finely chopped fresh parsley
2-3 bay leaves
1 litre very hot stock of your choice (see note above)
250g dried, unsoaked, yellow split peas
freshly ground black pepper
a large knob of butter
6 slices of ham leftover from a gammon joint, cut into fine shreds.
Method :
1. Place all the ingredients except the pepper and the butter into the slow cooker and stir to combine.
2. Turn the slow cooker to High and cook for 5 hours, or Medium and cook for 6-7 hours.
3. Half way through the cooking time, remove the lid and give the contents a stir.
4. Add a good pinch of black pepper and stir through, then replace the lid.
5. At the end of the cooking time, mash the contents roughly with a potato masher. Do not use a blender, as it will turn your soup into a puree.
6. Add the shredded ham and stir through.
7. Remove any bay leaves you can find and add the butter. Allow it to melt and stir it through, then taste for seasoning and add more freshly ground black pepper if necessary.
Serve, with a little of the shredded ham and some freshly ground black pepper on top for garnish and crusty bread for dipping.
Printable version
8 September 2013
Tonight's dinner : Simon Hopkinson I might love you ...
Why this sudden devotion to Simon Hopkinson (he of "Simon Hopkinson Cooks" on the t.v.)? Two words : Piedmontese Peppers. I'd seen him make them on his t.v. programme and saw how much he enjoyed them and was attracted to the idea from way back then. So when I had tomatoes and peppers in the same space, both looking for a job to do, I remembered the recipe.
This evening's dinner consisted of a gammon joint, pot roasted slowly in apple juice with a bouquet garni and black pepper, along with Piedmontese Peppers (half a capsicum pepper, with slices of garlic, half a tomato, salt & pepper and rapeseed - or olive - oil), almondy green beans, steamed carrots and potatoes, with gravy.
Those Piedmontese Peppers. Well, I can't remember the last time I ate something that so rattled my cage with delight in the way these did. The only trouble was - I was the only one! Hubby wasn't keen on the skins of either the peppers or the tomatoes, although he liked the flavours apart from too much garlic. He felt the garlic clashed terribly with the gammon. Son & heir didn't even try his pepper, having had a little taste of the anchovy on top. I was SO disappointed about that.
So. The next capsicum pepper I get, is going to be made into Piedmontese Peppers and I'm going to eat them on a socking great chunk of toasted ciabatta for a totally awesome and amazing lunch. Then I'll blog them - and try not to go on .. and on .. and on .. about how gorgeous they are.
Aside from that, the meat was tender and luscious - just so juicy, from being slow cooked in the apple juice.
It was the first time I'd made the almondy green beans, too. It's a bit of a shame that I chose the same day to make the peppers, as without them overshadowing the beans, I'd have been waxing lyrical about how gorgeous the beans were! Cooked normally (in boiling salted water), when you drain them, you melt a big old knob of butter in the hot pan then add the toasted almonds (I toasted them first in the same pan), put the beans back and warm them through over a low heat. Gosh but they were good!
With the Vegibox's fabulous carrots which are so mild and sweet and their lovely robust potatoes, everything about this evening's meal just hit the spot with me. It's just as well somebody liked it all!
This evening's dinner consisted of a gammon joint, pot roasted slowly in apple juice with a bouquet garni and black pepper, along with Piedmontese Peppers (half a capsicum pepper, with slices of garlic, half a tomato, salt & pepper and rapeseed - or olive - oil), almondy green beans, steamed carrots and potatoes, with gravy.
Those Piedmontese Peppers. Well, I can't remember the last time I ate something that so rattled my cage with delight in the way these did. The only trouble was - I was the only one! Hubby wasn't keen on the skins of either the peppers or the tomatoes, although he liked the flavours apart from too much garlic. He felt the garlic clashed terribly with the gammon. Son & heir didn't even try his pepper, having had a little taste of the anchovy on top. I was SO disappointed about that.
So. The next capsicum pepper I get, is going to be made into Piedmontese Peppers and I'm going to eat them on a socking great chunk of toasted ciabatta for a totally awesome and amazing lunch. Then I'll blog them - and try not to go on .. and on .. and on .. about how gorgeous they are.
Aside from that, the meat was tender and luscious - just so juicy, from being slow cooked in the apple juice.
It was the first time I'd made the almondy green beans, too. It's a bit of a shame that I chose the same day to make the peppers, as without them overshadowing the beans, I'd have been waxing lyrical about how gorgeous the beans were! Cooked normally (in boiling salted water), when you drain them, you melt a big old knob of butter in the hot pan then add the toasted almonds (I toasted them first in the same pan), put the beans back and warm them through over a low heat. Gosh but they were good!
With the Vegibox's fabulous carrots which are so mild and sweet and their lovely robust potatoes, everything about this evening's meal just hit the spot with me. It's just as well somebody liked it all!
7 September 2013
Tonight's dinner : BBQ Sausages, cornbread and salad
I haven't made cornbread for ages - but suddenly had a mad fancy for it. Hence when The Vegibox delivered a couple of lovely chunky cobs of corn, it seemed like the perfect time.
Along with the corn, this week, they also delivered a bag of delicious salad leaves and some deep scarlet salad tomatoes.
Well, the menu just wrote itself after that. Lovely chunky pork sausages coated in our favourite Mic's Chilli El Loco BBQ sauce. Happy days!
So, the corn went into the cornbread which son & heir loved. The salad leaves and tomato went into a little side salad (and really were a cut above anything you'll ever get from a supermarket) - and the gorgeous sausages were basted regularly with the BBQ sauce .. a match made in heaven.
3 September 2013
Today's dinner : Medicinal Shepherd's Pie
I've said before - many times, I suspect - that Shepherd's Pie is, to me, more of a medicinal thing than simply a comfort food thing.
I've been hankering after a Shepherd's Pie for a little while but the weather has just been wrong for the making, not to mention the eating, of one. So when things cooled down a few degrees and I found myself with a pack of lamb mince (because the Pilaff should have been lamb instead of chicken - I took the wrong thing out of the freezer!) and both hubby and I had tender tummies, it was an easy choice.
Not just any old Shepherd's Pie, though. If I was going to go to all the time and effort of making one, I was going to make my Really Lamby Shepherd's Pie. Click on the name there and it'll take you to the recipe - for me, it's the ultimate in Shepherd's Pie recipes.
Now I will admit that the whole recipe lives or dies on what stock you use. Because the big gravy granule producers (Knorr, Bisto etc.) haven't seen fit to produce a lamb version, (or if they have, I haven't found it) the gravy for this production has to be based on a lamb stock. Now Knorr do make a lamb stock cube, but it is frightfully salty. A far better idea is to use Essential Cuisine's utterly fabulous Lamb Stock powder. Nowhere near as salty as standard stock cubes, it has a rich deep lamb flavour and leaves you to add how much or how little salt you want/need.
I served mine with Vegibox's gorgeous carrots, along with some broccoli and peas. Don't forget to use the broccoli stem - it's just as nice as the fluffy bit!
You know, there's no hope for me. Because, as I have been tidying up the photographs for this blog post, my mouth has been watering. I only stopped eating dinner about an hour ago! I'm not hungry (not at all), it's just that it looks so good! Mind you, I wasn't feeling so chipper by the time the veggies were in the steamer and I'd spent the previous two hours cooking the Shepherd's Pie. I looked rather like this .... worn out and ready for a nap!
I've been hankering after a Shepherd's Pie for a little while but the weather has just been wrong for the making, not to mention the eating, of one. So when things cooled down a few degrees and I found myself with a pack of lamb mince (because the Pilaff should have been lamb instead of chicken - I took the wrong thing out of the freezer!) and both hubby and I had tender tummies, it was an easy choice.
Not just any old Shepherd's Pie, though. If I was going to go to all the time and effort of making one, I was going to make my Really Lamby Shepherd's Pie. Click on the name there and it'll take you to the recipe - for me, it's the ultimate in Shepherd's Pie recipes.
![]() |
| Just look at that beautifully baked top. Mmmmn. |
Now I will admit that the whole recipe lives or dies on what stock you use. Because the big gravy granule producers (Knorr, Bisto etc.) haven't seen fit to produce a lamb version, (or if they have, I haven't found it) the gravy for this production has to be based on a lamb stock. Now Knorr do make a lamb stock cube, but it is frightfully salty. A far better idea is to use Essential Cuisine's utterly fabulous Lamb Stock powder. Nowhere near as salty as standard stock cubes, it has a rich deep lamb flavour and leaves you to add how much or how little salt you want/need.
I served mine with Vegibox's gorgeous carrots, along with some broccoli and peas. Don't forget to use the broccoli stem - it's just as nice as the fluffy bit!
You know, there's no hope for me. Because, as I have been tidying up the photographs for this blog post, my mouth has been watering. I only stopped eating dinner about an hour ago! I'm not hungry (not at all), it's just that it looks so good! Mind you, I wasn't feeling so chipper by the time the veggies were in the steamer and I'd spent the previous two hours cooking the Shepherd's Pie. I looked rather like this .... worn out and ready for a nap!
1 September 2013
Today's dinner : a creation borne of a too-full vegetable drawer!
I decided to call this evening's dinner Chicken & Vegetable Pilaff, but it really - strictly speaking - is more of a "rice'n'stuff" than ever it is a pilaff.
It was all because our vegetable drawer in the fridge was beginning to groan under the weight of so many veggies. This weekly veggie box delivery malarky is forcing us to use many more veggies than we would normally. Now you might think that this is no bad thing, but I'm already getting grumbles about the personal veggie quota having been exceeded.
This dish involved a lot of cutting up of various veggies, but the cooking of it was fairly uncomplicated and went really rather well.
Start off by cutting up all your veggies into the correct size and shape, then put them on plates in order of appearance in the pan.
In a big old wok, heat some groundnut (or any oil really) oil to seriously hot, then slip in a couple of finely sliced skinless chicken breasts. Add a grind or two of black pepper and cook until golden and just cooked through. Remove to a good sized bowl. Immediately add diced courgette and aubergine to the pan and cook that also until it is golden on at least two sides and softened. Remove that to the bowl with the chicken. A slotted spoon is great for this, as it leaves the oil in the pan. Add a little more oil if you need to, then add chopped red onion and finely sliced chilli. Cook until softened, then add two sticks of celery and half a yellow pepper, also finely sliced. You don't want to be waiting hours for them to soften, you see, so the more finely you slice them, the better it is. Cook until softened. Then add 2 tsp of ground cumin, 1 tsp ground cinnamon, half a tsp ground allspice and 1 tsp of caraway seeds. Stir this lot in and cook for a minute or two, then add four chopped good sized tomatoes, three cloves of finely chopped garlic and a whole heap of button mushrooms. Add a good half teaspoonful of sea salt. The tomatoes will cook down into a sauce-like consistency, whereupon you can add the contents of your bowl back into the mix. Add a small handful of flaked almonds and allow the mix to simmer while the flavours combine and the tomatoes cook down. After around 10 minutes, test for seasoning and add a little more salt if necessary. Add a handful of thawed garden peas and some cooked rice. Stir through and allow to heat up, then serve.
Well, the veggie drawer is a lot lighter now!
It was all because our vegetable drawer in the fridge was beginning to groan under the weight of so many veggies. This weekly veggie box delivery malarky is forcing us to use many more veggies than we would normally. Now you might think that this is no bad thing, but I'm already getting grumbles about the personal veggie quota having been exceeded.
This dish involved a lot of cutting up of various veggies, but the cooking of it was fairly uncomplicated and went really rather well.
Start off by cutting up all your veggies into the correct size and shape, then put them on plates in order of appearance in the pan.
In a big old wok, heat some groundnut (or any oil really) oil to seriously hot, then slip in a couple of finely sliced skinless chicken breasts. Add a grind or two of black pepper and cook until golden and just cooked through. Remove to a good sized bowl. Immediately add diced courgette and aubergine to the pan and cook that also until it is golden on at least two sides and softened. Remove that to the bowl with the chicken. A slotted spoon is great for this, as it leaves the oil in the pan. Add a little more oil if you need to, then add chopped red onion and finely sliced chilli. Cook until softened, then add two sticks of celery and half a yellow pepper, also finely sliced. You don't want to be waiting hours for them to soften, you see, so the more finely you slice them, the better it is. Cook until softened. Then add 2 tsp of ground cumin, 1 tsp ground cinnamon, half a tsp ground allspice and 1 tsp of caraway seeds. Stir this lot in and cook for a minute or two, then add four chopped good sized tomatoes, three cloves of finely chopped garlic and a whole heap of button mushrooms. Add a good half teaspoonful of sea salt. The tomatoes will cook down into a sauce-like consistency, whereupon you can add the contents of your bowl back into the mix. Add a small handful of flaked almonds and allow the mix to simmer while the flavours combine and the tomatoes cook down. After around 10 minutes, test for seasoning and add a little more salt if necessary. Add a handful of thawed garden peas and some cooked rice. Stir through and allow to heat up, then serve.
Well, the veggie drawer is a lot lighter now!
Subscribe to:
Posts (Atom)