Showing posts with label simple recipe. Show all posts

24 March 2020

Pan Muffins - a super-simple bread alternative!

We're currently experiencing the lack of certain products in the stores, thanks to selfish people panic buying.  My hubby saw this recipe today and thought it sounded such a good idea as a bread alternative, that he immediately sallied forth into the kitchen to give it a go - and do you know, it only worked!

Now I know that there are some people who have never bought flour (and some who are unlikely to ever be able to buy flour, if the panic buying continues), but most people I know will have a fairly decent stock of both plain (all-purpose) and self-raising (self-rising) flour, not to mention a pot of either Greek or natural yoghurt in the fridge.  If you're new to flour and are able to get some, then these little muffins are super-easy for everyone to have a go at.  They don't even need an oven!


They make up into a muffin that you can cut in half, butter and enjoy with cheese or jam, dip into soup or just plain old eat as they are.  The outside is a little bit hard, but no worse than a crusty loaf and the inside is surprisingly fluffy.  The acidity in the yoghurt reacts with the bicarbonate of soda in the self raising flour, which causes the muffins to rise and gives them the fluffy consistency.  Hence, plain flour most definitely wouldn't work, not unless you add a little bicarb!

We had them for lunch today and I can confirm they're extremely yummy with some cheddar and chutney.

PAN MUFFINS (makes 6)

Ingredients :

1 cup plain Greek yoghurt
2 cups self raising flour
a pinch of salt
1 tbsp olive or rapeseed oil.

Method :

Add the yoghurt to a large bowl and sift in the self raising flour.

Add a pinch of salt and mix until a shaggy dough forms.

Shape into a sausage and divide into 6 equal portions.

Form each portion into a ball and then flatten into a disk roughly the size of a muffin (an English muffin, if you're from America or Canada!).

Leave to rest in a warm place for 15 mins.

Using a large frying pan with a lid, add the oil to coat the bottom of the pan and place over a low heat.

Once the oil is heated (hot, but not smoking) add the muffins (as many as will fit without overcrowding).

Cover the pans and cook the muffins for around ten minutes on each side.

At the end of cooking remove the lids and cook for 1 minute extra on each side, then remove onto a wire rack to cool.

Super tasty served warm with butter.

Printable version

21 July 2017

Fish Willies - yes, you read that right

Yes, you read correctly - Fish Willies. *chuckle*  Now I haven't a clue what this used to be called by Antony Worral-Thompson when he first conceived the idea, but in the intervening years and within our family, it has come to be known as "Fish Willies" and so it shall stay.

A very simple confection of citrus, bacon and fish, it's as easy to assemble as it is to cook and will go with any number of different accompaniments.  I've served them with steamed vegetables, new potatoes and a parsley sauce through salad to couscous and they were as good with them all.

Fish Willies, but this time with Prosciutto instead of bacon
When I came to make the Fish Willies this time, I couldn't believe my eyes that the recipe wasn't up on Rhubarb & Ginger yet.  This dish has been part of the family's favourites for quite literally years, so why I haven't blogged it before now is anyone's guess!  As a tried and tested favourite, this definitely makes the grade.

Quickly into the COOK'S TIPS, it is much better to buy a big chunky piece of cod loin that you can cut into fingers, than try and cobble together two thinner pieces. Trying to keep two slippery pieces of fish together while you wrap them in bacon, well, there are easier ways to waste your time.   Anyway, make sure not to wrap any more than one layer of bacon around the fish or you will find the bacon doesn't get time to cook as the fish cooks so quickly.

The original recipe used lemon in the marinade, but I prefer lime.  However, if you have lemon and don't have lime, then fear ye not - either will work!


As something a bit different to do with some cod, this really hits the spot.  So, without any further ado, onwards!

FISH WILLIES   (serves 3)

Ingredients :

500g skinned cod loin or haddock fillet, cut into 12 fingers
6 rashers of smoked streaky bacon, cut in half to make shorter pieces
zest of half a lime
juice of 1 lime
1 tbsp extra virgin olive oil
a pinch of ground black pepper
1 tbsp fresh dill, chopped finely.

Directions :

Pre-heat the oven to 180degC/350degF/Gas 4.

Mix the lime zest and juice, olive oil, black pepper and fresh dill together in a large bowl.

Add the fingers of fish and turn them until they are liberally covered in the marinade. Set aside for 10-15 minutes to allow the flavours to penetrate the fish.  Don't leave it too long to marinade, as the citrus will start the fish cooking.

Wrap each fish piece in one of the halved slices of streaky bacon. Place on a wire rack, leaving a little space between each, over an oven tray.

Once all the fish is wrapped, spoon the remaining marinade over each Willy and place into the oven for a minimum of 15 minutes.  Check them after this to make sure the bacon is cooked.  You'll have to gauge this for yourself, but make sure not to over cook the fish!

Serve with your choice of accompaniment.

Printable version

10 May 2017

Prawn Pad Thai - my new favourite thing!

And when I say "my new favourite thing", I'm talking about it being right up there alongside Nasi Goreng and Shepherd's Pie. Now THAT is high praise indeed.

I don't mind admitting that I was a wee bit intimidated by this recipe.  You see, I had attempted a Pad Thai a very long time ago - before I started blogging, so around seven or eight years ago - and it was a singular failure. Having just cooked the dish again, I can see that first go didn't work because I didn't understand the first thing about any of the ingredients. However, without the benefit of getting a good one under my belt, I was a bit worried that it would fail again.

Coming out the other side of having completed an outstandingly successful rendition of Pad Thai, I now haven't a clue what I was worried about as it was incredibly simple to make.  However, you do need to have your mise en place done before you begin to cook, as you cook at such a pace that you really have no time in which to turn around and chop a spring onion, for instance.  That, and overcooking the noodles in a big way, are much of the reason why the first one didn't work.


Having everything chopped, squeezed, measured out and ready to go is essential.  You almost need to put everything in order, the cooking goes that quickly.  However, once you've got everything ready, the cooking is fabulously simple and the results spectacular.

I've seen lots of different Pad Thai recipes, some ask for tamarind, some for coconut milk.  This one doesn't ask for any of those things, it keeps things clean and simple with just fish sauce, oyster sauce and gorgeous lime juice to stitch all the other flavours together.


I used John Torode's recipe from BBC Good Food as the guide for this recipe but several things are different and because of that things happen in a slightly different order, so I decided to blog the recipe so as not to lose it. The original recipe is here if you are curious.  I think my version just simplifies things a little bit further.

The only Cook's Tip I have for you is what I have already stated - get your chopping, peeling and squeezing done before you start cooking!

So, onwards to major, serious, deliciousness and clean, wholesome eating.

PRAWN PAD THAI   (serves 2-3)

Ingredients :

200g rice noodles, the white, vermicelli style
2 tbsp olive or coconut oil
2 eggs, beaten
pinch of sea salt & black pepper
2 large garlic cloves, chopped
1 tsp granulated sugar
1 tbsp fish sauce
2 tbsp oyster sauce
1 large lime, juice only
6 spring onions, sliced diagonally
1 red chilli (leave the seeds in for additional heat)
200g beansprouts
15g coriander, chopped to include the stems
250g cooked coldwater prawns, drained
100g dry roasted peanuts, chopped slightly.

Method :

To begin, set a saucepan of water to boil.  Once boiling, add the rice noodles and remove from the heat.  As soon as the noodles have softened, but before being fully cooked - around a minute and a half - drain well and run under cold water to stop the cooking process.  Set aside to drain fully.

Add a pinch of sea salt & black pepper to the beaten egg and stir through. Heat the oil in a wok over a moderate heat and once the oil appears to shimmer slightly, add the beaten egg and stir gently to form an omelette. Reduce the heat to low, so as not to burn the underside of the omelette and once formed and set, remove from the pan with a slotted spoon so as to keep the majority of the oil in the pan, onto a plate to keep warm.

Still over a gentle heat, add the chopped garlic to the wok and stir fry it very gently until the pieces have turned a gentle golden colour.  Don't rush this process, or the garlic will burn and become bitter.  Slow and steady wins the day.

Next, add the sugar, fish sauce, oyster sauce and lime juice, along with the spring onions, chilli, beansprouts and three quarters of the coriander. Increase the heat to moderate and stir regularly as the onions soften and cook.  This should take no more than around 4-5 minutes.

Add the cooked prawns, the drained noodles and a third of the peanuts and stir and toss to combine and heat through.  Keep the contents of the pan moving, so that nothing catches on the underside and the noodles combine well with the other ingredients.

Once well mixed, serve into warmed bowls and garnish with the remaining peanuts and chopped coriander.

Tuck in and enjoy!

Printable version

18 March 2017

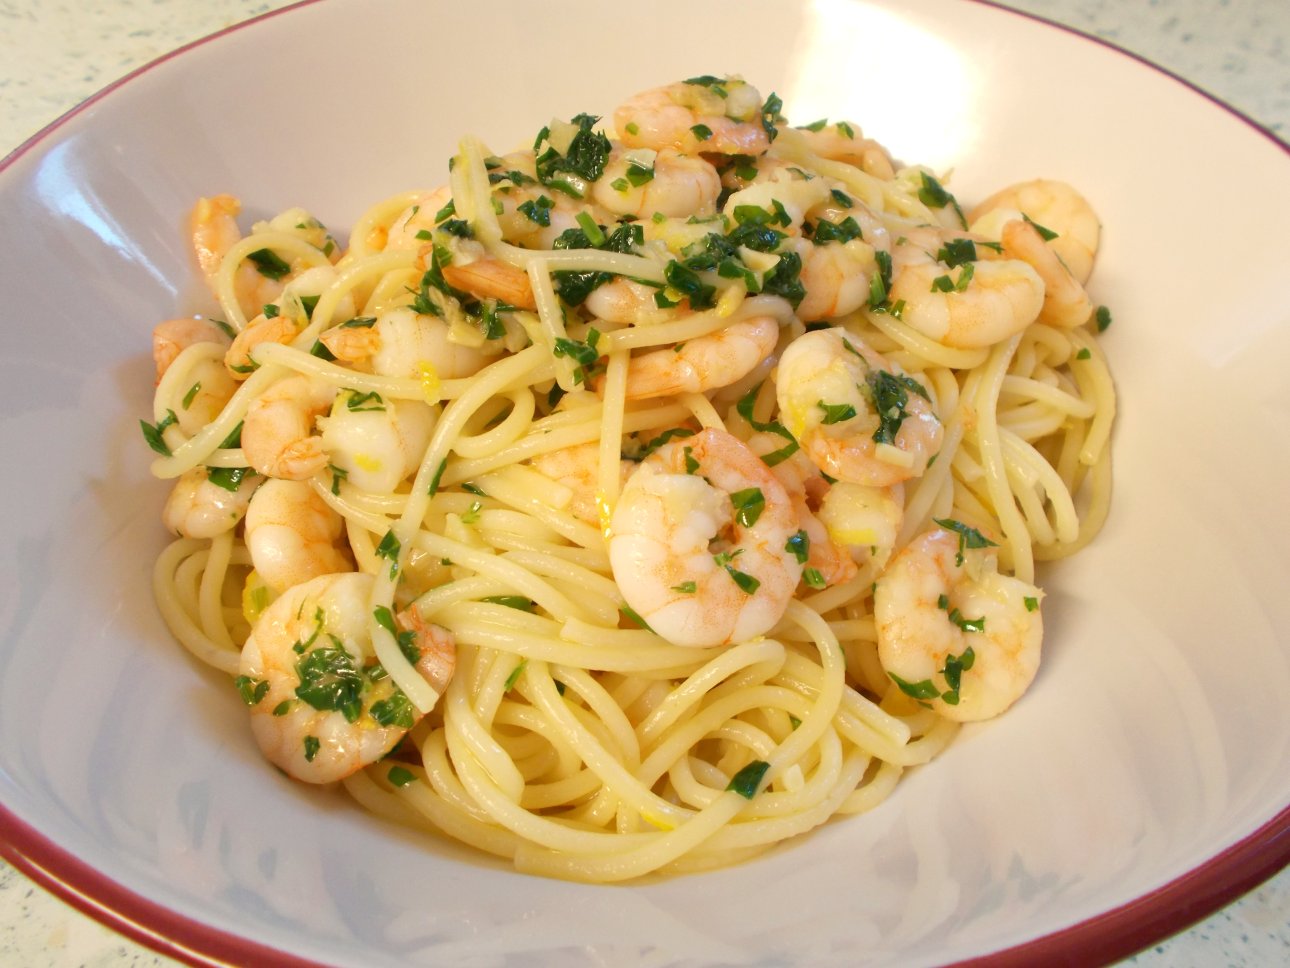
Simple garlic butter prawn spaghetti

Well, this one was a real unexpected surprise.  I wasn't supposed to be cooking this recipe at all and in fact, can't remember why I wasn't cooking the intended one.  Whatever the reasons were - and it could be any number of them! - I decided to go for this because it looked simple and sounded like it could be rather good.

Yes, it's certainly simple - both in number of ingredients, cooking process and method - and as for "rather good", well that's a bit of an understatement.  It turned out to be very good indeed.

The recipe originates with the BBC Good Food website and I could just direct you straight there, however, it occurred to me that if we ever lost that site, I'd lose a very useful and tasty recipe.  So here it is, with thanks to BBC Good Food for the original.

There is only one Cook's Tip for this recipe - and that is, if you are using cooked King prawns (or Tiger prawns), then literally just heat them up in the pan.  Don't cook them, as they are already cooked and will become tough and hard if heated for too long.  They just need to be brought up to a good temperature so as to avoid any risk of encouraging bacteria by half-hearted warming and that's all.


This dish certainly doesn't have big, bold flavours.  However, if you're into garlic butter, lemon and prawns, then you will love it.  The spaghetti gives it that comfort food thing and the lemon prevents the butter from becoming too rich.  I'd have it again tomorrow, I liked it that much!

SIMPLE GARLIC BUTTER PRAWN SPAGHETTI    (serves 2)

Ingredients :

250g dried spaghetti
sea salt
20g salted butter
2 cloves of garlic, chopped finely
a pinch of ground black pepper
250g cooked King prawns
zest of 1 lemon
15g fresh parsley, chopped.

Method :

Firstly, bring a large pan of salted water to the boil.  Add the dried spaghetti and cook to manufacturer's recommendation.

In the meanwhile, melt the butter in a frying pan over a gentle heat and add the chopped garlic.  Sweat, as opposed to fry, the garlic ever so ever so gently until the pieces are softened, adding the black pepper along the way.  Then, add the prawns, the lemon zest and the parsley and increase the temperature just slightly, sufficient to heat the prawns through without cooking them and without frying the pan's contents.

Drain the pasta and add to the prawn & garlic pan.  Toss the pasta in the garlicky butter and serve into warmed bowls, sharing the prawns out evenly.

Printable version

13 October 2016

Quick Chicken Biryani - an "after the style of" recipe

No, this recipe is very definitely not culturally correct.  So before people go shooting me down in flames for it not being X, Y or Z, please note that I make no claim that it is correct for a Biryani.  In fact, I think it is probably closer to a Pilaff, but as "Biryani" is what we've been calling it for years, that's what it shall stay.

So, having said that, if you've ever made my Kedgeree you'll no doubt notice similarities in the way the making of this recipe is approached.  It's basically a chicken Kedgeree with just a few differences.

Incidentally, it's worth noting that if you've got the other half of a roasted chicken with no job to do - it works very well in this recipe.  Just add the chicken after the curry paste & spices and don't bash it about with a wooden spoon too much, to keep the pieces whole.

Oh, and prawns work well here too!  If they're defrosted ex-frozen prawns, make sure to squeeze them between two sheets of kitchen paper to remove any excess water, then add them just before the rice etc.  Just give them time enough to heat through but no longer and they won't turn all hard and rubbery.


As you can see, I served ours with a few Indian style snacks from the supermarket - samosas, pakoras and bhajis.  This recipe has always worked well for us as a midweek dinner, I hope it can do the same for you!

QUICK CHICKEN BIRYANI   (serves 4)

Ingredients :

4 eggs
1 tbsp coconut oil (groundnut oil works well here too)
1 large onion, chopped
2 cloves of garlic, chopped
1 red chilli, chopped (remove the seeds if you want)
pinch of sea salt
pinch of black pepper
half a tsp of ground cinnamon
25g salted butter
3-4 boneless, skinless chicken breasts, sliced small
2 tbsp Patak's korma curry paste
1 tsp ground coriander
1 tsp garam masala
200ml hot water
2 tbsp flaked almonds
1 tbsp sultanas
1 flat tsp turmeric
250g cooked white basmati rice, hot
1 large tbsp fresh coriander, chopped - saving some for garnish.

Method :

Place the eggs into a pan of boiling water and cook until hard boiled.  Set aside in cold water, to prevent the yolk turning grey around the outside.

Heat the coconut oil in a pan and add the onion, garlic and red chilli.  Cook on a moderate heat until the onion is softened, transparent and just beginning to caramelise.  Part way through the cooking, add the sea salt, black pepper and cinnamon.

Add the butter and allow it to melt, then turn up the heat to maximum and add the sliced raw chicken.  Cook, stirring to prevent the onions and garlic from burning, until the chicken is all opaque and no pink areas are left.

Add the curry paste, ground coriander and garam masala and stir through.  Cook on a moderate heat, again stirring to prevent it catching on the bottom of the pan, until the curry paste has released its oils.  This should take around 4-5 minutes.

Add the hot water and stir through, creating a thick curry sauce.  Now you will need to keep a close eye on the consistency until you combine it with the cooked rice and add a tiny amount of water each time it appears to be becoming too dry.

Add the flaked almonds and sultanas and cook on, gently simmering, for another 10-15 minutes, during which time you can peel the hard boiled eggs and quarter them.

Add the turmeric, cooked rice and three quarters of the chopped fresh coriander and stir through.

Serve onto warmed plates, with a quartered hard boiled egg on top and a sprinkle of fresh chopped coriander over everything.  If you like that kind of thing, Mango chutney goes well by the side.

Printable version

30 December 2015

Bacon with Red Pepper Pesto Pasta - done in a twinkling!

What a success this one proved to be!  Mind you, I don't know why I'm sounding surprised because it uses three of my favourite things - bacon, mushrooms and Asda's ricotta & red pepper pesto.  To my way of thinking, it was a winner before I even took my knife to the bacon.  However, sometimes what seems like the perfect combination of ingredients turns out to leave a little to be desired in one way or another - but happily, not so here.  Plus, of course, it has the added bonus of being simplicity itself to prepare.

Oh and as a little aside, have you noticed how often my food seems to turn out to be orange coloured? I don't try to make it that way, honest I don't, it seems as though my choice of ingredients has a marked lean towards the orange.  But then, the menfolk grumble if there's too much green on the plate, grumble again if I serve them "brown food" and would justifiably grumble at being served black food, so aside from white I guess that just leaves the red/yellow/orange palette as there's not too many blue foods out there!  So this one is following along in the tradition of being the seemingly man-friendly colour of orange. 

Now, let me recommend to you Asda's little pot of Ricotta & Red Pepper pesto.  This seemingly unassuming little jar contains one of the most delicious substances that I have used in everything from sandwiches to pasta.  Along with the rich ricotta and flavoursome red pepper, it also has a sneaky little bite from red chilli that just makes it glorious.  I would be very happy if you were all to rush out and buy some, love it and continue buying it, as that would mean it will stay around on the shelves for ever!

The pesto marries up with bacon perfectly, of course.  The celery adds a welcome freshness that prevents the dish from becoming too heavy on the palate and the addition of the small amount of sour cream helps to loosen the pesto into a sauce without impinging on the flavour at all.


I call this one a very definite win.  The empty bowls and enquiries as to whether there was any left, gave proof to that belief, too.  As a mid-week, easy, relatively cheap dinner, you can't go wrong.

BACON WITH RED PEPPER PESTO PASTA   (serves 3)

Ingredients :

1 tbsp olive oil
350g smoked back bacon, trimmed of fat and diced
1 large onion, diced finely
1 clove garlic, chopped finely
2 sticks of celery, diced finely
black pepper
half a tsp dried oregano
200g quartered mushrooms 
190g jar red pepper & ricotta pesto
1 tbsp sour cream
200ml water
250g dried pasta shapes - tubes are good.

Method :

Heat the olive oil in a large deep sided frying pan and add the bacon.  Fry over a high heat until all the moisture has evaporated and the bacon is cooked through.

Reduce the heat to moderate and add the onion, garlic and celery, along with a pinch of black pepper and the oregano.  Fry until the onion is transparent and the celery is beginning to soften.

Add the mushrooms and continue to fry until they are beginning to soften.

Three quarters fill a large saucepan with water and add a pinch of salt.  Bring to the boil and once boiling, add the dried pasta.  Remember to give the pasta a stir every so often to ensure it's not sticking to the bottom of the pan.  Cook for 10-12 minutes, or to manufacturer's instructions.

Add the contents of the pesto jar to the bacon mix, along with 100ml of water (you can use it to rinse out the pesto jar, so as to get every last little bit!) and stir to combine.

Once the ingredients are looking mixed, stir in the sour cream.  Simmer on a very low heat until the pasta is ready.  You may need to add a little more water from time to time to keep the mixture saucy.

Once the pasta is cooked, drain it well and return it to the hot saucepan.  Take the bacon mixture and decant it on top of the pasta and stir gently, but thoroughly, through.

Serve in warmed bowls with some garlic bread to accompany.

Printable version

Related Posts Plugin for WordPress, Blogger...