Showing posts with label garlic. Show all posts

8 June 2019

Lemon & Black Pepper Chicken - super tasty, with a definite zing!

What a very pleasant surprise this meal turned out to be.  I really wasn't expecting much from it and hence only took a couple of pictures.  You'd have thought I'd know better by now and would take more pictures just in case, but no.

The recipe is incredibly simple - just pan fried chicken breast in a sauce made with slices of lemon, crushed fresh garlic, some chicken stock, lemon juice, runny honey and a whole heap of black pepper. How often it is that the most simple recipes turn out to be the best!

I particularly enjoyed the lemony sauce with the Jersey Royals and the Sweetheart (or Hispi) cabbage. Mmmnnn, but that was sooo good. I'd been craving cabbage, so that might be why, but son & heir agreed the combination was very tasty and a second opinion is always helpful. Feel free to pair the recipe up with whatever accompaniments you fancy - after all, it's your dinner so why not please yourself.


Uncharacteristically, let's head on directly to the recipe and gird your loins for a zingy, fresh tasting chicken sensation.

LEMON & BLACK PEPPER CHICKEN (serves 2)

Ingredients :

1 tbsp olive oil
2 individual skinless, boneless chicken breasts
a pinch of sea salt
half a lemon, sliced thinly
half a lemon, juiced
one clove of garlic, crushed
as much fresh ground black pepper as you want - I used a teaspoonful
1 tbsp runny honey
200ml chicken stock - I used a combination of Knorr stock granules (half tsp) and chicken Bovril (half tsp)
2 tsp approx finely chopped fresh parsley
2 tsp Bisto best chicken gravy granules.

Method :

Heat the olive oil in a good sized frying pan until sizzling hot. Gently add the chicken breasts and sprinkle with a little sea salt. Leave the chicken to brown - you're aiming for it to have an all over golden tan, so don't keep fidgeting it about or it won't sear. Turn the chicken to sear the other side and add the lemon slices to the pan.

In a small bowl, combine the lemon juice, crushed garlic, black pepper, runny honey and chicken stock. When both sides of the chicken are golden, pour the mixture over the chicken into the pan. Allow the sauce to heat through and bubble, reduce slightly and thicken. Turn the chicken from time to time, to keep it basted in the sauce and ensure it is cooked through.

Reduce the heat to medium and include the parsley.  Allow a moment or two for the parsley to heat through and add the gravy granules if necessary, to thicken the sauce to your personal taste.

Serve with the lemon slices on top, with a little chopped parsley as garnish and vegetable accompaniments of your choice.

Printable version

21 March 2018

Quick barbecue orange chicken - super speedy!

I have been hearing a lot about "Orange Chicken" just recently and had been keeping my eye open for a recipe that would suit me.  Such a lot of recipes seem to involve coating the chicken pieces in batter and either deep frying them, or frying them in some way, shape or form, before adding the sauce - and I'm just not into that.  I'm not averse to colouring the chicken in a frying pan though - ostensibly frying it, but in just a whisper of oil and without the batter.

This week, I found this recipe "Crockpot Orange Chicken" from Heidi's Home Cooking blog and it was so simple that I felt it would stand up to being swiftly cooked in a wok or frying pan (or skillet, depending on where you're from!) as opposed to the slow cooker it was intended for.  However, as is my wont, immediately I began thinking about ways of broadening its flavour horizons.

So, step 1 was to make sure the seasoning was on point and as we're using soy sauce there were no worries about the salt.  However, pepper wasn't mentioned - and I wound up using both black and white peppers.  Black pepper directly on the chicken and the white pepper in the final seasoning of the sauce.

I could also see that some garlic and ginger wouldn't go amiss, however hubby is sensitive to ginger so that was out (but feel free to add some if you're okay with it!) but some finely chopped fresh garlic cooked with the chicken became step 2.

Because of the lack of ginger, it seemed as though some red chili pepper would be a good idea, so step 3 was to add a finely chopped fresh red chili and dried red chili flakes, to taste.  This was a lovely addition as it definitely helped to balance out the sweetness from the barbecue sauce and the orange marmalade, although using a dark coloured marmalade also helped in that regard as it was rather more bitter than sweet.

All together, because I had everything prepped and ready to go before I started cooking, the dish only took around 25-30 minutes from start to serve, which was perfect.

Both my menfolk really liked this dish and returned clean plates to the kitchen.  Always a satisfaction!  The flavours weren't hugely in one way or the other - both the barbecue sauce and the marmalade seemed to be knitted together with the help of the soy sauce and the garlic and chili just helped to make everyone friends.  As it was cooked so quickly, the chicken didn't have an opportunity to dry out, staying moist and tender throughout.

I served the chicken with egg fried rice, some prawn crackers and chopped spring onion sprinkled over as garnish, however it occurred to us that it would be fairly epic served similarly to crispy fried duck - in small pancakes with spring onion & cucumber shreds.  So I'll leave that aspect up to you, but do let me know how you like it if you try it!

QUICK BARBECUE ORANGE CHICKEN   (Serves 3)

Ingredients :

200 ml of a good, tasty barbecue sauce
1 heaped tbsp of a dark orange marmalade
2 tsp cornflour
1 red chili pepper, finely chopped
3 tbsp light soy sauce
a good pinch of white pepper
1 tbsp rapeseed oil
3 skinless, boneless chicken breasts, sliced finely against the grain
a pinch of black pepper
1 large garlic clove, finely chopped
2 spring onions, finely chopped on the diagonal for garnish.

Method :

In a jug, whisk together the barbecue sauce, marmalade, cornflour, chili pepper, soy sauce and white pepper and set aside.

Heat the rapeseed oil in a deep frying pan or wok and add the chicken.  Season with the black pepper.  Cook over a high heat until all trace of pinkness has gone from the chicken.

Add the chopped garlic and continue to cook for another 1-2 minutes until softened and fragrant, in the residual liquid from the chicken.

Pour in the sauce and stir to combine.  Bring the sauce to a boil and allow it to reduce until a sticky glaze consistency has been reached and it is coating the chicken.

Serve, adding a sprinkle of chopped spring onion as garnish, with your choice of additional rice and a few prawn crackers for crunch.

Printable version

1 November 2017

Manchego chicken Alfredo - super quick, two pot supper

This bowl of chickeny, cheesy, garlicky and creamy delight could almost be called a one pot supper, but regrettably the pasta needed to be cooked in its own pan - hence it became a two pot deal.  However, that in no way slows it down, oh no.  The sheer simplicity of the ingredients makes this as speedy a dinner to produce as any you could wish for.

With no onions to chop, no veggies to peel or slice, the only preparation that's required is to peel and chop some garlic, cut some chicken in half, grate some cheese and chop a bit of parsley.  I certainly can't claim that's in any way difficult - and oh boy, does it pay off by way of flavour!  Alfredo de Lelio, you sure knew what you were doing when you put the original dish together, all those years ago in 1892.


However, I suspect Mr de Lelio would be horrified to learn that I have removed the quintessentially Italian Parmesan cheese from the recipe and submitted, instead, a Spanish replacement - the gorgeous Manchego hard cheese.  Being a sheep's cheese, Manchego has a very different flavour to Parmesan, but equally there are similarities in both texture and colour plus they both melt in a similar way.

Son and heir is passionately opposed to Parmesan - he can't bear the after taste it brings with it, so consequently I was committed to finding a replacement for it or not indulging in pasta Alfredo at all.  I was intending on using Grana Padano, but having recently used some Manchego in cheese scones with every success, I decided to give it a go and I'm so glad I did.

So there we are.  A bit of a different spin on pasta Alfredo, but super tasty and super quick to make, too.  If, perchance, you can't find any Manchego but like the sound of the recipe and don't have anyone at home passionately opposed to Parmesan, then by all means use Parmesan.  You won't be harming the recipe at all, you'll simply be returning it back to its roots.

I only have one Cook's Tip for you, which is that when you drain the pasta make sure to keep some of the pasta water close by.  If (as sometimes happens), the sauce becomes too gloopy and thick, simply add a little of the pasta water.  Far better to use that than add more cream, or milk, or have to mix up some chicken stock.

Onwards to the recipe!

MANCHEGO CHICKEN ALFREDO   Serves 2

Ingredients :

250g small, open style pasta such as Conchiglie shells
1 tbsp rapeseed or olive oil
2 tbsp butter
2 boneless, skinless chicken breasts, halved horizontally
sea salt & black pepper, to taste
2 cloves garlic, chopped finely
200ml dry white wine
250ml single cream
50ml double cream
half a tsp good quality chicken stock powder (or half a chicken stock cube)
125g Manchego cheese, grated finely
2 tbsp fresh parsley, chopped.

Method :

Bring a good quantity of salted water to the boil in a large saucepan and cook the Conchiglie shells to manufacturer's recommendation, draining once cooked.

In a large frying pan, heat the rapeseed oil and melt the butter over a high heat.

Season the two halves of each chicken breast with both sea salt & black pepper and carefully place into the frying pan.  Fry the chicken until it is a deep golden brown on both sides and cooked through.

Remove the pan from the heat and decant the chicken onto a warmed plate.  Cut the chicken into even sized slices and reserve to keep warm.

Replace the pan onto a reduced heat and add the garlic.  Stir and cook gently until the garlic is softened and lightly golden.  Add the wine (and a little bit extra for luck is definitely allowed) and allow to bubble and reduce by one third.

Add the single and double creams along with the chicken stock powder and stir gently to combine.  Once the sauce has heated through, is bubbly and slightly thickened, add the grated cheese, most of the parsley, the hot, drained pasta and sliced chicken.  Toss everything in the sauce until all is well combined.  Taste for seasoning and add more pepper if necessary.

Serve into warmed bowls with a sprinkle of the reserved parsley on top as garnish.


25 September 2017

Cherry bomb & chicken curry - frisky, fruity and fab!

This curry really wasn't supposed to be like this and I don't mind admitting it.  If I had have been paying attention, it was supposed to be my Chilli Chicken Curry with Courgettes. However, I wasn't paying attention and the aforesaid curry seemed to be too complicated for my head to handle, so I decided to wing it. Aaaah, how often does winging it result in a great recipe?  Not as often as I'd like, to be honest, but in this case it did.

I've been having problems with my chicken recently.  Now I don't THINK it's my cooking methods - or I flipping hope it's not my cooking methods - but it seems to often come up hard or even tough in the finished dish.  I'm coming to the conclusion that the quality of chicken breasts that aren't organic, corn fed, gold plated and groomed by faerie folk, is just pretty parlous.  A kind of "keep the good chicken for the people with money, fob the rest off with the hard as nails, brought up in Wormwood Scrubs, whatchoolookinat chicken" situation. So I've been thinking about how I can alter my cooking methods to best cope with this reluctant to be cooked chicken - and this was my first foray into this turned on its head kind of cooking and, to my palate anyway, it seems to have worked.


The chicken spends much less time in the pan, but it didn't seem to lose anything for having not been cooked for long in the curry sauce, so I'm happy with that.  The curry sauce is made with the same oil that the courgettes and chicken were cooked in, so none of the flavour is lost.  However, the big joy with this recipe is the cherry tomatoes.  By piercing the stalk end of each tomato, it allows the sauce to penetrate and the short time they are in the pan means that each tomato while cooked, still retains the characteristic sweetness and juice of a cherry tomato.  They are nothing short of little flavour bombs that fill your mouth with deliciousness and refresh you as they go.  Just remember to keep your mouth closed when you bite one!  Nobody enjoys being targeted by someone else's cherry tomato explosion, particularly not one that comes with curry sauce.

I really enjoyed this curry.  I liked its lighter nature, it has a cleanliness that a cream based curry, or even a lentil based curry, doesn't have.  The courgettes lend it a natural sweetness and the tamarind sauce balances that with a touch of sour.  Frisky enough with its medium curry powder, black pepper and red chilli flakes to satisfy those who enjoy a spicy curry, it can easily be pepped up by simply adding more red chilli if you like your curries hotter than the average.

I'd better get on and type out the recipe, before I forget it!

CHERRY BOMB & CHICKEN CURRY   (serves 3)

Ingredients :

2 tbsp rapeseed oil
20g salted butter
1 courgette, cut into bite sized chunks
3 boneless, skinless chicken breasts, sliced
sea salt
ground black pepper
2 red onions, diced small
2 garlic cloves, chopped
0.5 tsp ground cinnamon
3 heaped tsp of medium curry powder
1 heaped tsp of Tikka curry powder
1 tsp paprika
a pinch of red chilli flakes
400ml hot water
2 tbsp tamarind sauce (I used East End brand)
1 heaped tbsp creamed coconut
10-12 tiny cherry tomatoes, pierced at the stalk end with a sharp knife
1 tbsp fresh coriander, chopped (keep some back for garnish)
Cooked, hot, Basmati rice to serve.

Method :

Heat the rapeseed oil and butter together in a deep pan or wok over a medium heat, until the butter is foamy.  Add the courgette pieces and fry until just beginning to take on colour.  Turn each courgette piece and continue frying until beginning to soften but still fairly firm.  Using a slotted spoon, remove the courgettes to a warm bowl and reserve, leaving as much of the buttery oil behind as possible.

Increase the heat under the pan and add the chicken slices.  Season with a pinch of sea salt & black pepper and fry until just beginning to turn golden, then turn and repeat on the other side.  Cook until just cooked through - a little bit of pink showing is okay, as they will receive more cooking once added to the sauce.  Using a slotted spoon, remove from the pan to the bowl with the courgettes and reserve.  Retain the oil and cooking juices in the pan.

Add the chopped onions, garlic and cinnamon to the pan and fry until the onions and garlic are softened.  Take care not to allow the garlic pieces to burn.  

Add the two curry powders, paprika and chilli flakes to the pan and stir well while they cook out.  This should take about 3-4 minutes.

Add the water and tamarind sauce and stir well to combine.  Pour any cooking juices into the pan from the courgette and chicken bowl and stir to combine.  Bring to a lively simmer and reduce the heat.  Simmer the sauce, stirring from time to time, until reduced by approximately a third.

Add the coconut cream and stir gently through.  Add the contents of the chicken & courgette bowl and the cherry tomatoes and stir gently until everything is covered with the curry sauce.  Simmer until you are happy that the chicken is cooked through, the cherry tomatoes are hot and the sauce is at your preferred consistency.  If the sauce becomes too dry, simply add a little more hot water.

Stir in the chopped coriander and serve with hot white rice.

Printable version

18 March 2017

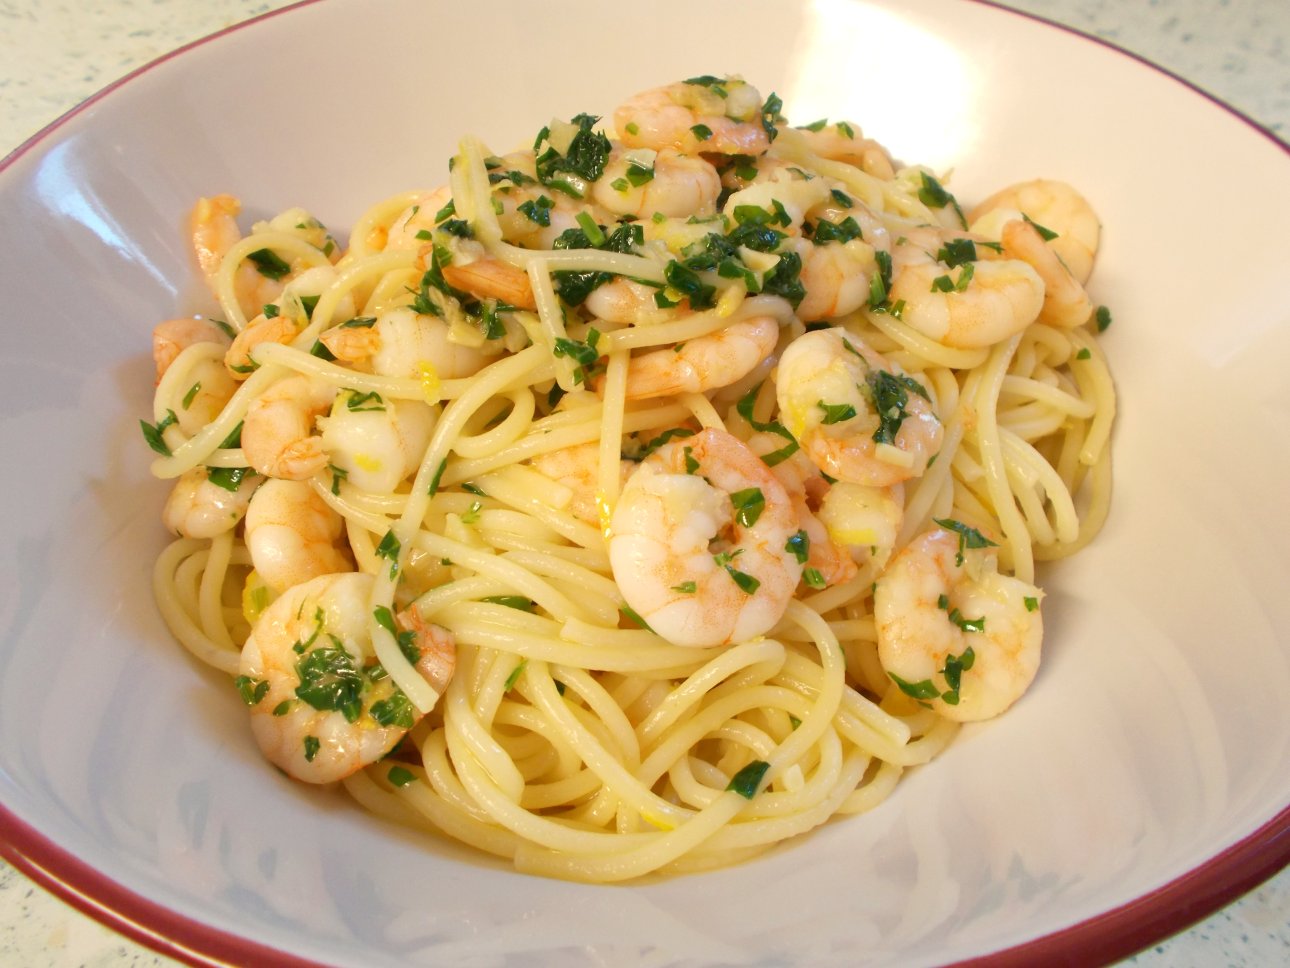
Simple garlic butter prawn spaghetti

Well, this one was a real unexpected surprise.  I wasn't supposed to be cooking this recipe at all and in fact, can't remember why I wasn't cooking the intended one.  Whatever the reasons were - and it could be any number of them! - I decided to go for this because it looked simple and sounded like it could be rather good.

Yes, it's certainly simple - both in number of ingredients, cooking process and method - and as for "rather good", well that's a bit of an understatement.  It turned out to be very good indeed.

The recipe originates with the BBC Good Food website and I could just direct you straight there, however, it occurred to me that if we ever lost that site, I'd lose a very useful and tasty recipe.  So here it is, with thanks to BBC Good Food for the original.

There is only one Cook's Tip for this recipe - and that is, if you are using cooked King prawns (or Tiger prawns), then literally just heat them up in the pan.  Don't cook them, as they are already cooked and will become tough and hard if heated for too long.  They just need to be brought up to a good temperature so as to avoid any risk of encouraging bacteria by half-hearted warming and that's all.


This dish certainly doesn't have big, bold flavours.  However, if you're into garlic butter, lemon and prawns, then you will love it.  The spaghetti gives it that comfort food thing and the lemon prevents the butter from becoming too rich.  I'd have it again tomorrow, I liked it that much!

SIMPLE GARLIC BUTTER PRAWN SPAGHETTI    (serves 2)

Ingredients :

250g dried spaghetti
sea salt
20g salted butter
2 cloves of garlic, chopped finely
a pinch of ground black pepper
250g cooked King prawns
zest of 1 lemon
15g fresh parsley, chopped.

Method :

Firstly, bring a large pan of salted water to the boil.  Add the dried spaghetti and cook to manufacturer's recommendation.

In the meanwhile, melt the butter in a frying pan over a gentle heat and add the chopped garlic.  Sweat, as opposed to fry, the garlic ever so ever so gently until the pieces are softened, adding the black pepper along the way.  Then, add the prawns, the lemon zest and the parsley and increase the temperature just slightly, sufficient to heat the prawns through without cooking them and without frying the pan's contents.

Drain the pasta and add to the prawn & garlic pan.  Toss the pasta in the garlicky butter and serve into warmed bowls, sharing the prawns out evenly.

Printable version

23 February 2017

Chicken Jalfrezi - a lighter but still tasty version!

Over the last few months, my hubby has slowly taken agin the curry pastes that are widely available for home made curries.  He's begun to find them very one-dimensional but more importantly to him, they don't taste of curry. Now this curry flavour is a very definite thing that we have yet to quite pin down, but this Jalfrezi got the closest to it in any curry for a long time.  We're still not quite there, but as I liked this recipe a lot for its flavour and use of fresh vegetables, I thought I'd pass it on to you all.

This recipe doesn't result in a heavy, thickly sauced curry but one that is a lot lighter in texture and without the pools of oil that characterise so many curries these days.  Oh and I'm really not sure how much of a Jalfrezi it really is, but I'm hoping that it is close at least.  As it uses curry powder, my first word of warning is to make sure you are using a good curry powder.  One which has a number of different flavours to it is by far and away the best.  I have yet to find - and yes, I will admit that perhaps there is one somewhere - a supermarket own brand curry powder that would even remotely fit the bill. My favourite curry powders come from our local ethnic shop, where I'm hoping that the curry powders on offer are close to the "real thing", but are certainly a long way from bland.


Secondly, make sure to use tomatoes that have flavour.  Vine ripened are the best of the supermarket choices, but it is worthwhile throwing in a few cherry tomatoes just to boost the profile a bit.

Lastly, make sure to leave yourself enough time.  Once the tomatoes get cooking, you need time for them to cook down, then time for the juice to reduce and intensify the flavour.  If you take the pot off the heat and think it's finished too soon, you'll just have a vaguely spicy tomato stew and not a curry.  So, give yourself and your curry time to chuckle, burp and spit tiny blobs of curry into random spots in your kitchen, you'll be glad you did even if the clean up is tricky.  (Of course, I could have got out the splatter guard which would have made sure no blobs escaped, but I was comfy and would have had to have moved.  What can I tell you?  ~shrug~).

From first putting the coconut oil into the wok, to calling everyone to attention in order to get them sat down and ready for the meal, my curry took around 50 minutes (with a good 30 minutes of chopping beforehand).  So it's not an earth-shattering amount of time, but if you only have half an hour, you're going to be in tomato stew land.  So leave sufficient time.

I really liked this curry.  Hubby wasn't so enthused, but I've already told you about the quest for curryness that we're on there.  When cooking it, I was concerned that it didn't have enough curry character, but as our son came home from college and immediately knew it was curry for dinner, I'm assuming it was just that my nose had got used to the aromas.  It tasted good right from the off and really came together in the last 10 minutes, once the liquid had reduced and the proper curry sauce texture arrived.  It was amazing the difference that reduction made to the overall flavour.

So, enough blathering and on with the recipe!

CHICKEN JALFREZI  (serves 4)

Ingredients :

2 red peppers, one roughly chopped into chunks, the other sliced
1 large onion, half roughly chopped into chunks, the other half sliced
4 large garlic cloves, peeled and roughly chopped
1 tbsp coconut oil
3 boneless, skinless chicken breasts, sliced
a pinch of sea salt
4 heaped teaspoonfuls curry powder
1 heaped teaspoonful garam masala
a quarter of a teaspoonful of ground black pepper
2 very large sweet tomatoes, chopped
6 cherry tomatoes, quartered
1 tsp chicken stock powder (or 1 stock cube)
150ml hot water
1-2 tsp runny honey (optional)
10g butter (optional)
15g fresh coriander, chopped (reserve a little for garnish)
cooked white rice to serve.

Method :

Begin by placing the chunks of red pepper, the chunks of onion and the garlic into a food processor and blitz until a purée is achieved.  Set this aside.

Next, heat the coconut oil in a large saucepan or wok until really quite hot and gently add the sliced chicken breasts and sprinkle with the sea salt.  Spread the pieces across the pan and leave them to achieve a little colour, then turn and do the same again.  The slices do not need to be cooked through at this stage.

Using a slotted spoon, remove the chicken to a bowl and reserve.

Add the sliced red pepper and sliced onion to the wok and cook, covered, for 5-6 minutes stirring half way through, until they have gained a little colour and begun to soften.

Add the puree to the wok, along with the curry powder, garam masala and black pepper.  Stir well to combine and fry, stirring occasionally, until the juices are released and the mix has dried out considerably.  This should take around 10 minutes if your wok heat is high enough.

Add the chopped tomatoes and stir through, along with the chicken stock and the water.  Once combined, add the chicken pieces and stir through.  Now this is where the patience is required.  You need to have the pan hot enough that the tomatoes will cook and release their juices, then the juices (and the chicken stock) will reduce and the full flavour be created.  You will start with a quite considerable quantity in the pan, but once everything has cooked down and reduced, the sauce will thicken and the liquid will evaporate.

Marginally before the sauce reaches its final few minutes, taste for the salt level and add a little more if necessary, but remember that there will be a little salt in the butter that if you're using, should be added now.  Taste also for acidity and add the honey to your preference to correct that.  If you consider there's no sweetening required, then don't use the honey.

Once everything is combined and happy to be there, the sauce is thick and there are no pools of water on the surface of the curry, then you're ready to serve.

Serve with plain white Basmati rice and sprinkle with the reserved chopped fresh coriander as garnish.

Printable version

22 February 2017

Tomato & Bacon Bruschetta - majorly epic flavourness

Is there such a word as "flavourness"?  If not, then there needs to be, if only to describe truly epic loveliness in the epicurean department such as this tomato and bacon bruschetta.  Oxford English Dictionary - in the words of the inestimable Captain Picard, "make it so!".

There now, having dealt with that, let's have a closer look at this Italianised bacon & tomatoes on toast.  Because that's what it is, really.

It all came about from our weekly staff meeting (that is, hubby, myself and the dogs) when I posed the question "what would you LIKE to eat, if you could".  Having got around the "lark's tongues in aspic" and "T-bone steak", not to mention "a Pavlova as big as my head", we came down to things that were rather more achievable.  Hubby mentioned the griddled sourdough that we had a little while ago, (that time with Coronation chicken on board) and we promptly had a bit of a brainstorm as to what you could put on griddled sourdough.

Well, the end result of pan fried, chopped bacon rashers with roughly chopped raspberry tomatoes and cherry tomatoes, all cooked in olive oil, just made my mouth water.


Now, if you're tempted to give this a go (and why wouldn't you be - it's beyond fab!), don't be put off by the fact that you can't source any raspberry tomatoes.  Just find the best flavoured tomatoes you can - any combination thereof will work.  Raspberry tomatoes are approximately the same size as a big old beefsteak tomato, but with 100% more flavour.  I reckon three or four normal sized vine ripened tomatoes would equal one raspberry tomato, if that helps.  If your tomatoes wind up being a tad acidic, never fear, just add a teaspoonful of honey to the pan and they'll taste like they were picked in the middle of summer.

It is important to drizzle the sourdough bread with a tasty extra virgin olive oil and rub it with garlic, but don't worry if you don't have a griddle pan.  Just toast it under the grill and it'll do the same job.  I adore my cast iron griddle pan and grab any excuse to use it, but I do appreciate that not everybody has one.

I paired our bruschetta up with an avocado based salad because it was served as a dinner.  However, this bruschetta recipe is perfectly adequate as a lunch without the salad.  A glass of something refreshing alongside is all you're likely to require for a fabulous lunch.

My favourite thing, apart from the gorgeous bacony, tomatoey, garlicky olive oil flavours, is the relationship between the sourdough and the tomato juice.  The toasted sides along with the chewy crust maintain the integrity of the bread whilst the gorgeous tomato juice just soaks, willy nilly, into the centre and shuffles around causing the bread and garlic to instantly fall in love with it.  Chunky salty bacon and sweet tomatoes on juice soaked garlicky toast with flakes of parmesan cheese on top.  Serious, extra large deliciousness.

TOMATO & BACON BRUSCHETTA  (serves 3)

Ingredients :

1 tbsp olive oil
345g smoked back bacon, chopped into chunks
2 extra large raspberry tomatoes (6-8 vine ripened tomatoes would do), chopped into chunks
6 sweet cherry tomatoes, quartered
1 small garlic clove, sliced finely and 1 large garlic clove, left whole
half a tsp of freshly ground black pepper
half a tsp of dried basil (oregano is good, if you don't have basil)
1 tbsp tomato ketchup
1 tsp Worcestershire sauce
1 tsp runny honey (just in case your tomatoes need help in the sweetening department)
3 good, thick, slices of sourdough bread
extra virgin olive oil
shards of Parmesan cheese
finely chopped fresh parsley
a mixed salad, to serve.

Method :

If you are serving salad alongside, prepare said salad before you begin to cook the bruschetta, as it really doesn't take long.

Heat the olive oil (not the extra virgin olive oil) in a frying pan and, once hot, add the chopped bacon.  Fry on a moderate to hot heat, so evaporate any water and begin to caramelise the bacon.  Once the pieces have begun to take on a golden colour, add all the tomatoes, the sliced garlic (not the whole garlic), black pepper, dried basil, tomato ketchup and Worcestershire sauce and stir from time to time as the mixture cooks.

The juice will escape from the tomatoes, which is good.  However, you want this liquid to reduce so as to intensify the flavour so keep the heat fairly high and stir regularly.  You are aiming for a fairly thick, chunky tomato sauce kind of texture.  When the tomato liquid has reduced by at least half, taste for acidity and add the teaspoonful of honey if necessary.

Once the consistency of the bacon & tomatoes is to your liking, reduce the heat to a tickover and turn your attention to the toast.

Taking the whole garlic clove, rub both sides of each slice of bread liberally with the clove.  Make sure to rub around the edge as the crust will help to shred the garlic.

Next, drizzle generously with the extra virgin olive oil on both sides.

Heat your griddle pan (or grill) and toast each slice on both sides to your own taste.

Place each slice of toast onto the plate you're going to serve them on and pile the bacon & tomatoes on top.  Make sure to catch the juice as you're piling as that's where a lot of the flavour is.

To finish, sprinkle the top with shards of Parmesan cheese and finally with the chopped parsley.

Serve with your pre-prepared salad and a glass of something refreshing.  Be happy!

Printable version

30 December 2015

Bacon with Red Pepper Pesto Pasta - done in a twinkling!

What a success this one proved to be!  Mind you, I don't know why I'm sounding surprised because it uses three of my favourite things - bacon, mushrooms and Asda's ricotta & red pepper pesto.  To my way of thinking, it was a winner before I even took my knife to the bacon.  However, sometimes what seems like the perfect combination of ingredients turns out to leave a little to be desired in one way or another - but happily, not so here.  Plus, of course, it has the added bonus of being simplicity itself to prepare.

Oh and as a little aside, have you noticed how often my food seems to turn out to be orange coloured? I don't try to make it that way, honest I don't, it seems as though my choice of ingredients has a marked lean towards the orange.  But then, the menfolk grumble if there's too much green on the plate, grumble again if I serve them "brown food" and would justifiably grumble at being served black food, so aside from white I guess that just leaves the red/yellow/orange palette as there's not too many blue foods out there!  So this one is following along in the tradition of being the seemingly man-friendly colour of orange. 

Now, let me recommend to you Asda's little pot of Ricotta & Red Pepper pesto.  This seemingly unassuming little jar contains one of the most delicious substances that I have used in everything from sandwiches to pasta.  Along with the rich ricotta and flavoursome red pepper, it also has a sneaky little bite from red chilli that just makes it glorious.  I would be very happy if you were all to rush out and buy some, love it and continue buying it, as that would mean it will stay around on the shelves for ever!

The pesto marries up with bacon perfectly, of course.  The celery adds a welcome freshness that prevents the dish from becoming too heavy on the palate and the addition of the small amount of sour cream helps to loosen the pesto into a sauce without impinging on the flavour at all.


I call this one a very definite win.  The empty bowls and enquiries as to whether there was any left, gave proof to that belief, too.  As a mid-week, easy, relatively cheap dinner, you can't go wrong.

BACON WITH RED PEPPER PESTO PASTA   (serves 3)

Ingredients :

1 tbsp olive oil
350g smoked back bacon, trimmed of fat and diced
1 large onion, diced finely
1 clove garlic, chopped finely
2 sticks of celery, diced finely
black pepper
half a tsp dried oregano
200g quartered mushrooms 
190g jar red pepper & ricotta pesto
1 tbsp sour cream
200ml water
250g dried pasta shapes - tubes are good.

Method :

Heat the olive oil in a large deep sided frying pan and add the bacon.  Fry over a high heat until all the moisture has evaporated and the bacon is cooked through.

Reduce the heat to moderate and add the onion, garlic and celery, along with a pinch of black pepper and the oregano.  Fry until the onion is transparent and the celery is beginning to soften.

Add the mushrooms and continue to fry until they are beginning to soften.

Three quarters fill a large saucepan with water and add a pinch of salt.  Bring to the boil and once boiling, add the dried pasta.  Remember to give the pasta a stir every so often to ensure it's not sticking to the bottom of the pan.  Cook for 10-12 minutes, or to manufacturer's instructions.

Add the contents of the pesto jar to the bacon mix, along with 100ml of water (you can use it to rinse out the pesto jar, so as to get every last little bit!) and stir to combine.

Once the ingredients are looking mixed, stir in the sour cream.  Simmer on a very low heat until the pasta is ready.  You may need to add a little more water from time to time to keep the mixture saucy.

Once the pasta is cooked, drain it well and return it to the hot saucepan.  Take the bacon mixture and decant it on top of the pasta and stir gently, but thoroughly, through.

Serve in warmed bowls with some garlic bread to accompany.

Printable version

13 July 2015

Citrus & spice chicken

I've been going through a whole heap of old paperwork recently - which included my many and various files and folders chock-a-block full of collected recipes.  In doing so, I have re-discovered several favourites from pre-Rhubarb & Ginger times, one of which being this citrus & spice chicken.

The recipe has developed over the years (as recipes are wont to do) but I note from the paper recipe in my folder, that the original was adapted from the Good Food Magazine's "40 Best Chicken Recipes" booklet.  Well, it's been adapted yet again - and very much for the better.  The very first recipe was basically a traybake, my first version added several ingredients such as the honey and chilli powder.  This last incarnation has separated out the vegetables to be cooked on the hob instead of in the oven, which I much prefer.

Marinate, my little lovelies!
Oven cooking the vegetables inevitably led to burned ends and undercooked middles, as the sheer quantity of meat and vegetables in the tray didn't really allow for even cooking.  Plus, it is nice to have a small degree of char on the chicken, but not so nice on the peppers and mushrooms.

This way, the chicken has plenty of air space around each piece and the cooking is much more even - particularly if you place the larger pieces to the outside and the smaller pieces to the inside of the tray.  The surface attains nice little charred corners, while the chicken itself stays moist and delicious.

Cooking the vegetables in a frying pan enables much more degree of control.  Inevitably the leftover marinade isn't enough moisture to see them through the entirety of the cook, but adding a little water from time to time not only allows the vegetables to steam, but also keeps the marinade saucy.  This way, you have the relatively dry chicken, accompanied by the saucy vegetables - which provides a lovely balance and completely without burned ends.

Ready for the oven - Bacofoil's non-stick aluminium foil is great for this!
Another huge positive to this recipe - apart from the flavour which is really tasty - is its speed.  Provided you get the chicken on to marinade in advance, it is a really simple task to prepare a couple of salad veggies, cook some rice, put the chicken in the oven and pan cook the vegetables.  From taking the marinating chicken out of the fridge to dishing up, probably only took around 45 minutes in total.  I love that - especially when there's such a pay-off by way of flavour.


So what's the flavour like?  The chicken flavour is there, no one flavour overrules it and because the curry past is used fairly sparingly and is very much tempered by the use of the yoghurt, it doesn't take precedence.  The honey gives a quiet sweetness and the garlic helps to savoury it all up nicely.  In fact, don't tell anyone, but if you add the yoghurt, then the lemon juice, then the honey, stir it all together and have a taste - mmmmn, it would make a smashing dessert!

Once the curry paste, oil and garlic are added though, I wouldn't recommend tipping it on top of your strawberries.  The oven adds the last element of flavour to the chicken, in the small degree of charring as the tops of the chicken pieces catch in the oven.  It all amounts to an absolutely scrumptious whole.

Now, as for Cook's Tips, I don't have many but there are a few worth mentioning.

The recipe calls for the juice of half a lemon.  If, however, you don't have a lemon but do have a lime - then no worries, use that instead!  You will need the whole lime's juice and the flavour will be slightly different, but no less nice.  I have used both in the past and can't decide which one I like the best.

Where the chilli powder is concerned, feel free to add as little or as much as you like.  However, if you're new to chilli powder and curry spice, I'd suggest you err on the side of caution to begin with - you can always add a little bit more the next time.


You can certainly freewheel a bit where the accompaniments are concerned.  I think the chicken and vegetables would be lovely served in a soft Indian flatbread with some salad alongside.  On this occasion, I served the chicken with some basmati rice that I had cooked in chicken stock and turmeric, along with the cooling influence of avocado and cucumber.  For my son, who isn't keen on avocado, I served a sliced juicy tomato and cucumber.  The chicken is certainly flexible enough in flavour profile, that there are a whole host of accompaniments you could serve with it.


Calories are in the range of 398 per portion, it is low in sodium and high in Vitamins B6 and C, so it could be worse!

I am so happy to have rediscovered this recipe.  I think it is going to appear fairly regularly on the menu plan and I recommend it to you.  Without the chilli powder, it would be great for children, too.

CITRUS & SPICE CHICKEN   (Serves 3)

Ingredients:

For the marinade :

150ml natural yoghurt (I used Greek yoghurt)
juice of half a lemon
1 tsp runny honey
1 tbsp vegetable oil (I used sunflower)
2 generous tsp curry paste or powder
1 garlic clove, crushed
chilli powder to taste (I used 1 tsp Kashmiri chilli powder).

Other ingredients :

3 skinless, boneless chicken breasts cut into large chunks
1 red pepper, deseeded and cut into large slices
half a green pepper, deseeded and cut into large slices
1 onion cut into large slices
6 medium chestnut mushrooms , quartered
1 tbsp olive oil.

Method :

1.  Mix together the marinade ingredients in a bowl.

2.  Add chicken chunks to the marinade, stir to coat and set aside to marinate for as long as you've got - from 4 hours to 30 minutes.

3.  Pre-heat your oven to 180degC/350degF/Gas 4.

4.  Place the chicken chunks onto a baking tray, taking care to leave as much of the marinade in the bowl, but without scraping any off the chicken.

5.  Bake the chicken for 30 minutes, remembering to turn the tray half way through to ensure even colouring.

6.  Add the vegetables to the bowl and stir to coat them in the marinade.

7.  Heat the olive oil in a large frying pan and add the vegetables, marinade and 200ml water.  Cook, covered, on a medium heat until the peppers are softened and onions are cooked through.  You may need to add more water, but only a little at a time.

8.  Once the vegetables are cooked, remove the lid and allow the sauce to reduce and thicken, which will only take 2-3 minutes if you haven't added too much water.

9.  The chicken is ready once the chunks are cooked through and they have gained a little bit of charred colour.

Serve with steamed basmati rice, avocado and cucumber.

Printable version

4 February 2015

Minty aromatic pulled lamb pittas

As with the Stellar Slow Cooked Lamb Shanks, the gorgeous (huge!) rolled and boned piece of lamb shoulder came (delivered by courier, still frozen) from Farmer's Choice Free Range Ltd., for me to "play with" and develop a recipe for them to feature on their website.

I spent a week or so thinking about what to do with it.  Yes, I could have just roasted it and had the biggest slap up roast lamb dinner of all time - and it would have been utterly memorable - but you know me, things like that just seem too easy.  If every blogger does that, then how does it demonstrate what joe public could be enjoying?


I don't believe in "fiddling about" with a gorgeous product just for the sake of it - if it is something different, something a bit out of the ordinary to begin with, then I'll honour that and do the simplest thing available, so as to make the product the star of the show.

36 hours of marination is up - time to cook!
Now in this case, in no way am I implying that this gorgeous lamb shoulder was run of the mill.  I mean, just look at it!  No, it was quite the opposite.  I can honestly say I have never had a rough piece of meat from Farmer's Choice Free Range, they have all been quite special in their own right.  The lamb was no different, no more fatty than you would expect a good quality piece of lamb to be and with great muscle development, which gives you lovely lines of lean meat.  However, it was a simple rolled and boned lamb shoulder.  A normal Sunday roast cut of meat.  So, what to do with it, that makes it a little bit out of the ordinary?

I'm sue you won't be surprised to hear that I tossed probably dozens of ideas out before I finally hit upon "the one".

Just an hour of cooking time left to go - and smelling amazing.
Out in foodie circles, there is much talk of pulled pork - which has translated to the supermarkets and burger restaurants.  Even our local pizza chain is now offering pulled pork on their pizzas.  So, how about pulled lamb?  Let's develop a complimentary marinade or rub for the lamb, then slow roast it to render most of the fat - and pull it.  Oooh yes, now this is sounding good.  Serve the pulled lamb in a wholemeal pitta bread (the wholemeal ones have way more flavour), with a minted yoghurt sauce?  Yup.  Maybe some roast sweet potato chips (fries) alongside and a little salad for freshness.  Well there you have it.  The recipe suddenly almost wrote itself.

Why, oh why, can't blogging use smellivision?
I knew that I wanted to include mint in the marinade, because lamb with mint is just the BEST thing.  As for what spices to include, well I knew about the North African spices - Ras al Hanout, Harissa - but I didn't fancy those too much.  After all, Ras al Hanout has rose petals in it.  Rose and mint?  Maybe in a sweet - not with lamb though.  Harissa can be quite harsh and lamb doesn't need harsh treatment.

So I looked at a lot of lamb recipes just to get my head focused more on what I didn't want, rather than what I did want, to put with the lamb.  Then I went to the spice cupboard and started putting spices together.  I wound up with quite a list, but it smelled fantastic.  Added sea salt and black pepper, that was a given.  Now lamb can be quite fatty - so I wasn't pushed to decide upon how much extra to give the joint, just a little olive oil to cheer along the upper layers.  However, the marinade needed (by this time it was definitely a marinade, not a rub) more liquid.  I didn't have any fruit juice in at the time but I did have two oranges.  Mmmn, orange zest and juice!  Yes, that would work!  Oh and garlic - lamb just has to have garlic.  I did contemplate including a couple of anchovies too, but felt that was probably a bit out there in conjunction with everything else.

Quite incredibly moist, soft and tender lamb.  Just wonderful.
My goodness but what a powerful, aromatic marinade it turned out to be.  Even encased in a freezer bag - with the lamb, obviously - every time you opened the fridge door, the marinade reached out (aromatically, obviously), grabbed you by the nose and slammed your head (in a friendly kind of a way) into the freezer compartment.  In the end, for the good of everyone involved (including the milk, because nobody fancied marinated milk in their tea), I had to put the marinated lamb into a second freezer bag, which just about managed to contain the beast.  Containing the beast was very necessary, because I was taking this marinading seriously and had put everything together some 36 hours before I was due to cook the lamb.  I wanted to give those flavours time to really get to work!

Be generous with the lamb, it is too good to leave in the tin!
Amazingly, considering how the marinade had behaved on the way, when it came to releasing the lamb into the roasting dish, it had really settled down!  Mellowed, even.  You know how lamb can smell really lamby, some times?  Well this smelled really fresh and so yummy.  I didn't want the dish to run dry during its long cooking time, so added a little water.  Into the oven it went, swimming around in its paddling pool of flavour.

After an hour or so, even with having sealed it as far as was possible with silver foil, the smell from the oven was just amazing.  There was no one aroma that was dominant (well, apart from lamb anyway!), it had just all amalgamated into a gorgeous whole.  I checked it half way through - just to make sure it had enough water - and gave it a little baste.

By the end of the cooking time, our mouths were watering.


Pulling the lamb was the simplest thing.  If, like me, you have family members who are a bit fat phobic, it is very easy to pick out any fatty bits en route.  The lamb just fell apart and was so moist and juicy - no dry, miserable pulled lamb here.  Two forks and a large dish and in just a couple of minutes the dish was full and I was surrounded by hopeful (but disappointed) dogs.  I recommend adding a couple of spoonfuls of the cooking liquid to the pulled lamb, so that when it has to wait for you to prepare the breads and serve the side dishes, there is no worry about it drying out - and why not capitalise on all the flavours that are contained in the cooking liquid?

Speaking of the cooking liquid, I have kept what was in the roasting dish as I have some (as yet) vague plans to make a soup with it.  Well, it was too good to throw away!  Just set it aside for the fat to set, then you can pour the stock out from underneath with no difficulty.

Apologies for there being no lamb in this picture ...
I served the lamb with a yoghurt, mint, cucumber & caper sauce drizzled over and some yummy mint jelly under (the vinegary flavours of a standard mint sauce would work too), in the wholemeal pitta bread.  Absolutely divine.

The flavours that the marinade brought to the lamb were in no way overpowering.  I was so happy with that!  The citrus juice had helped to tenderise the meat and even though I was expecting some warmth from the black pepper and cayenne pepper, it was so subtle.  Beautiful.

Everyone loved this recipe and there were murmurs of disappointment when told "no, there's none left".  Of course, I didn't tell them about the other half of the joint that I'd put in the freezer.  *wink*  Let it be a lovely surprise one day!


A fantastically easy recipe, the very next time you lay your hands on a piece of lamb - and I recommend you have a look at the Farmer's Choice website, to see what they've got - give this a go.  You can't possibly regret it.  Even if you don't pull the lamb and just go with a roast dinner, the flavour of the lamb won't disappoint.  However, the combination of the lamb, the sauce, the mint jelly and pitta bread is just perfect.  Go on, give it a go!

MINTY AROMATIC PULLED LAMB PITTAS   (serves 8)

Ingredients :

1kg boned and rolled, lamb shoulder

For the marinade :

1 bunch fresh mint, finely chopped
2 garlic cloves, finely grated
2 oranges, zest and juice
50ml olive oil
1 and a half tsp ground coriander
1 tsp smoked sweet paprika
1 tsp ground ginger
1 tsp ground cinnamon
1 tsp ground black pepper
1 tsp sea salt
half a tsp cayenne pepper
half a tsp ground cumin
half a tsp ground cardamom
half a tsp ground allspice
quarter of a tsp ground cloves

3 tbsp plain yoghurt (Greek or Goat yoghurt are best)
3 inch piece of cucumber
1 tsp capers, chopped
2 tbsp fresh mint, chopped finely
8 wholemeal pitta bread
Mint jelly to taste.

Method :

1.  Between 48 and 36 hours before you plan to cook the lamb, place all the marinade ingredients into a bowl and mix well.

2.  Take the lamb and pierce 2 inches into the piece repeatedly all over, with a sharp butcher's knife.  This will allow the marinade to really get in there and do its work.

3.  Place the lamb into a large stout plastic freezer bag and pour the marinade over.  Seal the bag and turn over repeatedly until the lamb is entirely covered.  I recommend you then place it into another large stout plastic freezer bag, as I discovered the aromas were very good at escaping!

4.  Put the bagged lamb into a dish - just in case of leakage - and keep it in your fridge until around an hour or so before you plan to cook it.  Turn the lamb over, to redistribute the marinade, whenever you pass by.

5.  Pre-heat the oven to 140degC/275degF/Gas 1, it shouldn't take long!

6.  Line a large roasting tin with a double layer of silver foil.  This will help when it comes to doing the dishes and you'll be glad you did.

7.  Open the bag and tip the lamb together with the marinade, into the lined roasting dish.  Add up to 500ml of water around the lamb (don't wash the marinade off the actual joint though!) and cover it all tightly with more silver foil.

8.  Place into the oven for the next three and half hours.  Check it half way through, just to make sure that the liquid levels are good.  Add a little more water, if necessary.

9.  In the meantime, make the yoghurt sauce by placing the yoghurt into a bowl.

10.  Using a fine grater, grate the cucumber into the bowl and add the capers, fresh mint, a pinch of sea salt and black pepper.  Stir to combine, then set aside in the fridge for the flavours to develop.

11.  Remove the top layer of silver foil from the lamb when there is a half an hour to go.  This will help colour the lamb and develop the flavours.

12.  Once the cooking time is up, remove the lamb from the roasting tin onto a chopping board.  I recommend dealing with half at a time, so cut it in half and return the other half to the roasting tin, cover it with foil, to keep warm.

13.  Using two forks, pull the lamb apart into shreds.  It is fairly easy to remove any large lumps of fat at this stage, if you so require.  Once the first half is pulled, move on to the second half.  Once the lamb is pulled, add two tablespoonfuls of the cooking liquid to the meat and set aside to keep warm while you prepare the pitta bread.

14.  Lightly toast the pitta bread and make a slit down one side of each.

15.  Smooth a teaspoonful of mint jelly (or you could use mint sauce if the sweet flavour of jelly isn't to your liking) onto one side of each pitta bread.

16.  Fill each pitta generously with pulled lamb, then add two teaspoonfuls or so of the yoghurt sauce.

Serve with oven baked sweet potato fries and a small salad.

Printable version


Related Posts Plugin for WordPress, Blogger...