Showing posts with label easy cooking. Show all posts

18 March 2017

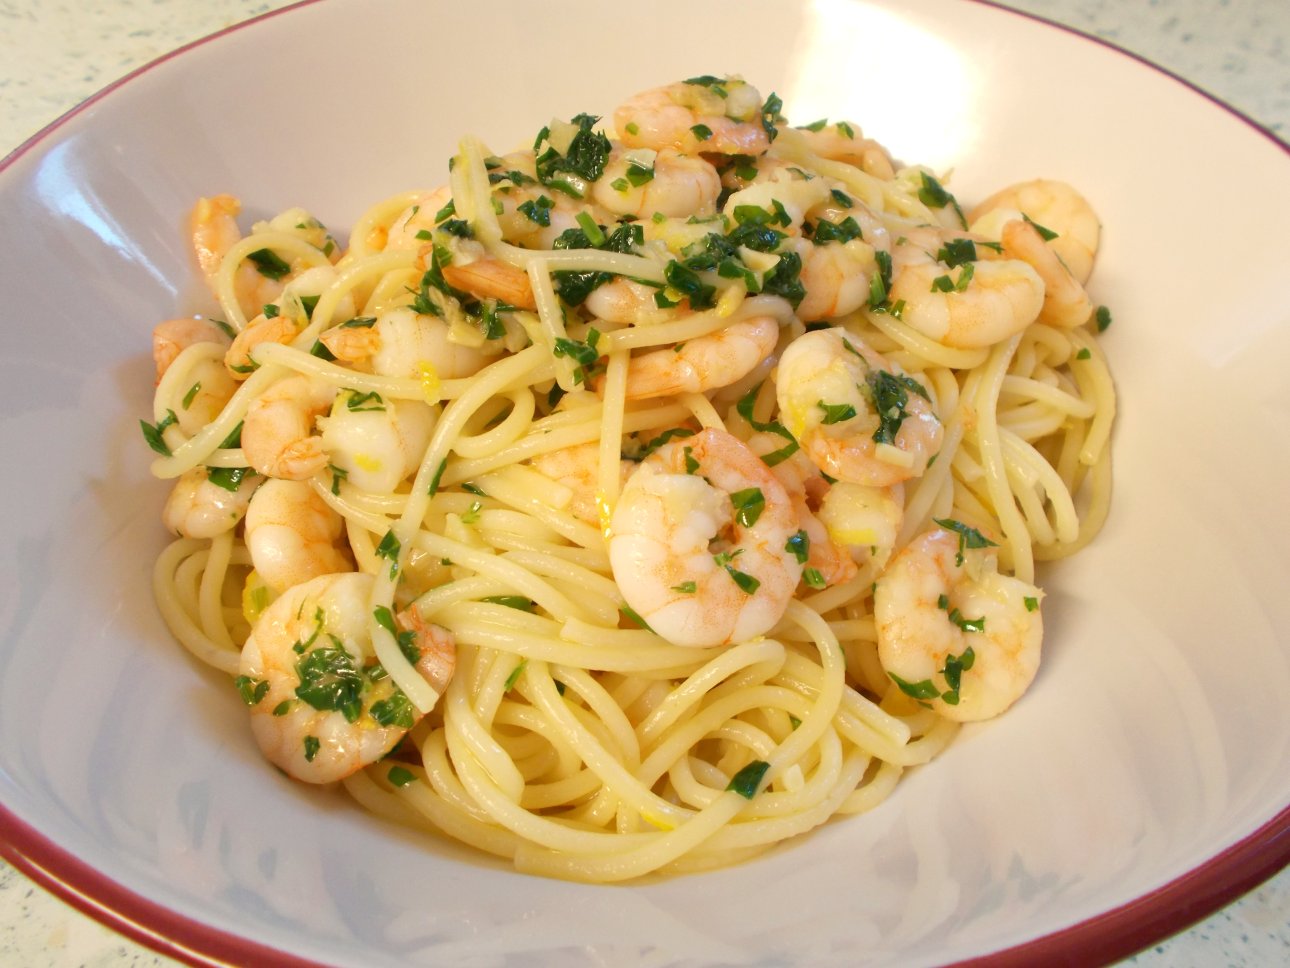
Simple garlic butter prawn spaghetti

Well, this one was a real unexpected surprise.  I wasn't supposed to be cooking this recipe at all and in fact, can't remember why I wasn't cooking the intended one.  Whatever the reasons were - and it could be any number of them! - I decided to go for this because it looked simple and sounded like it could be rather good.

Yes, it's certainly simple - both in number of ingredients, cooking process and method - and as for "rather good", well that's a bit of an understatement.  It turned out to be very good indeed.

The recipe originates with the BBC Good Food website and I could just direct you straight there, however, it occurred to me that if we ever lost that site, I'd lose a very useful and tasty recipe.  So here it is, with thanks to BBC Good Food for the original.

There is only one Cook's Tip for this recipe - and that is, if you are using cooked King prawns (or Tiger prawns), then literally just heat them up in the pan.  Don't cook them, as they are already cooked and will become tough and hard if heated for too long.  They just need to be brought up to a good temperature so as to avoid any risk of encouraging bacteria by half-hearted warming and that's all.


This dish certainly doesn't have big, bold flavours.  However, if you're into garlic butter, lemon and prawns, then you will love it.  The spaghetti gives it that comfort food thing and the lemon prevents the butter from becoming too rich.  I'd have it again tomorrow, I liked it that much!

SIMPLE GARLIC BUTTER PRAWN SPAGHETTI    (serves 2)

Ingredients :

250g dried spaghetti
sea salt
20g salted butter
2 cloves of garlic, chopped finely
a pinch of ground black pepper
250g cooked King prawns
zest of 1 lemon
15g fresh parsley, chopped.

Method :

Firstly, bring a large pan of salted water to the boil.  Add the dried spaghetti and cook to manufacturer's recommendation.

In the meanwhile, melt the butter in a frying pan over a gentle heat and add the chopped garlic.  Sweat, as opposed to fry, the garlic ever so ever so gently until the pieces are softened, adding the black pepper along the way.  Then, add the prawns, the lemon zest and the parsley and increase the temperature just slightly, sufficient to heat the prawns through without cooking them and without frying the pan's contents.

Drain the pasta and add to the prawn & garlic pan.  Toss the pasta in the garlicky butter and serve into warmed bowls, sharing the prawns out evenly.

Printable version

4 December 2015

Midweek beef mince with black garlic - not scary at all!

How do you elevate a midweek minced beef recipe?  Why, add black garlic of course!

Black garlic is exactly that - it's garlic and it's very black, having been aged in balsamic vinegar.  Balsajo is the black garlic I used today and we love it.  The cloves are stickily dark like soft liquorice, but they don't taste of liquorice!  If you're expecting it to taste of raw garlic, it doesn't do that either.  It has a taste all of its own, being sweet but slightly tangy and incredibly delicious.  I haven't yet eaten an entire clove like a sweetie, but the thought is there!

So today we were due to have just plain common or garden beef mince in gravy, which I always try to make as flavoursome as possible.  Just because it's a midweek dish, doesn't mean it should be lacking in flavour or interest.


Having received the Balsajo as a competition prize a few days ago, I was keen to try it out in as many different incarnations as possible - so I backed off on a few ingredients that I would normally include in a midweek beef mince and added a nice whack of black garlic.  The challenge to it was clear - see what you can do with this!  

Because the black garlic has a quiet, sweet flavour, it's effect on the savouriness of the mince dish wasn't a big slap in the face sort of effect but very much one of infusing that mellow richness throughout the meat and gravy.  Just gorgeous.  Every so often you picked up a little chunk of black garlic on the fork, enabling a more intense flavour to come through.

I was astounded at the price for our Balsajo black garlic.  Being so keen on it we were eager to replace our bulb once it was finished and so looked online to find out more.  The Balsajo website has a handy "Where To Buy" section, from which we discovered that if we turned up at our local Sainsbury's with the princely sum of £1.50 (December 2015 price) clutched in our hot little hand, all would be well.  Now how often does that happen?  Not very often, not with "artisan" products that are unusual and slightly off the wall, I've found.  Colour me seriously impressed.

So all that has made me very happy.  After all, it's one thing being given an item to review (although, as I say, I won it in this instance), but quite something else if once you've decided you love it and cannot be without it, to find out that you need to re-mortgage the house in order to do so.  As long as Balsajo keep making this delicious product, I'll keep on buying it and I recommend that you do, too.

MINCED BEEF WITH BLACK GARLIC   (serves 3-4)

Ingredients :

1 tbsp olive oil
500g reduced fat minced beef
smoked sea salt (normal is fine)
ground black pepper
1 onion, chopped finely
1 clove garlic, chopped finely
1 bay leaf
2 tomatoes, chopped
4 cloves black garlic, sliced
quarter of a tsp ground cinnamon
half a tsp dried rosemary
1 Knorr Rich Beef stock pot
1 tsp Bovril
1 heaped tsp French mustard
2 tbsp Bisto Best beef gravy granules.

To serve : mashed potato and seasonal vegetables (I used carrot, broccoli, runner beans and peas)

Method :

Heat the olive oil until really quite hot in a large, deep frying pan.  Add the beef and break up the block into small pieces as it cooks.  Add a small pinch of smoked sea salt and a good helping of black pepper.  Fry until the beef has all browned, the moisture has evaporated and there is just oil left under the beef.  Leave the beef to caramelise for at least two turns, then remove it with a slotted spoon into a bowl.

Remove all but 1 tbsp of the fat from the pan and reserve in case you need more as you cook the vegetables.

Add the onion, garlic and bay leaf and fry until the onion is transparent and soft.  Do not let the garlic burn.

Add the tomatoes and black garlic and stir to combine.  Fry until the tomatoes are starting to break down.

Add the cinnamon and rosemary and stir to combine.

Add the stock pot and sufficient water to just under the level of the mince.

Add the Bovril and mustard and stir to combine.  Bring to a lively simmer, then cover the pan and leave to cook for some 10-15 minutes.

Taste for seasoning and adjust if necessary - the dish can cope with lots of black pepper but remember that the gravy granules are high in salt!

Pull the mince to one side of the pan and remove from the heat.  Sprinkle in the gravy granules and stir immediately.  Return the pan back to the heat and stir gently.  Once the gravy has thickened, you are ready to serve.

Serve with mashed potatoes and seasonal vegetables.

Printable version

2 December 2015

Malay style chicken & peanut curry - silky, spicy and delicious

Well, this one worked out well!  

I think I shall call it a Malay style chicken & peanut curry as the basis of it was the recipe as below, but I halved the Thai curry paste and added the other half in Indian curry paste (a Korma paste) - so it wound up being a fusion of the two.  Knowing what a fusion of races now call Malaysia home, I think that represents Malaysia quite well.  

Original recipe : http://www.bbcgoodfood.com/recipes/2838670/thai-pork-and-peanut-curry

I deviated from the original recipe in several different ways, the first being the addition of the Korma paste as I've already mentioned.  I added a red pepper, chopped into smallish dice, for colour and interest and a white sweet onion cut into eighths, the sweetness of which meant I could leave the soft brown sugar specified in the recipe, out.  I'm always keen, where I can, to reduce the amount of added sugar in dishes.  The sweet red pepper, the sweet onion, the baby sweetcorn, the coconut milk all have an inherent sweetness and I felt that the soft brown sugar would just take it too far.

It was mildly spiced so easy to pep up if you like it hotter and was jolly tasty.  Everyone said they'd be happy to have it again, only with rather less coriander, next time!  LOL  (I'm a bit heavy handed with the coriander, because I like it so much.  I forget that others aren't as keen!).

I've reproduced the recipe with my alterations below, but feel free to cook the original if you prefer the look of that!  I'm not precious about my recipes - they're there for you to use, change, adjust and develop as much or as little as you wish.

MALAY STYLE CHICKEN & PEANUT CURRY   (serves 3-4)

Ingredients :

1 tbsp vegetable oil
3 skinless & boneless chicken breasts, cut into bite sized chunks
ground black pepper 
1 sweet white onion, cut into eighths
bunch spring onions, sliced
small bunch coriander, stalks finely chopped, leaves chopped
1 red pepper, cored and cut into dice
130g baby sweetcorn, halved lengthways
2 tbsp Thai red curry paste
2 tbsp Korma curry paste
2 tbsp peanut butter
400ml can coconut milk
1 tbsp soy sauce 
juice 1 lime.  

Method :

Heat the oil in a large and deep frying pan until very hot and carefully add the chicken chunks.  Fry them until lightly golden on at least two sides and season with black pepper.  Remove from the pan and set aside.

Add the sweet onion, spring onions, coriander stalks, red pepper and baby sweetcorn to the pan and stir fry (adding a little more oil if necessary) until softened.

Return the chicken to the pan and reduce the heat slightly.

Add the Thai curry paste, the Korma curry paste and peanut butter and stir to combine.  Cook over a moderate heat for some 3 minutes or so, until well combined.

Add the coconut milk and soy sauce and stir gently.  Simmer for some 10 minutes or so until the sauce thickens to your preference.

Just prior to serving, add the lime juice (Half a lime at a time, then taste.  If necessary, add more) and stir in the chopped coriander leaves.

Serve with plain white rice, or jasmine rice.

Printable version


20 July 2015

Bacon & tomato gnocchi bake

This unctuous, decadent and totally yummy dish is one of those "made it in the past, didn't get around to blogging it" meals that really should have been blogged long before now.

I've only made it twice (so far) and I'm sure it will appear on the menu again before too very long.

The first time, I added some veggies such as green and red pepper to the mix because I had them there and needed to use them up.  This time, I went with just the mushrooms and we all loved it on both occasions.

I would point out that the dish isn't, strictly speaking, a "bake" but more of a "grill" as you simply grill the sliced mozzarella to melt it and give it a little colour.   However, it really is by the by - I just thought I'd clarify in case you were puzzled by it.


I must be getting old, as the guilt over the calories involved (bacon, cream, cheese ... need I say more?) resulted in my serving it with a side salad instead of the garlic bread we had previously.  You know what?  I actually preferred it with the side salad.  At which all the men in the audience may now take a sharp intake of breath - salad being an anathema to the majority of man-kind, as I'm given to understand.  The majority of the laydeez may take this opportunity to nod wisely.


It was the contrast in textures, though.  The richness and softness of the gnocchi beside the freshness and crunch of the salad ingredients, just worked beautifully for me.

Not that it wasn't extremely good the first, garlic bread accompanied, time.  No, it was pretty darned horny (if you'll excuse the expression - borrowed from my husband, you understand) then, too.  In fact, I think it'd be fairly irresistible no matter how or when you served it.  I'd even give it a go for breakfast, it's that good.

Plus - and this is a big plus - it is another from the age-old and much favoured school of "chop and peel, put into a pan in order and serve" cooking.  Perfect for when you've spent all day chauffeuring your progeny around from school to concert hall, or just plain worn yourself out doing some retail therapy.  Assuming, of course, that the gnocchi is either already made and in your freezer, or already made and in a bag in your fridge.  Don't tell anyone, but mine was made by Mr Asda.  Their fresh gnocchi is very acceptable indeed.

If you've got any teenagers in the house, don't expect there to be any leftovers for lunch.  Even after a perfectly adequate serving with salad alongside, they will still find a corner for a little bit more.  I'm not sure, but I think son & heir may even have licked the plate.

As for COOK'S TIPS, it really is so simple that there aren't many.

Firstly, it is as well to use the best ingredients you can afford with this one.  The simplicity of the dish is such that if you use cheap tinned tomatoes (for instance), it's going to show.  For the sake of the few pence that's involved, go for the best you can afford.  It really is worthwhile.


Lastly, don't be tempted to use double cream.  Not even if you've got some left over in your fridge without a home to go to.  Buy some peaches and use it on them, if you must.  Single cream won't leave you with the clagginess that double will, when used in this context.  It really is a very rich tomato sauce - and extra fat is neither required nor welcome.

Either saladed or garlic breaded, this is a great one for a weekday dinner.  Your menfolk will thank you, either way.

BACON & TOMATO GNOCCHI BAKE   (serves 3-4)

Ingredients :

1 tbsp olive oil
340g back bacon, diced
1 large shallot, diced
2 cloves of garlic, finely chopped
1 tsp paprika
half a tsp smoked sweet paprika
6 good sized chestnut mushrooms, sliced
1 large tasty tomato, chopped
400g can of chopped tomatoes
1 tbsp tomato puree
1 tbsp tomato ketchup
150ml water
1 tsp Worcestershire sauce
1 tsp sugar
half a tsp finely ground black pepper
2-3 tbsp single cream
1 tbsp finely chopped parsley
500g fresh gnocchi
2 balls of mozzarella cheese, sliced.

Method :

1.  Heat the oil in a large deep sided frying pan and once hot, add the bacon pieces.  Fry until the fat has begun to render and the pieces have begun to caramelise.  Do not allow to burn.

2.  Add the shallot and garlic and continue to fry until the shallot has softened and turned transparent.

3.  Add the two types of paprika and stir to combine.  Fry for another 30 seconds.

4.  Place a large saucepan of slightly salted water on to boil.

5.  Add the mushrooms and the tomatoes in all their guises, the Worcestershire sauce, water, sugar and black pepper.  Stir well, then allow to simmer for 15-20 minutes to allow the flavours to combine and the sauce to thicken and reduce.

6.  Once the sauce has reduced to a thick, chunky texture, remove from the heat and add the cream and parsley.

7.  Put the gnocchi into the boiling water.  Once they float to the surface (3 minutes, no more), they're done.  Remove from the water using a slotted spoon and add them to the tomato sauce.  Stir them in gently, making sure each gnocchi is coated with sauce.

8.  Place the sliced mozzarella over the surface of the gnocchi/sauce mixture and place under a hot grill.  Once the mozzarella has melted and begun to colour, you're ready to serve.

I served mine with garlic bread and on the second occasion, with a side salad.  The choice is yours!

Printable version


Related Posts Plugin for WordPress, Blogger...