Showing posts with label Pasta dish. Show all posts

18 March 2017

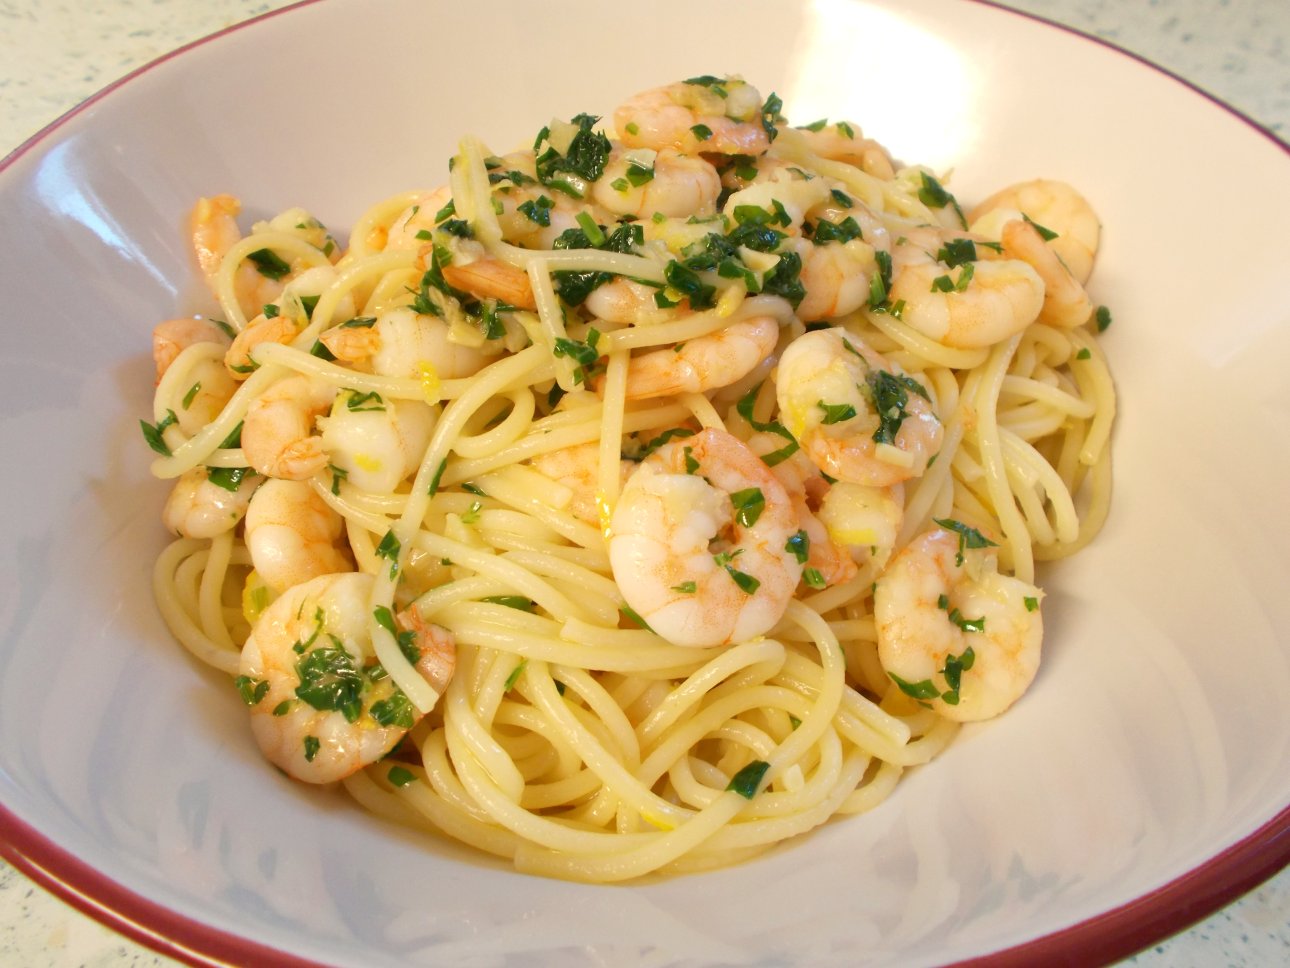
Simple garlic butter prawn spaghetti

Well, this one was a real unexpected surprise.  I wasn't supposed to be cooking this recipe at all and in fact, can't remember why I wasn't cooking the intended one.  Whatever the reasons were - and it could be any number of them! - I decided to go for this because it looked simple and sounded like it could be rather good.

Yes, it's certainly simple - both in number of ingredients, cooking process and method - and as for "rather good", well that's a bit of an understatement.  It turned out to be very good indeed.

The recipe originates with the BBC Good Food website and I could just direct you straight there, however, it occurred to me that if we ever lost that site, I'd lose a very useful and tasty recipe.  So here it is, with thanks to BBC Good Food for the original.

There is only one Cook's Tip for this recipe - and that is, if you are using cooked King prawns (or Tiger prawns), then literally just heat them up in the pan.  Don't cook them, as they are already cooked and will become tough and hard if heated for too long.  They just need to be brought up to a good temperature so as to avoid any risk of encouraging bacteria by half-hearted warming and that's all.


This dish certainly doesn't have big, bold flavours.  However, if you're into garlic butter, lemon and prawns, then you will love it.  The spaghetti gives it that comfort food thing and the lemon prevents the butter from becoming too rich.  I'd have it again tomorrow, I liked it that much!

SIMPLE GARLIC BUTTER PRAWN SPAGHETTI    (serves 2)

Ingredients :

250g dried spaghetti
sea salt
20g salted butter
2 cloves of garlic, chopped finely
a pinch of ground black pepper
250g cooked King prawns
zest of 1 lemon
15g fresh parsley, chopped.

Method :

Firstly, bring a large pan of salted water to the boil.  Add the dried spaghetti and cook to manufacturer's recommendation.

In the meanwhile, melt the butter in a frying pan over a gentle heat and add the chopped garlic.  Sweat, as opposed to fry, the garlic ever so ever so gently until the pieces are softened, adding the black pepper along the way.  Then, add the prawns, the lemon zest and the parsley and increase the temperature just slightly, sufficient to heat the prawns through without cooking them and without frying the pan's contents.

Drain the pasta and add to the prawn & garlic pan.  Toss the pasta in the garlicky butter and serve into warmed bowls, sharing the prawns out evenly.

Printable version

15 November 2014

Catalan Butifarra sausage pasta with chestnuts - thank you, Quiet Waters Farm

Wow.  These are by far and away the best sausages I have ever had the very great pleasure of sampling.  However, having said that, I'm getting a bit ahead of myself.  As my Dad would say, "start at the beginning".

My lovely friend Marcus Bawdon, he of "Country Woodsmoke" blogging fame and a mean old barbecuing pal (if you've not been to his blog, do go - but be ready to salivate a LOT), has been singing the praises of Quiet Waters Farm and their produce, particularly the sausages, a fair amount just recently.  So when I spotted - on the Quiet Waters Farm Facebook page - a competition to win some of their sausages, I was quick to slip a late entry in and crossed my fingers.

Lo and behold - and much to my surprise - I trotted in as one of the runners up and won three packs of sausages!  Yay!  I even had a choice as to which sausages I would like and went for the Catalan Butifarra (a delicate balance of black pepper and sea salt in a pork sausage), the Toulouse (garlic and white wine) and the Siciliano (fennel, garlic and lemon).

Now because of Marcus' bigging them up on his blog, they had an awful lot to live up to.  However, I trust Marcus and know that if he says something is great - it's probably a little bit better than great.  So I was super excited to receive and try these sausages.

They arrived on the day they were supposed to, tightly packaged and still frozen inside a polystyrene box that made it very easy to put them straight into the freezer.  Because we'd arranged the day of delivery, I had been able to include them in this week's menu plan and had opted to try the Catalan Butifarra ones first.  Now I had also done a little research about the Butifarra/Botifarra sausage in general and discovered that there are a number of different kinds of Butifarra sausage that originate from different areas of the world - hence the slight difference in the spelling.  Having the "Catalan" bit there in the name enabled me to pinpoint the research and establish what the primary flavours were likely to be and what, generally, people put with them.  Of course, it goes without saying that whatever the general method of cooking and serving was, I would wind up doing something different.  However, I learned that these sausages are often eaten with broad (or fava) beans - so earthy type flavours - and did not necessarily require pan frying, as they were often simply placed into a stew type of dish and allowed to cook gently for a long time.

So, "earthy flavours" eh?  Immediately - and that'll be because of the time of year - my thoughts flew to chestnuts.  I adore chestnuts and so do piggies, so chestnuts were a definite.  Naturally, chestnut mushrooms were hot on their heels and would be just perfect, but I needed something that would give colour and sweetness whilst retaining that "close to the earth" theme.  Peas were no good, sweet yes but earthy?  No.  Butternut squash was the answer, but because it can be slightly bland I thought I'd roast it to gain that lovely intensity of flavour that roasting a butternut can bring.

So I'd got my main ingredients, but as of yet no sauce.  Pasta has to have sauce.  I also had no input from any herbs - and I love herbs.  The obvious choice for herbs was a pesto - and I debated red pesto versus green pesto versus home made herb pesto but with a nod towards the fact that I'd quite like you to be able to reproduce the recipe, I went with a common or garden basil and pine nut, green pesto.  The pesto would give the background herb flavour that I had in my imagination, whilst saucing the pasta - but I wanted more than just a potentially greasy pesto.

At this stage, I was still envisaging the contents of the sausage pan being mixed into the pasta prior to serving.  Right up until I had a flash of inspiration and considered saucing both the sausages and the pasta, but with different sauces that would combine sympathetically in the bowl.  Aha!  We're onto something now.  It was a simple matter of adding a small amount of quite intensely flavoured vegetable stock to the sausage mixture, which would deglaze the pan and gather all those lovely sausagey, savoury flavours that would otherwise be lost.  Then, serve the pesto pasta into the warm bowl and add the sausage component next, with its light sauce that would trickle through the pasta just perfectly.  A small sprinkle of fresh chopped parsley over the top to underline the freshness of the herb flavours and a light grating of parmesan for its umami and salt and I was there.

All this just totally relied upon the sausages being ace for pork flavour and not exceptionally fatty.  Now flavour is a subjective thing and all I could do was hope, however the fat content of the sausages I knew about, as in talking to Quiet Waters Farm on their Facebook page, I'd established that the fat ratio ran at around 75/25 percent lean to fat.  Well that sounded okay to me - I'd just keep an eye on the fat that was accumulating in the pan and use as little as possible to begin with, then prior to adding the stock, if there was too much I could easily remove some by spooning it off.  Perfect.

You see, I had thought about this recipe before attempting it.  Just a little bit.  *chuckle*

Oh my goodness - or ERMAGHERD! - it worked and it worked absolutely beautifully.


These Catalan Butifarra sausages are incredible.  There is a claim on the website that "we know you will not have tasted anything quite like them before" and they are absolutely right.  After I had tasted a piece during the cooking, I described them to hubby as having a porky flavour that is more roast pork than sausage pork and that they are quite intensely porky.  He got a bit concerned at that, as he hates (with a passion) sausages that taste of "old pork".  You know how pork can sometimes taste really "piggy" more than porky.  Well not these babies.  Having tasted their succulent gorgeousness, he declared himself both surprised and relieved at the cleanness of the flavour.  The black pepper is slow to rise to the surface, behind the gorgeous richness of the intense pork that is subtly supported by the sea salt.  However, when it does, the flavours just dance across your tongue.  The robustness of the sausage is everything you would hope it could be - even without their natural casings to contain them (which I removed), there's no falling apart, no mushiness (that'll be the lack of cereal, then!), just firm, succulent, tasty sausage.  Oh happy days.  Hubby even went so far as to declare that they were the best sausages he had ever sampled (and he's a sausage connoisseur, let me tell you) - and I agree.

Having done "the fancy thing" with the Catalan Butifarra, we both then had a terrible hankering for a couple of them, pan fried, in between two slabs of doorstep Farmhouse bread, with lashings of real butter, HP sauce and a huge mug of builders' tea.  Which, at some point, just HAS to be done. 


Now, having got all the superlatives out of the way, let's have a think about any "Cooks Notes" I might have for you.

Firstly, if you should invest in some of these wonderful sausages (whoops, another superlative slipped in), which I heartily recommend, then you can follow the recipe as written.  However, if you're intending on using another type of sausage, go for as high a percentage pork as you can afford.

Secondly, when cooking the shallots it is important not to think "the pan is a bit dry, I'll add more oil".  No, add a splash or two of water, so that the shallots steam for a while before returning to frying.  You can do this several times, without any fear of loss of flavour.  The most important thing is to keep the oil to a minimum.


Thirdly, as with the oil, you need to keep the salt to a minimum.  The sausages have a natural saltiness in their recipe and you have the potential to make the whole thing over salted if you take into account the stock, the salt in the pasta water, the salty pesto and lastly the saltiness of the grated parmesan - so you definitely don't need any additional salt.  Tie your hands behind your back of you think you're likely to over season!

If you fancy it, to up the gorgeousness, you could add some porcini mushrooms along with the chestnut mushrooms - and use their soaking water to make the vegetable stock mixture.  They would add another layer of earthy flavour along with making the recipe a little bit more special.

So there you have it!  I cannot recommend these sausages enough - do, please, to go the Quiet Waters Farm website (just click on the name) and check out their Farm Shop where you'll find the hundreds of different type of sausages that are on offer.  The next ones to cross my cooker will be the Toulouse - and I can't wait!

CATALAN BUTIFARRA SAUSAGE PASTA WITH CHESTNUTS   (Serves 3)

Ingredients :

1 tbsp olive oil, split into 3 tsp
half a butternut squash (the thin end is best)
2 banana shallots, finely chopped
200ml warm water and 300ml warm water
1 pack of 6 Quiet Waters Farm Catalan Butifarra sausages, skinned and broken into small pieces
5 chestnut mushrooms
1 tsp vegetable stock base
250g pasta (spirali is good)
2 tbsp basil and pine nut pesto
2 tbsp chopped fresh parsley
parmesan cheese, for grating
sea salt and black pepper.

Method :

1.  Pre-heat the oven to 220degC/425degF/Gas 7.

2.  Cut and peel the butternut squash, then slice into small bite sized cubes.  Put one tsp of olive oil into a bowl with the butternut pieces, add a touch of seasoning and stir until the pieces are all coated in the seasoned oil.

3.  Tip the butternut pieces out onto a baking tray and roast for 20-25 minutes.

4.  Fill a large saucepan two-thirds full with water, add a pinch of salt and place on to boil.

5.  In a large frying pan, add the last two tsp of olive oil and the finely chopped shallots.  Do not add any salt, as between the butternut and the sausages, you already have a fair amount of salt there.  Sweat the shallots down for 5-10 minutes or so, if you find the pan is a little dry, add 100ml of warm water to add a little steam which will hurry them along a bit, without the threat of excessive colour.

6.  Once the shallots are softened, but not coloured, add the broken sausage pieces.  Increase the heat to keep the pan going, otherwise the cold sausage pieces will reduce the heat in the pan and everything will just boil instead of fry.  

7.  Once the sausage pieces have started to colour, add the mushrooms to cook alongside.  Cook everything until the sausage pieces have changed colour and are just cooked through.

8.  Once the water in the saucepan has boiled, add the pasta and cook to manufacturer's instructions.

9.  Back to the sausages.  Add 300ml of warm water and the vegetable stock base.  Stir to combine and cover the pan.  Reduce the heat and simmer for as long as it takes for the pasta to cook, then remove the lid and stir.  If the contents are particularly wet, leave the lid off to evaporate some of the liquid while you deal with the pasta.  If there is just enough liquid to form a glossy sauce, replace the lid - you're ready to go.

10.  Once the pasta is cooked, drain it well and add the pesto.  Stir through.

11.  Serve the pasta into warmed bowls, then add the sausage mixture on top.  Then sprinkle on a tsp of chopped parsley and grate a little parmesan over the top.

12.  Sit, eat and enjoy.

Printable version

26 June 2012

Roasted Vegetable & Bacon Pasta

I am one of those people who believes that everything can be made better by including bacon with it.  Got to wait in the car for hours?  Have a bacon sandwich - makes it better straight away.  Got a boring old chicken recipe on the list for dinner?  Put some bacon with it - that'll cheer it up no end.  Got to stand on the touchline watching your son put his best foot forward for the local footie team?  A bacon roll can save the day.  So I wasn't wrong when I chose bacon for the meat aspect of this pasta dish.

From hubby's point of view, it could have been made better by losing the garlic and adding some oregano.  I thoroughly agree with him where the oregano is concerned - and have reflected that in the recipe set out below.  I'm not so sure about the garlic, however, as I feel it lent a lovely savoury depth to the entire dish which helped to make it a cohesive whole as opposed to a number of different ingredients on the same plate.

Son & heir had a friend over for tea that day and I felt I was taking something of a risk presenting said friend with a) courgette & aubergine, b) cooked tomatoes and c) goat's cheese.  However, I had confidence in the ability of the bacon to carry us through.  I was using some of Spring Fields Butchers' beautiful smoked back bacon which is always fabulous in that the rashers are huge, thickly cut and tasty as anything.  I would definitely go for some substantially sized rashers if you're going to be cooking this one - as limp thin bacon could wind up being too chewy when accompanying the soft vegetables and pasta.

We got a "thumbs up" from both boys, as they both cleared their plate and declared it to be "lovely" (and without a hint of sarcasm, too!).  Amazing.  Made me wish I'd included mushrooms in the mix!  (Which is a very good idea, if you like mushrooms, by the way).

Hubby wasn't too keen on the fact that the dish didn't have a sauce with it - just relying on the juiciness of the roasted vegetables and goat's cheese wasn't enough for him.  I suspect it's pure and simply a preference thing, as I was quite happy with the "sauceless" state and - to be honest - it made a pleasant change to not have an overwhelming cheese or tomato sauce.  I felt it gave the vegetables a chance to shine on their own, without being overshadowed by a sauce.  The rapeseed oil that I'd used to roast the vegetables was a lovely nutty flavoured one and the cherry tomatoes lent their juice to the overall picture.

The only thing missing was a lovely glass of wine, a patio and a warm evening!

ROASTED VEGETABLE AND BACON PASTA   (feeds 4)

Ingredients :

1 courgette , cut into one inch dice
half an aubergine, cut into one inch dice
a handful of cherry tomatoes, split across the stem end
1 red onion, halved and each half cut into four wedges
two cloves of garlic
sea salt & freshly ground black pepper
1-2 tsp dried or fresh oregano
2 tbsp rapeseed oil or olive oil
500g back bacon
400g spirali pasta
50-100g Parmesan cheese (to taste)
a handful of fresh basil leaves, shredded
130g soft goat's cheese.

Method :

1.  Pre-heat your oven to 180degC/350degF/Gas4 and prepare a baking tray large enough to carry all the vegetables.  I usually cover the tray with non-stick silver foil, just because it makes the washing up easier!

2.   Place all the vegetables, including the garlic, onto the roasting tray and sprinkle with seasoning, oregano and the oil.  Using your fingers, toss the vegetables until they are well coated with the oil.

3.  Place the tray into the oven and bake for 25-30 minutes, or until the vegetables are tender and just beginning to caramelise.

4.  In the meantime, get a big pan of salted water on to boil for the pasta and grill the bacon, cutting each rasher into largeish pieces with some scissors and retain, somewhere warm.

5.  Once the pasta water boils, get the pasta in and cooking according to the packet instructions - usually 9-11 minutes.

6.  Once the vegetables are tender, take them out of the oven and squash the two cloves of garlic into a paste.

7.  When the pasta is cooked to your satisfaction, drain well and add the vegetables, bacon, parmesan, basil and some seasoning and mix gently to combine.

8.  Spoon the pasta mixture onto warmed plates and break pieces of goats cheese over the top.

Serve.

.


8 May 2012

Springtime Pasta with Pork Meatballs

It was only a week ago that I cooked this dish, but it seems like it was months ago!  So much has happened - in the kitchen, anyway - since then!

So, scratching around in my brainbox, I seem to remember that I chose this recipe because a) I liked the "springtime" aspect of it and b) it was another "variation on a meatball", of which we must have quite a few, now.

I'm afraid that I rather killed the success of the dish for hubby, by using too much garlic in the meatball mixture (although the recipe states FOUR cloves of garlic - and I only put two!) and letting the sauce reduce too far before combining with the pasta .

However, son & heir and I both enjoyed our helpings - even if we were garlic-monsters for (probably) days afterwards.  I'm a bit confused over the garlic thing, truth be told, as even though I use jumbo garlic (with big fat cloves) the recipe didn't state "four small thin garlic cloves" - it just said "4 garlic cloves, crushed".  I reckon I'd have been fine with one clove of jumbo garlic and smaller meatballs, though.  The garlic flavour was a teensy bit on the side of raw garlic, which means that the cooking - although it had cooked the mince through - hadn't done justice to the grated garlic contained in the meatballs.  Smaller meatballs would solve that problem.

As for the sauce, well it was one of those cream sauces where you sit and watch it reducing to a suitable thickness, then think "is it too thin?" and leave it a bit longer - by which time it goes over and becomes too thick.  I really should learn to keep a little bit of pasta water back, so that I can let a thick sauce down when it calls for it.  Hey ho.

I included some shredded Little Gem lettuce in the recipe.  Son & heir was aghast at this idea, imagining soggy wet hot limp lettuce.  However, I put it into the sauce just fractionally before it was due to be served - and by the time it was served, the lettuce had just wilted and was still crunchy.  Perfect!

The lettuce added an additional texture and flavour to the dish that sat well with the "Springtime" theme and meant that you didn't need to use quite so many peas to achieve the same appealing colour (or should that be "a-pea-ling" colour?).

Hubby also reckoned that the sauce lacked flavour, which I can see where he was coming from with it.  I felt that the flavour was very subtle - and had been stamped all over by the sheer power of the garlic in the meatballs.  As such, I've included a little Worcestershire sauce in my version of the recipe.  I know that in pasta dishes like our Bacon & Leek Pasta, a little dash of Worcestershire sauce makes all the difference.

I might give this one another go - with less garlic, as per the recipe below - very soon and see if hubby likes it a little better.  However, in the interests of sharing, you might find that husbands and fathers aren't so keen on this one, as the rest of the family are!

SPRINGTIME PASTA & MEATBALLS   (feeds 3)

Ingredients :

400g pork mince
1 small onion, grated
1 garlic clove, grated
1 tsp lemon zest
50g grated Parmesan cheese
1 tbsp olive oil
400g pasta of your choice (spaghetti or spirali work well)
150ml double cream
a good splosh of Worcestershire Sauce (to taste, effectively)
150g frozen peas (petits pois work well)
1 Little Gem lettuce, leaves separated, washed well and shredded
handful of parsley, roughly chopped.


Method :


1.  In a bowl, mix the mince, garlic, zest and half the Parmesan, together with some salt & pepper.  Shape into 16 or so small (walnut sized) meatballs.


2.  Heat the oil in a frying pan and fry the meatballs for 10-15 minutes, until a rich golden colour.


3.  In the meantime, put a large pan of lightly salted water on to boil and cook the pasta according to packet instructions.


4.  Drain and reserve some 150ml of the cooking liquid.


5.  Add the cream, Worcestershire sauce and a little of the pasta water to the meatballs, making sure the pan is deglazed at the same time.  Stir well to combine, then taste for seasoning and adjust if needs be.


6.  Add the peas and bring back up to temperature, bubbling until the sauce is thick and the meatballs are safely cooked through.


7.  Add a little more pasta water if the sauce has reduced too far, then add the lettuce & parsley, stir through, combine with the pasta and serve immediately with the remainder of the Parmesan sprinkled over the top.


Printable version
.

30 April 2012

Tuna & Vegetable Lasagne - very definitely out of the ordinary!

Announcing ... hubby's truly spectacular Tuna & Vegetable Lasagne!

This recipe was dreamt up during our brainstorming session, last Monday.  Hubby had wanted to make a Lasagne since for ever and it just seemed that the time was right for the Lasagne, as we were having a bit of an Italian theme.

We picked a day when (we hoped!) we wouldn't have too much else on, so that he could give the recipe the time it required.  We didn't want him to be rushing the various stages, as when you're developing a recipe from scratch and without a recipe to follow, some times you need time in which to make changes.

As it was, he travelled through the various stages (starting in the morning, with the fennel sauce) without mishap or any changes to the original plan - and the end result was pretty darned exceptional.  It continued being exceptional the following day for lunch, too!

I'll pass you over to hubby now, so that he can talk you through the process :


As most people will already know, a classic Lasagne has several elements and cooking stages to tussle with.  These include making two sauces and then assembling with pasta sheets before smothering in cheese and then letting the oven do the rest.  In truth, one could pre-buy the sauces and then just put the thing together in a dish for a perfectly good Lasagne...but where's the fun in that eh?  This recipe adds a couple of extra tasks which aren't very taxing but do add a little to the time required.  For the sake of simplicity, I'll list all of the ingredients needed for all of the stages and then move on to the method.

TUNA & VEGETABLE LASAGNE    (serves 5-6)

Ingredients :

For the Tomato & Tuna Sauce

1 medium Onion (or three banana shallots), chopped small
1 clove Garlic, minced
2 Tbs Olive oil
1 Courgette, chopped to 1cm pieces
1 large Carrot, chopped to 1cm pieces
6 Asparagus stalks, tips removed, stems cut to 1cm pieces
185g Tin of tuna, in Water or Brine  (130g drained weight)
1 Tin Chopped Tomatoes
2 tbs Tomato Puree
1 tsp Oregano
1 tsp Basil
1/2 tsp Thyme
Dash of Worcester Sauce

For the Fennel Bechamel

1 Fennel (preferably with lots of the green frondy parts on top)
200ml good Vegetable stock  (I use Marigold stock powder)
75g Salted Butter
75g Plain Flour
2 pints semi skimmed Milk
Pinch of Nutmeg.

Additional Ingredients

1 pack Lasagne sheets
100g grated Cheddar Cheese
75g grated Parmesan

Method :

1.  Take the fennel and slice into thin strips, reserving the green frondy parts, and place in a small saucepan with the vegetable stock.  Simmer these together for ten minutes or until the fennel softens.  Drain the stock into a cup and set aside before using a hand blender to puree the softened fennel.  Put the fennel puree into a bowl and set aside.

2.  Melt the butter in a saucepan and then mix in the flour, stirring vigorously with a wooden spoon.  Take great care not to let the flour burn on the bottom of the pan or you'll have to start all over again.  A thick paste, called a roux, will quickly form in the pan.  Keep stirring for a few minutes to allow the flour to cook out before adding enough milk to loosen the roux.

3.  Keep adding more milk, little by little, making sure that it mixes in well, until you have a thick sauce.  At this stage it's probably best to switch to a balloon whisk as you continue to add more milk until the sauce gets to a nice consistency.  I aim for a bit thicker than double cream.  At this stage, season the sauce with salt (not too much, remember the butter was salted) pepper and a little grated nutmeg.  Now add the pureed fennel and the finely chopped green frondy parts.  Bear in mind, that the flour in the sauce will continue to cook and thicken throughout the whole process so you may need to readjust the consistency, by adding more milk, after adding the fennel puree.


4.  Taste to check the seasoning and add more if necessary, before setting the sauce aside. As a final point, I should mention that classic bechamel uses milk which had previously been infused with onion and cloves.  I elected not to use infused milk because I didn't want to lose the delicate flavour of the fennel.

Now go and have a nice cuppa.....your whisking arm will thank you for it.

5.  For the tomato sauce you will need firstly to par boil the carrots in just enough water to cover them until they are slightly tender before being set aside.  Keep the liquid that the carrots cooked in as this will be added to the tomato sauce, along with the fennel stock reserved earlier.

6.  Saute the onion and garlic gently in the olive oil until soft.  Add the herbs and cook for a minute or two before stirring in the tomato puree.  Allow this to cook for a few minutes and then add the chopped tomatoes and the reserved cooking liquids from the fennel and the carrots.  Simmer for 15-20 minutes, until the tomato sauce has thickened a little, before adding the courgette and asparagus.


7.  Cook through until the vegetables begin to feel tender and then stir in the drained tuna. After adding a dash of worcester sauce, check for seasoning and consistency, which should be a nice thick ragu-a-like, before adding the carrots and then taking the pan off the heat.

Both sauces should be allowed to cool a little before assembly, which goes  like this:

8.  Firstly place a thin layer of the bechamel on the bottom of the lasagne dish.  This layer is here purely to prevent the lasagne sheets from sticking to the bottom of the dish.  Now place a layer of lasagne sheets to cover the whole base of the dish and then top it with half of the tomato sauce.  Another layer of pasta is followed by a layer of bechamel, then pasta, then tomato, then pasta and finally a top layer of bechamel.

9.  The whole lasagne can now be put aside for cooking later in the day or frozen for cooking another time (allow an extra 45 mins in the oven if cooking from frozen).

10.  When ready to cook, sprinkle the grated cheddar evenly over the top and then the finely grated parmesan over that.  If cheese isn't really your thing (quelle horreur!) then the cheddar can be omitted....but definitely not the parmesan.

11.  Cook in the oven, preheated to 180c for 45 minutes, rotating the dish halfway through cooking.  When ready, remove from the oven and allow to rest for at least 10-15 minutes. Ideally, lasagne should be served warm, rather than hot (oh, and the aroma generated will drive your family nuts....hehe).

Serve with your preference of salad.


Related Posts Plugin for WordPress, Blogger...