30 December 2015

Bacon with Red Pepper Pesto Pasta - done in a twinkling!

What a success this one proved to be!  Mind you, I don't know why I'm sounding surprised because it uses three of my favourite things - bacon, mushrooms and Asda's ricotta & red pepper pesto.  To my way of thinking, it was a winner before I even took my knife to the bacon.  However, sometimes what seems like the perfect combination of ingredients turns out to leave a little to be desired in one way or another - but happily, not so here.  Plus, of course, it has the added bonus of being simplicity itself to prepare.

Oh and as a little aside, have you noticed how often my food seems to turn out to be orange coloured? I don't try to make it that way, honest I don't, it seems as though my choice of ingredients has a marked lean towards the orange.  But then, the menfolk grumble if there's too much green on the plate, grumble again if I serve them "brown food" and would justifiably grumble at being served black food, so aside from white I guess that just leaves the red/yellow/orange palette as there's not too many blue foods out there!  So this one is following along in the tradition of being the seemingly man-friendly colour of orange. 

Now, let me recommend to you Asda's little pot of Ricotta & Red Pepper pesto.  This seemingly unassuming little jar contains one of the most delicious substances that I have used in everything from sandwiches to pasta.  Along with the rich ricotta and flavoursome red pepper, it also has a sneaky little bite from red chilli that just makes it glorious.  I would be very happy if you were all to rush out and buy some, love it and continue buying it, as that would mean it will stay around on the shelves for ever!

The pesto marries up with bacon perfectly, of course.  The celery adds a welcome freshness that prevents the dish from becoming too heavy on the palate and the addition of the small amount of sour cream helps to loosen the pesto into a sauce without impinging on the flavour at all.


I call this one a very definite win.  The empty bowls and enquiries as to whether there was any left, gave proof to that belief, too.  As a mid-week, easy, relatively cheap dinner, you can't go wrong.

BACON WITH RED PEPPER PESTO PASTA   (serves 3)

Ingredients :

1 tbsp olive oil
350g smoked back bacon, trimmed of fat and diced
1 large onion, diced finely
1 clove garlic, chopped finely
2 sticks of celery, diced finely
black pepper
half a tsp dried oregano
200g quartered mushrooms 
190g jar red pepper & ricotta pesto
1 tbsp sour cream
200ml water
250g dried pasta shapes - tubes are good.

Method :

Heat the olive oil in a large deep sided frying pan and add the bacon.  Fry over a high heat until all the moisture has evaporated and the bacon is cooked through.

Reduce the heat to moderate and add the onion, garlic and celery, along with a pinch of black pepper and the oregano.  Fry until the onion is transparent and the celery is beginning to soften.

Add the mushrooms and continue to fry until they are beginning to soften.

Three quarters fill a large saucepan with water and add a pinch of salt.  Bring to the boil and once boiling, add the dried pasta.  Remember to give the pasta a stir every so often to ensure it's not sticking to the bottom of the pan.  Cook for 10-12 minutes, or to manufacturer's instructions.

Add the contents of the pesto jar to the bacon mix, along with 100ml of water (you can use it to rinse out the pesto jar, so as to get every last little bit!) and stir to combine.

Once the ingredients are looking mixed, stir in the sour cream.  Simmer on a very low heat until the pasta is ready.  You may need to add a little more water from time to time to keep the mixture saucy.

Once the pasta is cooked, drain it well and return it to the hot saucepan.  Take the bacon mixture and decant it on top of the pasta and stir gently, but thoroughly, through.

Serve in warmed bowls with some garlic bread to accompany.

Printable version

28 December 2015

Devilled Eggs - now I understand the attraction

I know that people have different opinions of Facebook, however, I love it.  It has enabled me to find out more about what ordinary people in other countries eat, than ever any cookbook would have done.  One of the most regular dishes that I've seen occur across the United States and Canada (ex-pats included) is the humble devilled egg.  Now it turns out that devilled eggs were being served as far back as Ancient Roman times and it seems that just about every country that has chickens, has a recipe for their own version of devilled eggs.

Now I had never experienced a devilled egg, even though I knew they had been popular in this country at one time.  I was intrigued.

Photo by Morgan Davies-Scorer
Eggs are one of my very favourite foods.  I'm well known for declaring that "you'll never be hungry with an egg in the house", such is my confidence in the little lovelies.  Son and heir is also partial to an egg, but with hubby we have to be careful as he is quite obviously on the allergic side of sensitive as regards them.  Consequently, making devilled eggs has never been top of my list.  Until this Christmas when I couldn't stand not knowing any longer and decided to make some.

Photo by Morgan Davies-Scorer
Okay, so now I understand the attraction.  Obviously, you have to like all the component parts of a hard boiled egg to appreciate them.  That's no problem for me, I used to take a hard boiled egg to school for my playtime snack (feel sorry for my classmates, some of those eggs were quite whiffy!).  There's something so moreish about the rich unctuousness of the filling.  The savoury yolk, mixing with the creamy mayonnaise, tangy vinegar, mustardy warmth, buttery richness and the final hit of enlivening chilli from the hot sauce, all encased in the coolness of the set egg white.  Oh and a quick word about the Mic's Chilli "Of Foam & Fury" hot sauce.  Because it has a degree of India Pale Ale as an ingredient, it added an interestingly hoppy angle to the end flavour.  I recommend it!  A devilled egg is so simple - and as with all things simple, so good.

I might have come late to this particular party, but I can see I shall be making up for lost time where devilled eggs are concerned.  I wonder if I've time to put a couple on to hard boil now ....


DEVILLED EGGS   (makes 8 halves)

Ingredients :

4 eggs, hard boiled and shelled
1 tsp English mustard powder
a pinch of ground black pepper
1 tsp soft salted butter
half a tsp celery salt
hot sauce, to taste (I used a quarter tsp Mic's Chilli "Of Foam & Fury" hot sauce)
1 heaped tbsp mayonnaise
half a tsp white wine vinegar
cayenne pepper and fresh parsley, to garnish.

Method :

Cut each egg in half lengthwise (trying to achieve bisecting the yolk in each case).

Gently scoop out the yolk into a bowl, leaving the white intact.

Take a super-fine slice from the underside of the egg, so that it will stand straight on a plate, then reserve.

Break the yolk down into a powder with a fork and add all the ingredients other than the cayenne and parsley.

Mix gently until all is well combined and you have a fairly smooth consistency.

Either fill a piping bag with the mixture, or spoon the mixture carefully into the empty egg whites.  Make sure you gain some height with the filling.

Sprinkle each with a tiny pinch of cayenne and garnish with a parsley leaf.

Refrigerate if the eggs are going to have to wait to be served.

Printable version
 

27 December 2015

Christmas Quinoa Salad - little bits of leftovers become lunchtime bounty

Christmas has come and gone and of course, we're left with a bit of this and a bit of that left over.  The question, therefore, is how to make best use of all these lovely bits.

Now my family are singularly useless at eating up leftovers, so it very often is left to me to finish up ingredients by making them into new dishes, to be served as my lunch.  A favourite for this, is the humble salad.  Salads are so convenient because they're relatively quick, very often only require the minimum of cooking (maybe a boiled egg, or some quinoa - as with this salad), are remarkably satisfying to eat and are full of nutrition.  Even more nutritious when you're using quinoa, of course.

The individual seeds of quinoa might be small, but they contain a good amount of dietary fibre and are packed with nutrients, including iron, B-vitamins, magnesium, phosphorus, potassium, calcium and vitamin E.  Goodness only knows where they put all those good things - they must have big pockets.  However, the good report doesn't stop there.  Quinoa is also a complete provider of protein – it contains all the amino acids we need, unlike rice and wheat.  It will lower cholesterol, is gluten free and as far as I know, does not cause allergies.  So provided you aren't like me and are put off (in a big way, it's taken me - literally - years to give it another go) by how the grains develop little tails (which is only the germ of the grain loosening from the main body as it softens) in the cooking, you have no reason to skip past it in the supermarket.

As a pre-Christmas surprise from my favourite people at Red Communications, I was sent three little jars of Quinoa from Peru - black, red and the standard white quinoa to sample and do something delicious with.  Now I can't say I was overjoyed at the prospect (I refer you back to my being put off by the little tails), however, I am nothing if not a game girl and decided to give it another chance.

So, I present to you my oh-so-tasty (and it really is!) Christmas Quinoa Salad which single-handedly takes care of your nutrition, whilst using up an inordinate amount of leftover salad or roasted veggies and those little pieces of cold roast meat that you look at and think "not enough for a soup, too much for a sandwich".

Roast duck with sumac & tangerine
The recipe is pretty free-form, you can use whatever salad vegetables you have on hand, or even cold roasted vegetables or cooked frozen peas.  In my case we had duck for our Christmas dinner, so it is duck that I've used as the meat component.  Any meat would work just perfectly, from cold roast turkey to leftover smoked salmon (I know, it's unlikely, but someone somewhere might have some!).

I didn't feel the need for a salad dressing, as the tomato juice coupled with the cranberry sauce did the job.  However, feel free to add a dressing of your choice, if that's what you fancy.  Oh, and a note regarding the sauce component - if you use a bird for your meat then cranberry is perfect.  Cold roast pork would demand apple sauce, roast beef would need horseradish, lamb could have mint or redcurrant jelly.  Pair them up according to what is traditional, or what you prefer.


As for quantity, the recipe as described will be sufficient for two as a light lunch with a soup or a small dessert or alternatively one hungry person i.e. me.

CHRISTMAS QUINOA SALAD

Ingredients :

a quarter of a cup of quinoa
a half a cup of water
half a tsp of reduced salt chicken stock powder (or just under half a reduced salt stock cube)
half a celery stick, halved lengthways and sliced
four slices of cucumber, quartered
a ripe, tasty tomato, cut into small chunks
a tiny carrot (I used a Chantenay carrot), sliced finely
three Little Gem lettuce leaves, sliced
1 tbsp cooked chestnuts, halved
1 green spring onion, sliced finely
sea salt & freshly ground black pepper
100-150g cold roast meat of your choice (I used duck)
1 tsp of a tangy sauce to complement the meat (I used cranberry).

Method :

Pour the water into a small saucepan and add the stock powder.  Stir to combine whilst heating until almost boiling.  Add the quinoa and stir.  Bring the mixture to a simmer and cook for around 15 minutes, stirring regularly, until the quinoa is soft and the water has almost evaporated.

Remove from the heat and decant into a large flattish bowl.  Fluff the quinoa up with a fork, spread it out evenly and leave to cool.

In the meanwhile, prepare your vegetables, after which the quinoa should be cold.

Add the vegetables to the bowl (keeping a few green onion slices back for garnish), season with a tiny pinch of sea salt and the black pepper and lightly toss with the quinoa.

Add half of the meat and toss again, to combine.

Spread the remainder of the meat attractively across the surface of the salad and add small amounts of the sauce at strategic intervals.

Sprinkle the reserved green onion on top for garnish, take a photograph for posterity and tuck in!

(Taking the photograph is optional, of course, but if you should - do come to the Rhubarb & Ginger facebook page here and upload it.  I'd love to see your salad).

Printable version

18 December 2015

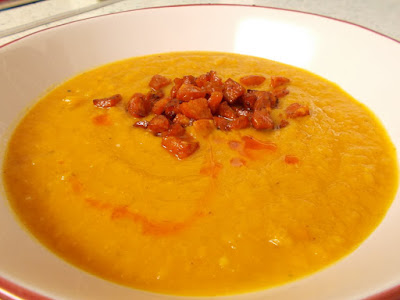
Sweet Potato & Chorizo soup - a smooth and exotic spoonful

A few weeks ago, I spotted a recipe for sweet potato and chorizo soup and I liked the idea of that combination.  However, the recipe I saw didn't seem to have enough depth of flavour for a really tasty and satisfying soup.

I spent the next couple of weeks - on and off - thinking about the soup and how I could add more flavour to it, without detracting from the main two components.  Ultimately, I didn't adjust the recipe radically - just added carrot, celery, rosemary and thyme, all of which served to round it out and add a few extra layers of flavour.

By the way, for those who are baffled by the mention of a "donkey" carrot, think of the kind of carrot that a donkey would like to receive.  A great, big, chunky fat carrot not less than six inches long and preferably longer.  Now THAT is a donkey carrot.


The original method underwent a bit of a re-think as well and the roasting of the sweet potato and carrot was a great idea.  The original recipe had them cooked in the stock, however the roasting added an intensity to the flavour that you couldn't hope to gain any other way.

The use of olive oil instead of the original vegetable oil helped the flavours along, too.  In fact, between the sweet potato, herbs and olive oil, if it wasn't for the Chorizo, it would have been a disgracefully healthy soup!  *Phew*  Thank goodness for Chorizo, eh?

I served this as a dinner soup and it was easily enough for the three of us.  As a starter, it would definitely make sufficient for four.

As ever, if you are not using low salt stock, be careful about how much salt you include when seasoning.  Far easier to add later, you certainly can't take it away!

Hubby pointed out that this soup would make a wonderful November soup for supping around a bonfire, or for warming cold hands around a hearty mugful.  It certainly has got all the hallmarks for that!  However or whenever you decide to sample it, I'm sure you'll love it as much as we did. 

SWEET POTATO & CHORIZO SOUP    (serves 3-4)

Ingredients :

1kg sweet potato, peeled and cut into large chunks
1 large donkey carrot, peeled and cut into large chunks
1-2 tbsp olive oil
sea salt & black pepper
200g cooking Chorizo sausage - 100g cut into quarters, 100g cut in half
1 red onion, diced finely
2 cloves garlic, chopped finely
1 stick of celery, diced finely
1 tsp dried rosemary
half tsp dried thyme
750ml hot water
2 tsp chicken stock powder (low salt) or 2 chicken stock cubes (low salt).

Method :

Place the sweet potato and carrot chunks onto a baking tray and drizzle with 1 tbsp olive oil.  Season with sea salt & pepper and put into a pre-heated oven at 200degC/400degF/Gas 6 for 30 mins or until softened and just beginning to caramelise.

Remove from the oven and set aside.

Heat the remaining olive oil in a frying pan and fry the quartered Chorizo until crispy.  Remove from the pan onto a plate and reserve to keep warm.  This Chorizo will form your garnish.

Add the halved Chorizo to the pan next and fry until lightly coloured.  Remove from the pan onto a plate and set aside.  

Decrease the heat under the pan and remove some of the oil to a small dish.  Reserve the oil in case you need to replace any - and you can use a little of the remainder to garnish once the soup is served.

Add the onion, garlic and celery to the pan, along with a pinch of salt and a good helping of black pepper.  Fry until softened but not coloured.  Part way through, add the rosemary and thyme.

Once softened, decant the contents of the pan into a large saucepan, add the sweet potato, carrot, hot water and chicken stock powder.  Heat through and taste for seasoning but before simmering point blitz with a hand-held blender until smooth.  Add the halved Chorizo and stir through.  Simmer, without boiling, to heat the soup through.  Taste for seasoning and adjust if necessary - I found my soup needed more black pepper at this stage.

Serve in warmed bowls and add a spoonful of the quartered Chorizo and a swirl of Chorizo oil as garnish and warm crusty bread (or fresh baked American biscuits) for dipping.

Canadian apple & cheddar biscuits - yum!
Printable version


16 December 2015

Cheese & mustard pork sausage filo rolls - perfect crunchy morsels

So what do you do when you've bought a pack of Turkish "Sac Yufka", or filo pastry, and find that you have enough pastry left over to pave the way from your kitchen to the moon and back? 

Oddly enough, I also had best part of a pack of pork sausages left over from a miscalculation and hubby immediately said "sausage rolls!" when I pondered audibly as to what to do with them both.  Seemed like a great idea. 


Now, as luck would have it, I just happened to also have a small bowl of grated mature cheddar cheese that was also a leftover and just asking to be used in something.


Sausage, cheese, crispy pastry - yes, but it definitely needed something to lift the flavours.  English mustard would be good, but our son isn't keen on English mustard.  So, French mustard did the job - and, to be honest, I think it did it rather better than the English would have done. 

So easy to make - just paint the pastry with oil or melted butter (I used a combination of groundnut oil and melted butter), spread on a tiny amount of mustard, sprinkle on some grated cheese, then lay on a skinned sausage and roll 'er up.  Cut in half and ta-daa!  Sausage rolls all ready to go in the oven (barring a quick swipe with the oily brush to encourage them to become golden).

At this stage they can be frozen, (provided the sausages haven't already been frozen).  It is best to do so unbaked or be prepared to bake them again for 10-15 minutes to crisp up the pastry, if already cooked.


Truth be told, just about anything could go with the sausages in these sausage rolls - so feel free to go wild with funky combinations!  Sausage and pickle, sausage and mushrooms, sausage & olives, sausage and chillis - I'm sure you can think of many more.  I've since made some with wholegrain mustard and again with brown pickle (like Branston) and I can't decide which is the nicer as they were all so good!


The filo gives a deliciously light and crunchy texture to the soft, tasty sausage meat that would make them perfect for a finger buffet, or high tea, picnic or just as a snack.  Don't wait until you've got leftover filo, sausages or cheese - these are too tasty to wait! 

CHEESE & MUSTARD PORK SAUSAGE FILO ROLLS   (makes 16 individual rolls)

Ingredients :

8 pork sausages, skinned
8 rectangles of filo pastry 3" x 6" (approx)
4 tbsp grated cheddar cheese
French mustard to taste
10g melted butter or groundnut oil.

Method :

Take a rectangle of pastry and brush with melted butter or oil.

Spread a small amount of French mustard across one third of the pastry.

Sprinkle grated cheese on top of the mustard.

Place a skinned sausage on top of the cheese and slightly stretch it to reach both sides, if necessary.

Begin to roll the sausage into its cheesy mustardy pastry from the sausage end, right to the end of the pastry.

Taking a very sharp knife, cut the sausage roll in half.

Place each half onto a baking sheet (I always line mine with baking parchment or greaseproof paper), making sure they are sitting upon the pastry join.

Place into a pre-heated oven at 180degC/340degF/Gas 4 for 15 minutes, then turn to achieve an even bake and replace for another 10 minutes or until the pastry is golden and the sausage is obviously cooked.

Serve immediately, or cool on a wire cooling rack.  

Printable version

7 December 2015

Midweek braised pork steaks with mushrooms


In days gone by (more days than I care to consider), I used to write a blog on another platform.  When that closed, I saved all my recipes and pictures and although I have cherry picked from them over the years, I have been meaning to get back to them in some kind of structured way.

So I shall be including them as I go along and these posts are going to be fairly brief (blessedly so, you may say) but they all represent a recipe that I think is worth passing on. 

The first of which is this, my midweek braised pork steaks with mushrooms.  

Firstly, I just happened to have some home made pork stock in the freezer.  However, if you don't have that and need to use a stock cube, you may want to include a finely chopped carrot in with the onion, celery & garlic.  This will give the sweetness and a further depth to the flavour of the sauce/gravy.

Secondly, the pork steaks I have used here are loin steaks.  As such they don't need a lot of cooking to become tender, unlike a leg or shoulder steak.  Hence you might need to adjust the braising time to suit whichever cut you have at the time.

Lastly, the Bisto Best gravy granules aren't essential if you're ethically opposed to them for some reason, just use whichever thickener you prefer - cornflour, or plain flour, or some other proprietary brand.  I use Bisto Best because a) they provide the best flavour of all the gravy products available and b) they mix in really easily, without leaving great sticky clumps of goo.  Goo is definitely not essential to the success of your pork dinner. 

MIDWEEK BRAISED PORK STEAKS WITH MUSHROOMS    (serves 3)

Ingredients :

1 tbsp rapeseed or olive oil
3 pork steaks (I used 2 each as they were very thin, so 6 in all)
1 onion, chopped finely
2 sticks celery, chopped finely
(1 carrot, chopped finely - optional)
1 large clove of garlic, roughly chopped
sea salt and black pepper
750ml home made pork stock (or chicken - or at a pinch, use 1.5 good low salt stock cubes)
125g chestnut mushrooms, cleaned and quartered
1 tbsp Bisto Best pork gravy granules.

Method :

Heat the oil in a deep frying pan or wok until smoking hot, then add the pork steaks (three at a time, if necessary, so as not to overcrowd the pan) and brown them lightly on both sides.  Remove to keep warm on a plate.

Once all the steaks are browned, reduce the heat and add a little more oil if necessary, then add the onion, celery and garlic (plus the carrot, if you're using it).  Stir fry gently until softened and just beginning to colour.

Replace the pork back into the pan and add the stock and mushrooms.  Stir to combine.

Bring up to a lively simmer and taste for seasoning.  Adjust if necessary.  Place a lid onto the pan and cook for 30 minutes or so, stirring occasionally, until the pork is tender.

Remove the pan from the heat and add the gravy granules, stirring quickly to prevent any lumps.

Serve with steamed new potatoes and an assortment of in season vegetables.

Printable version

6 December 2015

Chicken & vegetable dinner soup - golden gorgeousness.

When autumn strikes, I don't know about you, but my mind immediately turns to soup.  In fact, it turns to soup before autumn has fully struck.  Those days when the weather turns from comfortably warm to "hmmn, I think I'll take a sweater with me", seem to spark off the desire.  I find myself pondering  lunches and thinking "I'll have a look down the supermarket soup aisle", not to mention speculatively considering keeping the vegetable peel for soup stock.  It's a dead giveaway every year.

Every so often, I've found myself making soup for lunch.  However, it invariably ends up being just eaten by myself as the menfolk seem to prefer beans on toast, or something in a packet involving pastry for their lunches.  Now I like soup - but eating the same one for the next four lunchtimes gets a bit dull, no matter how good it is.

So, as a result, I've been developing a nice line in "Dinner soup".  That is, the kind of soup that - having partaken of a bowlful - you know you've eaten.  A soup with a nice balance of protein, vegetable and carbohydrate that, without the liquid, could pass for a main course with perhaps a little gravy added.

One such is this chicken & vegetable dinner soup.


Now we all know the reputation that chicken soup carries with it - of being wholesome, healthy and akin to penicillin in lots of situations.  That's a fairly unbeatable place to start.  My thinking was to stay with that spirit and not add anything that would be superfluous to the cause.  No wine, or butter, or cream, or spice.  Just chicken, vegetables and herbs.  Clean, pure and simple.

The task was to get every last bit of chicken flavour into the soup and prevent it from becoming a vegetable soup with chicken, yet not cook the chicken to within an inch of its life.  I think my method of poaching the chicken in the soup stock, then removing it and adding it back at a later stage, took advantage of both those requirements.  The stock had the benefit of the chicken cooking in it, but the late addition of the chicken prevented the meat from becoming overcooked.  Perfect.  In the meantime, the veggies had a lovely time bathing in some very chickeny chicken stock and all of them were chosen to complement the chicken flavour in one way or another.

I will admit to having a terrible wrangle with myself over pasta versus dumplings.  I did SO want to include dumplings, but I also wanted to include pasta - and I knew we were going to be eating the soup with crusty bread so three major carbohydrate sources was just a carb too many.  In the end, I dropped the idea of the dumplings in favour of keeping the soup relatively fat free and light.  However, if you want to swap the pasta in favour of dumplings, then go right ahead.  I won't argue and neither will your diners, I'm sure!

I hadn't intended for the bite-sized chunks of veggies to cook quite as much as they did.  I had in mind that the veggies that were chopped small would ultimately dissolve into the soup and the bite sizes would stay cleanly cut, but tender to the bite.  Well, the former happened, but the latter didn't.  Ultimately though, I was so pleased with how the soup finished.  I think the cleaner cut, just beyond al dente vegetables would have detracted from the comfort food nature of this soup - and you all know what a complete sucker I am for comfort food.

The flavour was super-chickeny, the chicken wasn't dry at all, each vegetable could be discerned in a spoonful (well, except maybe for the onion and garlic that were just part of the general melange) and crusty bread dipped into the broth was just divine.  Hubby abstained from dinner that night, but son & heir declared that not only was the soup delicious, but it was most definitely a "do it again" recipe.  On you come, autumn.  I've got this under control.


CHICKEN & VEGETABLE DINNER SOUP   (serves 4-5)

Ingredients :

1 litre chicken stock
quarter of a tsp dried thyme
quarter of a tsp dried tarragon
half a tsp dried parsley
half a tsp ground black pepper
2 skinless & boneless chicken breasts
1 skinless chicken leg or 2 skinless chicken thighs
1 tbsp olive oil
1 onion, chopped fine
1 clove garlic, sliced
1 carrot, half sliced, half chopped fine
1 leek, halved and cut into 1 inch pieces
2 celery sticks, half of one chopped fine, the remainder cut into pieces
half a butternut squash, peeled, de-seeded and cut into bite sized chunks
2 small potatoes, one cut into small chunks, one in bite sized chunks
1 red pepper, cored and cut into bite sized chunks
1 sweetcorn cob's-worth of kernels
1 tsp fresh rosemary, chopped
2 bay leaves
2 large handfuls of dry macaroni
sea salt, if necessary
2 good handfuls of frozen peas.

Method :

Make up the litre of chicken stock (if you're using a cube, use one and a half for extra flavour) in a pan and add the thyme, tarragon, parsley and black pepper to it.   Bring to a gentle boil and add the chicken.  Simmer gently for 15-20 minutes or until the chicken is just cooked and will shred with two forks.

Remove the chicken from the stock and reserve.

Pour the stock into a separate container and reserve.  Rinse out the saucepan, to remove any scum stuck to the sides.

Add the olive oil to the pan and on a moderate heat, add the onion and garlic.  Cook, stirring regularly, until transparent.  Make sure not to colour the onion at all.

Add the carrot, leek, butternut squash, potato, sweetcorn, celery and red pepper along with the reserved stock, rosemary and bay leaf.

Bring back to the boil, then reduce the heat and simmer until the vegetables are just soft.

In the meantime, shred the chicken breasts and the meat from the chicken leg or thighs.  Discard the bones.

Add the chicken and dry macaroni to the pot and simmer until the macaroni is done.

A few minutes before the macaroni is cooked, taste for seasoning and adjust if necessary, then add a handful of frozen peas and simmer until the peas are piping hot.

Serve with chunks of crusty bread and fresh butter.


Printable version


One bowl apple cake - moist, cinnamon rich and fantastic

It's been a while since I made a cake.  Well, the last one was for son & heir's birthday back in October - a zebra cake - which I haven't blogged yet.  (But I will!).  This one is nothing like as adventurous as that one, but you know?  I'd say this one was just as successful, if not more so.

I've said before about how recipes that have me dotting about the kitchen, doing one process after another, are no good these days.  Well that goes for baking too.  So you can imagine the attraction of seeing this recipe - one bowl?  Count me in!

Not only is it one bowl, but there's no messing about with whisks other than a hand whisk to blend the eggs in, there's no "mix this with that in one bowl, then that with this in another, oh and you'll need another smaller one for this and maybe to put that on a plate", thus creating a mountain of washing up.  Nope.  One bowl, a set of measuring cups (ones that microwave - for the butter, you know), a chopping board, knife and/or peeler and you're done.  I like that.
 
Hot out of the oven

I found the original recipe on Facebook and consequently, I have no idea who to attribute it to.  However, thank you - whoever you are - for your cake!  I'm not sure what - other than the simplicity of the preparation - it was that attracted me to this cake recipe.   After all, it's really just apples and cinnamon and I could get an apple/cinnamon fix from making an apple crumble.  It just looked like it would be munchy.  Munchy is good.

With a cup of tea?
Having made the cake, I'm absolutely in love with it.  It has a lovely, slightly crunchy, caramelised top (which you could sprinkle some sugar onto, if you're not already scared by the amount of sugar in it, like I was), the cake itself is as light as a feather, the apple is cooked and juicy but not wet - it's perfect.  Perfect to have with a cup of coffee in the morning, at tea time in the afternoon or as a dessert.  Hubby reckons it'd be great with vanilla ice cream and I see his reasoning, however I like it with creme fraiche as the slight tanginess of the creme fraiche is a lovely partner to the sweetness of the cake.

Who am I kidding?  I'd eat this cake at any time of the day and with or without a drink alongside.  I really think it has taken the crown as my very favourite cake.  Sorry, coffee and walnut cake, you've just been superceded!
 
Cooled and ready to cut

Oh and don't think you need lovely fresh apples to make it work, either.  I used two very old and leathery Russets, one ancient Jazz, one sad and decrepit old Braeburn and two new, fresh and lively Braeburns.  Once they're peeled and in the cake, you can't tell the difference.  So, don't waste those wrinkly, sad apples - give them a splendid job to do and make this cake!

Or maybe with coffee - everything goes!
I have made some adaptions from the original recipe, in that I've reduced the sugar slightly (by a quarter of a cup), swapped the vegetable oil for melted butter, stipulated self raising flour and decreased the baking powder by a half teaspoonful to reflect that.  I shouldn't admit it, but I was amazed that the cake came out as well as it has, considering how much alchemy goes into cake baking.  It doesn't normally do to tinker about with recipes, but I definitely got away with it (and for the better, I am sure) in this instance.

Now, if you'll excuse me, I have a tea plate here and it is embarrassingly empty.  I believe I have some cake somewhere that will do the job nicely ...  

ONE BOWL APPLE CAKE   (serves 8-10)

Ingredients :

2 large eggs
1.5 cups golden caster sugar
2 heaped tsp cinnamon
half a cup of melted salted butter
6 medium crisp apples
2 cups self raising flour

1.5 tsp baking powder.

Directions :

Preheat oven to 180degC/350degF/Gas4.


In a large bowl, mix the eggs, sugar, cinnamon and melted butter.

Peel and slice the apples and add to mixture in bowl (coating as you go to keep apples from turning brown).

Mix together the baking powder and flour and add to the ingredients in the bowl. Mix quickly but well until all of the flour is absorbed by the wet ingredients.

Pour mixture into a lined 9″ round springform pan. Bake for approximately 55 minutes or until a skewer inserted into the middle, comes out clean.

Printable version

5 December 2015

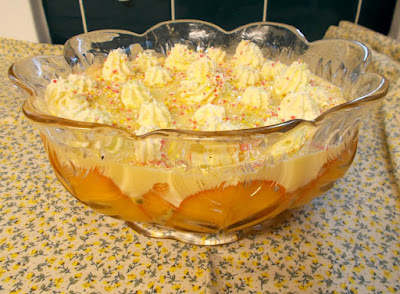
Persimon & Passion Fruit Sherry Trifle - form an orderly line, now!


Yup.  Let's just think about that for a moment.  Persimon - sweet, golden and juicy.  Passion fruit - tangy, crunchy and sharp.  Sherry - boozily heady.  Sponge cake, vanilla custard, lemon & orange jelly and fresh cream with sprinkles.  Surely you don't need any more convincing?

I didn't think so.

Perhaps some of you are asking yourselves what the heck a persimon is.  Well, think of an apple sized cross between a mango and a peach but without the stone in the middle and the fur.  Yes, the skin can be eaten and yes, you can eat it like an apple.  No, it doesn't have pips but it does have a small woody core at one end that is best avoided.  Unless you're some kind of beaver, in which case gnaw away.


Persimon are available from various parts of the world and come in slightly different species.  They are also known as Sharon Fruit, having been named such in Israel.  However, the ones I used (Persimon with the one "m") originated in Spain and carry with them some of Spain's sunshine.  I'm sure of it.  They are incredibly adaptable to use and I've seen them in everything from a chicken dish to baking!  They are especially pretty when sliced horizontally across the grain, as they have a star shape to their internal layout - which makes for pretty patterns on the side of glass trifle bowls, for instance.

I really like them and as soon as peaches and nectarines finish their season, I immediately swap to Persimon for my lunchtime fruit.  So it was nice to do something structured with them, something to make them feel a little bit special.

I will often have a passion fruit alongside them for my lunchtime fruit, as passion fruit are small but pack a mighty punch in flavour.  Consequently, when deciding what to use for a touch of acidity in this sweet creaminess, I didn't need to look very far.  They are a perfect match, neither one overshadowing any part of the other.

Feel free, when assembling your trifle, to use a tin of custard or a pot of ready-made chilled custard to ease the process along a bit.  Personally, I prefer the good old fashioned Bird's custard made from the tinned powder (just add milk and sugar) because you can make it extra thick and it sets up nicely.  Plus, that's what my Nanna always used and she made a great trifle.

Oh - and make sure to have your pinny on, or at the very least a clean apron.  If you're going to make a retro dessert, you'd better be dressed for the occasion!


PERSIMON & PASSION FRUIT SHERRY TRIFLE   (serves 6-8)

Ingredients :

135g lemon jelly cubes
200ml hot water
250ml fresh orange juice
plain sponge cake slices, enough for 2 layers
2-3 tbsp (or more, to taste) sweet Sherry
3 Persimon
2 passion fruit
1 pint (or just under) of vanilla custardwhipped cream, to taste, for decoration
multi coloured sugar sprinkles.

Method :

To begin with, select your trifle bowl with care.  It needs to be sufficiently large to contain all the contents, as once you've started assembling it is very difficult to change into a larger bowl!  Far better to be too big, than too small.

Firstly, make the jelly by breaking the cubes into a bowl and adding the hot water and microwaving for 1-2 minutes, then stirring and repeating as necessary, until the jelly cubes have dissolved.  Add the cold orange juice and stir through.  Set the jelly aside to cool.

Next, break half the sponge cake into the bottom of the trifle bowl making sure to cover the surface well.

Sprinkle the sherry over the cake.  Now lots of sherry is a very good thing, but too much is ghastly for those who don't like alcohol - so temper your sherry to suit your audience.  Remember, it is good to taste the sherry before adding it, so as ... well, you just need to.  *wink*

Slice one or two of the Persimon thinly and horizontally and place the slices against the side of the trifle bowl, but higher than the layer of cake, so that they can be clearly seen from the outside.  Next, dice up the remains of the fruit - whether you peel it is up to you - and add half on top of the cake.

Halve the passion fruit into a separate bowl - as you cut them open, often the juice will flood out, so make sure they're in/over a bowl so as to catch it - and scrape out the seeds.  Sprinkle half around the edge of the cake layer, so that it can be seen from the outside, and include the juice.

Add the second layer of cake and press gently but firmly, to compact the layers.

Add a little more sherry if you like.  You can have another little taster, too.  Better to be safe than sorry.

Sprinkle the remaining Persimon over the cake and add the remaining passion fruit, distributing it as evenly as possible over the cake layer.

Gently pour the jelly over the cake and fruit and press down gently if anything decides to float.

Chill your trifle in the fridge until the jelly has set.

The next step is to make the custard as per the pack instructions - but use slightly less milk than directed, to give a firm set to the custard layer.  Once again, leave your trifle in the fridge to set - but make sure to not cover with cling film, or you will find your custard will have diluted by the time you get back to it!

All you have next to do is to either pipe on the whipped cream, or just create another layer by covering the custard with cream.

Just before serving, get creative with edible decorations - hundreds and thousands, sprinkles, edible glitter, cherries, more Persimon slices - whatever you like!  Make sure your trifle doesn't have to wait, or you may find that your decorations will have dissolved, so do that last stage at the last minute for best effect.

Serve.


Printable version
Related Posts Plugin for WordPress, Blogger...