Showing posts with label foodporn. Show all posts

20 January 2016

Turkey and apple curry - a variation upon a theme

If, perhaps, you have come here via the Recipe Index page of this blog, you may well have noticed that I have two recipes for turkey curry.  This is owing to the fact that today I decided to make the already existing, part Marco Pierre White, part my own, authored curry - but it turned into something else.  Oh it is still very much a curry - but a very different tasting one to the original.

This one is sharper, more zesty, with a smoother coconut flavour and without the butter or cream.  So, potentially, better for you I suppose!

I also started off differently, using raw turkey breast (which is enticingly priced in the shops, at the moment) instead of Christmas roast turkey leftovers.  I think I sort of freestyled thereafter!

I thoroughly enjoyed the lighter nature of this curry and the menfolk all cleared their plates, so they obviously agreed.


All I can suggest, when trying to decide between the two curries, is to look at each recipe's ingredients list and decide which one you like the look of the most.  Or alternatively, which one you already have the most ingredients for!


TURKEY AND APPLE CURRY   (serves 3-4)

Ingredients :

2 tbsp sunflower, peanut or vegetable oil
1 large onion, chopped finely
1 sweet white onion, cut into large chunks
2 big fat cloves of garlic, chopped finely
1 red chilli, chopped finely and de-seeded if you prefer your curry milder
half a tsp ground cinnamon
a pinch of sea salt (use smoked if you've got it)
500g raw turkey breast, cut into bite sized chunks
1 Braeburn (or similarly tart) apple, peeled, cored and diced
1 large tomato, diced
3 tbsp Patak's Korma curry paste
1 tbsp tomato puree
1 Knorr chicken stock pot (a chicken stock cube will do, but the more chickeny the better)
2-300ml water
1 good tbsp of lemon juice
1 tsp ground turmeric
30g creamed coconut
1 tbsp chopped fresh coriander.

Method :

In a large, deep frying pan, heat the oil until a piece of onion will sizzle.  Add the onions, garlic and chilli and fry for 10-15 minutes over a moderate heat until the onions are beginning to turn golden.  Keep the contents of the pan moving, so as to prevent the garlic from burning.

Add the cinnamon and sea salt part way through the frying.

Push the onion mixture to the side of the pan, add a little more oil and increase the heat.  Add the turkey breast pieces to the empty side of the pan and fry until golden on at least three sides.  Mix the onions in with the turkey.

Reduce the heat back to moderate and add the apple and tomato and cook on for a few moments.

Add the curry paste and tomato puree and stir through.  Continue to fry and stir until you can see the oil beginning to separate.

Add the chicken stock pot (minus its pot, obviously), water, lemon juice and ground turmeric and stir gently through.  Allow the mixture to simmer - stirring regularly to prevent the curry catching on the bottom of the pan - for a good 15-20 minutes.  Keep your eye on the fluid levels, you should be aiming for a slightly wetter mix than you would want to serve.

Finally, add the creamed coconut and chopped coriander and stir through.  The sauce will thicken as the coconut cooks, you can add more water if it becomes too stiff.  Once the sauce is at your preferred texture, your curry is ready to serve.

Serve with hot white basmati rice and a sprinkle of chopped coriander as garnish.

Printable version

6 December 2015

Chicken & vegetable dinner soup - golden gorgeousness.

When autumn strikes, I don't know about you, but my mind immediately turns to soup.  In fact, it turns to soup before autumn has fully struck.  Those days when the weather turns from comfortably warm to "hmmn, I think I'll take a sweater with me", seem to spark off the desire.  I find myself pondering  lunches and thinking "I'll have a look down the supermarket soup aisle", not to mention speculatively considering keeping the vegetable peel for soup stock.  It's a dead giveaway every year.

Every so often, I've found myself making soup for lunch.  However, it invariably ends up being just eaten by myself as the menfolk seem to prefer beans on toast, or something in a packet involving pastry for their lunches.  Now I like soup - but eating the same one for the next four lunchtimes gets a bit dull, no matter how good it is.

So, as a result, I've been developing a nice line in "Dinner soup".  That is, the kind of soup that - having partaken of a bowlful - you know you've eaten.  A soup with a nice balance of protein, vegetable and carbohydrate that, without the liquid, could pass for a main course with perhaps a little gravy added.

One such is this chicken & vegetable dinner soup.


Now we all know the reputation that chicken soup carries with it - of being wholesome, healthy and akin to penicillin in lots of situations.  That's a fairly unbeatable place to start.  My thinking was to stay with that spirit and not add anything that would be superfluous to the cause.  No wine, or butter, or cream, or spice.  Just chicken, vegetables and herbs.  Clean, pure and simple.

The task was to get every last bit of chicken flavour into the soup and prevent it from becoming a vegetable soup with chicken, yet not cook the chicken to within an inch of its life.  I think my method of poaching the chicken in the soup stock, then removing it and adding it back at a later stage, took advantage of both those requirements.  The stock had the benefit of the chicken cooking in it, but the late addition of the chicken prevented the meat from becoming overcooked.  Perfect.  In the meantime, the veggies had a lovely time bathing in some very chickeny chicken stock and all of them were chosen to complement the chicken flavour in one way or another.

I will admit to having a terrible wrangle with myself over pasta versus dumplings.  I did SO want to include dumplings, but I also wanted to include pasta - and I knew we were going to be eating the soup with crusty bread so three major carbohydrate sources was just a carb too many.  In the end, I dropped the idea of the dumplings in favour of keeping the soup relatively fat free and light.  However, if you want to swap the pasta in favour of dumplings, then go right ahead.  I won't argue and neither will your diners, I'm sure!

I hadn't intended for the bite-sized chunks of veggies to cook quite as much as they did.  I had in mind that the veggies that were chopped small would ultimately dissolve into the soup and the bite sizes would stay cleanly cut, but tender to the bite.  Well, the former happened, but the latter didn't.  Ultimately though, I was so pleased with how the soup finished.  I think the cleaner cut, just beyond al dente vegetables would have detracted from the comfort food nature of this soup - and you all know what a complete sucker I am for comfort food.

The flavour was super-chickeny, the chicken wasn't dry at all, each vegetable could be discerned in a spoonful (well, except maybe for the onion and garlic that were just part of the general melange) and crusty bread dipped into the broth was just divine.  Hubby abstained from dinner that night, but son & heir declared that not only was the soup delicious, but it was most definitely a "do it again" recipe.  On you come, autumn.  I've got this under control.


CHICKEN & VEGETABLE DINNER SOUP   (serves 4-5)

Ingredients :

1 litre chicken stock
quarter of a tsp dried thyme
quarter of a tsp dried tarragon
half a tsp dried parsley
half a tsp ground black pepper
2 skinless & boneless chicken breasts
1 skinless chicken leg or 2 skinless chicken thighs
1 tbsp olive oil
1 onion, chopped fine
1 clove garlic, sliced
1 carrot, half sliced, half chopped fine
1 leek, halved and cut into 1 inch pieces
2 celery sticks, half of one chopped fine, the remainder cut into pieces
half a butternut squash, peeled, de-seeded and cut into bite sized chunks
2 small potatoes, one cut into small chunks, one in bite sized chunks
1 red pepper, cored and cut into bite sized chunks
1 sweetcorn cob's-worth of kernels
1 tsp fresh rosemary, chopped
2 bay leaves
2 large handfuls of dry macaroni
sea salt, if necessary
2 good handfuls of frozen peas.

Method :

Make up the litre of chicken stock (if you're using a cube, use one and a half for extra flavour) in a pan and add the thyme, tarragon, parsley and black pepper to it.   Bring to a gentle boil and add the chicken.  Simmer gently for 15-20 minutes or until the chicken is just cooked and will shred with two forks.

Remove the chicken from the stock and reserve.

Pour the stock into a separate container and reserve.  Rinse out the saucepan, to remove any scum stuck to the sides.

Add the olive oil to the pan and on a moderate heat, add the onion and garlic.  Cook, stirring regularly, until transparent.  Make sure not to colour the onion at all.

Add the carrot, leek, butternut squash, potato, sweetcorn, celery and red pepper along with the reserved stock, rosemary and bay leaf.

Bring back to the boil, then reduce the heat and simmer until the vegetables are just soft.

In the meantime, shred the chicken breasts and the meat from the chicken leg or thighs.  Discard the bones.

Add the chicken and dry macaroni to the pot and simmer until the macaroni is done.

A few minutes before the macaroni is cooked, taste for seasoning and adjust if necessary, then add a handful of frozen peas and simmer until the peas are piping hot.

Serve with chunks of crusty bread and fresh butter.


Printable version


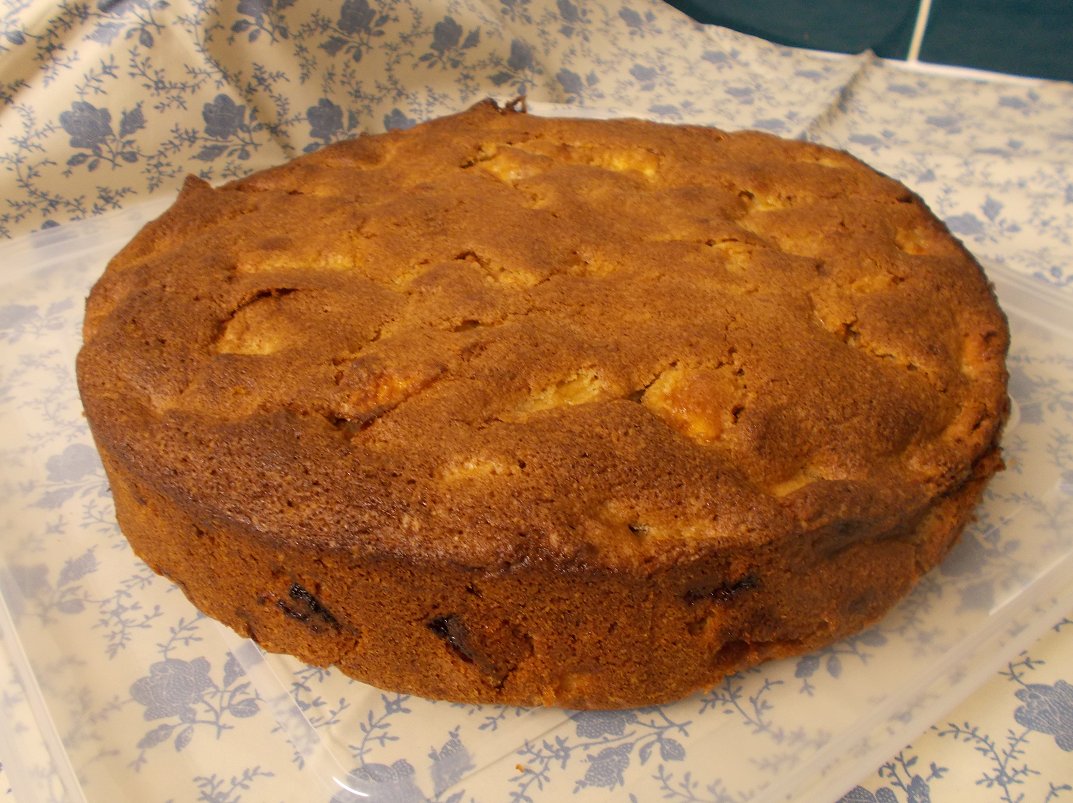
One bowl apple cake - moist, cinnamon rich and fantastic

It's been a while since I made a cake.  Well, the last one was for son & heir's birthday back in October - a zebra cake - which I haven't blogged yet.  (But I will!).  This one is nothing like as adventurous as that one, but you know?  I'd say this one was just as successful, if not more so.

I've said before about how recipes that have me dotting about the kitchen, doing one process after another, are no good these days.  Well that goes for baking too.  So you can imagine the attraction of seeing this recipe - one bowl?  Count me in!

Not only is it one bowl, but there's no messing about with whisks other than a hand whisk to blend the eggs in, there's no "mix this with that in one bowl, then that with this in another, oh and you'll need another smaller one for this and maybe to put that on a plate", thus creating a mountain of washing up.  Nope.  One bowl, a set of measuring cups (ones that microwave - for the butter, you know), a chopping board, knife and/or peeler and you're done.  I like that.
 
Hot out of the oven

I found the original recipe on Facebook and consequently, I have no idea who to attribute it to.  However, thank you - whoever you are - for your cake!  I'm not sure what - other than the simplicity of the preparation - it was that attracted me to this cake recipe.   After all, it's really just apples and cinnamon and I could get an apple/cinnamon fix from making an apple crumble.  It just looked like it would be munchy.  Munchy is good.

With a cup of tea?
Having made the cake, I'm absolutely in love with it.  It has a lovely, slightly crunchy, caramelised top (which you could sprinkle some sugar onto, if you're not already scared by the amount of sugar in it, like I was), the cake itself is as light as a feather, the apple is cooked and juicy but not wet - it's perfect.  Perfect to have with a cup of coffee in the morning, at tea time in the afternoon or as a dessert.  Hubby reckons it'd be great with vanilla ice cream and I see his reasoning, however I like it with creme fraiche as the slight tanginess of the creme fraiche is a lovely partner to the sweetness of the cake.

Who am I kidding?  I'd eat this cake at any time of the day and with or without a drink alongside.  I really think it has taken the crown as my very favourite cake.  Sorry, coffee and walnut cake, you've just been superceded!
 
Cooled and ready to cut

Oh and don't think you need lovely fresh apples to make it work, either.  I used two very old and leathery Russets, one ancient Jazz, one sad and decrepit old Braeburn and two new, fresh and lively Braeburns.  Once they're peeled and in the cake, you can't tell the difference.  So, don't waste those wrinkly, sad apples - give them a splendid job to do and make this cake!

Or maybe with coffee - everything goes!
I have made some adaptions from the original recipe, in that I've reduced the sugar slightly (by a quarter of a cup), swapped the vegetable oil for melted butter, stipulated self raising flour and decreased the baking powder by a half teaspoonful to reflect that.  I shouldn't admit it, but I was amazed that the cake came out as well as it has, considering how much alchemy goes into cake baking.  It doesn't normally do to tinker about with recipes, but I definitely got away with it (and for the better, I am sure) in this instance.

Now, if you'll excuse me, I have a tea plate here and it is embarrassingly empty.  I believe I have some cake somewhere that will do the job nicely ...  

ONE BOWL APPLE CAKE   (serves 8-10)

Ingredients :

2 large eggs
1.5 cups golden caster sugar
2 heaped tsp cinnamon
half a cup of melted salted butter
6 medium crisp apples
2 cups self raising flour

1.5 tsp baking powder.

Directions :

Preheat oven to 180degC/350degF/Gas4.


In a large bowl, mix the eggs, sugar, cinnamon and melted butter.

Peel and slice the apples and add to mixture in bowl (coating as you go to keep apples from turning brown).

Mix together the baking powder and flour and add to the ingredients in the bowl. Mix quickly but well until all of the flour is absorbed by the wet ingredients.

Pour mixture into a lined 9″ round springform pan. Bake for approximately 55 minutes or until a skewer inserted into the middle, comes out clean.

Printable version

5 December 2015

Persimon & Passion Fruit Sherry Trifle - form an orderly line, now!


Yup.  Let's just think about that for a moment.  Persimon - sweet, golden and juicy.  Passion fruit - tangy, crunchy and sharp.  Sherry - boozily heady.  Sponge cake, vanilla custard, lemon & orange jelly and fresh cream with sprinkles.  Surely you don't need any more convincing?

I didn't think so.

Perhaps some of you are asking yourselves what the heck a persimon is.  Well, think of an apple sized cross between a mango and a peach but without the stone in the middle and the fur.  Yes, the skin can be eaten and yes, you can eat it like an apple.  No, it doesn't have pips but it does have a small woody core at one end that is best avoided.  Unless you're some kind of beaver, in which case gnaw away.


Persimon are available from various parts of the world and come in slightly different species.  They are also known as Sharon Fruit, having been named such in Israel.  However, the ones I used (Persimon with the one "m") originated in Spain and carry with them some of Spain's sunshine.  I'm sure of it.  They are incredibly adaptable to use and I've seen them in everything from a chicken dish to baking!  They are especially pretty when sliced horizontally across the grain, as they have a star shape to their internal layout - which makes for pretty patterns on the side of glass trifle bowls, for instance.

I really like them and as soon as peaches and nectarines finish their season, I immediately swap to Persimon for my lunchtime fruit.  So it was nice to do something structured with them, something to make them feel a little bit special.

I will often have a passion fruit alongside them for my lunchtime fruit, as passion fruit are small but pack a mighty punch in flavour.  Consequently, when deciding what to use for a touch of acidity in this sweet creaminess, I didn't need to look very far.  They are a perfect match, neither one overshadowing any part of the other.

Feel free, when assembling your trifle, to use a tin of custard or a pot of ready-made chilled custard to ease the process along a bit.  Personally, I prefer the good old fashioned Bird's custard made from the tinned powder (just add milk and sugar) because you can make it extra thick and it sets up nicely.  Plus, that's what my Nanna always used and she made a great trifle.

Oh - and make sure to have your pinny on, or at the very least a clean apron.  If you're going to make a retro dessert, you'd better be dressed for the occasion!


PERSIMON & PASSION FRUIT SHERRY TRIFLE   (serves 6-8)

Ingredients :

135g lemon jelly cubes
200ml hot water
250ml fresh orange juice
plain sponge cake slices, enough for 2 layers
2-3 tbsp (or more, to taste) sweet Sherry
3 Persimon
2 passion fruit
1 pint (or just under) of vanilla custardwhipped cream, to taste, for decoration
multi coloured sugar sprinkles.

Method :

To begin with, select your trifle bowl with care.  It needs to be sufficiently large to contain all the contents, as once you've started assembling it is very difficult to change into a larger bowl!  Far better to be too big, than too small.

Firstly, make the jelly by breaking the cubes into a bowl and adding the hot water and microwaving for 1-2 minutes, then stirring and repeating as necessary, until the jelly cubes have dissolved.  Add the cold orange juice and stir through.  Set the jelly aside to cool.

Next, break half the sponge cake into the bottom of the trifle bowl making sure to cover the surface well.

Sprinkle the sherry over the cake.  Now lots of sherry is a very good thing, but too much is ghastly for those who don't like alcohol - so temper your sherry to suit your audience.  Remember, it is good to taste the sherry before adding it, so as ... well, you just need to.  *wink*

Slice one or two of the Persimon thinly and horizontally and place the slices against the side of the trifle bowl, but higher than the layer of cake, so that they can be clearly seen from the outside.  Next, dice up the remains of the fruit - whether you peel it is up to you - and add half on top of the cake.

Halve the passion fruit into a separate bowl - as you cut them open, often the juice will flood out, so make sure they're in/over a bowl so as to catch it - and scrape out the seeds.  Sprinkle half around the edge of the cake layer, so that it can be seen from the outside, and include the juice.

Add the second layer of cake and press gently but firmly, to compact the layers.

Add a little more sherry if you like.  You can have another little taster, too.  Better to be safe than sorry.

Sprinkle the remaining Persimon over the cake and add the remaining passion fruit, distributing it as evenly as possible over the cake layer.

Gently pour the jelly over the cake and fruit and press down gently if anything decides to float.

Chill your trifle in the fridge until the jelly has set.

The next step is to make the custard as per the pack instructions - but use slightly less milk than directed, to give a firm set to the custard layer.  Once again, leave your trifle in the fridge to set - but make sure to not cover with cling film, or you will find your custard will have diluted by the time you get back to it!

All you have next to do is to either pipe on the whipped cream, or just create another layer by covering the custard with cream.

Just before serving, get creative with edible decorations - hundreds and thousands, sprinkles, edible glitter, cherries, more Persimon slices - whatever you like!  Make sure your trifle doesn't have to wait, or you may find that your decorations will have dissolved, so do that last stage at the last minute for best effect.

Serve.


Printable version

4 December 2015

Midweek beef mince with black garlic - not scary at all!

How do you elevate a midweek minced beef recipe?  Why, add black garlic of course!

Black garlic is exactly that - it's garlic and it's very black, having been aged in balsamic vinegar.  Balsajo is the black garlic I used today and we love it.  The cloves are stickily dark like soft liquorice, but they don't taste of liquorice!  If you're expecting it to taste of raw garlic, it doesn't do that either.  It has a taste all of its own, being sweet but slightly tangy and incredibly delicious.  I haven't yet eaten an entire clove like a sweetie, but the thought is there!

So today we were due to have just plain common or garden beef mince in gravy, which I always try to make as flavoursome as possible.  Just because it's a midweek dish, doesn't mean it should be lacking in flavour or interest.


Having received the Balsajo as a competition prize a few days ago, I was keen to try it out in as many different incarnations as possible - so I backed off on a few ingredients that I would normally include in a midweek beef mince and added a nice whack of black garlic.  The challenge to it was clear - see what you can do with this!  

Because the black garlic has a quiet, sweet flavour, it's effect on the savouriness of the mince dish wasn't a big slap in the face sort of effect but very much one of infusing that mellow richness throughout the meat and gravy.  Just gorgeous.  Every so often you picked up a little chunk of black garlic on the fork, enabling a more intense flavour to come through.

I was astounded at the price for our Balsajo black garlic.  Being so keen on it we were eager to replace our bulb once it was finished and so looked online to find out more.  The Balsajo website has a handy "Where To Buy" section, from which we discovered that if we turned up at our local Sainsbury's with the princely sum of £1.50 (December 2015 price) clutched in our hot little hand, all would be well.  Now how often does that happen?  Not very often, not with "artisan" products that are unusual and slightly off the wall, I've found.  Colour me seriously impressed.

So all that has made me very happy.  After all, it's one thing being given an item to review (although, as I say, I won it in this instance), but quite something else if once you've decided you love it and cannot be without it, to find out that you need to re-mortgage the house in order to do so.  As long as Balsajo keep making this delicious product, I'll keep on buying it and I recommend that you do, too.

MINCED BEEF WITH BLACK GARLIC   (serves 3-4)

Ingredients :

1 tbsp olive oil
500g reduced fat minced beef
smoked sea salt (normal is fine)
ground black pepper
1 onion, chopped finely
1 clove garlic, chopped finely
1 bay leaf
2 tomatoes, chopped
4 cloves black garlic, sliced
quarter of a tsp ground cinnamon
half a tsp dried rosemary
1 Knorr Rich Beef stock pot
1 tsp Bovril
1 heaped tsp French mustard
2 tbsp Bisto Best beef gravy granules.

To serve : mashed potato and seasonal vegetables (I used carrot, broccoli, runner beans and peas)

Method :

Heat the olive oil until really quite hot in a large, deep frying pan.  Add the beef and break up the block into small pieces as it cooks.  Add a small pinch of smoked sea salt and a good helping of black pepper.  Fry until the beef has all browned, the moisture has evaporated and there is just oil left under the beef.  Leave the beef to caramelise for at least two turns, then remove it with a slotted spoon into a bowl.

Remove all but 1 tbsp of the fat from the pan and reserve in case you need more as you cook the vegetables.

Add the onion, garlic and bay leaf and fry until the onion is transparent and soft.  Do not let the garlic burn.

Add the tomatoes and black garlic and stir to combine.  Fry until the tomatoes are starting to break down.

Add the cinnamon and rosemary and stir to combine.

Add the stock pot and sufficient water to just under the level of the mince.

Add the Bovril and mustard and stir to combine.  Bring to a lively simmer, then cover the pan and leave to cook for some 10-15 minutes.

Taste for seasoning and adjust if necessary - the dish can cope with lots of black pepper but remember that the gravy granules are high in salt!

Pull the mince to one side of the pan and remove from the heat.  Sprinkle in the gravy granules and stir immediately.  Return the pan back to the heat and stir gently.  Once the gravy has thickened, you are ready to serve.

Serve with mashed potatoes and seasonal vegetables.

Printable version

18 September 2015

Watermelon & lime marmalade

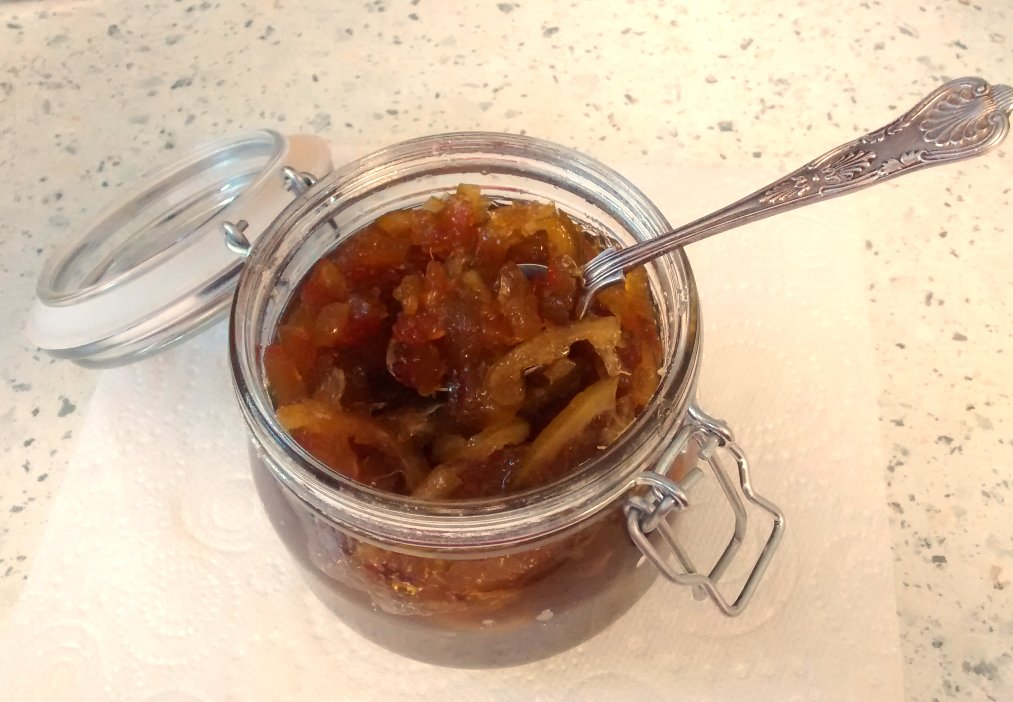
I'm a bit in the habit of posting photographs of a particularly yummy breakfast or lunch to the Jenny Eatwell Facebook page.  Well, I like to share.  What can I tell you?  Having done so of hubby's new brew of Watermelon Rind & Lime Marmalade, quite a few people have shown just as much interest in it as we did when we first saw the recipe, here : http://food52.com/blog/13793-stop-throwing-out-the-best-part-of-the-watermelon .  The recipe has had quite a journey, having originated with Olia Hercules' cook book Mamushka, then been slightly adapted by Food 52's Kristen Miglore, before coming to roost with us!

A typical Facebook breakfast post - duck egg & marmalade.
The words "watermelon rind" caught my attention to begin with, as it begs the question "the green bit?".  Apparently not, however.  You peel off the green bit and use the white bit that's in between the fleshy layer and the outer green rind.  So, truth be told, it should be called "Watermelon pith and lime marmalade", but that doesn't sound very appealing.

So having established we're talking about a semi-edible bit of the watermelon, my attention is next caught by the idea of pairing it with lime.  I love lime.  Anything lime gets my vote, instantly.

Well hubby was so intrigued, it became one of those "it has to be done" things.  So he did and I love it.  It has a really strong, bitter flavour that is akin to Frank Cooper's Vintage orange marmalade, which I love.  However, hubby finds the lime peel to be sliced too thick and the melon pith to be cut too small.  I do agree with him that slicing the lime ultra-thin, maybe just zesting some of the peel and leaving the watermelon pith a lot bigger, would have altered the balance of power between the two flavours, bringing the watermelon to the fore.  The watermelon undergoes quite a transition in the cooking process, becoming glassy and almost crystalline in structure, winding up looking like little square sweeties.  It tastes divine, but does have a tendency to be knocked sideways by the lime, currently.


Once I've eaten this batch (because I'm the only one who likes it), we're going to give it a go with the thinner lime zest and bigger watermelon pith - just to see what happens.  I can't say whether it'll work - but even if it doesn't, you'll still have a fantastic marmalade for your toast!


The fallback position of "hmmn, it's just the same" is fine by me!

WATERMELON & LIME MARMALADE  (Makes two 450ml (3/4 pint) jars)

Ingredients :

500g watermelon pith (sweet red flesh removed, green skin removed), diced
300g golden caster sugar
4 limes, halved and thinly sliced (or quartered and finely sliced).

Method : 

Mix all the ingredients together in a container (plastic or glass, preferably), cover with cling film, and leave in the refrigerator overnight.

Using a non-reactive saucepan, pour in the ingredients and cook gently over a low heat until the sugar is all dissolved.

Bring to a boil and cook at a lively simmer for 50 minutes or until the watermelon skin turns translucent.

The marmalade should reach setting point (where a small amount dropped onto a cold surface will develop a skin as it cools) before you remove from the heat.

Once at setting point, pour into 2 warm sterilized 450-ml (3/4 pint) jars, seal and cool.

The marmalade should be stored in the refrigerator and should keep, unopened, for several months.

Printable version

20 August 2015

The best Game Pie, made for Farmer's Choice (Free Range) Ltd

Tucked away - nay, nestled - in our freezer for the last few weeks has been a pack of mixed diced Game, (being venison, rabbit, pheasant, partridge and wood pigeon), just waiting for the stars to align and for me to come up with a recipe.

Those lovely people at Farmer's Choice (Free Range) Ltd were kind enough to respond to my promise of a good Game Pie recipe and very obligingly supplied the necessary, for which, my thanks.  (Follow the link here which will take you to the relevant page of their website).  However, none of us quite reckoned on just how good this good Game Pie recipe would be.  It was more than good - it was (to quote my hubby) "a triumph".


Now bear in mind that I'm a bit of a novice when it comes to Game.

Yes, I've cooked several wild rabbits with success in the past, I've had a very bad experience with someone else's pheasant dish that was so high it was inedible and consigned two Mallards to the bin that just didn't even bear description.  So I think you could considered my experience somewhat chequered.

Undaunted, however, I had a vision of a Game Pie in my imagination and that vision was just busting to be made real.  Not a raised Game Pie (a sort of wild meat version of a pork pie) but a good old fashioned country style, hearty, stick to your ribs kind of pie.  One with a golden crispy crust that hides the cornucopia of deliciousness below.  All I can say is that I just wish I had this kind of vision more often, as the actuality exceeded expectation by a factor of many - and the expectation was pretty darned high to begin with!
I dare you to identify any one piece ... lol
I had the picture of the pie mapped out in my head from an early stage.

What I was lacking, were the links and balances between ingredients which would result in a great combination.  My starting point is always "what does the primary ingredient taste like?".  Now I have tasted venison before, but only in a sausage.  Rabbit I'm well versed in, pheasant - not so much, partridge was a new one and wood pigeon I've had once previously and loved.  So I had an idea of how the meats would taste, but only an idea.  (Incidentally, I had no compunction in eating wood pigeon having had many tubes of niger seed go down their gullets instead of into the intended goldfinches.  I considered it payback).  I knew I wanted BIG flavours, flavours that were easily accessible by most home cooks and a nice selection of herbs.  After that, it was open season.


A couple of rashers of smoked bacon were a definite, so the next question was what vegetables would go nicely and look appealing in the pie?  Good old favourites onion, garlic, carrot and celery always make a great start to a good flavoured gravy and sliced carrots add colour.  Mushrooms are excellent for flavour and baby button mushrooms look delicious, too.  I knew I wanted to use red wine, so I was looking for something to combat the acidity that the red wine would bring.  Carrots were a good start, but I needed something that would echo the earthy, whilst balancing the acidity with sweetness.  Something that would go well with Game.  Something like ... chestnuts.  Having had the chestnut idea, it led on to considering prunes.  Prunes - just a few cut in half - would lend their deep sweetness, fruity flavour and dark colour to the equation perfectly.


It was all coming together nicely.

The last question was regarding herbage.  My dislike of thyme is well documented and I felt it was too easy to just opt for that.  It's rapidly becoming today's Herbes de Provence.  Way back in the eighties, that hideous stuff was in just about every Delia Smith recipe that had been documented and as such I'm sick to death of it.  The same goes for thyme and .. whoops, narrowly avoided an anti-thyme rant.  *phew*

I remembered my two front-door herbs, rosemary and bay.  (So called because they are either side of my front door).  Both would be perfect with the wild flavours of the Game and I liked the idea of those straight away.  My mind was wandering along pine nut routes when I suddenly remembered Juniper berries.  They would provide a gorgeous aromatic quality, along with a subtle citrussy fruitiness that would be hard to pin down but very "there".  Oh yes, it was all coming together beautifully.

The pastry was an unspoken given, in that I would be using my superb (and it IS superb, I kid you not) butter/suet pastry.  Just the sheer fact that it contains suet qualified it for the job, but the deliciously crisp lightness of the end result was absolutely spot on.

I added a few more ingredients over the course of the cooking process - the spoonful of tomato puree both for colour and fruitiness, the Knorr stock pot for its invaluably deep, dark colouration and excellent flavour - and I can safely say that each and every ingredient became as important as the next in the production of the pie.


Yes, it is basically a day-long labour of love to make this pie - but oh my gosh it is worthwhile.  Taken in stages, the process becomes an easy matter which I grant you is time consuming, but not difficult.  If you're looking for a dish with which to impress (and you could easily prepare the pie filling ahead of time and freeze it - which would make things a whole lot easier) you don't need to look much further.

"The nicest pie - both filling and pastry - I've had in many a long year" was my hubby's verdict. I think he liked it.


Perhaps not surprisingly, I have a few Cook's Tips for you.

The most important thing is not to rush this pie.  Give yourself a complete day in which to produce it if you're intending on making it all in one day, as it does take time.  Cutting the oven time short will only result in a potentially tough or undercooked filling that has none of the deep, developed flavours that a long oven bake will bring.

Don't make the pastry until the filling is made.  That way the pastry has a shorter time to wait and won't deteriorate in the fridge.

Don't be tempted to add the pastry to the pie until the filling is, at worst, luke warm or at best, stone cold.  Any significant heat will instantly melt your pastry, which will dissolve distressingly before you can get it into the oven.

Lastly, don't be scared to add a good deal of black pepper.  It gives a lovely warmth to the sauce that lingers on the tongue like a delicious echo.

You're also in luck that August is currently within Game season  - so invest in some mixed Game and tuck it away for a rainy day that can only be salvaged by the application of delicious Game Pie.  Your family will thank you.


GAME PIE     (Serves 3-4)

Ingredients :

1 tbsp olive oil
10g butter
500g mixed Game, diced  (I used venison, rabbit, pheasant, partridge & wood pigeon)
sea salt & freshly ground black pepper
1 large onion, finely chopped
1 large garlic clove, finely chopped
1 large carrot, half finely diced, half sliced small
1 stick celery, finely diced
2 rashers back bacon, diced
10 small round shallots
150g small button mushrooms, left whole
3 bay leaves
1 tsp fresh rosemary
8 juniper berries, crushed well
200ml red wine
1 heaped tsp tomato puree
1 Knorr rich beef stock pot
500ml water
10 semi dried prunes, halved
100g chestnuts.

For the pastry :

150g plain flour
50g vegetable suet
50g cold salted butter
sea salt
freshly ground black pepper
Carbonated mineral water as necessary.

1 egg yolk to glaze.

Method :

In a deep frying pan, heat the olive oil and add the butter.  When the butter is frothy, add the game and sear over a high heat with a tiny pinch of sea salt and a good pinch of black pepper.  Just get two or three sides of the meat coloured, then remove to an ovenproof casserole dish, using a slotted spoon.

Add the chopped onion, garlic, carrot (both sizes), celery and bacon to the pan.  Season with a small pinch of sea salt and black pepper.  Fry over a moderate heat until the onion is transparent and the bacon fat has begun to render.

Add the whole shallots and button mushrooms and increase the heat under the pan.  Fry until everything has gained a little colour - around five minutes, or so.

Add the bay leaves, rosemary and crushed juniper berries and stir through.

Add the red wine and tomato puree, stir through and allow to boil rapidly for 2-3 minutes, then reduce the heat to moderate and add the beef stock and the water.  Stir through again to ensure the stock has melted properly.

Simmer the pan contents for 10 minutes, then taste for seasoning and add more salt or pepper, as necessary.

Add the prunes and chestnuts.

Decant into the casserole dish and gently stir to mix the game through.

Cover the casserole dish and place into a pre-heated oven at 180degC/350degF/Gas 4 for 2 hours.

Once the cooking time is up, decant the casserole contents into your pie dish, cover lightly and set aside to cool.

Make the pastry by gathering all the ingredients except the water (and egg) into a large bowl.  Using your fingertips, rub the butter into the flour and suet, until you have a cross between breadcrumbs and cornflakes.  Add around 100ml of water and stir with a knife.  You will probably need a little more water, but what you are looking for is that the pastry dough just clings together and is damp, not wet.  Do not knead the dough at all, just pat and push it together then place onto a sheet of cling film and wrap tightly.  Rest in the fridge for at least 30 minutes before using.

When your dough is rested and your filling lukewarm, roll out the pastry to just bigger than the size of your pie dish.

Using a pastry brush, brush egg yolk around the lip of the pie dish.

Carefully lift the pastry on top of the pie, so that it overhangs the edge.  Using the tip of a knife, press down all around the edge then trim off the excess.

Brush all but a small amount of the remaining egg yolk over the surface of the pastry, taking care to go right to the edges.

Cut out some leaves or other decoration from your leftover pastry and lay them on top of the egg wash.  Brush egg onto the leaves.

Take a sharp knife and cut some holes into the pastry to allow the steam to escape.

Place into a pre-heated oven at 180degC/350degF/Gas 4 for 35-40 minutes until the pastry is crisply golden and the filling is bubbling hot.

Serve with buttered new potatoes and vegetables of your choice.

Printable version


Related Posts Plugin for WordPress, Blogger...