Showing posts with label Jenny Eatwell. Show all posts

23 October 2019

Keema Muttar (or minced lamb with garden peas) Curry

It is possible that you have come here looking for the old recipe for Keema Muttar and are currently scratching your head and thinking "I'm sure this isn't the one!".  Well, you would be right.  I made the old recipe recently and hated it.  I can't help but think I'd written something down wrong, or remembered something wrong (probably those multiple spoons of tomato puree), but the end result was horrid.  It makes me wonder how many of you also tried it and thought the same thing!  I do hope you'll tell me, if that happens in future!


Anyway, I read many, many recipes for Keema Muttar and came up with a new one which I've been refining over several different attempts (as these rather random photographs will attest).  The last incarnation was deemed "this is your best one yet!" by my hubby.  As I happened to agree, it was time to include the recipe on the blog in place of the old unsatisfactory version.

This one doesn't contain any tomato puree, you may be happy to note.  I certainly was.  LOL

This one was "the best one yet!"
I've a couple of points worth noting for you, the first of which is that if you like your curry on the milder side then make sure to remove the pith and seeds from the inside of the chilli before chopping it up.  For the same reason, you may wish to reduce the curry powder down to a mild version and likewise reduce the amount of black pepper and ginger you include.  Made as the recipe states, you'll wind up with a curry that will make your nose run and may even demand some mango chutney alongside as it's a frisky one!  I like to serve a cucumber & mint raita - which I really must blog the recipe for - which does a brilliant job of calming the beast.

Secondly, the amount of peas you include is entirely up to you.  I like a moderate amount of peas, but not too many.  Please don't leave them out entirely or it isn't a Keema Muttar, it's a minced lamb curry.  LOL


Righto then, it's time to head for the kitchen!  


KEEMA MUTTAR (or MINCED LAMB WITH GARDEN PEAS) CURRY   (Serves 4)

Ingredients :

1 tbsp coconut oil
500g minced lamb
a quarter of a teaspoon of sea salt
half a teaspoon of freshly ground black pepper
1 large onion, chopped finely
2-3 cloves of garlic, chopped finely
1 red or green chilli, chopped finely
half a teaspoon of ground cinnamon
2 large vine ripened tomatoes, core removed and diced
5-6 cherry tomatoes, quartered
3 heaped teaspoonfuls of your favourite medium curry powder
half a teaspoonful of ground coriander
a flat teaspoonful of ground turmeric
1 teaspoonful of ground ginger
1 tablespoonful of Maggi tamarind sauce
300ml water (approx)
50g (approx) of frozen garden peas
2 tablespoonfuls of fresh coriander leaves, chopped.

Method :

Heat the coconut oil in a large frying pan over maximum heat and, once the oil is liquid, add the minced lamb.  Fry, stirring and turning the mince, until the mince has all changed colour and any liquid has been steamed off.  Add the sea salt and black pepper and stir through.  Once the lamb has just begun to caramelise, remove from the pan into a bowl using a slotted spoon to retain the oil and rendered fat and set the mince aside.

If there is a lot of fat in the pan, spoon some off until you are left with around 2 tablespoonfuls.  Add the onion, garlic and green chilli and stir to combine.  Fry over a medium heat, stirring often, until the onion is transparent and the garlic is fragrant.  Make sure not to burn any of the garlic, to avoid any bitterness.  Part way through cooking, add the cinnamon and stir through.

Next, add the tomatoes and continue frying until the tomatoes have softened and begun to break up.

Add the curry powder, ground coriander, turmeric, ginger and tamarind sauce to the pan and stir through.  Continue cooking for 2-3 minutes until the powders are all well combined with the mixture.

Return the mince to the pan and stir through, making sure to combine the ingredients well and coat the mince with the spice mixture.  Add the water (you may need more, so keep a little extra on hand) and gently stir through.  Allow the mixture to come to a steady simmer for some 20 minutes or so.  As the curry simmers, the sauce will thicken and reduce to your favoured degree.  Some like their curry to be quite dry in which case you won't need any additional water, others prefer a saucier curry.  Keep an eye on the sauce as the curry cooks and be prepared to add a little more water from time to time to keep the sauce how you like it.

A few minutes before you are ready to serve, add the garden peas and fresh coriander (retaining some for garnish) and stir through.  Try not to add the peas too soon, or they will lose their fresh green colour.

Serve with Basmati rice, naan bread and a cucumber & mint Raita.  Don't forget to garnish with a sprinkle of the chopped fresh coriander, just to make it look pretty!

Printable version

27 September 2019

Poached eggs made with a poaching pan

Lots of people have asked me about how to use an egg poaching pan. I know that it is perfectly possible to achieve a wonderfully shaped, beautifully cooked poached egg without the use of a cheating pan, but if you consider how few people - these days - have access to REALLY fresh eggs, you probably understand why the interest in the pan.

Plus, for people who just aren't into the mechanics and finer points of poaching an egg, or students, or just anyone who wants an egg that's not fried and doesn't require winkling out from its shell, an egg poacher is the answer.

Here on Granary toast and seasoned with a little Sumac spice

The big advantage is that using a poaching pan means you don't need to worry about how old your eggs are. Obviously, the fresher the better, but if you've got a few that are getting ready to claim their pensions there's no need to scramble them, your trusty poacher will have them ready for you irrespective of their age.

Here, one gorgeous poached egg on potato cakes. Delicious!

Now, it's dead easy - the pan comes with (usually) four little plastic cups which sit inside a metal framework which fits into the top of a small, shallow frying pan type of affair. (In fact, mine can be used as a frying pan if you remove the five bits and pieces - multi-purpose, yay!). In essence, what happens is that you put water into the pan, re-assemble the framework and cups (work of seconds) then, as the water heats (on the cooker hob, or over the campfire - I rule nothing out), you bung your egg(s) into the cup(s), replace the lid and wait (patiently, this isn't a microwave you know) until the egg is set to your preference, whereupon you upturn the cup and so long as you've greased the cup sufficiently, out pops your egg. Yum yum.

Here, on wholemeal toast with fresh Dill.  Gorgeous.
One thing I will make sure to say is that the timings depend upon things like the size of your egg, whether you keep your eggs in the fridge or not (in the fridge means they'll take a bit longer because they're so cold when they arrive in the pan) and how your cooker behaves. So you may find it takes a couple of goes before you get the perfect poached egg. Don't, however, feel downhearted and think you can't do it if the first one or two goes isn't quite right - just adjust the timings accordingly (less time for a runnier yolk, more time for a harder yolk) and try again. :)

Got it? Well, if you need step by step instructions, I've done those for you as well. Read on!

POACHED EGGS, MADE USING A POACHING PAN

Ingredients :

1 to 4 eggs (basically either as many as you want -v- as many as your pan can hold)
a knob of butter or a tsp of olive oil or coconut oil - a fat of your choice
cold water.

Method :

First of all, you need to remove the cups and the supporting frame, then pour a half inch or so of water into the bottom of the pan. Place the pan over your heat source, replace the frame for the cups, cover and switch on to high.

Take each cup that you'll be using and smoosh whichever your choice of fat is around the inside of the cup - just a bit, just to help the egg back out again when it's done.

Once the water is boiling, remove the lid, replace the cups back into their holes and break one egg into each cup. Replace the lid and patiently wait for the eggs to cook. This is often a good moment to get the toast on.

Now you don't want the water to be boiling hard, but equally you want it to do more than just simmer. Let it get a bit frisky in there. As the eggs cook, they'll turn white and opaque and cook from the outside in. In order to test them, touch the yolk with a rounded knife tip. If it gives but doesn't shimmy like a jelly (which means it needs more cooking) - you need it to be a bit firm - then it's done and you're likely to have a runny yolk. If you like your eggs more set, then the more firm the centre of each poaching egg gets, the harder the yolk will be. I usually wait around 7-9 minutes for a large egg, but then I like my yolks to be gorgeous and runny.

Anyway, when you think you're there, take each cup out (holding the cup with the help of a tea towel usually prevents burns or scalds), run a knife very gently around the edge of the egg to release it - and with a flick of the wrist, upside down it goes onto your toast.

Sprinkle to taste with salt & black pepper and tuck in!

Printable version

Plum & Pomegranate Clafouti

This is one of those recipes that I included on the blog but didn't ever complete the post, so it didn't reach the stage of being published.

It reaches back to 2012 (and it's now 2019), so you'll forgive me if I've forgotten the true in's and out's of the recipe, but what I do remember is that the end result was gorgeous.  What reminded me about it was the fact that we're about at the end of plum season again and I really haven't made the most of the little darlings, this year.  Hence, I was pondering on what I could make that involved plums - and suddenly remembered this Clafouti.


Well, here it is.  The recipe itself couldn't be any easier, in fact the hardest bit about it as I recall, was finding the right dish to put it in!  LOL  It certainly didn't stay in that dish for long - we made a serious hole in it that first serving.

Somewhere between pancakes and sponge pudding, a clafouti definitely fits into the "comfort food" brackets that you know I so love.  Go on, indulge yourself!


PLUM & POMEGRANATE CLAFOUTI  (Serves 3-4)

Ingredients :

500g red plums, stoned and quartered
2 tbsp of runny honey
1 tbsp of pomegranate molasses
1 tsp orange flower water
20g unsalted butter
2 medium eggs
3 tbsp caster sugar
1 heaped tbsp self raising flour
50g semi skimmed milk
3 tbsp greek yoghurt
a pinch of sea salt.

Method :

Place the plums, honey, pomegranate molasses and orange flower water into a bowl and mix until the plums are liberally coated, then tip the plum mixture into a large wide, shallow tart dish and level out.

Melt the butter either in a pan, or in the microwave.  Take care not to let it burn.

Into a large bowl, place the sugar, eggs and flour.  Whisk together until creamy and whilst whisking, add the milk, yoghurt, salt and melted butter.  Whisk until all ingredients are incorporated.

Pour the batter over the plums and place into a pre-heated oven at 180degC/350degF/Gas 4.  Bake for 30-35 minutes, until the top is slightly domed and a pointed knife inserted into the centre comes out clean.

Serve warm with cream.

Printable version

14 June 2019

Fruity and intense chicken, sweet potato & cauliflower curry

Now I know I have both a chicken & sweet potato and a chicken & cauliflower curry on the blog here, but honest injun, this one is different.  It makes no pretence of being related to any authentic Indian curries but is purely of my own making and, in particular, to my hubby's taste.  You see, for ages he complained about my making curries that "didn't taste of curry".  Well, I tried this way and tried that way, tried this recipe and that recipe but nothing did the trick.  Right up until Asda started selling their Medium curry powder which contains the following : Coriander Seeds, Garlic Powder (12%), Cumin Seeds (8.0%), Onion Powder, Paprika (8.0%), Turmeric, Ginger, Salt, Chilli Powder (5.0%), Cinnamon, Fenugreek Seeds, Fennel Seeds, Black Pepper, Cloves and Cardamom.  Suddenly, curries tasted of curry for him.  So you might want to find a curry powder that sounds very similar in its ingredients, to get close to the right flavour for this curry.  Alternatively, just use your favourite curry powder, because maybe my favourite won't taste of curry to you!


I recommend that you par-boil the cauliflower while you are cooking the sauce, as that puts you in far better control over how tender it is by the end.  It would be so easy for the curry to be the right texture, but the cauliflower to be too hard - or even worse, utterly fallen apart to mush.

I always include the sweet potato pieces (cut into half inch or smaller dice) from the beginning and they seem to have just cooked to perfection by the end.  However, if you're dubious about that, feel free to par-boil those with the cauliflower.

We've become quite accomplished at eating some fairly fierce curries, of which this was one.  However, there's no need for you to suffer the pain if you're not so keen on the hot'n'spicy, just leave out the raw chilli and if necessary, substitute one or more teaspoonfuls of medium curry powder for a mild version.

As for accompaniments, well the Indian world is your oyster.  We always have plain Basmati rice alongside the curry because it helps to cool the tongue.  However, you could make a pilau rice, or have chapattis, naan bread, raita (which is also great for cooling), onion bhaji's, pakoras - whatever you fancy.  Right at the moment, I'm trying to lose weight, so I've cut down on the accompaniments but the menfolk still had a couple of onion bhaji's, just so that they don't feel too hard done by.

Here's the recipe, don't be scared by the list of ingredients as it is a simple matter of putting them all in the one pan in order.  As such, I recommend you get everything ready before you start to cook, otherwise you could find yourself dashing around the kitchen getting a bit stressed - and we don't want that!  Oh and if you cook for just one person and have a freezer, I can recommend freezing the leftovers as it only gets better for keeping and defrosts perfectly.

Maggi Tamarind Sauce - to help you find it, if you're new to it.
FRUITY AND INTENSE CHICKEN, SWEET POTATO & CAULIFLOWER CURRY   (serves 3)

Ingredients :

1 tbsp coconut oil
300g boneless, skinless chicken breast cut across the grain into small chunks
sea salt
50g or thereabouts of small cauliflower pieces
1 large onion, diced finely
2 cloves of garlic, chopped finely
1 fresh red chilli, chopped finely (save a little back for garnish)
half a tsp ground black pepper
half a tsp ground cinnamon
25g salted butter
1 medium sweet potato, peeled and cut into half inch dice
2 medium sized ripe tomatoes, finely diced
4 heaped tsp medium curry powder
1 flat tsp ground turmeric
2 tbsp Maggi tamarind sauce (or 1 tbsp lemon juice)
500ml cold water
a small handful of sultanas or raisins
2 tbsp chopped fresh coriander (save a little back for garnish)
25g creamed coconut
1 tsp honey.

Method :

Heat the coconut oil in a deep frying pan and, once sizzling hot, add the chicken breast pieces and sprinkle with a pinch of sea salt.  Leave them to turn golden on two sides, then remove from the pan using a slotted spoon and reserve.  The chicken doesn't need to be cooked through at this stage.

While the chicken is cooking, bring a pan of water to the boil and add the cauliflower pieces to par-boil for 5-10 minutes.  You want them to be just off being fork tender, as they will finish cooking in the curry sauce.

Add the onion, garlic, red chilli, a pinch of sea salt & the black pepper to the frying pan (using the oil that remains from the chicken) and cook for some 10-15 minutes until the onion is softened and transparent.  Add the cinnamon and stir through.

Add the salted butter and while that is melting, add the sweet potato pieces.  Stir everything together and cook on for another 5 or so minutes, until the sweet potato is heated through and beginning to cook.

Add the diced tomatoes and stir through.  Cook on for another 15 minutes or so, until the tomato has begun to break down and the oil is separating from the mixture.

Don't forget to drain the cauliflower and reserve it for use later!

Sprinkle in the curry powder and turmeric and stir through.  Cook on, to ensure that the spices are cooked through and lose their raw taste, for another 5-10 minutes, stirring often to ensure they don't catch on the bottom of the pan.

Add the tamarind sauce (or lemon juice) and cold water, along with the sultanas and coriander and stir through.  Bring the contents of the pan to a lively simmer and cover with a lid.  Cook until the sweet potato is just off being fork tender, then remove the lid.

Add the cauliflower and chicken and simmer for another 10 minutes during which time the sauce will reduce.  Continue the lively simmer (add a little water if the sauce becomes too reduced) and add the creamed coconut.  This will have the effect of thickening and sweetening the sauce so once the coconut is stirred in well, taste for sweetness and if your preference is for the mix to be a little sweeter, then add the tsp of honey.  It is quite okay to omit the honey, if the mix is sweet enough already.

When the sauce is at your preferred consistency, serve onto warmed plates with the reserved coriander and red chilli sprinkled over and accompaniments of your choice.

Printable version
7 December 2015

Midweek braised pork steaks with mushrooms


In days gone by (more days than I care to consider), I used to write a blog on another platform.  When that closed, I saved all my recipes and pictures and although I have cherry picked from them over the years, I have been meaning to get back to them in some kind of structured way.

So I shall be including them as I go along and these posts are going to be fairly brief (blessedly so, you may say) but they all represent a recipe that I think is worth passing on. 

The first of which is this, my midweek braised pork steaks with mushrooms.  

Firstly, I just happened to have some home made pork stock in the freezer.  However, if you don't have that and need to use a stock cube, you may want to include a finely chopped carrot in with the onion, celery & garlic.  This will give the sweetness and a further depth to the flavour of the sauce/gravy.

Secondly, the pork steaks I have used here are loin steaks.  As such they don't need a lot of cooking to become tender, unlike a leg or shoulder steak.  Hence you might need to adjust the braising time to suit whichever cut you have at the time.

Lastly, the Bisto Best gravy granules aren't essential if you're ethically opposed to them for some reason, just use whichever thickener you prefer - cornflour, or plain flour, or some other proprietary brand.  I use Bisto Best because a) they provide the best flavour of all the gravy products available and b) they mix in really easily, without leaving great sticky clumps of goo.  Goo is definitely not essential to the success of your pork dinner. 

MIDWEEK BRAISED PORK STEAKS WITH MUSHROOMS    (serves 3)

Ingredients :

1 tbsp rapeseed or olive oil
3 pork steaks (I used 2 each as they were very thin, so 6 in all)
1 onion, chopped finely
2 sticks celery, chopped finely
(1 carrot, chopped finely - optional)
1 large clove of garlic, roughly chopped
sea salt and black pepper
750ml home made pork stock (or chicken - or at a pinch, use 1.5 good low salt stock cubes)
125g chestnut mushrooms, cleaned and quartered
1 tbsp Bisto Best pork gravy granules.

Method :

Heat the oil in a deep frying pan or wok until smoking hot, then add the pork steaks (three at a time, if necessary, so as not to overcrowd the pan) and brown them lightly on both sides.  Remove to keep warm on a plate.

Once all the steaks are browned, reduce the heat and add a little more oil if necessary, then add the onion, celery and garlic (plus the carrot, if you're using it).  Stir fry gently until softened and just beginning to colour.

Replace the pork back into the pan and add the stock and mushrooms.  Stir to combine.

Bring up to a lively simmer and taste for seasoning.  Adjust if necessary.  Place a lid onto the pan and cook for 30 minutes or so, stirring occasionally, until the pork is tender.

Remove the pan from the heat and add the gravy granules, stirring quickly to prevent any lumps.

Serve with steamed new potatoes and an assortment of in season vegetables.

Printable version

6 December 2015

Chicken & vegetable dinner soup - golden gorgeousness.

When autumn strikes, I don't know about you, but my mind immediately turns to soup.  In fact, it turns to soup before autumn has fully struck.  Those days when the weather turns from comfortably warm to "hmmn, I think I'll take a sweater with me", seem to spark off the desire.  I find myself pondering  lunches and thinking "I'll have a look down the supermarket soup aisle", not to mention speculatively considering keeping the vegetable peel for soup stock.  It's a dead giveaway every year.

Every so often, I've found myself making soup for lunch.  However, it invariably ends up being just eaten by myself as the menfolk seem to prefer beans on toast, or something in a packet involving pastry for their lunches.  Now I like soup - but eating the same one for the next four lunchtimes gets a bit dull, no matter how good it is.

So, as a result, I've been developing a nice line in "Dinner soup".  That is, the kind of soup that - having partaken of a bowlful - you know you've eaten.  A soup with a nice balance of protein, vegetable and carbohydrate that, without the liquid, could pass for a main course with perhaps a little gravy added.

One such is this chicken & vegetable dinner soup.


Now we all know the reputation that chicken soup carries with it - of being wholesome, healthy and akin to penicillin in lots of situations.  That's a fairly unbeatable place to start.  My thinking was to stay with that spirit and not add anything that would be superfluous to the cause.  No wine, or butter, or cream, or spice.  Just chicken, vegetables and herbs.  Clean, pure and simple.

The task was to get every last bit of chicken flavour into the soup and prevent it from becoming a vegetable soup with chicken, yet not cook the chicken to within an inch of its life.  I think my method of poaching the chicken in the soup stock, then removing it and adding it back at a later stage, took advantage of both those requirements.  The stock had the benefit of the chicken cooking in it, but the late addition of the chicken prevented the meat from becoming overcooked.  Perfect.  In the meantime, the veggies had a lovely time bathing in some very chickeny chicken stock and all of them were chosen to complement the chicken flavour in one way or another.

I will admit to having a terrible wrangle with myself over pasta versus dumplings.  I did SO want to include dumplings, but I also wanted to include pasta - and I knew we were going to be eating the soup with crusty bread so three major carbohydrate sources was just a carb too many.  In the end, I dropped the idea of the dumplings in favour of keeping the soup relatively fat free and light.  However, if you want to swap the pasta in favour of dumplings, then go right ahead.  I won't argue and neither will your diners, I'm sure!

I hadn't intended for the bite-sized chunks of veggies to cook quite as much as they did.  I had in mind that the veggies that were chopped small would ultimately dissolve into the soup and the bite sizes would stay cleanly cut, but tender to the bite.  Well, the former happened, but the latter didn't.  Ultimately though, I was so pleased with how the soup finished.  I think the cleaner cut, just beyond al dente vegetables would have detracted from the comfort food nature of this soup - and you all know what a complete sucker I am for comfort food.

The flavour was super-chickeny, the chicken wasn't dry at all, each vegetable could be discerned in a spoonful (well, except maybe for the onion and garlic that were just part of the general melange) and crusty bread dipped into the broth was just divine.  Hubby abstained from dinner that night, but son & heir declared that not only was the soup delicious, but it was most definitely a "do it again" recipe.  On you come, autumn.  I've got this under control.


CHICKEN & VEGETABLE DINNER SOUP   (serves 4-5)

Ingredients :

1 litre chicken stock
quarter of a tsp dried thyme
quarter of a tsp dried tarragon
half a tsp dried parsley
half a tsp ground black pepper
2 skinless & boneless chicken breasts
1 skinless chicken leg or 2 skinless chicken thighs
1 tbsp olive oil
1 onion, chopped fine
1 clove garlic, sliced
1 carrot, half sliced, half chopped fine
1 leek, halved and cut into 1 inch pieces
2 celery sticks, half of one chopped fine, the remainder cut into pieces
half a butternut squash, peeled, de-seeded and cut into bite sized chunks
2 small potatoes, one cut into small chunks, one in bite sized chunks
1 red pepper, cored and cut into bite sized chunks
1 sweetcorn cob's-worth of kernels
1 tsp fresh rosemary, chopped
2 bay leaves
2 large handfuls of dry macaroni
sea salt, if necessary
2 good handfuls of frozen peas.

Method :

Make up the litre of chicken stock (if you're using a cube, use one and a half for extra flavour) in a pan and add the thyme, tarragon, parsley and black pepper to it.   Bring to a gentle boil and add the chicken.  Simmer gently for 15-20 minutes or until the chicken is just cooked and will shred with two forks.

Remove the chicken from the stock and reserve.

Pour the stock into a separate container and reserve.  Rinse out the saucepan, to remove any scum stuck to the sides.

Add the olive oil to the pan and on a moderate heat, add the onion and garlic.  Cook, stirring regularly, until transparent.  Make sure not to colour the onion at all.

Add the carrot, leek, butternut squash, potato, sweetcorn, celery and red pepper along with the reserved stock, rosemary and bay leaf.

Bring back to the boil, then reduce the heat and simmer until the vegetables are just soft.

In the meantime, shred the chicken breasts and the meat from the chicken leg or thighs.  Discard the bones.

Add the chicken and dry macaroni to the pot and simmer until the macaroni is done.

A few minutes before the macaroni is cooked, taste for seasoning and adjust if necessary, then add a handful of frozen peas and simmer until the peas are piping hot.

Serve with chunks of crusty bread and fresh butter.


Printable version


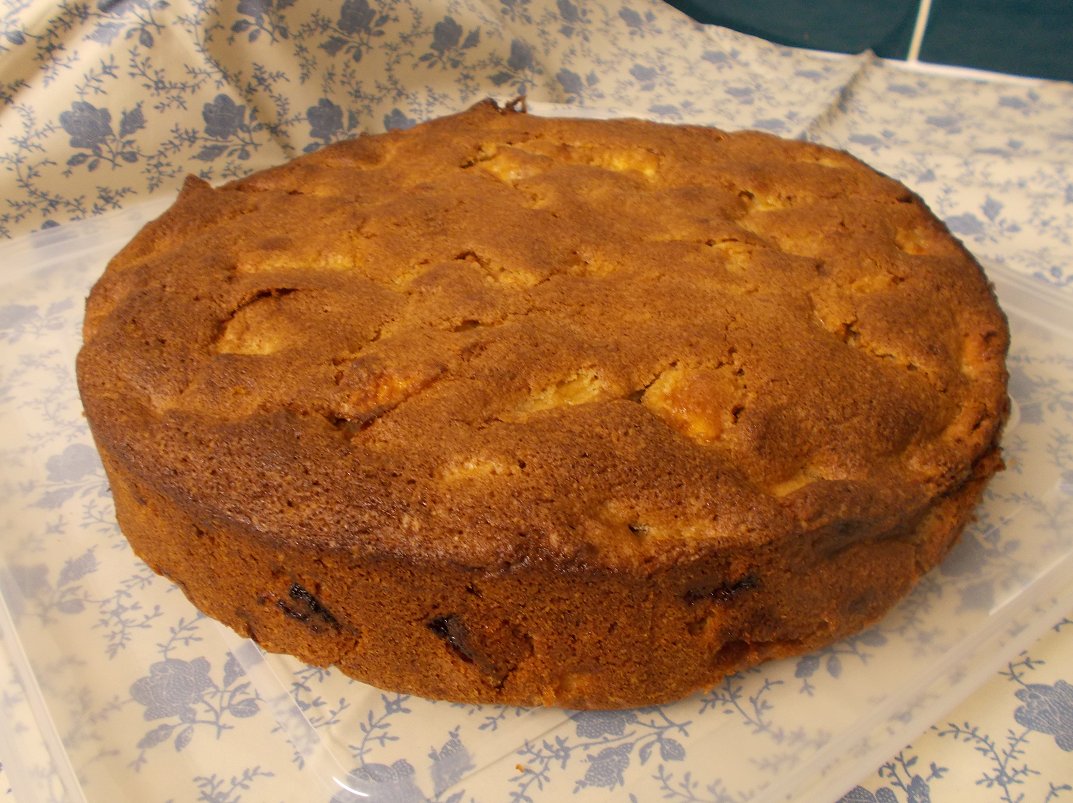
One bowl apple cake - moist, cinnamon rich and fantastic

It's been a while since I made a cake.  Well, the last one was for son & heir's birthday back in October - a zebra cake - which I haven't blogged yet.  (But I will!).  This one is nothing like as adventurous as that one, but you know?  I'd say this one was just as successful, if not more so.

I've said before about how recipes that have me dotting about the kitchen, doing one process after another, are no good these days.  Well that goes for baking too.  So you can imagine the attraction of seeing this recipe - one bowl?  Count me in!

Not only is it one bowl, but there's no messing about with whisks other than a hand whisk to blend the eggs in, there's no "mix this with that in one bowl, then that with this in another, oh and you'll need another smaller one for this and maybe to put that on a plate", thus creating a mountain of washing up.  Nope.  One bowl, a set of measuring cups (ones that microwave - for the butter, you know), a chopping board, knife and/or peeler and you're done.  I like that.
 
Hot out of the oven

I found the original recipe on Facebook and consequently, I have no idea who to attribute it to.  However, thank you - whoever you are - for your cake!  I'm not sure what - other than the simplicity of the preparation - it was that attracted me to this cake recipe.   After all, it's really just apples and cinnamon and I could get an apple/cinnamon fix from making an apple crumble.  It just looked like it would be munchy.  Munchy is good.

With a cup of tea?
Having made the cake, I'm absolutely in love with it.  It has a lovely, slightly crunchy, caramelised top (which you could sprinkle some sugar onto, if you're not already scared by the amount of sugar in it, like I was), the cake itself is as light as a feather, the apple is cooked and juicy but not wet - it's perfect.  Perfect to have with a cup of coffee in the morning, at tea time in the afternoon or as a dessert.  Hubby reckons it'd be great with vanilla ice cream and I see his reasoning, however I like it with creme fraiche as the slight tanginess of the creme fraiche is a lovely partner to the sweetness of the cake.

Who am I kidding?  I'd eat this cake at any time of the day and with or without a drink alongside.  I really think it has taken the crown as my very favourite cake.  Sorry, coffee and walnut cake, you've just been superceded!
 
Cooled and ready to cut

Oh and don't think you need lovely fresh apples to make it work, either.  I used two very old and leathery Russets, one ancient Jazz, one sad and decrepit old Braeburn and two new, fresh and lively Braeburns.  Once they're peeled and in the cake, you can't tell the difference.  So, don't waste those wrinkly, sad apples - give them a splendid job to do and make this cake!

Or maybe with coffee - everything goes!
I have made some adaptions from the original recipe, in that I've reduced the sugar slightly (by a quarter of a cup), swapped the vegetable oil for melted butter, stipulated self raising flour and decreased the baking powder by a half teaspoonful to reflect that.  I shouldn't admit it, but I was amazed that the cake came out as well as it has, considering how much alchemy goes into cake baking.  It doesn't normally do to tinker about with recipes, but I definitely got away with it (and for the better, I am sure) in this instance.

Now, if you'll excuse me, I have a tea plate here and it is embarrassingly empty.  I believe I have some cake somewhere that will do the job nicely ...  

ONE BOWL APPLE CAKE   (serves 8-10)

Ingredients :

2 large eggs
1.5 cups golden caster sugar
2 heaped tsp cinnamon
half a cup of melted salted butter
6 medium crisp apples
2 cups self raising flour

1.5 tsp baking powder.

Directions :

Preheat oven to 180degC/350degF/Gas4.


In a large bowl, mix the eggs, sugar, cinnamon and melted butter.

Peel and slice the apples and add to mixture in bowl (coating as you go to keep apples from turning brown).

Mix together the baking powder and flour and add to the ingredients in the bowl. Mix quickly but well until all of the flour is absorbed by the wet ingredients.

Pour mixture into a lined 9″ round springform pan. Bake for approximately 55 minutes or until a skewer inserted into the middle, comes out clean.

Printable version

5 December 2015

Persimon & Passion Fruit Sherry Trifle - form an orderly line, now!


Yup.  Let's just think about that for a moment.  Persimon - sweet, golden and juicy.  Passion fruit - tangy, crunchy and sharp.  Sherry - boozily heady.  Sponge cake, vanilla custard, lemon & orange jelly and fresh cream with sprinkles.  Surely you don't need any more convincing?

I didn't think so.

Perhaps some of you are asking yourselves what the heck a persimon is.  Well, think of an apple sized cross between a mango and a peach but without the stone in the middle and the fur.  Yes, the skin can be eaten and yes, you can eat it like an apple.  No, it doesn't have pips but it does have a small woody core at one end that is best avoided.  Unless you're some kind of beaver, in which case gnaw away.


Persimon are available from various parts of the world and come in slightly different species.  They are also known as Sharon Fruit, having been named such in Israel.  However, the ones I used (Persimon with the one "m") originated in Spain and carry with them some of Spain's sunshine.  I'm sure of it.  They are incredibly adaptable to use and I've seen them in everything from a chicken dish to baking!  They are especially pretty when sliced horizontally across the grain, as they have a star shape to their internal layout - which makes for pretty patterns on the side of glass trifle bowls, for instance.

I really like them and as soon as peaches and nectarines finish their season, I immediately swap to Persimon for my lunchtime fruit.  So it was nice to do something structured with them, something to make them feel a little bit special.

I will often have a passion fruit alongside them for my lunchtime fruit, as passion fruit are small but pack a mighty punch in flavour.  Consequently, when deciding what to use for a touch of acidity in this sweet creaminess, I didn't need to look very far.  They are a perfect match, neither one overshadowing any part of the other.

Feel free, when assembling your trifle, to use a tin of custard or a pot of ready-made chilled custard to ease the process along a bit.  Personally, I prefer the good old fashioned Bird's custard made from the tinned powder (just add milk and sugar) because you can make it extra thick and it sets up nicely.  Plus, that's what my Nanna always used and she made a great trifle.

Oh - and make sure to have your pinny on, or at the very least a clean apron.  If you're going to make a retro dessert, you'd better be dressed for the occasion!


PERSIMON & PASSION FRUIT SHERRY TRIFLE   (serves 6-8)

Ingredients :

135g lemon jelly cubes
200ml hot water
250ml fresh orange juice
plain sponge cake slices, enough for 2 layers
2-3 tbsp (or more, to taste) sweet Sherry
3 Persimon
2 passion fruit
1 pint (or just under) of vanilla custardwhipped cream, to taste, for decoration
multi coloured sugar sprinkles.

Method :

To begin with, select your trifle bowl with care.  It needs to be sufficiently large to contain all the contents, as once you've started assembling it is very difficult to change into a larger bowl!  Far better to be too big, than too small.

Firstly, make the jelly by breaking the cubes into a bowl and adding the hot water and microwaving for 1-2 minutes, then stirring and repeating as necessary, until the jelly cubes have dissolved.  Add the cold orange juice and stir through.  Set the jelly aside to cool.

Next, break half the sponge cake into the bottom of the trifle bowl making sure to cover the surface well.

Sprinkle the sherry over the cake.  Now lots of sherry is a very good thing, but too much is ghastly for those who don't like alcohol - so temper your sherry to suit your audience.  Remember, it is good to taste the sherry before adding it, so as ... well, you just need to.  *wink*

Slice one or two of the Persimon thinly and horizontally and place the slices against the side of the trifle bowl, but higher than the layer of cake, so that they can be clearly seen from the outside.  Next, dice up the remains of the fruit - whether you peel it is up to you - and add half on top of the cake.

Halve the passion fruit into a separate bowl - as you cut them open, often the juice will flood out, so make sure they're in/over a bowl so as to catch it - and scrape out the seeds.  Sprinkle half around the edge of the cake layer, so that it can be seen from the outside, and include the juice.

Add the second layer of cake and press gently but firmly, to compact the layers.

Add a little more sherry if you like.  You can have another little taster, too.  Better to be safe than sorry.

Sprinkle the remaining Persimon over the cake and add the remaining passion fruit, distributing it as evenly as possible over the cake layer.

Gently pour the jelly over the cake and fruit and press down gently if anything decides to float.

Chill your trifle in the fridge until the jelly has set.

The next step is to make the custard as per the pack instructions - but use slightly less milk than directed, to give a firm set to the custard layer.  Once again, leave your trifle in the fridge to set - but make sure to not cover with cling film, or you will find your custard will have diluted by the time you get back to it!

All you have next to do is to either pipe on the whipped cream, or just create another layer by covering the custard with cream.

Just before serving, get creative with edible decorations - hundreds and thousands, sprinkles, edible glitter, cherries, more Persimon slices - whatever you like!  Make sure your trifle doesn't have to wait, or you may find that your decorations will have dissolved, so do that last stage at the last minute for best effect.

Serve.


Printable version
Related Posts Plugin for WordPress, Blogger...