Now you all know, I'm sure, what a big fan I am of comfort food. Well, when Jus-Rol (the ready made/ready rolled pastry people) got in touch with me and suggested I might like to create something to honour British Pie Week (which is their very own confection and hooray to them for it), of course I said a big "yes please!".
If you're still in the dark as to what British Pie Week is all about (not that it's likely, but just in case), Jus-Rol have a web page to answer all your questions at http://jusrol.co.uk/british-pie-week/.
I'm quite proud to say that I have been getting along quite well with making my own pastry just lately, however, there's no way on this earth I shall ever be making my own puff pastry. It just seems like a strange kind of torture, when Jus-Rol make such a good ready made version! It rises beautifully into deliciously light, crisp and airy flakes of golden loveliness, I am quite sure I couldn't compete - so I don't - and that is why I chose to use puff pastry for my chicken, mushroom & black garlic slices. The choice honours both British Pie Week and Jus-Rol's reliability where both quality and flavour are concerned.
Of course, you know what I'm like by now and making a simple pie was out of the question. Far too predictable. I tossed various recipe ideas around in my head, but kept on coming back to the savoury slice that was the first idea to surface. They're basically hand held (well you can try!) savoury filled, small (well they were supposed to be small) pies that aren't pasties. The pastry flakes so much, that I would suggest when eating al fresco that you make sure you're near a duck pond, as I am positive the ducks would very much enjoy the flaky fallout - which will be fairly considerable. Oh - and don't attempt to eat one in a high wind or you may be left with a handful of filling as your pastry flies off into the wide blue yonder. Jus-Rol's puff pastry is REALLY puffy!
I would anticipate that just about everyone is familiar with the chicken & mushroom savoury slice. Many have been consumed in moments of random onset hunger and they are one of the staples of supermarket pie & pastry sections. However, you know what I'm like for wanting to give a bit of added value to my recipes and as Balsajo's black garlic is one of my new favourite things - and of course, it would be luscious with chicken and mushroom - I couldn't resist including it and hence the new chicken, mushroom & black garlic savoury slice was born.
Now if you haven't sampled black garlic, hie thee hence to your local supermarket and put that right. Black garlic is ordinary garlic that has been aged by the use of heat and humidity until it becomes thoroughly blackened, incredibly sweet and balsamicky (is that a word?) and not like ordinary raw garlic at all. It's just lovely and I have to resist eating it straight from the bulb, whenever I'm cooking with it. Oh and interestingly, it doesn't set of my garlic sensitivity - which is great.
The filling for the slices might seem a bit of a faff to prepare, but in reality it couldn't be any easier. It's simply a matter of a bit of a-chopping and a-peeling, heating up some stock and away we go with the frying pan.
It is very worthwhile making the filling several hours before you require it, so that it can cool right down. Trying to fill puff pastry rectangles as they dissolve under a hot filling is nothing short of guaranteed disaster. I know, I've tried it. So don't do that - make it early and chill it down. It's so much easier.
Also, please don't be put off at the thought of making the slices. That doesn't get any easier either when you are using Jus-Rol's ready rolled puff pastry sheets. Buy two, cut them into quarters and all the hard work has been done by the factory. You can sit back and accept the admiration and appreciation of your audience, without ever having broken a sweat. Perfect.
Now, I have a few Cook's Tips for you - it's been a while since any of those turned up, hasn't it!
Firstly, don't be tempted to add more vegetables than you need. The slices are intended to be primarily chicken, not vegetable. For instance, where the carrot is concerned, I say to use one small carrot, but in fact I used one third of a big donkey carrot as they have such a big carroty flavour. However, it's entirely up to you, just keep it small.
If you have a bunch of celery to hand, dig out the small sticks from the centre of the bunch. They are way more tender and sweet.
Now I know I've gone on rather about the black garlic, but in case you don't have any to hand, regular garlic will do just as nicely. Finely chop one clove and add it along with the onions and bacon etc. It will require more cooking than the black version.
Everyone might know this tip, but it's worth passing on just in case. Whenever you are cutting puff pastry, make sure to cut directly vertically downwards. Lift your knife and make the second cut and so on. When you draw a knife through the pastry, it bends the layers and can make the rise uneven.
Lastly, when egg washing, remember to paint liberally with your egg wash and THEN cut the steam holes. This prevents the holes from becoming clogged by cooked egg, which can make your slices burst at the seams.
I was so very pleased with the flavours. The chicken is right up there - as it should be - and softly tender. The mushroom has a definite presence, with the remainder of the vegetables acting as a harmonious choir in the background. The black garlic is subtly sweet and adds delicious umami to the whole. The pastry is light, crispy and tastes just great. I'm only pleased that there's just three in this family and there are four slices. That's lunch tomorrow sorted, then.
So there you are. No need to wait until next British Pie Week - get your slice on!
CHICKEN, MUSHROOM & BLACK GARLIC SLICES (serves 4)
Ingredients :
2 boneless, skinless chicken breasts
1 Knorr chicken stock pot
200ml hot water
1 tbsp olive oil
10g salted butter
half a medium onion, chopped finely
2 rashers of smoked streaky bacon, chopped finely
1 small carrot, diced finely
3" stick of celery, diced finely
half a tsp dried rosemary
sea salt & black pepper
1 mushroom, chopped finely plus 4 mushrooms, sliced
3 cloves of black garlic, chopped
1 heaped tbsp of plain flour
1 tbsp single cream
2 320g packs of Jus-Rol Puff pastry
1 beaten egg.
Method :
To make the filling, cut the two chicken breasts in half along their length, in order to reduce their thickness.
In a medium sized saucepan, add the water and chicken stock pot and heat until the stock pot has melted. Add the chicken and poach until just done. Remove the chicken to a bowl and reserve the stock.
In a frying pan, add the olive oil and butter and heat until the butter is melted.
Add the onion, bacon, carrot, celery and chopped mushroom and fry over a moderate heat until softened but not coloured. Add the rosemary and season with a pinch each of sea salt & black pepper. Add the sliced mushrooms and black garlic and continue to fry until the mushrooms have softened slightly.
Sprinkle over the plain flour and stir in. Reduce the heat under the pan, then add the reserved stock in small increments, stirring well in between each addition. You are looking for a thick sauce that coats the vegetables to a dropping consistency, but not runny, so you may well have unused stock left over.
Take each piece of chicken and, with two forks, shred the meat. Make sure to leave some of the chicken in small chunks, for texture. Add them to the pan with the vegetables as you go.
Stir the chicken into the sauce and add the single cream. Taste for seasoning and adjust if necessary.
Decant the filling into a bowl and refrigerate until perfectly cool.
Taking the two sheets of pastry, cut each into four equal sized rectangles.
Place two rectangles each onto baking trays that have been lined with greaseproof paper or baking parchment.
Paint the edges of the four pastry rectangles with beaten egg, then pile a quarter of the chicken mixture into each of these rectangles, taking care to spread the filling evenly across each piece.
Take an unfilled rectangle of pastry and place it over the chicken mix, making sure that the edges meet evenly. Press down lightly around the edges. You may wish to just trim off the corners, to give a rounded appearance. Crimp the edges together, or seal by pressing a fork into the pastry to leave a nice pattern.
Egg wash the tops of the four slices and don't forget to cut two little holes in the top to let the steam escape. Decorate the tops with a light sprinkle of freshly ground black pepper.
Place into a pre-heated oven at 180degC/350degF/gas 4 for 40-45 minutes, until the pastry is risen and evenly golden brown.
Serve with baby potatoes, vegetables of your choice and a yummy chicken gravy.
Printable version
9 March 2016
Chicken, mushroom & black garlic puff pastry slices - it's British Pie Week!
3 March 2016
Pressure cooker poached quince - delightfully fudgy and exotic
A few days ago, hubby came home with two gorgeously voluptuous, golden and deliciously fragrant, huge quince. He found them at our local ethnic shop and they are certainly a whole other story to our native English quinces!
I pondered, for a while, what to do with these two lovelies. Hubby was keen to make a small batch jam with them, but I realised that he wouldn't have a chance to do that in the foreseeable future, purely from a time restriction point of view. I have baked with our little English quinces in the past and wanted to do something different to that, so decided to just go ahead and plain old poach them. We love poached pears, so I knew I was onto a good bet.
Some time last year, hubby made some wine with our home grown rhubarb. He still has several bottles in the shed and when I was pondering what to include in the simple syrup, I was initially intending to include Marsala wine. Right up until he cracked open a bottle of his rhubarb wine and I had a little taste. Wow. LOTS of alcohol, but behind that there's a lovely flavour. Not particularly rhubarb, but a lovely flavour nonetheless. So that was the wine component sorted.
As for additional flavours, well I knew that green cardamom was a definite. I liked the slightly exotic, middle eastern kind of vibe that would fit well with the quince. I was pondering other, similar, spices when I suddenly remembered the pomegranate molasses I had in the cupboard. That would continue the theme perfectly!
The quince can be quite a challenge to peel and core - I recommend having both a sharp peeler and knife! Just take your time and make sure not to let either gadget slip, as the fruit will change colour to a rich amber without the addition of your blood to help it on its way!
Make sure to put the peeled and cored pieces into some acidulated water, to prevent them discolouring. I simply filled a bowl with cold water and added half a lemon's worth or slices and juice. Cut each quince into quarters. Two quarters makes for a perfect dessert serving, accompanied by some cream or Greek yoghurt.
Once the fruit is prepared, combine all the other ingredients in the pressure cooker. Once they are nicely mixed and the sugar has dissolved, add the quince pieces and on goes the lid.
Bring the pressure cooker up to pressure and cook for around 20 minutes if the quince is quite ripe, slightly longer if it appears to be a little under-ripe.
At the end of the cooking time, I removed the quince pieces and the cardamom pods and boiled the remaining liquor until it had taken on a lovely syrupy sheen and had reduced by a little more than half. Taste it as it reduces, then you'll know when to stop concentrating the flavours. Pour the syrup on top of the fruit and cardamom and leave to cool. The cardamom will continue to infuse into the syrup until such time as you are ready to serve.
I served ours with a spoonful of Greek yoghurt and it was utterly divine. The fruit takes on a beautiful deep amber colour and has the consistency of a good clotted cream fudge, but with a slight graininess that is reminiscent of pears. The flavour is just so good. Intensely fruity, with a slight toffeeness and that gorgeous botanical, floral bouquet. My son described it well, in that it tastes like Witch Hazel smells.
I've got one half quince left, which I'm intending on including in some chocolate fruit baskets for a sweet choice as part of an afternoon tea. If it works well, I'll add it on to the blog!
PRESSURE COOKER POACHED QUINCE (serves 4)
Ingredients :
2 large ripe quinces, peeled, cored and quartered
250ml sweet white wine
500ml warm water
40g granulated sugar
5 whole cardamom pods
1 tbsp pomegranate molasses.
Method :
Having peeled, cored and quartered the quinces, make sure to place them into acidulated water as you go, so as to prevent them from discolouring.
Mix all the remaining ingredients together in the pressure cooker, ensuring that the sugar has all dissolved.
Add the quince and place the lid onto the pressure cooker.
Bring up to pressure, then reduce the heat to just enough to keep the pressure constant.
Cook for some 20 minutes for ripe fruit, slightly longer for fruit that is not so ripe.
De-pressurise the cooker gently and remove the lid.
Test the fruit, which should be soft but still holding together.
Remove the fruit using a slotted spoon and place into a bowl. Remove the cardamom pods and include them in the bowl with the fruit.
Bring the cooking liquor up to a lively boil and cook until it is reduced by at least half and becomes syrupy. Taste the liquor before you begin to reduce it, then as it reduces, so that you will be able to choose when to stop the reduction.
Pour the syrup over the fruit and spice and leave to cool. The cardamom will continue to infuse the syrup with flavour, so it is up to you when you decide to remove the pods.
Serve at room temperature, with cream or Greek yoghurt.
Printable version
28 February 2016
Caraway & Lemon Sponge Cake - deliciously light as a feather!
I can't remember why I suddenly had a notion to make a caraway seed cake, all I know is that I'd been trying to make one for the last week or so. Well, when I say "trying to" what I mean is trying to find time, rather than trying to and failing in a welter of eggs, butter and flour!
It has been an absolute dog's age since I last made a caraway seed cake and I recall the last one was very successful. I've used caraway in various savoury recipes (braised red cabbage, that sort of thing) and had plenty to call upon in the cupboard - which always helps.
So this cake is actually a collaboration between Saint Delia Smith of hallowed baking and cooking fame and myself. You see, I took Delia's Caraway Seed Cake recipe (just click on the link to see it) and adapted it with somewhat spectacular results. It's often an extremely dodgy thing to do, adapting something like a cake recipe, but I've always been a tryer.
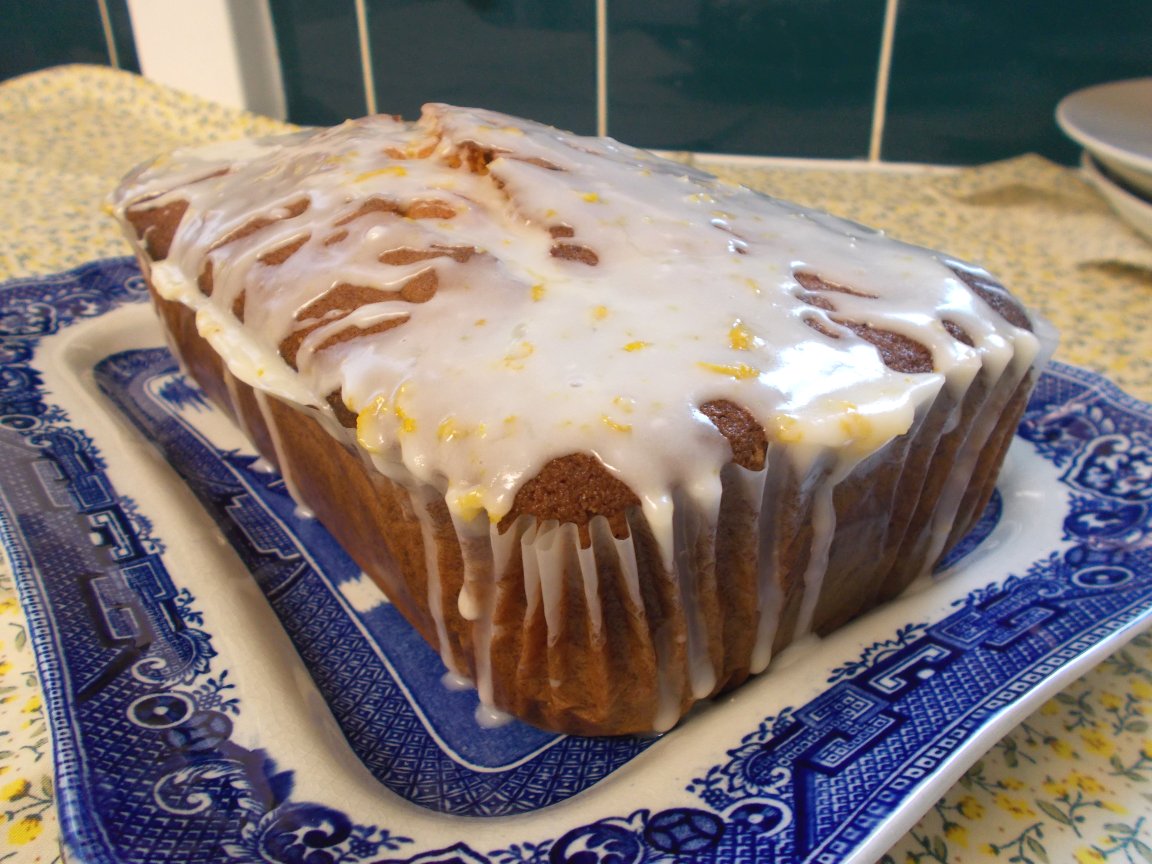
Because I'm me, I just had to consider a bit of a spin on an old favourite and decided to pair lemon up with the caraway. It seemed to me to be a compatible pairing. Delia's recipe uses ground almond and I didn't want that, so out that went and I simply replaced it with the same amount of flour. To up the lemon influence, I added a small amount of lemon essence along with the lemon zest.
Oh boy, what a team we make, Delia and I. The cake baked well, rose beautifully and smelled divine.
The addition of the lemon juice drizzle icing is perfect in that it adds a yummy zing to the cake and the caraway comes in once the lemon calms down, adding a deliciously warm aromatic element to the flavour.
The texture of the cake is just perfect, if I say so myself. Light as a proverbial feather, it dances across your tongue like a deliciously cakey zephyr, leaving mouthwatering lemon and comforting caraway flavours. Mmmmmn, get the kettle on Mother, I'll cut us another slice!
CARAWAY & LEMON SPONGE CAKE
Ingredients :
225g self raising flour
Place into the oven on a low shelf for 60-65 minutes or until a skewer inserted in the middle comes out clean. It will be worthwhile checking the cake at around 40 minutes and placing some baking parchment over the top (we know this as "putting a hat on it!") if the cake looks particularly brown.
Once done, let the cake cool in the tin for some 10 minutes, then remove onto a cooling rack.
Once the cake is cool, mix together the icing ingredients in a small bowl and drizzle the icing over the top of the cake. Allow some time for the icing to dry - and tuck in!
Printable version
It has been an absolute dog's age since I last made a caraway seed cake and I recall the last one was very successful. I've used caraway in various savoury recipes (braised red cabbage, that sort of thing) and had plenty to call upon in the cupboard - which always helps.
So this cake is actually a collaboration between Saint Delia Smith of hallowed baking and cooking fame and myself. You see, I took Delia's Caraway Seed Cake recipe (just click on the link to see it) and adapted it with somewhat spectacular results. It's often an extremely dodgy thing to do, adapting something like a cake recipe, but I've always been a tryer.
Because I'm me, I just had to consider a bit of a spin on an old favourite and decided to pair lemon up with the caraway. It seemed to me to be a compatible pairing. Delia's recipe uses ground almond and I didn't want that, so out that went and I simply replaced it with the same amount of flour. To up the lemon influence, I added a small amount of lemon essence along with the lemon zest.
Oh boy, what a team we make, Delia and I. The cake baked well, rose beautifully and smelled divine.
The addition of the lemon juice drizzle icing is perfect in that it adds a yummy zing to the cake and the caraway comes in once the lemon calms down, adding a deliciously warm aromatic element to the flavour.
The texture of the cake is just perfect, if I say so myself. Light as a proverbial feather, it dances across your tongue like a deliciously cakey zephyr, leaving mouthwatering lemon and comforting caraway flavours. Mmmmmn, get the kettle on Mother, I'll cut us another slice!
CARAWAY & LEMON SPONGE CAKE
Ingredients :
225g self raising flour
175g salted butter at room temperature
175g golden caster sugar
3 rounded tsp caraway seeds
zest of 1 lemon
half a tsp of lemon essence
3 large eggs
4 tbsp milk (I used skimmed goat milk).
For the icing :
3 tbsp icing sugar
zest of 1 lemon
juice of half a lemon.
Method :
Pre-heat the oven to 180degC/350degF/Gas 4.
Prepare a 2lb loaf tin by lining with either a pre-formed tin liner or with baking parchment.
Take a large mixing bowl and add all the cake ingredients (not the icing ingredients!).
Now, using an electric hand whisk, mix the lot up until you have a smooth, creamy consistency. It really is as easy as that.
Spoon the mixture into the prepared tin. Take a moment to level the surface to achieve a more even bake.
Place into the oven on a low shelf for 60-65 minutes or until a skewer inserted in the middle comes out clean. It will be worthwhile checking the cake at around 40 minutes and placing some baking parchment over the top (we know this as "putting a hat on it!") if the cake looks particularly brown.
Once done, let the cake cool in the tin for some 10 minutes, then remove onto a cooling rack.
Once the cake is cool, mix together the icing ingredients in a small bowl and drizzle the icing over the top of the cake. Allow some time for the icing to dry - and tuck in!
Printable version
20 January 2016
Turkey and apple curry - a variation upon a theme
If, perhaps, you have come here via the Recipe Index page of this blog, you may well have noticed that I have two recipes for turkey curry. This is owing to the fact that today I decided to make the already existing, part Marco Pierre White, part my own, authored curry - but it turned into something else. Oh it is still very much a curry - but a very different tasting one to the original.
This one is sharper, more zesty, with a smoother coconut flavour and without the butter or cream. So, potentially, better for you I suppose!
I also started off differently, using raw turkey breast (which is enticingly priced in the shops, at the moment) instead of Christmas roast turkey leftovers. I think I sort of freestyled thereafter!
I thoroughly enjoyed the lighter nature of this curry and the menfolk all cleared their plates, so they obviously agreed.
All I can suggest, when trying to decide between the two curries, is to look at each recipe's ingredients list and decide which one you like the look of the most. Or alternatively, which one you already have the most ingredients for!
TURKEY AND APPLE CURRY (serves 3-4)
Ingredients :
2 tbsp sunflower, peanut or vegetable oil
1 large onion, chopped finely
1 sweet white onion, cut into large chunks
2 big fat cloves of garlic, chopped finely
1 red chilli, chopped finely and de-seeded if you prefer your curry milder
half a tsp ground cinnamon
a pinch of sea salt (use smoked if you've got it)
500g raw turkey breast, cut into bite sized chunks
1 Braeburn (or similarly tart) apple, peeled, cored and diced
1 large tomato, diced
3 tbsp Patak's Korma curry paste
1 tbsp tomato puree
1 Knorr chicken stock pot (a chicken stock cube will do, but the more chickeny the better)
2-300ml water
1 good tbsp of lemon juice
1 tsp ground turmeric
30g creamed coconut
1 tbsp chopped fresh coriander.
Method :
In a large, deep frying pan, heat the oil until a piece of onion will sizzle. Add the onions, garlic and chilli and fry for 10-15 minutes over a moderate heat until the onions are beginning to turn golden. Keep the contents of the pan moving, so as to prevent the garlic from burning.
Add the cinnamon and sea salt part way through the frying.
Push the onion mixture to the side of the pan, add a little more oil and increase the heat. Add the turkey breast pieces to the empty side of the pan and fry until golden on at least three sides. Mix the onions in with the turkey.
Reduce the heat back to moderate and add the apple and tomato and cook on for a few moments.
Add the curry paste and tomato puree and stir through. Continue to fry and stir until you can see the oil beginning to separate.
Add the chicken stock pot (minus its pot, obviously), water, lemon juice and ground turmeric and stir gently through. Allow the mixture to simmer - stirring regularly to prevent the curry catching on the bottom of the pan - for a good 15-20 minutes. Keep your eye on the fluid levels, you should be aiming for a slightly wetter mix than you would want to serve.
Finally, add the creamed coconut and chopped coriander and stir through. The sauce will thicken as the coconut cooks, you can add more water if it becomes too stiff. Once the sauce is at your preferred texture, your curry is ready to serve.
Serve with hot white basmati rice and a sprinkle of chopped coriander as garnish.
Printable version
18 January 2016
Chicken La Mancha - well this is something different!
![]() |
I'm recording my "adjusted" recipe here because it was so flipping good, I don't want to lose it! You know what websites are like - they can up and disappear overnight - and I'd hate to lose this one.
Now this recipe really is something a little bit different. It is basically a Spanish sweet and sour chicken recipe - but don't think oriental at all. Instead think saffron, orange juice, chilli and olives. It also has the benefit of not involving any sweet peppers at all. Not that I have a problem with sweet peppers, it just makes a pleasant change to not have to put them into something "Spanish". What makes it "sweet and sour" is the combination of sherry vinegar (my first time using that - and I love it!) and runny honey. Now I will say, you do need to like saffron for this one. Happily, I love it - it's by far and away my favourite of all the spices. If you're going to be picky, then Spanish La Mancha Saffron is the best type to use for this recipe. However, don't break your neck trying to find some - any old saffron is better than none, but do try to use the saffron threads rather than ground saffron.The recipe is simplicity itself to both prepare for and make - it's another of my favourite "sit in one place and add ingredients to a pan in the right order" recipes. I like those.
It is most important that you reduce the sauce down to a syrupy consistency. It tastes good in the early, wetter, stage - but once you've reduced it down to being syrupy, my goodness but the flavour becomes so intense. I had a hard job to not taste it too often!
The next time I make it, I may very well include some sliced mushrooms - so you'll see I've included them in the recipe. The original recipe uses some toasted pine nuts and fresh coriander by way of garnish, however I didn't bother with either of these - I just sprinkled on some chopped parsley.
I served mine with plain white rice, but it could easily have taken some broccoli or green beans as a side dish, or been served with a side salad and some bread to mop up the sauce.
CHICKEN LA MANCHA (serves 3)
Ingredients :
a large pinch of saffron (Spanish saffron, ideally)
½ chicken stock cube, crumbled into 100ml boiling water
2 tbsp olive oil
1 onion, thinly sliced
1 garlic clove, chopped finely
1 red chilli, chopped and seeds removed if you prefer
2 large chicken breasts, cut into bite-sized pieces
half a tsp of ground cinnamon
150ml orange juice
2 tbsp sherry vinegar
1 tbsp clear honey
10 cherry tomatoes, quartered
1 courgette, quartered and diced
4 chestnut mushrooms, sliced
6 stoned green olives, halved
1 tbsp raisins
1 tbsp finely chopped fresh parsley, for garnish.
Method :
In a small bowl, add the saffron to the hot stock and leave to soak.
Heat the oil in a good sized frying pan and cook the onion, garlic and chilli until the onion is soft and just beginning to turn golden.
Push the onion mixture to one side of the pan and add the chicken. Cook on a fairly high heat for a few minutes until the chicken is browned all over.
Reduce the heat, add the cinnamon and stir through.
Add the saffron stock, orange juice, vinegar, honey, tomatoes, courgettes, olives and raisins. Increase the heat to bring the contents to a boil, then reduce the heat and simmer for ten minutes or until the sauce is reduced and the chicken and vegetables are cooked through.
Serve with a scattering of chopped fresh parsley for garnish.
Printable version
3 January 2016
Diced pork with parsnips & celery in cider (oven version)
Yes, this is a pretty much identical dish to the slow cooker pork shoulder with parsnips & celery in cider - except cooked in the oven.
Sometimes, it's just easier to use a casserole dish in the oven than to break out the mighty weighty slow cooker (or crockpot) - especially when you're going to be indoors and available to keep a wether eye on the oven. Today was just such a day and as I'd not cooked the pork this way before, I thought I'd indulge.
Instead of using the pork shoulder, I cheated unmercifully and bought 500g of diced pork which turned out to be lean and very acceptable indeed. I shall use that again.
Aside from that, I used a different type of cider - Thatcher's Red Apple Cider. It did give the dish a worryingly pink hue to begin with, however the colour cooked out as we went along. The Red Apple Cider is a sweeter version than I would normally have chosen, but it worked very nicely. I also increased the herbage in the recipe - using sage, thyme and rosemary to just offset the sweetness a tiny bit. Our smoked salt helped a little there, too.
Here is the recipe, just in case you too have a non-slow cooker day!
PORK WITH PARSNIPS & CELERY IN CIDER (serves 3-4)
Ingredients :
2 tbsp olive oil
500g diced lean pork
a pinch of sea salt
a pinch or two of ground black pepper
1 onion, diced finely
2 celery sticks, chopped small
half a tsp dried thyme
half a tsp dried rosemary
half a tsp dried sage
1 large parsnip, peeled and sliced evenly
2 tbsp plain flour
500ml medium or dry cider
200ml stock (I used ham stock, but chicken, pork or veggie would do fine).
Method :
Heat the oil in a deep frying pan until very hot. Add the pork (cooking in batches if needs be, so as not to overcrowd the pan), season with salt and pepper and fry until golden on at least two sides. Remove the pork from the pan using a slotted spoon and decant into a casserole dish with a lid.
Replace the remains of the oil onto the heat and reduce the heat to moderate.
Add the onion, celery and herbs and fry until the onion is softened, but without colouring.
Add the parsnip pieces and fry to get some heat into them.
In a small bowl, mix the plain flour with a little of the cider - just enough to create a free running mixture.
Pour the remaining cider into the pan and add the stock. Increase the heat under the pan and, while the liquid is heating, drizzle in the flour/cider mix. Stir well to prevent lumps forming.
Continue to stir until the sauce thickens. Taste for seasoning and adjust if necessary.
Decant into the casserole dish, stir to distribute the pork evenly then cover and place into a pre-heated oven at 180degC/350degF/Gas 4 for 1 hour.
At the end of the hour, give the contents of the casserole a stir and replace into the oven with the lid off. The casserole can now continue to cook for a minimum of another half an hour, or as long as until the meat is tender and the parsnips cooked through.
Serve with mashed potato and steamed vegetables of your choice.
Printable version
30 December 2015
Bacon with Red Pepper Pesto Pasta - done in a twinkling!
What a success this one proved to be! Mind you, I don't know why I'm sounding surprised because it uses three of my favourite things - bacon, mushrooms and Asda's ricotta & red pepper pesto. To my way of thinking, it was a winner before I even took my knife to the bacon. However, sometimes what seems like the perfect combination of ingredients turns out to leave a little to be desired in one way or another - but happily, not so here. Plus, of course, it has the added bonus of being simplicity itself to prepare.
Oh and as a little aside, have you noticed how often my food seems to turn out to be orange coloured? I don't try to make it that way, honest I don't, it seems as though my choice of ingredients has a marked lean towards the orange. But then, the menfolk grumble if there's too much green on the plate, grumble again if I serve them "brown food" and would justifiably grumble at being served black food, so aside from white I guess that just leaves the red/yellow/orange palette as there's not too many blue foods out there! So this one is following along in the tradition of being the seemingly man-friendly colour of orange.
Now, let me recommend to you Asda's little pot of Ricotta & Red Pepper pesto. This seemingly unassuming little jar contains one of the most delicious substances that I have used in everything from sandwiches to pasta. Along with the rich ricotta and flavoursome red pepper, it also has a sneaky little bite from red chilli that just makes it glorious. I would be very happy if you were all to rush out and buy some, love it and continue buying it, as that would mean it will stay around on the shelves for ever!
The pesto marries up with bacon perfectly, of course. The celery adds a welcome freshness that prevents the dish from becoming too heavy on the palate and the addition of the small amount of sour cream helps to loosen the pesto into a sauce without impinging on the flavour at all.
I call this one a very definite win. The empty bowls and enquiries as to whether there was any left, gave proof to that belief, too. As a mid-week, easy, relatively cheap dinner, you can't go wrong.
BACON WITH RED PEPPER PESTO PASTA (serves 3)
Ingredients :
1 tbsp olive oil
350g smoked back bacon, trimmed of fat and diced
1 large onion, diced finely
1 clove garlic, chopped finely
2 sticks of celery, diced finely
black pepper
half a tsp dried oregano
200g quartered mushrooms
190g jar red pepper & ricotta pesto
1 tbsp sour cream
200ml water
250g dried pasta shapes - tubes are good.
Method :
Heat the olive oil in a large deep sided frying pan and add the bacon. Fry over a high heat until all the moisture has evaporated and the bacon is cooked through.
Reduce the heat to moderate and add the onion, garlic and celery, along with a pinch of black pepper and the oregano. Fry until the onion is transparent and the celery is beginning to soften.
Add the mushrooms and continue to fry until they are beginning to soften.
Three quarters fill a large saucepan with water and add a pinch of salt. Bring to the boil and once boiling, add the dried pasta. Remember to give the pasta a stir every so often to ensure it's not sticking to the bottom of the pan. Cook for 10-12 minutes, or to manufacturer's instructions.
Add the contents of the pesto jar to the bacon mix, along with 100ml of water (you can use it to rinse out the pesto jar, so as to get every last little bit!) and stir to combine.
Once the ingredients are looking mixed, stir in the sour cream. Simmer on a very low heat until the pasta is ready. You may need to add a little more water from time to time to keep the mixture saucy.
Once the pasta is cooked, drain it well and return it to the hot saucepan. Take the bacon mixture and decant it on top of the pasta and stir gently, but thoroughly, through.
Serve in warmed bowls with some garlic bread to accompany.
Printable version
Oh and as a little aside, have you noticed how often my food seems to turn out to be orange coloured? I don't try to make it that way, honest I don't, it seems as though my choice of ingredients has a marked lean towards the orange. But then, the menfolk grumble if there's too much green on the plate, grumble again if I serve them "brown food" and would justifiably grumble at being served black food, so aside from white I guess that just leaves the red/yellow/orange palette as there's not too many blue foods out there! So this one is following along in the tradition of being the seemingly man-friendly colour of orange.
Now, let me recommend to you Asda's little pot of Ricotta & Red Pepper pesto. This seemingly unassuming little jar contains one of the most delicious substances that I have used in everything from sandwiches to pasta. Along with the rich ricotta and flavoursome red pepper, it also has a sneaky little bite from red chilli that just makes it glorious. I would be very happy if you were all to rush out and buy some, love it and continue buying it, as that would mean it will stay around on the shelves for ever!The pesto marries up with bacon perfectly, of course. The celery adds a welcome freshness that prevents the dish from becoming too heavy on the palate and the addition of the small amount of sour cream helps to loosen the pesto into a sauce without impinging on the flavour at all.
I call this one a very definite win. The empty bowls and enquiries as to whether there was any left, gave proof to that belief, too. As a mid-week, easy, relatively cheap dinner, you can't go wrong.
BACON WITH RED PEPPER PESTO PASTA (serves 3)
Ingredients :
1 tbsp olive oil
350g smoked back bacon, trimmed of fat and diced
1 large onion, diced finely
1 clove garlic, chopped finely
2 sticks of celery, diced finely
black pepper
half a tsp dried oregano
200g quartered mushrooms
190g jar red pepper & ricotta pesto
1 tbsp sour cream
200ml water
250g dried pasta shapes - tubes are good.
Method :
Heat the olive oil in a large deep sided frying pan and add the bacon. Fry over a high heat until all the moisture has evaporated and the bacon is cooked through.
Reduce the heat to moderate and add the onion, garlic and celery, along with a pinch of black pepper and the oregano. Fry until the onion is transparent and the celery is beginning to soften.
Add the mushrooms and continue to fry until they are beginning to soften.
Three quarters fill a large saucepan with water and add a pinch of salt. Bring to the boil and once boiling, add the dried pasta. Remember to give the pasta a stir every so often to ensure it's not sticking to the bottom of the pan. Cook for 10-12 minutes, or to manufacturer's instructions.
Add the contents of the pesto jar to the bacon mix, along with 100ml of water (you can use it to rinse out the pesto jar, so as to get every last little bit!) and stir to combine.
Once the ingredients are looking mixed, stir in the sour cream. Simmer on a very low heat until the pasta is ready. You may need to add a little more water from time to time to keep the mixture saucy.
Once the pasta is cooked, drain it well and return it to the hot saucepan. Take the bacon mixture and decant it on top of the pasta and stir gently, but thoroughly, through.
Serve in warmed bowls with some garlic bread to accompany.
Printable version
Labels:
Asda,
bacon,
celery,
garlic,
main course recipe,
midweek recipe,
onion,
pasta recipe,
red chilli,
Ricotta and Red Pepper Pesto,
simple recipe,
Smoked back bacon,
smoked bacon,
sour cream,
spirali pasta
28 December 2015
Devilled Eggs - now I understand the attraction
I know that people have different opinions of Facebook, however, I love it. It has enabled me to find out more about what ordinary people in other countries eat, than ever any cookbook would have done. One of the most regular dishes that I've seen occur across the United States and Canada (ex-pats included) is the humble devilled egg. Now it turns out that devilled eggs were being served as far back as Ancient Roman times and it seems that just about every country that has chickens, has a recipe for their own version of devilled eggs.
Now I had never experienced a devilled egg, even though I knew they had been popular in this country at one time. I was intrigued.
Eggs are one of my very favourite foods. I'm well known for declaring that "you'll never be hungry with an egg in the house", such is my confidence in the little lovelies. Son and heir is also partial to an egg, but with hubby we have to be careful as he is quite obviously on the allergic side of sensitive as regards them. Consequently, making devilled eggs has never been top of my list. Until this Christmas when I couldn't stand not knowing any longer and decided to make some.
Okay, so now I understand the attraction. Obviously, you have to like all the component parts of a hard boiled egg to appreciate them. That's no problem for me, I used to take a hard boiled egg to school for my playtime snack (feel sorry for my classmates, some of those eggs were quite whiffy!). There's something so moreish about the rich unctuousness of the filling. The savoury yolk, mixing with the creamy mayonnaise, tangy vinegar, mustardy warmth, buttery richness and the final hit of enlivening chilli from the hot sauce, all encased in the coolness of the set egg white. Oh and a quick word about the Mic's Chilli "Of Foam & Fury" hot sauce. Because it has a degree of India Pale Ale as an ingredient, it added an interestingly hoppy angle to the end flavour. I recommend it! A devilled egg is so simple - and as with all things simple, so good.
I might have come late to this particular party, but I can see I shall be making up for lost time where devilled eggs are concerned. I wonder if I've time to put a couple on to hard boil now ....
DEVILLED EGGS (makes 8 halves)
Ingredients :
4 eggs, hard boiled and shelled
1 tsp English mustard powder
a pinch of ground black pepper
1 tsp soft salted butter
half a tsp celery salt
hot sauce, to taste (I used a quarter tsp Mic's Chilli "Of Foam & Fury" hot sauce)
1 heaped tbsp mayonnaise
half a tsp white wine vinegar
cayenne pepper and fresh parsley, to garnish.
Method :
Cut each egg in half lengthwise (trying to achieve bisecting the yolk in each case).
Gently scoop out the yolk into a bowl, leaving the white intact.
Take a super-fine slice from the underside of the egg, so that it will stand straight on a plate, then reserve.
Break the yolk down into a powder with a fork and add all the ingredients other than the cayenne and parsley.
Mix gently until all is well combined and you have a fairly smooth consistency.
Either fill a piping bag with the mixture, or spoon the mixture carefully into the empty egg whites. Make sure you gain some height with the filling.
Sprinkle each with a tiny pinch of cayenne and garnish with a parsley leaf.
Refrigerate if the eggs are going to have to wait to be served.
Printable version
Now I had never experienced a devilled egg, even though I knew they had been popular in this country at one time. I was intrigued.
![]() |
| Photo by Morgan Davies-Scorer |
![]() |
| Photo by Morgan Davies-Scorer |
I might have come late to this particular party, but I can see I shall be making up for lost time where devilled eggs are concerned. I wonder if I've time to put a couple on to hard boil now ....
DEVILLED EGGS (makes 8 halves)
Ingredients :
4 eggs, hard boiled and shelled
1 tsp English mustard powder
a pinch of ground black pepper
1 tsp soft salted butter
half a tsp celery salt
hot sauce, to taste (I used a quarter tsp Mic's Chilli "Of Foam & Fury" hot sauce)
1 heaped tbsp mayonnaise
half a tsp white wine vinegar
cayenne pepper and fresh parsley, to garnish.
Method :
Cut each egg in half lengthwise (trying to achieve bisecting the yolk in each case).
Gently scoop out the yolk into a bowl, leaving the white intact.
Take a super-fine slice from the underside of the egg, so that it will stand straight on a plate, then reserve.
Break the yolk down into a powder with a fork and add all the ingredients other than the cayenne and parsley.
Mix gently until all is well combined and you have a fairly smooth consistency.
Either fill a piping bag with the mixture, or spoon the mixture carefully into the empty egg whites. Make sure you gain some height with the filling.
Sprinkle each with a tiny pinch of cayenne and garnish with a parsley leaf.
Refrigerate if the eggs are going to have to wait to be served.
Printable version
Subscribe to:
Posts (Atom)