Showing posts with label sponge cake. Show all posts

29 August 2016

Classic Victoria Sandwich Cake

Do you know, I was absolutely flabbergasted to discover that I have never blogged a recipe for a classic Victoria Sandwich cake? I still can't quite believe it. 

I have been making Victoria Sandwiches, also known as Victoria Sponge cakes, since I was about 8 years old!  It is one of my most vivid memories, walking into the living room of our house in Oakley, Basingstoke, proudly bearing my lovely Victoria Sandwich that I'd made (with the help of my Mum, of course!) for my Dad's approval and for us to have with a cup of tea.

How on earth has this stalwart of baking escaped from being included on Rhubarb & Ginger?  The answer is, I have no idea.  However, I shall now remedy this and my favourite recipe is set out below.  In fact, it is almost the same recipe as the Mary Berry Victoria Sandwich cake, the only differences being that I use 1 tsp of vanilla essence in the cake mix and always fill the cake with jam and cream (and sometimes, as in the latest one, with fresh fruit, too).


This recipe has never failed me and always turns out a lovely deep, moist sponge cake that is man enough to cope with the weight of the jam, cream and extra fruit as well as its other half, without collapsing at all.  It is so disappointing to have the bottom half of your cake flatten and compressed by the weight above it, so it is quite important to have a mix that can hold some weight!


It doesn't matter whether you use home made, the shop's best or a cheap as chips jam - they all work and this really is a cake to suit all pockets.  If you can't afford to use all butter, then by all means use whatever your budget will allow.  The flavour will be slightly different, but the cake will be just as well received and I bet there won't be much left!

So, be it an economy version or a ridiculously outrageous, filled with whipped cream and buckets of fruit version, I've never known this cake to be turned down.  It's as easy as winking to whip up - just bung it all in one bowl and whisk away and takes just a twinkling to bake.  In fact, the longest and most arduous part about this whole recipe is waiting for the cake to cool so that you can fill it and get stuck in!

CookBlogShare

What's this?  Well, for the first time ever, I've linked up with the 
Cook Blog Share's recipe linkup.   Hopefully, if you click
 on the following link you'll be taken to
the Easy Peasy Foodie blog, where you will find lots of new 
and interesting recipes to consider.  Yummy!

CLASSIC VICTORIA SANDWICH CAKE   (serves 8-12 slices)

Ingredients :

4 large eggs
225g caster sugar
225g self raising flour
2 tsp baking powder
225g butter, at room temperature, plus a little to grease the tins
1 tsp vanilla essence.

For the filling & decoration :

150g raspberry jam
300ml whipping cream
75-100g fresh or frozen raspberries, saving 4-5 whole, good raspberries for the top
1 tsp icing sugar.

Method :

Pre-heat your oven to 180degC/350degF/Gas 4.

Taking two 8 inch (20cm) sandwich tins (loose bottomed ones are great for this!), cut out a circle of baking parchment to sit in on the base.  Then, using the little dab of extra butter, grease the tins, lay the parchment in and grease the parchment.

Break the eggs into a large bowl (it's as well to break them individually into a cup, then tip them into the bowl, just in case one turns out to be a bit dodgy.  That way you don't lose all the eggs at once!) and give them a light mixing.  Add the sugar, flour, baking powder, butter and vanilla essence and set to the lot with a whisk.  Whisk until just combined - don't over-whisk or your sponge will turn rubbery.  The mixture should be what's known as a "dropping" consistency, which has nothing to do with what horses leave behind them and everything to do with how easily it falls from your spoon.

Decant half the mixture into each prepared cake tin and carefully level the contents.

Gently place the tins onto the centre shelf of your oven (don't lean one on the other, or you'll wind up with a wonky cake) and bake for 25 minutes.  Don't be tempted to open the door and peek at how they're doing, or turn your hand to some panel beating beside the oven while the cakes bake - as these things will guarantee to make your sponge drop and become a pancake.  You don't want that.

At the end of the 25 minutes, the cakes should be smelling delicious and (yes, you can look now) should be coming away from the edges of the tin.  If you give the centre a little press, the cake should spring back like an olympic trampolinist.

Take them out of the oven and place onto a wire rack for some 10 minutes, to just let them get over the change in circumstances and cool a little.  If you have loose bottomed cake tins, this is where they come into their own, as you can remove the cakes from the tins without fear of calamity.

If you are baking the cakes the day before you'll need them, leave them on the parchment paper for support and once they are totally cold, pop them into a freezer bag each.  They'll keep perfectly until the following day.

Otherwise, carefully remove the baking parchment once the cakes are totally cool and place one upside down on your cake plate.

Carefully smooth loads of jam over the surface of this cake, then whip up the cream and even more carefully smooth generous amounts of cream on top of the jam.  If you're going the whole hog and including raspberries (or other fruit), now is the time to embed it into the cream.  Add a little more cream on top of the fruit (to help the upper cake stick and stop it from entertaining any ideas of sliding off onto the floor) and oh so carefully add the second layer of cake - flat side down, baked side up.

Lastly, take a tea strainer and sieve a little icing sugar all over the top of your cake and add the few raspberries that you kept back for decoration.  (Provided your son hasn't eaten them, as mine very nearly did).

Take a photograph of your cake before you alert the family to the fact that it is ready to be eaten, because it's not going to be around for long!

Printable version


28 February 2016

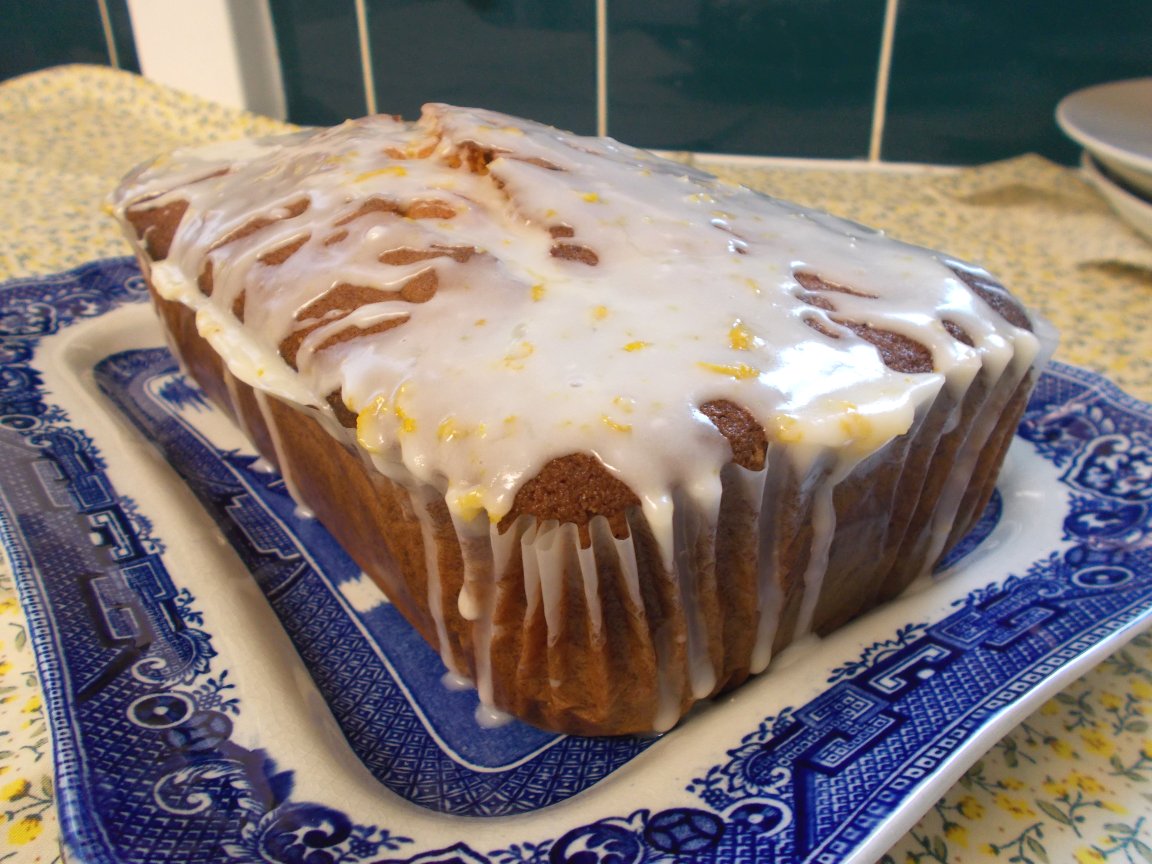
Caraway & Lemon Sponge Cake - deliciously light as a feather!

I can't remember why I suddenly had a notion to make a caraway seed cake, all I know is that I'd been trying to make one for the last week or so.  Well, when I say "trying to" what I mean is trying to find time, rather than trying to and failing in a welter of eggs, butter and flour!

It has been an absolute dog's age since I last made a caraway seed cake and I recall the last one was very successful.  I've used caraway in various savoury recipes (braised red cabbage, that sort of thing) and had plenty to call upon in the cupboard - which always helps.


So this cake is actually a collaboration between Saint Delia Smith of hallowed baking and cooking fame and myself.  You see, I took Delia's Caraway Seed Cake recipe (just click on the link to see it) and adapted it with somewhat spectacular results.  It's often an extremely dodgy thing to do, adapting something like a cake recipe, but I've always been a tryer.

Because I'm me, I just had to consider a bit of a spin on an old favourite and decided to pair lemon up with the caraway.  It seemed to me to be a compatible pairing.  Delia's recipe uses ground almond and I didn't want that, so out that went and I simply replaced it with the same amount of flour.  To up the lemon influence, I added a small amount of lemon essence along with the lemon zest.

Oh boy, what a team we make, Delia and I.  The cake baked well, rose beautifully and smelled divine.


The addition of the lemon juice drizzle icing is perfect in that it adds a yummy zing to the cake and the caraway comes in once the lemon calms down, adding a deliciously warm aromatic element to the flavour.


The texture of the cake is just perfect, if I say so myself.  Light as a proverbial feather, it dances across your tongue like a deliciously cakey zephyr, leaving mouthwatering lemon and comforting caraway flavours.  Mmmmmn, get the kettle on Mother, I'll cut us another slice!

CARAWAY & LEMON SPONGE CAKE

Ingredients :


225g self raising flour

175g salted butter at room temperature
175g golden caster sugar
3 rounded tsp caraway seeds
zest of 1 lemon
half a tsp of lemon essence
3 large eggs
4 tbsp milk (I used skimmed goat milk).

For the icing :

3 tbsp icing sugar
zest of 1 lemon
juice of half a lemon.

Method :

Pre-heat the oven to 180degC/350degF/Gas 4.

Prepare a 2lb loaf tin by lining with either a pre-formed tin liner or with baking parchment.

Take a large mixing bowl and add all the cake ingredients (not the icing ingredients!).

Now, using an electric hand whisk, mix the lot up until you have a smooth, creamy consistency.  It really is as easy as that.

Spoon the mixture into the prepared tin.  Take a moment to level the surface to achieve a more even bake.

Place into the oven on a low shelf for 60-65 minutes or until a skewer inserted in the middle comes out clean.  It will be worthwhile checking the cake at around 40 minutes and placing some baking parchment over the top (we know this as "putting a hat on it!") if the cake looks particularly brown.

Once done, let the cake cool in the tin for some 10 minutes, then remove onto a cooling rack.

Once the cake is cool, mix together the icing ingredients in a small bowl and drizzle the icing over the top of the cake.  Allow some time for the icing to dry - and tuck in!

Printable version


22 February 2011

Caramelised Plum & Nectarine Sponge, with Amaretto

Photograph by our son
Having been sent the lovely gift box of South African stone fruit from Red Communications, my mind immediately set to with regard to the best way of using them - apart from just eating the lot there and then, of course.  Which, I have got to tell you, was sorely tempting.

I pondered on fools, and tarts, and pies - but nothing really said "yes!" until I considered doing a sponge dessert for after our Sunday dinner.


Although they are all delicious, I didn't want to venture into steamed sponge pudding land (as I can't but help thinking that this is a dangerous road to travel, being such a short hop to syrup sponge pudding), so I began thinking along the baked sponge line - and upside-down cake in particular.


I used to make a seriously nice upside down cake using pineapple, but had stopped because they were just so huge, we'd spend all week eating the stuff.  Which was nice in a way - but seriously bad for our expanding waistlines.


So, upside-down cake it was, using plums (one of which tasted so much like bubblegum it was incredible) and white flesh nectarines.  However, how to provide enough juice to make the cake luscious and moist, and what flavouring to use in the sponge to make it interesting?


Answer?  Hubby's Amaretto.  Now he swears it isn't HIS Amaretto, but I'm sure at Christmas I heard him say he would be fighting off all comers who had intentions of getting near HIS Amaretto.  *chuckle*


So, the end result is slices of nectarine and plum fried off in a blindingly hot pan with a little butter and teensy bit of oil until they colour.  Then add some sugar and let it caramelise, then let the whole thing down with a splash of Amaretto - and include 3 tbsp of Amaretto in the sponge mix.  Completely and utterly gorgeous, both hot and cold two days later.


CARAMELISED PLUM & NECTARINE SPONGE, WITH AMARETTO (serves 6)


Ingredients :

1 knob of butter
1 tsp flavourless vegetable oil
1 large deep red plum, halved, stoned and cut into sixths
1 large nectarine, halved, stoned and cut into sixths
1 tbsp granulated sugar
2 tbsp Amaretto + 3 tbsp Amaretto for the sponge
110g self-raising flour
1 tsp baking powder
110g butter (room temperature) or soft margarine
90g caster sugar
2 large eggs


Method :

1.  Heat the butter and oil in a large frying pan until sizzling and drop the fruit in gently.  Do not stir, just allow each slice to colour and then turn and do the other side.  It's important that the pan is hot, or the fruit will stew - and you don't want that.  The whole process just takes a few seconds.


2.  Add the sugar and toss the fruit while the sugar melts and caramelises, then add the Amaretto and toss the fruit to coat.  Pour the fruit and the sauce into the base of your baking tin, arrange the fruit prettily and put to one side while you make the sponge.


3.  This sponge couldn't be any easier.  Place all ingredients (bar the fruit) into a bowl and whisk until well incorporated.


4.  Pour over the top of the fruit and level the surface gently.  Then put into the oven to bake for 25-30 mins, or until a skewer comes out clean.


5.  Allow to cool slightly and turn out onto a serving dish.  Don't let it cool too much, or the caramel will be too sticky to turn out.


Serve with double cream.


.
Related Posts Plugin for WordPress, Blogger...