Showing posts with label dijon mustard. Show all posts

16 September 2017

Chicken sausage, pea & courgette risotto - fresh and tasty!

As much as I would like to, I can't take credit for this delicious risotto recipe. No, that accolade needs to go to Heck Sausages. However, I found the recipe because it was featured on lovefood.com 
with credit going to Heck - so I suppose this is the great-grand daughter recipe recommendation, if you like!  I have changed the recipe a tiny bit, but it's only re-organising the order of play and not changing the ingredients.  Now I could have just placed the link here and not bothered to reproduce the recipe, but I have learned that sometimes favourite recipes disappear from the internet never to be found again - so I'm immortalising it here for future reference.

If you're still with me after such a meandering explanation, well done.  LOL


It has been ages since I made a risotto.  Hubby is ordinarily the risotto chef in our house - and he does a cracking job at it too.  However, he was otherwise engaged so I decided to give it a go.  I'd made some good risottos in the past, so my track record wasn't bad.

For all that it is currently autumn - and a good time for risotto - I have to say that this recipe would be very much at home in a springtime capacity.


The addition of the courgette and petit pois, with the light touch of the chicken sausages, definitely made us think of the relief of coming out of the heaviness of winter and into a relatively lighter menu, as spring comes around.  However, as all the ingredients aren't reliant upon seasonal produce (although, again, it is the perfect time for young courgettes), you can enjoy its fresh tasting loveliness at any time of the year.

As with all risottos, they live or die on the quality of the stock you are using. So at this point I have to blow my Essential Cuisine trumpet once again.  I used 75% Essential Cuisine chicken stock and 25% Essential Cuisine vegetable stock for this risotto and it was fantastic.  The very best part of the Essential Cuisine stable of stocks is their wonderfully intense flavours, however, because they are a stock powder (and they have a new range of liquid stocks, too) it is so simple to just increase the intensity by adding another half a teaspoonful as required.  For a risotto stock, this works perfectly.  So - I recommend them.  'Nuff said.


As for Cook's Tips, I have two :

Firstly, I wasn't looking forward to the unzipping the sausages and separating the sausagemeat into individual little meatballs.  It's a gacky thing to have to do, even if you baste your hands liberally with cold water so that the sausagemeat doesn't stick.  Then, I had this brilliant idea.  I unzipped each sausage from its skin, ran my chef's knife under the cold water and chopped each sausage into five pieces.  It worked, too!  You have to wet the knife in between each sausage, but it is SO much more of a pleasant way to do it.

Lastly, if you're wondering what pan to use to cook the risotto in, well I used our new wok.  It's quite compact, with high walls and fits nicely onto each burner so there are no cold spots to contend with.  So if, like me, you were worried about the rice catching on the bottom of your pan and/or can't see in to the top of a tall pan (alright, so I'm short and most unhelpfully, have to sit to cook), consider using a wok.  It worked absolutely perfectly for me.

So, without further ado, here's your recipe :

CHICKEN SAUSAGE, PEA & COURGETTE RISOTTO    (serves 3-4)

Ingredients :

1-2 tbsp olive or rapeseed oil
8 chicken sausages (Heck or Asda are our favourites), skinned and each sausage formed into 5 small meatballs
450g approx of courgettes, cut into half centimetre dice
1 sweet onion, diced small
2 cloves of garlic, chopped finely
125g Arborio risotto rice
pinch of sea salt
quarter of a tsp ground black pepper
1 litre of good quality hot chicken stock, or chicken/vegetable combined
half a tsp of ground nutmeg
1 heaped tsp of Dijon mustard
300g defrosted petit pois (peas)
1 handful basil leaves (I used Thai basil as we prefer it)
grated Grana Padano, Parmesan or Manchego cheese to garnish.

Method :

Heat the oil in a large frying pan and once heated, add the sausagemeat balls. Fry on a medium/hot heat until deeply golden on at least three sides, then remove from the pan into a bowl and reserve.

In the meantime, make up the stock in another saucepan and place on the heat to simmer.  Just before you are due to add the peas to the risotto, give them a few minutes in the stock pan to take the rawness off of them and heat them up.

Leaving the sausage flavoured fat in the pan, add the chopped courgettes and fry until just beginning to soften and take on colour.  Remove from the pan to the same bowl as the sausage balls and reserve.

Decant what little fat is left into a high sided saucepan or wok and add a little more oil if necessary.  Once the oil is hot, add the onion and garlic and fry over a medium/hot heat until softened and transparent.  Add the sea salt and black pepper and stir through.

Increase the heat under the pan to maximum and add the dry rice.  Stir well, to cover the rice in the flavoured oil and cook until you can see the rice is beginning to toast.  Add a ladleful of the stock and stir well, to release the starch from the rice.  Add the nutmeg and Dijon mustard and stir in.  Once the stock has all but disappeared, pour in another ladleful and stir consistently - it is the stirring that ensures you wind up with a creamy texture to your risotto. Once the pan is again almost dry, repeat with another ladleful of stock and continue this way until the rice is very nearly cooked through.  You may find that you have a little too much stock, or you may need to add a little boiling water as your last ladleful - it all depends on how much you stir and how starchy your rice is.

Add the petit pois along with your last ladleful of stock and stir through, then add the courgette/meatball combination and stir through.  Make sure to bring the pan contents to piping hot and add the torn basil.

Serve immediately, on warmed plates and with grated Grana Padano or Parmesan cheese as garnish.

Printable version

12 September 2013

Tonight's dinner : I cut my finger - does that make me a cook, now?

There is a train of thought in amongst the Shamanic fraternity that it takes a near death experience (preferably with lightning) in order to make a Shaman.  So, I was wondering whether nearly taking the top of your finger off on a mandolin, qualifies you as a Cook with a capital "c"?

I'll go with a "yes", I think.


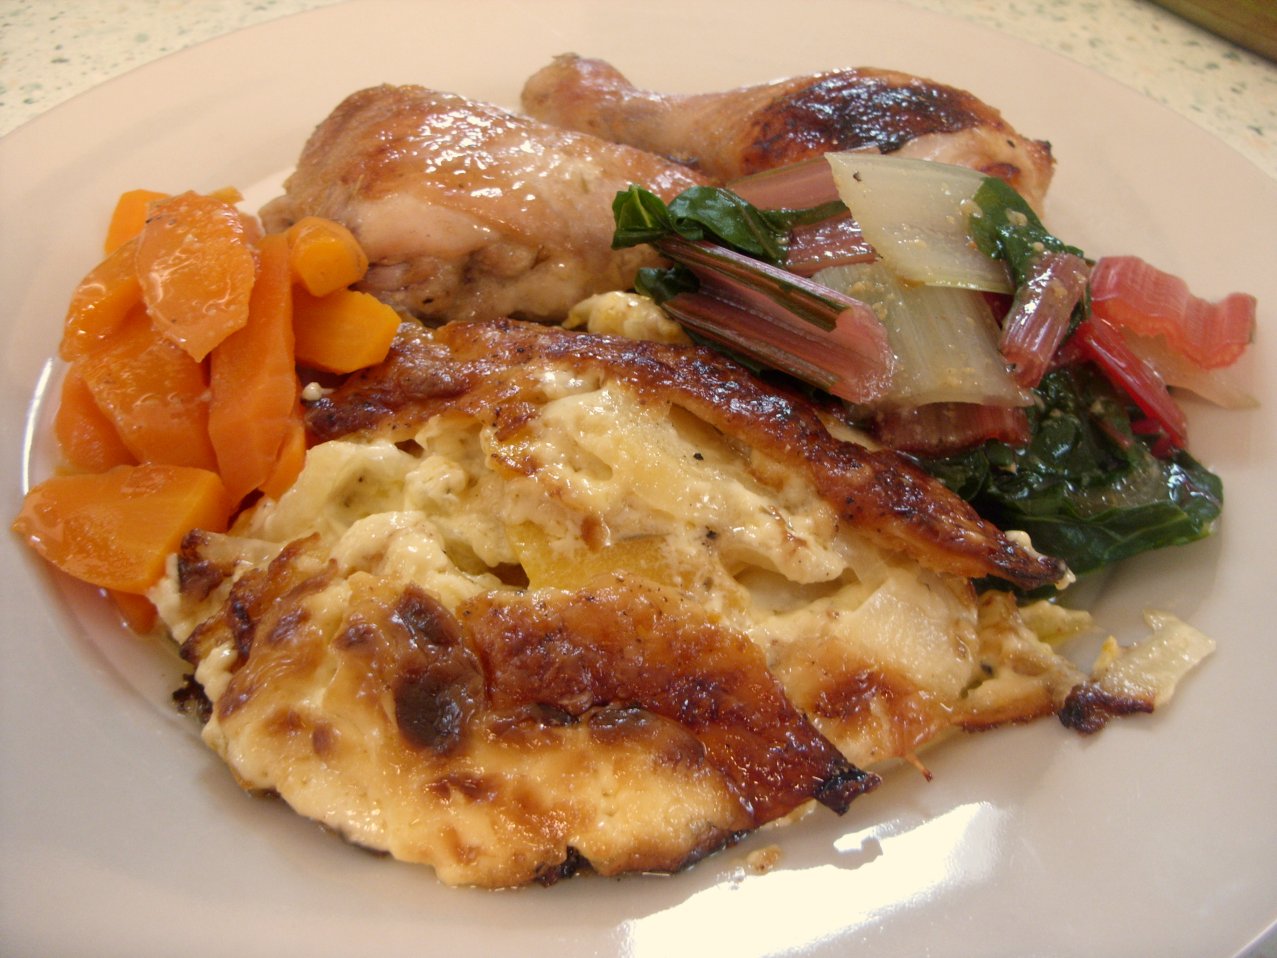
I was slicing parsnips and squash (beautiful parsnips and squash from thevegibox.com), to make this creamy parsnip & squash bake.  Poor hubby and son & heir came back from walking the dogs, to find me hyperventilating whilst holding my right hand in the air with my little finger swathed in kitchen paper.  Yes, it did leak - copiously.  However, with the addition of a dressing, a plaster and a latex glove, I soldiered on like the brave likkle Cook that I now am.

Now, this 'ere bake very definitely deserves its own recipe post - so watch this space and it shall appear.  It was utterly delicious, incredibly moreish and comfort food to the Nth degree.  Like so many of my favourite recipes, it was so easy to make too!  (Well, not counting the first aid requirement).

I partnered the bake up with some honey & mustard chicken (gorgeous) together with some  steamed young carrots and rainbow chard from thevegibox.com.  This was our first go with chard as a side veggie and combined with the cooking juices from the chicken, it was really good.  It didn't taste how I was expecting it to - it has a definite spinach quality, whereas I was expecting more of a cabbage quality.  Very nice!

The chicken was rolled around in some runny honey that I'd combined with Dijon mustard, a little dried thyme and a pinch of salt and pepper.  It baked up well and provided some lovely juices that stood in well instead of having to make a gravy or jus.


The whole family enjoyed the meal and there were clear plates all round.  Can't ask for more than that!


28 March 2013

Minty mustard lamb's liver pitta bread - a spur of the minute lunch

I'm currently going through a phase of loving pitta bread.

Now I've always liked pitta bread, but just recently I seem to have taken to them in a big way.  I suppose the fact that my tummy seems to accept them more readily than ordinary bread (~sob~ I love my bread!) has made all the difference.

There are a number of other benefits to pitta bread, as I've discovered.  For instance, there's very little on this earth that can't be put into one for a yummy and fairly portable lunch.  Everything from steak and chips, through stew, to trifle can be contained in a pitta bread.  Although why anyone would want to put trifle in a pitta, is another matter.  Anyway - I do think that soup is really the only thing that won't go into a pitta bread - but you can dip your pitta bread into soup, so it still wins!

Pitta bread is also self-limiting, quantity wise.  As an example, I was making scrambled egg to go in my pitta this morning.  As I was just scrambling the one egg, I used just the one pitta.  Now had I have been making scrambled egg on toast, I might have felt I should just use the one slice of bread - but you could guarantee that I'd have put two into the toaster because of habit.  With pitta, just one comes out of the packet at a time and just one does the job with no reason to feel hard done by.

Creamy, minty, mustardy - what's not to like?

The whole butter question is another thing that is improved by the use of pitta bread.  With a sandwich, you would butter both slices of bread.  Not so with a pitta.  Very often it isn't necessary to use butter at all - but if you do, then just butter the one side and the job is done with half the amount.  How good is that?

With regard to quantity, putting a whole bucket load of salad into a sandwich just results in your having to use two hands to hold the whole collapsing mess.  Not so with a pitta.  Jam the salady loveliness in there as hard and fast as you can!  You might need two hands as you go, but only because of the sheer weight of health giving salad inside your cheese or egg pitta.  *wink*

So, when we picked up a little pack of fresh lamb's liver from the Ferndene Farm Shop at Bashley, Hampshire the other day, it got me wondering what to do with it.  Naturally, "put it in a pitta" was right up there as a suggestion.

I was in two minds whether to go down the "devilled, mustardy" route with it, or the "redcurrant and rosemary" route.  They both seemed as enticing as one another, but I could tell from the way my mouth was watering at the idea of the mustardy version, that this was the one.

I love mint sauce with lamb and felt that just the mustard sauce wasn't going to be quite enough.  I didn't have any fresh mint (the awful weather has terminated our mint plant's delusions of grandeur) but suddenly remembered putting mint sauce onto cooked new potatoes and how good that is.  So, if I use Dijon mustard for its piquancy, then add a little mint sauce for the sweet/sour thing it brings with it, hmmmn.  What can I use to lengthen and de-intensify the sauce with?  Aha!  I've a teensy tiny bit of double cream in the fridge looking for a home.  Perfect!  And it was.  The cream - only a dessertspoonful at the most - was sufficient to just saucify (is that a word?  If not, it ought to be) all the lovely flavours.


My friend Suzy Bowler entitled her brilliant food blog "Sudden Lunch" and I had her in mind all the time I was making this lunch, as apart from a little thought, it came together in a twinkling.

MINTY MUSTARD LAMB'S LIVER PITTA BREAD    (serves 1)

Ingredients :

1 pitta bread
1 tbsp rapeseed or olive oil
sufficient lamb's liver for one person, trimmed and sliced
sea salt and freshly ground black pepper
1 tsp Dijon mustard
half tsp Mint sauce (the vinegary kind, not Mint jelly)
1 dessertsp of double cream
small handful of rocket leaves.

Method :

1.  First of all, put your pitta bread in the toaster - put it in diagonally (or as diagonally as you can muster) so that as much as possible of it sees the heat.  Once toasted, split down one side and turn your attention to the liver.

2.  Heat a little rapeseed oil in a frying pan and chuck in the liver pieces.  Fry hard and fast - I like mine to have completely stopped bleeding, but I know there are others who can cope with a little red stuff, so it's up to you how long to cook it for.  A few seconds before finishing and adding the sauce ingredients, throw on a little sea salt and a lot of black pepper.  Then turn off the heat and leaving the pan on the hot plate, add a teaspoonful of Dijon mustard, half a teaspoonful of mint sauce and a dessertspoonful of double cream.  Stir to combine.  Pack the rocket leaves into the pitta and pour in the liver mix.

I can recommend either something tangy to drink with it, or a nice big mug of tea or coffee.  Mmmmn, glorious!

Printable version 
 

10 May 2012

"Maneating" Chicken - or Chicken in a maple syrup & mustard glaze.

We were really looking forward to sampling this Maneating Chicken.  No, really!

Hubby had been browsing through Pinterest again and had been enticed by the fantastic photograph and the title of "Man-pleasing Chicken".  The photograph linked back to a lovely blog called wittyinthecity.com which has lots of interesting looking (and sounding) recipes.

The recipe was simplicity itself - basically make up a maple syrup/Dijon mustard/white wine vinegar mix to go over your chicken pieces - then in the oven they go.

The smell of the chicken cooking was completely mouthwatering and bode well for the eating.

Snuggled up in a bath of mustardy goodness
I think hubby was a little bit disappointed in the end result, as I can't help feeling that he was hoping for something more than the simplicity of the mix.  However - and this is testament to the big flavours that were going on there - when son & heir took his first taste, his brow wrinkled and he exclaimed "wasabi!".

Amazingly, I could see exactly where he was coming from with his horseradish/wasabi comment, as the combination of the slightly smokiness of the maple syrup with the warmth and earthy tanginess of the Dijon mustard had definitely combined into something reminiscent of wasabi.  Son & heir wasn't entirely sold on the idea - horseradish is a fairly new flavour for him, so he was a little bit challenged by it.

As for me, well, I loved it.  I loved the flavours, I loved the texture of the baked chicken, I loved the look of it - everything.  I'd have been very happy to have had the exact same dinner the next day, too!

Hubby cooked an interesting side dish of sesame green beans and broccoli, which I also loved and could have eaten a whole lot more than was on my plate - but mustn't be greedy.  The roasted sweet potato cubes were lovely and although it didn't look like there was much on the plate (hubby's view, not mine!), I definitely felt that I'd eaten a complete meal by the end of it.

I guess if you're a bit nervous of the "horseradish effect", the thing to do would be to substitute honey for the maple syrup.  After all, a honey mustard glaze is a classic - and done this way, just can't go wrong.


MANEATING CHICKEN  (feeds 3)

Ingredients :

3 skinless boneless chicken breasts (or the equivalent in leg pieces)
half a cup of Dijon mustard
quarter of a cup of Maple syrup
1 tbsp white wine vinegar
sea salt & freshly ground black pepper
two sprigs of fresh rosemary, chopped finely.

Method :

1.  Pre-heat your oven to 180degC/350degF/Gas4.

2.  In a bowl, combine the Dijon mustard, Maple syrup and white wine vinegar.  Mix well.

3.  Take each chicken breast and cut into three pieces.  Place into a suitably sized oven dish that will enable the chicken to lay in a pool of the mustard mixture.

4.  Sprinkle each with a little seasoning, then pour over the mustard mixture and turn the chicken pieces, making sure that each piece of chicken is well coated.

5.  Bake in the oven for 40 minutes, basting half way through, until the edges of the meat are beginning to char slightly and the chicken demonstrates no pinkness when a knife is slipped into it.

6.  Allow the chicken to rest for 5 or so minutes before serving.

7.  Make sure to spoon any extra sauce over the top of the chicken, as it is way too good to leave in the pan!  Sprinkle on a little of the rosemary, add your choice of vegetables and serve.

Printable version
.

2 April 2012

Sausage & Mustard Spirali

Difficult to make sausage lumps look appetising - but it was sublime!
Now gather around, everyone, for this is a real, honest-to-goodness little gem of a recipe I'm about to share with you.

You know how, some days (usually middle of the week), you are looking for an easy yet completely scrumptious main course to serve to your family and you're thinking "pasta" but are fed up with tomato sauces?  Well, this is your recipe of choice.  No, honest, it absolutely is!

I was having a little click through the latest recipes that had been added to BBC Good Food's website and there was "Pasta with sausage, mustard and tarragon".  I was attracted to the idea but a little bit dubious about how the tarragon would suit the pork sausage.  However, having read through the ingredients list, everything was exactly the sort of thing we like - and I do enjoy being challenged with new combinations, so decided to give it a go.

Now I don't know about you, but I've been seriously disappointed by sausages just lately.  It seems to me that sausages have gone too far the other way now.  At one time they were disgusting in that they contained more cereal and fat than meat - they were little more than tubes of stuffing.  My old friend Mick Ford used to call them "tubes of plastic stuffed with horrid surprises".  These days, although you can still get those horrid pappy sausages, we opt for a more "Butcher's" type of sausage with a 85% or more meat content.  At one time, these were gorgeous and would burst in your mouth with a delicious juiciness that spoke of just enough fat to keep the meat content moist.  These days, however, it seems as though the fat content of a sausage has been demonised to such an extent that a supposedly "good" sausage is now a bag of meat-flavoured dry sawdust with no "juiciness" at all.  Where did the good juicy sausages that the Perishers' dog, Boot, used to pine over go?  What happened to a lovely tasty sausage that would go so well with fluffy mashed potato, onion gravy and peas?  I can't remember the last time I experienced such a sausage.  (No laughing at the back, please!).

Look at that mustardy sauce, tarragon shreds, sausage - where's my fork?
The sausages we used for this pasta dish were Sainsbury's Taste the Difference Pork & Fresh Herb - which I hadn't much enjoyed in their straight sausage incarnation.

However, when it came to using the other half of the pack as sausage meat (i.e. out of their skins and formed into sausage balls), they were perfect.

I can only put this transformation down to the fact that the sausage balls are cooked in a frying pan with olive oil - thus injecting the longed-for "juiciness" factor.  Maybe I should strip all my sausages of their skins and cook them in the frying pan!

Now dear ole hubby has a firmly held belief (and I think he has a point) that if a recipe contains something, then that thing should be able to be tasted in the end result.  Bearing this in mind, I was conscious that I needed to make sure that the tarragon could be tasted.  As such, I included half the chopped tarragon at the "adding the mustard/cream/stock" stage - and added the remainder at the last minute, as per instructions.  This allowed the tarragon to really become part of the sauce, as opposed to being almost an afterthought.

I see from the comments on the original recipe that folk have omitted the fennel seeds.  Now, to me, this is omitting a quite fundamental part of the flavour base.  Fennel has such a particular flavour, that with the two inclusions of tarragon, it completes a flavour triangle.  You have the earthy fennel seeds, the rich aniseed of the early included tarragon and the fresh greenness of the later tarragon.  I am sure the recipe would be quite different without them.

Another point that's worth mentioning, is to use the best Dijon mustard you can afford.  We have recently discovered Maille Dijon Mustard and its fabulous flavour just has to have helped in making the overall dish so gorgeous.  For gorgeous it was - and we all gave it a resounding thumbs up and resolved to have it again - soon!

16 April 2013 : Well, it wasn't soon, but I have got around to cooking this recipe again - and it turned out to be just as successful the second time around.  I currently have a nasty cold and, to be able to cook something so simple yet so satisfying and something that the family all enjoy, is fantastic.  Son and heir declared that it was "giving him a happy", eating it.  Can't argue with that.

I had forgotten how frisky the sauce got - very mustardy and definitely the sort of thing that warms the cockles of your heart.  The tarragon worked very well and was very definitely part of the sauce, this time around.

I also thought of a neat little trick for dividing up the sausages - poultry shears.  What you do is whip the skin off the sausage, then run your poultry shears under the cold tap and snip, snip, snip - cut each sausage into five equal sections.  Works perfectly - and with no mess.  If the shears start to get gummed up with sausagemeat, just run them under the tap again.  This makes serving easy, too - as two sausages equals ten meatballs.  Just keep count as you serve it up!

SAUSAGE & MUSTARD SPIRALI    (feeds 3)

Ingredients :

6 herby sausages
olive oil
2 cloves garlic, sliced finely
1 tsp fennel seeds
a pinch of chilli flakes
1.5 tbsp Dijon mustard
200ml single cream
200ml chicken stock
250gm spirali pasta (or penne)
35g parmesan, grated
2 big tbsp fresh tarragon, chopped.


Method :


1.  Take each sausage and with a sharp knife, slit the skin along the length of the sausage, then remove the skin.  I find this so much easier than squeezing the sausagemeat out, as that always seems to leave so much in the skin - and the price sausages are, I want to use every little bit!


2.  Once you've skinned all the sausages, break each into three (or less) pieces and roll each piece into a ball (or just tidy the ends up!).


3.  Heat 2 tbsp of the olive oil in a non-stick frying pan, then cook the sausage on a medium heat until they are crisp on the outside, golden and cooked through.


4.  Add the fennel seeds, chilli flakes and garlic and cook for 2 minutes.  Take care and reduce the temperature if necessary, so as not to let the garlic burn.


5.  Stir in the stock, cream, mustard, half the tarragon and season really well.  Simmer for as long as it takes to reduce the sauce to a double cream consistency, that will coat the back of a spoon.


6.  Cook the pasta following pack instructions (in a big pan, lots of salted boiling water, for around 9 minutes or so, usually).  Once cooked, drain well and return to the pan.  Add the sausage mixture, parmesan and the remainder of the tarragon (keeping some back to sprinkle over as you serve, if you like).  Gently stir to ensure the pasta is coated in the sauce.


7.  Serve in warmed bowls.


Printable version
 

30 August 2011

Cauliflower Cheese : making my mouth water!

You know what the best thing is? I've got half left for tomorrow!
You know how I said that hubby would be making a Vegetable curry on Monday?  Well, I was beset by a sudden raving lust for Sweet 'n' Sour Pork Balls whilst at work on Monday and, as a result, we wound up having a Chinese Takeaway.

Very nice it was, too!  We tried out "Canton" in the Ashley Road, Upper Parkstone, for the first time and apart from their getting Son & heir's rice wrong (should have been fried, instead he got steamed) which wasn't a critical error, everything was blinking gorgeous - especially the Beef Rendang.  I think we'll be going back there again!

So.  That left a whole cauliflower sitting in the fridge, looking all sad and unloved, without a curry home to go to.  Now I have added a curry to the menu list for this week (see next blog post!) but its ingredients aren't best palled up with cauliflower, so that wasn't any good.

Neither hubby nor son & heir will countenance cauliflower outside of a curry, so it's not even as though I can just include it in the vegetable rota.  So, there it sat, looking increasingly forlorn.

Fast forward to my sitting in the car waiting for hubby to return from the Dry Cleaners, when a huge great Cauliflower Cheese thought hit me.

Now I absolutely adore Cauliflower Cheese and will happily eat one for breakfast, given the chance.  Hubby and son, see above comment about not countenancing.  However, what I did know was that hubby was keen to try making a roux-based sauce, so that he can be armed and dangerous with regard to making a Lasagne, or even a Moussaka.  I am finding that, these days, I just don't have the legs to be able to cope with the amount of time that they take to prepare and so we haven't had one for ages.

I put the suggestion to hubby upon his return and he was keen for the Masterclass.  So, just before lunchtime today, we made a joint effort of a Cauliflower Cheese - and boy, was it good.  In fact, my mouth is watering at the very memory - as it did a moment ago when I sorted out the photographs for this blog post.  God, it was good.

I dug everything necessary out when I was putting the shopping into the fridge and we got started.
All ready to go in the oven

I began by removing all the green leaves from the cauliflower (well, all the gnarly ones, anyway!) and cut it into quarters, then into bite-sized florets.

Next, we par-boiled the cauliflower for around 3-5 minutes (and five sticks of Tenderstem Broccoli, which also needed a home to go to, had 2 minutes), then drained and placed in the oven dish.

In the meantime, hubby had got started with the sauce.  He firstly melted the butter, then added the flour and stirred while it cooked gently until it had lost its sandiness and was feeling smooth.

Next, he began adding the milk, a little at a time.  We used full cream in this instance, as hubby had inadvertently picked up a pint of it instead of our normal semi-skimmed, the previous day.  He began stirring with a wooden spoon, but soon swapped to a hand whisk to ensure no lumps survived.  Once the sauce had bubbled (just a simmer, no frantic boiling) and thickened, he added loads of black pepper, a teaspoon of Dijon mustard and a tablespoon or so of double cream.  He mixed that all in and allowed it to thicken some more.


Next, we added the grated cheddar cheese and allowed it to melt into the sauce.  Then we tasted and added a little salt.  It's important not to add salt until after you have added your cheese, just in case the cheese is terribly salty!


If you find that your sauce is too thick at this stage, it is easy to stir in a little additional milk.  Far easier to do it that way, than to try thickening it!


In fact, hubby's sauce was absolutely perfect for the job and it poured over the cauliflower in ribbons of thick cheesy loveliness.  I topped off the dish with a handful or two of breadcrumbs taken from my favourite bloomer loaf, and a grating of Grana Padano cheese - just because I could.


Then, it went into the oven for some 25 minutes or so, before devouring half of it for lunch.  Hubby and son & heir both tried a piece of cauliflower and decreed it to be "not half bad!" - which was what I'd been trying to tell them for years.

I was chuffed to bits with my "leftovers lunch" - and pleased for hubby that his first go at a roux-based sauce came out so well.


We've agreed that I'll make a Cauliflower Cheese the next time we have a piece of roast bacon for Sunday lunch - which is quite something, for two cauliflower-phobes!  It really makes you wonder why we're growing dozens of the flipping things out there in our vegetable patch!


CAULIFLOWER CHEESE (feeds 2 for lunch or 3-4 as a side dish)


Ingredients :


1 cauliflower head, cut into same-sized pieces

25g of butter
3 tbsp of plain flour
1 pint of milk
freshly ground black pepper or
1 tsp Dijon mustard
2 tbsp double cream
150-200g Mature Cheddar cheese, grated
sea salt
a handful of breadcrumbs
enough Grana Padano, or Parmesan, or Cheddar, to grate over.

Method : 

1.  Place a saucepan of salted water on to boil and pre-heat the oven to 220deg C/180deg fan/gas 4.

2.  Remove all the green leaves from the cauliflower and cut it into quarters, then into same-sized florets and once the water has boiled, par-boil the cauliflower for around 3-5 minutes, then drain and place in a deep oven dish.

3.  In a small saucepan, melt the butter, then add the flour and stir while it cooks gently until it had lost its sandiness and is feeling smooth - around 2-3 minutes.


4.  Begin adding the milk to the butter/flour mixture, a little at a time.  Make sure to stir like crazy, so that no lumps survive.  The sauce will begin to thicken and once your favoured thickness has been achieved, stop adding the milk unless it thickens further and you need to let it down a little.

5.  Once the sauce had bubbled (just a simmer, no frantic boiling) and thickened, add black pepper to taste, the Dijon mustard and double cream and stir to combine.


6.  Next, add the grated cheese and allow it to melt into the sauce.  Check for seasoning and add a little salt if necessary.  If you find that your sauce is too thick at this stage, stir in a little additional milk.


7.  Pour the cheese sauce over the cauliflower, taking care to cover each floret.  Then sprinkle the breadcrumbs over and finish with some grated cheese of your choice.


8.  Place into the oven for some 25 minutes or so, until browned on top and bubbling.


9.  Serve whilst still piping hot.


Gorgeous!


5 August 2011

Cheesy Parsnip Flan - perfect for al fresco eating

Not that we ate al fresco on the night we had the flan, but it would seem like a very civilised thing to do.  Maybe once we've got a table and chairs for our new patio!

I've had some success with tarts and flans since I bought the new flan/quiche dish and - owing to an oversight on the shopping front - had two packs of ready-rolled shortcrust pastry in the freezer, doing nothing.

So, I began to think about what I could put into a pastry case.  Sweet flans are relatively easy - and pretty much off limits at the moment.  Hence, I began to ponder on what went with what, savoury-wise.  Smoked haddock immediately sprang to mind, but have you seen how much it has gone up in price just lately?  I can only think that it's out of season - and as I like to eat seasonally (where possible) I rejected that on both those grounds.

Chorizo was the next on the list.  I don't know why Chorizo keeps on coming to mind, considering I don't really like it.  It's one of those things that I think I'll like, but when it comes to it, it's just to strong on the paprika.  I suppose it could be the type of Chorizo I buy and maybe I should source some from elsewhere and see if I like it better.  I wonder if Spring Fields butchers does it?  I'll have to find out.

So anyway, that was out for obvious reasons.

I'd recently done a Quiche Lorraine, so that ruled bacon out - unless I could find a flan topping that was so far from Quiche Lorraine as to be unrecognisable.

However, before I could come across a flan topping that used both chorizo and bacon (well there's bound to be one!), my mind travelled down the celeriac lines (remember the Cheesy Celeriac Slice?), and after a quick dalliance there, it hopped over to parsnip.  I pondered on whether if you cooked your parsnip pieces (just boiling them), then riced (or mashed) them and added oodles of sharp cheddar, some cream (just a small amount), maybe some mustard (Dijon or English?), before topping up the whole thing with some beaten egg - whether you'd wind up with something good?


Well, funnily enough, you do!  In fact, you wind up with something that is so good, it quite defies belief.

It isn't as deep as a quiche's middle, and the parsnip gives it a totally different kind of texture.  The cheese and the parsnip go together quite ridiculously well.  I had been worried that the parsnip would stamp all over the cheese, but so long as you make sure you've got a good flavoursome sharp mature cheddar, it'll be fine.  Incidentally, at the last minute, I added a teensy bit of Grana Padano just to add another dimension to the cheesy flavour.

Again, this is another dish that is so easy to do, it'd be a great one to prepare with your kids (if you've got some - if not, then borrow some just for this).  You'd better issue them with their own little piece of cheese to munch though, or all your recipe cheese will disappear!

We ate it with some gorgeous chutney from the Isle of Wight Garlic Farm, that my parents had brought back for us.  The pair of them were made for each other.

CHEESY PARSNIP FLAN  (feeds 4 hungry people)

Ingredients :

A piece of shortcrust pastry, enough to line your quiche dish
200g of cooked parsnip, cut into chunks
175g strong cheddar cheese, grated
75g grana padano or another cheese of your choice, also grated
3 large eggs
100ml double cream
1 tsp Dijon mustard
freshly ground black pepper.

Method :

1.  Pre-heat your oven to 180deg C//350deg F/Gas 4.

2.  Line the quiche dish with the pastry, then crack one of the eggs into a bowl and give it a light whisk with a fork.

3.  Brush some beaten egg onto the surface of the pastry and prick with a fork.  Line with non-stick baking paper and baking beans, then blind bake for 15-20 minutes.

4.  Remove the beans and baking paper and leave to one side while you prepare the filling.

5.  Into a large bowl, either mash the parsnip pieces or put them through a ricer.  You are aiming to have a smooth paste of parsnip.

6.  Add all but a handful of the cheeses to the parsnip.

7.  Crack the remaining two eggs into the bowl with the original egg and add the cream,  mustard and some freshly ground black pepper.  Whisk them up until they are nicely combined.  There is no need to add salt, as the cheeses will take care of that.

8.  Add the eggs to the mustard and cheese and stir gently to combine.  Pour onto the pastry case and smooth the surface, giving it a final flourish with the remaining cheese.

9.  Put back into the oven to bake for around 35-40 minutes, or until browned all over and firm to the touch.

Serve with a lovely piquant chutney and some salad.

. 

16 June 2011

Smoked Haddock & Sweetcorn Tart - superb picnic food!

If you don't make anything else over the course of the next two weeks, do try and make this tart - you won't regret it!

I'd reached the point where I had decided on meals for 6 out of the 7 days for the week, when it occurred to me that I was trying to find something for Tuesday - shopping day.  The point here is that shopping day is a perfect choice for something fishy.  I hate having to freeze fresh fish, and would by far prefer to use fresh over pre-frozen, you see.

So I pondered on the recipes I already know that involve fish and nothing filled me with enthusiasm.  So, I looked on the web for "Haddock Recipes" - and turned up HaddockRecipes.co.uk, a simply brilliant choice for all kinds of recipes involving haddock.  Several were skipped over, until I found the tart recipe from Laura Young.

Isn't it funny, how some recipes just say "Yes!", whereas others don't light up your imagination at all?  The minute I saw the name, I thought "oh, now, this one looks likely!" and upon first read-through I could almost taste how it was going to turn out.

Of course, I didn't count on Asda having a superlative piece of smoked haddock that, I am sure, turned this from a nice recipe into a gorgeous recipe.

On the way to do the shopping, it dawned on me that I didn't have a tart tin big enough to accommodate this tart.  As it turned out, neither did Asda - but they did have a glass Quiche dish that was the perfect size and by happy coincidence, made the perfect receptacle.  Serving was something of a delicate exercise, but achievable.

This photograph is so evocative, it makes me hungry!

I give my version of the recipe below, because I've altered four things in it.  Firstly, I've included a lot more fish, as the amount given just wasn't enough to cover what was quite a large tart tin.  Secondly, I've changed the wholegrain mustard to Dijon mustard, as I found the whole grains sank to the bottom of the egg mixture.  When you poured it into the tart tin, the whole grains all fell out in one place instead of being spread across the tart.  I can't help but think that Dijon will stay evenly spread.  Next, is that I recommend poaching the fish via the microwave, rather than on top of the cooker.  I find it a lot quicker and easier.  Lastly, I have dropped the temperature for cooking, from 220deg C to 190deg C.  I found the higher heat too aggressive for the pastry, which was very nearly burned by the time the tart was done.  The tart will need longer cooking, but that's fine so long as the pastry doesn't burn!

Apart from the lovely fish, I also used three Burford Brown eggs.  Burford Browns are just so gorgeously rich and I felt a tart like this could cope with a richer egg.  The ensuing flavour was beautifully savoury, yet light, without being at all sickly - even with 150ml of Double Cream in the mix!

So, do yourself and your family a favour - and make this recipe.  You won't regret it!


SMOKED HADDOCK & SWEETCORN TART  (Feeds 5)

Ingredients:

Pack of shortcrust pastry
500g smoked haddock
100ml milk
3 eggs
150ml cream
150g sweetcorn, drained
1 tbsp Dijon mustard
Handful of parsley
Salt and pepper

Method :

1.  Place the fish into a microwavable dish with the milk and some seasoning. Microwave on high for 3 minutes, to poach the fish until just shy of being done.  Remove it from the microwave and take each piece of fish out onto a plate to be flaked.  Reserve the milk.

2. Roll the pastry out to around 1cm thick and place it into a 23cm (9in) diameter loose-bottomed tart tin without trimming the sides. Line the pastry with baking parchment, and then tip some baking beans onto the paper. Blind bake the pastry for 15-20 minutes at 190deg C and then remove it from the oven and set it to one side.

3. Beat the eggs and mix them with the reserved milk and the cream. Finely chop the parsley and add to the mixture, along with the Dijon mustard. Season well.

4. Remove the baking beans and parchment from the pastry and then sprinkle the bottom of the tart with the sweetcorn and the flaked fish.

5. Pour the egg mixture over the fish and sweetcorn and then place the tart into the oven at 190deg C for 35-45 minutes, or until the surface no longer feels as though there is wet egg underneath it.

6. Once cooked, trim the excess pastry and then allow the tart to cool before cutting it into slices. 


For a main course, serve with new potatoes and a side salad.  Perfect also for picnics.

.


4 April 2011

Pork in cider sauce : a princely thing to do to some pork steaks

I mentioned this in passing, during my piece regarding what was for dinner this week.  I billed it as "a return to man food" - which it certainly was.

When I'd gone to the butchers to get the pork steaks, I was amazed to see that for £2.99 I was getting six steaks cut from what looked like a gorgeous piece of loin - and they certainly lived up to that brief glimpse.

I decided to cook all six steaks, as I wasn't sure whether they'd shrink much and although one steak would be enough for son & heir, hubby might raise an eyebrow at just the one.  As it was, one steak was considerably smaller (having been cut from the end of the piece) which made portioning the meal out a complete doddle.  The two steaks were ample for hubby and I.

My bay tree
This dish really couldn't have been any easier to make.  Sometimes you seem to be cooking and setting aside stuff for ever before you get to put it all together in the final dish - but with this one it's a simple matter of flash frying the steaks and setting them aside while you cook down the onion, then it's everything into the pan and in the oven it goes.  Easy peasy.

Incidentally, the Dabinett Cider from Sheppey's was glorious in this.  It has such a rich fruitiness that stands up well to the onions and the slow cooking.  Not only that, but I used low fat creme fraiche, without any comment from either of the chaps, which I take to mean that it was sufficient unto the cause.  It's definitely a mashed potato dish - you need something to mop up that gorgeous gravy with, because you certainly don't want to leave any on the plate!


31 August 2016

I made this recipe again today, the first time in a long time, and because I had some dill in the fridge and dill is a fundamental flavour in the pork meatballs that go into making Swedish meatballs, I thought I'd add some.  I also added a couple of teaspoonfuls of apple sauce.  Oh, and a little bit of thyme.  Oh and I forgot to include the bay leaves.  Oh yes, and I used wholegrain instead of Dijon mustard.  *sigh*  It was very nearly a whole new recipe.  LOL

However, my message to you is that I have included some of these things in the recipe as the end result was AWESOME!  Honestly, it was really good.  I almost ate that sauce with a spoon.  Here's what it looked like :


Oh yes.  This can come again - and this time, a whole lot sooner!

PORK STEAKS WITH CIDER SAUCE  (feeds 3)

Ingredients :

2 tbsp olive oil
700g of pork from the shoulder, or pre-cut steaks
sea salt & freshly ground black pepper
a large onion, thinly sliced
500ml cider
2 bay leaves
15g fresh dill, chopped
15g fresh parsley, chopped
1 tsp dried thyme
1 ham or pork stock cube
4 tbsp crème fraiche (use low fat if you want)
2 tsp Dijon mustard.
 
Method :

1.  Pre-heat oven to 160deg C/325deg F/gas 3.

2.  Heat the oil in a large frying pan and sear the pork on both sides, adding a touch of sea salt and black pepper to the one side, (you'll probably need to do this in two batches to maintain the temperature of the pan) then remove from the pan into a flameproof casserole dish with a lid and set aside.

3.  Reduce the heat under the pan to moderate and add the onions.  Fry until softened and golden – around 10 minutes or so.

4.  Add the cider, herbs and stock cube and stir everything through, bringing it to a simmer.

5.  Decant the cidery herby mix into the casserole dish, give everything a light stir to make sure the liquid has reached each piece of pork and cover.  Place into the oven for 2 hours.

6.  At the end of the cooking time, remove the pork and reserve to keep warm.  Either decant the sauce into a saucepan or (if it will handle it) put the dish directly onto the heat.  Stir in the mustard and bring to a boil.  Reduce the sauce by one third and then reduce to a simmer. 

7.  Stir in the creme fraiche and return the pork to the pan until fully re-heated.

Serve with mashed or new potatoes and seasonal vegetables.

1 February 2011

Mustard & Lemon Sausages

The fact that I got hold of this recipe is entirely down to the power of Twitter.

There I was, quietly reading everyone's input to my timeline, when up came a comment from the lovely @madamding about how she was intending on having a Nigel Slater recipe that evening, for "Mustard & Lemon Sausages".  Well, that intrigued me as I'm always in the market for a new sausage recipe.


Very graciously, she provided me with a link to where the original recipe was to be found so that I could decide whether to give it a go.  Having read through the incredibly simple ingredients list and method, it became one of those "just has to be done" recipes.  This is mainly because I have a quite similar and delicious recipe for Gammon steaks, which involves Whole Grain Mustard and Orange zest and juice.  (Which can be found here).  This recipe involves the same Whole Grain Mustard, but with honey, Dijon mustard and lemon juice.

Regrettably, because of personal commitments, Mrs M (@madamding) couldn't do the recipe when she was intending to, so I'm hoping very much that I've not beaten her to it where blogging it is concerned!

Anyway, fingers crossed and here goes.  "Mustard and Lemon Sausages" is a wonderful dish on all sorts of levels.  The sauce/glaze begins life being incredibly acidic, but undergoes some magical transformation as the sausages cook and the mixture reduces.  Out goes the acidity and in comes a lovely soft richness, with a rounded sweetness that isn't too much.  It may sound a tiny bit odd, but I found the sauce/glaze goes extremely well with mashed potato - so a forkful that comprised of a piece of sausage, a dollop of mashed potato and a swoop of sauce is just delightful.

However, one of its very great attractions is that it will be able to join my battalion of "quick and easy" dishes, which as a disabled cook, are always good to have up your sleeve for those not-so-good days.

Needless to say, I've tweaked the recipe a tiny bit.  However, it's just the quantities of the mustard that I've changed, in order to render it a bit more affordable when you've just spent an arm and a leg on two jars of (fairly) expensive Maille mustards, instead of your usual fare of Supermarket own brand and the quantity of honey, with a view towards the mildly diabetic in the family!

Oh yes, and I'd recommend using just a plain pork sausage, as I think you'd find some of the fancier flavours would clash.

MUSTARD & LEMON SAUSAGES  (Original recipe by Nigel Slater : feeds 3)

Ingredients
 

8 plump pork sausages
2 heaped tsp grain mustard
1 heaped tsp smooth Dijon mustard
3 heaped tsp runny honey
1 lemon, juiced

Method
1. Pre-heat the oven at 200C/400F/Gas 6.

2. Put the sausages in a roasting tin large enough to take them in a single layer. If they overlap, they won’t cook properly.

3. In a bowl mix the mustards, honey and lemon juice. Stir well and pour over all the sausages.

4. Bake for 25-30 minutes, rolling the sausages over in the honey and mustard mixture once or twice during cooking, so that they eventually take on a sticky, glossy coat.

Serve with mashed potato, sugar snap peas and carrots.

.
Related Posts Plugin for WordPress, Blogger...