Showing posts with label picnic recipe. Show all posts

30 November 2018

Pork And Apple Pie - think a lighter textured pork pie!

The moment I saw this recipe in the Take a Break - My Favourite Recipes magazine, I knew I had to give it a go.  I've done a couple of variations on a pork and apple pie already - Kentish Pie and Ham & Apple Pie - both of which are really popular with the family, so I reckoned this would also be a hit.  Little did I know just how much of a hit it would prove to be!  It's hard to say which way I like it best - room temperature, or direct from the fridge.  All I know is that it is delicious and especially good with mustard or piccalilli!

Of course, apart from the delicious flavour of this pie and the lightness of the gorgeous pastry, one of the very best things about it is just how simple it is to make.  I suppose it all hinges on your using a tasty sausagemeat for it as you won't get good things back if you don't put good things in to begin with!  I picked a 72% pork sausagemeat, which was seasoned with sage, nutmeg, mace and black pepper.  Inevitably, I tinkered about with the quantities, plus I used smoked back bacon, which inevitably has more flavour than unsmoked and more meat than fat, I swapped the leek for a small red onion because hubby hates leek and also added more sage until my nose told me there was enough.


Contrary to the original recipe, I pan fried the bacon before adding it to the filling mix as I was a bit nervous about it discharging too much water in the cooking.  I also baked the pie in a loose bottomed sandwich tin (the recipe states to bake it free form on a baking tray) basically because my crimping is rubbish and I would have hated for it to have come apart during the baking or got washed away by all the water from the bacon.


All of my tinkering about with the recipe worked perfectly, resulting in a nicely shaped, full of filling, golden baked pie that will grace our Boxing Day buffet table very nicely thank you.  It will be lovely with the pickles and salad that accompanies the cold meats and cheeses and make a fabulous centre piece for the table.


Many thanks to Laurie Burley of Cornwall for sending in her delicious pie recipe to the magazine - I know it has instantly become a family favourite!

PORK AND APPLE PIE   (serves 6)

Ingredients :

For the pastry :

225g plain flour
140g cold diced butter
a pinch of sea salt
a quarter tsp of black pepper
1 tsp English mustard powder
2 egg yolks kept separate - one for the pastry and another for glazing
2 tbsp or thereabouts, of cold water (I used carbonated mineral water).

For the filling :

400g of your favourite pork sausagemeat
100g smoked back bacon, finely diced
1 sharp eating apple (I used a Braeburn), peeled, cored and finely diced
1 small red onion, finely diced
2 heaped tsp finely chopped fresh parsley
1 tsp dried sage
half a tsp ground black pepper.

Method :

Using a food processor (you can opt to rub in the butter, if you prefer), put the flour, diced butter, sea salt, black pepper and mustard powder in to the bowl and whizz for as long as it takes to get to tiny breadcrumb stage.  Add the one egg yolk and half the water and blitz again.  You are aiming for the crumbs to clump together and form a mass.  You may need to add the remainder of the water and continue blitzing until the clumps form.  Don't add too much water too soon, or you will potentially end up with a too wet mixture.  Some loose mixture is acceptable as it will all come together in the cling film.

Spread a large piece of cling film out across the worktop and tip the contents of the processor on top.  Fold the cling film over the top and gently press and pat the pastry together so that it forms a cohesive whole.  Then fold each end up to seal and place into the fridge for a minimum of 15 minutes.

Pre-heat the oven to 190degC/375degF/Gas 5.

Heat a frying pan and add the diced bacon.  Dry fry until all the moisture has evaporated and the pieces are beginning to turn golden.  Set aside.

Taking a large bowl, add the sausagemeat, cooked bacon, diced apple, diced onion, chopped parsley, dried sage and pepper.  Using your hand, squish and mix the ingredients together until everything is evenly distributed.  Try not to massage the mixture into a lump, but keep the texture light and broken up.

Reclaim your pastry from the fridge and roll out half of it to line an 8" sandwich tin - a loose bottomed one helps to get the pie out at the end of baking.  Trim the pastry off neatly and level with the top edge of the tin.

Place the sausagemeat mixture gently into the pastry case and distribute it evenly, making sure to not press down too hard.  Remember, you want to keep the texture light.  Level off with the top of the tin.

Taking your egg intended for glazing, brush a little egg around the inside edge of the small amount of pastry above the level of the meat.

Roll out the second piece of pastry and place over the top of the tin to create the pie's lid.  Ease the pastry down onto the top of the meat filling and press lightly to create a seal around the edge where the egg wash is.  Trim off neatly and crimp the edges in a pretty pattern.

Cut a cross into the centre of the pastry and turn back each quarter of the cross, to allow the steam to escape whilst baking.  You can decorate the surface with pastry leaves or whatever you want, at this stage.

Finally, egg wash the surface of the pastry and place into the oven for 30 minutes.  When the time is up, reduce the oven temperature down to 170degC/325degF/gas 3 and bake for another 15-20 minutes or until a knife inserted into the centre of the meat sends back some resistance, indicating that the meat is cooked, and the pie is lovely and golden in colour.

Remove from the oven and cool for 10-15 minutes on a wire rack.  While the pie is still quite warm, remove from the tin (this is where the loose bottomed tin comes in SO handy) and gently place back onto the wire rack to cool.

Serve at room temperature with pickles and salad, or chips and baked beans.  The pie is just as good served directly from the fridge, to have with pickles and salad or to take on a picnic.

Printable version

11 April 2018

Pork, apple & mustard sausage rolls - an aide memoire!


I was so sure there was one, I just came to find the link for my pork, apple & mustard sausage rolls - and was absolutely astounded to find that I haven't blogged them!

Yes, I have several sausage roll recipes on the blog here but none of them are with my family's favourite pastry - a mix of flour, vegetable suet and butter.  This pastry is hugely calorific but so delicious with savoury recipes.  It's also not as much of a mouthful as puff pastry can be and not as claggy in the mouth as a light shortcrust can be, all of which is a very good thing.  Once baked, it also has a strength to it - particularly when judiciously coated in an egg yolk wash - which can be really useful when out on picnics or just plain old eating in the car.  Nobody wants a collapsible sausage roll in those circumstances.

As such, here now follows an aide memoire of this sausage roll recipe, including the correct quantities for the pastry - which will save me from having to work it all out for the umpteenth time!

PORK, APPLE & MUSTARD SAUSAGE ROLLS   (makes 6)

Ingredients :

For the pastry

225g plain flour
75g vegetable suet
75g salted butter
a pinch of sea salt
a good pinch of black pepper
60-80g of carbonated mineral water.

For the filling 

6 quality pork sausages, skins removed
half a Braeburn apple, peeled, cored and finely diced
6 tsp wholegrain mustard (or thereabouts)
an egg yolk, for glazing.

Method :

At least an hour before you require it, make your pastry.  Add the flour, suet, butter, sea salt & black pepper to a large bowl and rubbing between your fingers, rub the butter into the mix.  You should wind up with a mixture somewhere between cornflakes and breadcrumbs.

Stir in approximately half the water, adding a little more and a little more, until the mix is damp enough to come together when pressed.  Erring a little on the dry side is infinitely better than having it too wet, so add cautiously!

Lay out a large piece of cling wrap and dump the pastry into the middle.  By patting and pushing, make a rough log shape and close the cling film over it, tightening up either end to compress it.  Place the pastry into the fridge for a minimum of 30 mins before using.

When ready to make the sausage rolls, set your oven to pre-heat to 180degC/350degF/Gas 4.  Take the pastry from the fridge and cut into two halves and set aside.

Skin the sausages, disposing of the skins, and set the sausage meat aside still in its sausage shape.

Peel and core the apple and chop one half into fine dice.  Eat the other half.  Well, someone has to!

Roll out one half of the pastry on a floured board, to make a rectangle long enough to take three sausages, laid end to end, and with enough pastry on either side so that you can roll them up and have the sides meet.

Spread half the mustard onto the middle of the pastry, creating a "bed" for the sausages to lay on.  Add half the apple pieces to the mustard and lay the sausages on top, pressing down lightly onto the apple.

Brush a little water onto the side of pastry that is furthest away from you.  Lay the dry side of the pastry over the sausage mix and continue to roll onto the dampened side.  You may need to trim any excess pastry, rather than have too thick a layer around the sausage mix.

With a sharp, wet, knife cut the roll into three (or smaller, if you want picnic versions).  Lay each sausage roll onto a baking tray, join side down, and repeat the whole process with the second half of pastry, remaining mustard, apple and last three sausages.

Brush each sausage roll liberally with the egg yolk and pierce the top with a fork or make a knife cut, to let the steam out as the sausage cooks.

Place into the oven for 35-40 minutes, after which you should place the sausage rolls onto a wire rack to cool.  Beat off all comers until ready to serve.

Printable version

8 August 2017

Cheddar & chorizo quiche : a super-tasty surprise!

For some reason I decided to make a quiche. I haven't made one in literally ages and I don't really have a reason for it. But I was considering what to make for dinners this week and up popped "quiche" in my head. Well, it seemed like a good idea - particularly if I got some ready made pastry, that would make it a lot easier. So I did.  You can make your own pastry if you wish - feel free!  On a good day, so would I.

I already had some finely sliced chorizo in the freezer, left over from a paella. The idea of some good, mature cheddar with chorizo seemed to have merit. Ultimately, I also added some char-grilled red pepper - just a little bit - and a handful of chopped fresh parsley.  I also had a rush of blood to the head and added a teaspoonful of vegetable stock powder (bouillon, in other words) and I'm glad I did.  It didn't make a huge difference to the flavours, but it just savouried (is that a word?) everything up nicely.


The big difference with this quiche is that I took it upon myself to use sour cream.  I figured that the slight sourness of the cream would work well with the rich cheese and smokeyness of the paprika in the chorizo and so it did.


I think this is one of the best quiches I've made in a very long time.  I wasn't sure how it would all work out, but it worked out perfectly. Definitely a "do-again" quiche.

I have two Cook's Tips for you - firstly, there is no failure to using shop bought, ready rolled pastry.  It's quick, it's so simple to use and these days there are some really lovely tasting ones out there.  I got mine from Asda and it's perfectly acceptable.

Secondly, don't be tempted to skip the part-baking of the pastry case. It really does help to eliminate those soggy bottoms that can make quiche eating something of a trial.  All you need is some greaseproof paper and a pot of ceramic baking beans (or a quantity of dried beans - my Mum used hers for years and her pastry had an unmistakeable nuttiness because of them). It only adds 20 minutes to the baking time and in that time you can be making the filling. As the Nike ad. says, "just do it!".

Anyway, to the recipe!


CHEDDAR AND CHORIZO QUICHE   (serves 4-6)

Ingredients :

Approx. 300g shortcrust pastry (sufficient for an 8" flan dish, approx. 1" deep)
4 large eggs
250ml soured cream
a good pinch of ground black pepper
1 tsp vegetable stock powder (or vegetable bouillon powder)
40g finely sliced chorizo, sliced into small ribbons
50g mature cheddar cheese, grated
2 spring onions, sliced diagonally
1 tbsp char-grilled red pepper (from a jar), rinsed and sliced small
1 tbsp fresh parsley, chopped fine.

Method :

Your first job is to part-bake the pastry case.  So, pre-heat your oven to 180degC/350degF/Gas 4.  Then, cut a square of pastry that is significantly bigger than the baking dish or tin you will be using and gently sink it into the tin, making sure there are no bubbles under the pastry and it is pressed gently into the corners.  Trim off the excess with a sharp knife.

Cut a piece of greaseproof paper that is correspondingly bigger than the baking tin and crumple it up as though you're going to throw it away, then smooth it out again.  You'll find when it comes to laying it over the pastry, it will fit better now!  Lay it over the pastry and lightly smooth it across the base.  Pour in your baking beans in an even layer.

Place the tin centrally into the oven and bake for 20 minutes.  You can use this time to make the filling.

Break each of the eggs into a cup and pour them into a large bowl.  Doing this ensures that if one of your eggs is off or even slightly dodgy, you don't lose the lot!  Add the soured cream, black pepper and stock powder and give everything a good whisk to combine.  Add the chorizo ribbons, grated cheese, red pepper, spring onions and parsley and stir until everything is combined.

Remove the pastry case from the oven and gently lift out the baking beans by holding the greaseproof paper.  Set the baking beans aside to cool down.

Using a slotted spoon, spoon the solids from the mixture into the pastry case and distribute them around evenly.  Pour the leftover liquid into the pastry case.  You may find that you have slightly more than will go in - and better to do it this way around than find your quiche is full of egg mixture and there's no room for the chorizo!

Gently place the quiche into the oven and bake for 30-35 minutes, until the filling has risen, turned golden and feels fairly firm when pressed.

Remove from the oven and place onto a cooling rack for 5-10 minutes.  If your tin is a loose-bottomed one, you can now remove the quiche from the tin and place it back onto the cooling rack.  Serve whilst still a little warm with a crunchy garden salad.

Printable version

25 July 2012

Lean on Turkey challenge no. 3 - Roast Turkey Mufaletta!

No, that's not a made-up name (like the Petuba Canneloni was) but an actual, real, honest-to-goodness recipe.

The latest Lean on Turkey challenge was to cook a summer turkey meal for just £10 and in so doing, demonstrate how turkey is a great meat for summer cooking that's suitable for the whole family.

I had seen Rachel Allen preparing a Mufaletta on t.v. some time ago, so when hubby began to describe a dish that he'd seen on a Pinterest board, I knew exactly what it was he was talking about - and liked the idea straight away.  I felt sure that summer had to arrive in England soon (and I was right - it is absolutely roasting out there today) and picnics would be hurriedly assembled, before it can rain again!


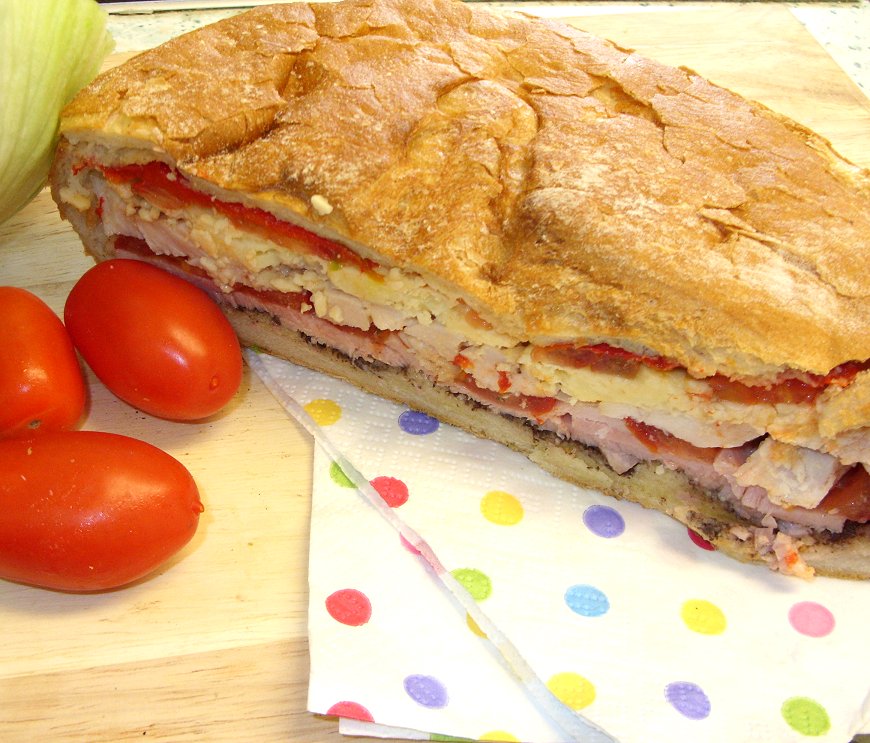
To explain, a Mufaletta is basically an entire loaf of bread which has had the middle crumb removed and then stuffed with a selection of different meats, salads and cheeses - anything you fancy, basically!  You then wrap it in clingfilm and put it in the fridge for some 3-4 hours with a heavy weight on its head.  This compresses the layers and - amazingly - when you come to cut it, everything holds together beautifully and the flavours are just mind blowing.

We compressed ours with a marble slab and "A Social History of Great Britain", which seemed to do the job perfectly.

So, what did our Mufaletta have in it?  Well, firstly I gave the entire inside of the loaf (once it was empty, of course!) a light drizzle with our favourite Rapeseed oil and smoothed it into the bread crumb with the back of a teaspoon.  I then seasoned with sea salt and freshly ground pepper.

The very bottom layer was a green olive tapenade, then going up through the layers, we had thick cut ham, sliced tomato, chunks of thick cut roast turkey breast, redcurrant jelly, Applewood smoked cheese slices, more sliced tomato, with slices of oven roasted red and yellow pepper to finish.

The filling had rather overflowed the top level of the loaf, but once I'd put the lid back on and it was compressed, it all fitted beautifully.

In retrospect, I think I'd include a layer of something like rocket leaves for that nice peppery crunch as you bite through - but it was completely fabulous all the same.  Both my two chaps loved the Mufaletta and gave it a very definite thumbs up of approval.

You would think that all those different flavours would just amalgamate into a globular, undefined whole - but quite the opposite occurred.  As you worked your way through, you would find that the first bite was an amazing mix of flavours, but then individuals would appear - the first being the smoked cheese, then tomato, then turkey and so on.  The best bit, for me, was when you would hit upon a bit that had the redcurrant jelly.  It - not surprisingly - went so well with the cold roasted turkey breast, the cheese and the ham.  To have a little burst of intense sweetness amongst all that savoury, was really delightful.

As a picnic dish, you just can't ask for more.  It would travel perfectly, all wrapped up in its cling film and just require a sharp knife to cut it once you got down to eating.  A fork is optional - depending on whether you mind eating with your fingers or not.  Surely, though, a picnic is all about eating with the fingers?  I had no problems marshalling my fallers and stuffing them into the action department - all done with decorum, of course!

As for the price, the entire Mufaletta came to £9.83 - and we shopped at Asda and Sainsbury's for the ingredients, so you will find that prices vary.  Where items like the oil are concerned, I have priced out the amount we used, rather than the entire bottle :


ITEM
COST

£
Loaf of crusty bread
1.50
Rapeseed oil
0.10
Olive tapenade
1.00
Thick cut ham
2.00
Tomatoes
0.55
Roast turkey breast (from the Deli)
2.10
Redcurrant jelly
0.55
Applewood smoked cheese
1.28
Red & Yellow Peppers
0.75
TOTAL
 £ 9.83


As for ease of preparation, well it doesn't get a lot easier!  The trickiest part is not removing too much of the crumb of the bread, so as to leave enough to soak up the juices from the tomatoes etc., without being soggy.  I made sure that I didn't go down as far as the crust anywhere and would say that the amount of bread we had in there was about perfect.

After that, it's a simple matter of deciding which meats would go with which accompaniment and layering them up in even layers.  With the redcurrant jelly, I gave it a good mix in the jar first, to ensure it was nicely spreadable, and plopped three or four teaspoonfuls onto the turkey and spread them around with the back of the teaspoon.  This meant that as it fell between the pieces of turkey it became random in its delivery when being eaten - which made for the above mentioned hits of sweetness that worked so well.

I also made sure that the tomatoes were seasoned well before being included, as I find that a little sea salt and freshly ground black pepper can transform the flavour of a vine ripened tomato into something very special.

I'd say that, from the start to putting the finished article in the fridge, probably took me around 15-20 minutes - which is probably about the same as making a few rounds of ordinary sandwiches!

We ate ours sitting on the patio enjoying the first of these few days of sunshine, for which it was just perfect.

ROAST TURKEY MUFALETTA   (serves between 4-8, depending on slice size!)

Ingredients :

1 red pepper
1 yellow pepper
a loaf of crusty bread (8" across, round loaf preferably)
Rapeseed or extra virgin olive oil for drizzling
sea salt & freshly ground black pepper
3-4 tsp green olive tapenade
120g thick cut honey roast ham
2 vine ripened tomatoes
130g roast turkey breast (from the deli - ask for it to be cut in one thick slice)
3-4 tsp redcurrant jelly
200g Ilchester Applewood smoked cheese slices.

Method :

1.  Pre-heat your oven to 180degC/350degF/Gas 4.  While the oven is heating, cut the peppers in half and remove the stalk and pips.  Place them onto a baking tray and drizzle with oil.  Season.

2.  Cook the peppers for 30 mins or until they are softened and collapsed.  As soon as you remove them from the oven, place them into a plastic bag and seal.  After some ten minutes or so, you should be able to peel the tough skins off, leaving the flesh in one piece.  Set them aside to cool completely.

3.  Take the loaf of bread and cut the top off, sufficiently far down that it forms a good "hat", but not so far down that you don't have much room for the filling.

4.  Pull the crumb of the bread out of the middle of the loaf and the "hat", leaving a half to a quarter of an inch of bread inside of the crust.

5.  Drizzle with a little rapeseed or olive oil ("hat" included) and smooth over with the back of a teaspoon.  Season.

6.  Begin the layers by smoothing on the olive tapenade, then layer in the ham.  I found to work in a spiral was the easiest way.

7.  Next, cut the two tomatoes into thin slices and season them.  Place one tomato into the loaf as the next layer.  Reserve the other tomato.

8.  Take the turkey slice and break it into roughly bite sized pieces.  Scatter them on top of the tomato, for the next layer.  Press down gently to compact the layers slightly.

9.  Add the teaspoonfuls of redcurrant jelly in different places, then smooth over with the back of a teaspoon.  It doesn't matter if some areas wind up with more than others - this adds to the randomness of the flavours.

10.  Lay on the cheese slices (again, I found a spiral pattern worked well), the last tomato and finish with the pepper slices.

11.  Give the contents a little drizzle of rapeseed or olive oil and place the "hat" on top.

12.  Wrap the loaf, in its entirety, in cling film and place into the fridge under a very heavy weight for some 3-4 hours.

13.  Take to somewhere lovely, and serve!


.

16 June 2011

Smoked Haddock & Sweetcorn Tart - superb picnic food!

If you don't make anything else over the course of the next two weeks, do try and make this tart - you won't regret it!

I'd reached the point where I had decided on meals for 6 out of the 7 days for the week, when it occurred to me that I was trying to find something for Tuesday - shopping day.  The point here is that shopping day is a perfect choice for something fishy.  I hate having to freeze fresh fish, and would by far prefer to use fresh over pre-frozen, you see.

So I pondered on the recipes I already know that involve fish and nothing filled me with enthusiasm.  So, I looked on the web for "Haddock Recipes" - and turned up HaddockRecipes.co.uk, a simply brilliant choice for all kinds of recipes involving haddock.  Several were skipped over, until I found the tart recipe from Laura Young.

Isn't it funny, how some recipes just say "Yes!", whereas others don't light up your imagination at all?  The minute I saw the name, I thought "oh, now, this one looks likely!" and upon first read-through I could almost taste how it was going to turn out.

Of course, I didn't count on Asda having a superlative piece of smoked haddock that, I am sure, turned this from a nice recipe into a gorgeous recipe.

On the way to do the shopping, it dawned on me that I didn't have a tart tin big enough to accommodate this tart.  As it turned out, neither did Asda - but they did have a glass Quiche dish that was the perfect size and by happy coincidence, made the perfect receptacle.  Serving was something of a delicate exercise, but achievable.

This photograph is so evocative, it makes me hungry!

I give my version of the recipe below, because I've altered four things in it.  Firstly, I've included a lot more fish, as the amount given just wasn't enough to cover what was quite a large tart tin.  Secondly, I've changed the wholegrain mustard to Dijon mustard, as I found the whole grains sank to the bottom of the egg mixture.  When you poured it into the tart tin, the whole grains all fell out in one place instead of being spread across the tart.  I can't help but think that Dijon will stay evenly spread.  Next, is that I recommend poaching the fish via the microwave, rather than on top of the cooker.  I find it a lot quicker and easier.  Lastly, I have dropped the temperature for cooking, from 220deg C to 190deg C.  I found the higher heat too aggressive for the pastry, which was very nearly burned by the time the tart was done.  The tart will need longer cooking, but that's fine so long as the pastry doesn't burn!

Apart from the lovely fish, I also used three Burford Brown eggs.  Burford Browns are just so gorgeously rich and I felt a tart like this could cope with a richer egg.  The ensuing flavour was beautifully savoury, yet light, without being at all sickly - even with 150ml of Double Cream in the mix!

So, do yourself and your family a favour - and make this recipe.  You won't regret it!


SMOKED HADDOCK & SWEETCORN TART  (Feeds 5)

Ingredients:

Pack of shortcrust pastry
500g smoked haddock
100ml milk
3 eggs
150ml cream
150g sweetcorn, drained
1 tbsp Dijon mustard
Handful of parsley
Salt and pepper

Method :

1.  Place the fish into a microwavable dish with the milk and some seasoning. Microwave on high for 3 minutes, to poach the fish until just shy of being done.  Remove it from the microwave and take each piece of fish out onto a plate to be flaked.  Reserve the milk.

2. Roll the pastry out to around 1cm thick and place it into a 23cm (9in) diameter loose-bottomed tart tin without trimming the sides. Line the pastry with baking parchment, and then tip some baking beans onto the paper. Blind bake the pastry for 15-20 minutes at 190deg C and then remove it from the oven and set it to one side.

3. Beat the eggs and mix them with the reserved milk and the cream. Finely chop the parsley and add to the mixture, along with the Dijon mustard. Season well.

4. Remove the baking beans and parchment from the pastry and then sprinkle the bottom of the tart with the sweetcorn and the flaked fish.

5. Pour the egg mixture over the fish and sweetcorn and then place the tart into the oven at 190deg C for 35-45 minutes, or until the surface no longer feels as though there is wet egg underneath it.

6. Once cooked, trim the excess pastry and then allow the tart to cool before cutting it into slices. 


For a main course, serve with new potatoes and a side salad.  Perfect also for picnics.

.


Related Posts Plugin for WordPress, Blogger...