28 July 2015

General Tso's chicken - a real crowd pleaser!

Now this is one recipe that I should have blogged a long time ago, as I've made it countless times since I discovered it on La Table de Nana.  As you may have guessed from the name, it sounds as though it should be of Chinese origin and to quote Wikipedia, "General Tso's chicken is a sweet, slightly spicy, deep-fried chicken dish that is popularly served in most Chinese and Asian themed American restaurants. The dish is most commonly regarded as a Hunanese dish.  The dish is named after General Tso Tsung-tang, or Zuo Zongtang, a Qing dynasty general and statesman, although there is no recorded connection to him".  So now you know.

I have to first deny all knowledge of deep frying my chicken.  You would have to pay me quite a lot to get me to deep fry anything, these days.   Not just from the health point of view, but um ~koff-blush~ I'm actually scared of deep frying.  I know.  I write a food blog and I'm scared of deep frying.  What can I tell you?  I think all those Public Information Films about the dangers of chip pan fires back in the seventies are still playing out in my head.

As a consequence, after velveting the chicken I just heat up a tablespoonful of oil in a wok and shallow fry to my heart's content.  The chicken still gets lovely and golden and I don't have a nervous conniption.  It's all good.

Served with coconut rice
The combination of goodies in the sauce is just an inspired thing.  Each contributes something to the final flavour(s) and it just wouldn't be right without any one of the ingredients.  Mind you, I do have to say that I don't use fresh ginger - as was recommended by the original recipe.  Both hubby and myself react badly to fresh ginger these days, whereas if I use ground (powdered) ginger, we're fine.  Yes, the flavour is slightly different, but we still get the ginger kick and flavour - so I'm not arguing.  I put the small amount of ginger into the sauce, where it incorporates nicely.

Something I would recommend highly to you - and yes, it could almost be construed as a Cook's Tip, is to invest in some authentic soy sauce.  If you can get them, both light soy and dark soy, as the difference in flavour to the small amounts of Blue Dragon, or even Kikkoman, is just incredible.  Once I'd invested in a large bottle of both, I wouldn't ever go back to "Westernised" soy sauce.  It's just a whole different ball game and you'll find you use far less as the flavour is so much more intense.

Cooked together with sliced green pepper
Okay, so while we're doing the tips, you absolutely must have everything chopped before you start.  This recipe moves so quickly once you begin cooking, that you definitely don't have time to leisurely chop a half a dozen spring onions.  It's a case of grab it and cook it so you need to have everything ready!

Oh, and it is nice to keep a certain amount of chopped green onion back for sprinkling over the top once served.  It definitely helps the dish to look fresh and tasty.  Unfortunately, I can't cope with raw spring (or green) onion, so I restrict myself to some toasted sesame seeds.

Served with a spring roll and some prawn crackers
Son and heir consistently finds the texture of the velveted chicken a surprise and requires reassurance that it is the cooking process, not the chicken, that has made it feel that way on the tongue.  As if I'd feed him dodgy chicken!  *tut*  The very idea.

Hubby and I, however, just love the recipe.  I've cooked it with toasted sesame seeds and without, with a sliced green pepper or mushrooms and without - in all sorts of incarnations - and we've loved them all.

As a super-quick meal to cook, you really can't do better than General Tso's chicken.  It's almost one of my favourite "bung it in the wok in order and serve" recipes.  If it wasn't for the fact that you cook the chicken first, then reserve it for later, it'd qualify.  But then, it's just another bowl to wash up and what's another bowl when dinner tastes so good?

GENERAL TSO'S CHICKEN    (serves 3-4)

Ingredients :

½ cup soft brown sugar
3 tbsp hoisin sauce
3 tbsp rice wine vinegar
3 tbsp tomato ketchup
2 tbsp soy sauce
1 flat teaspoonful of powdered ginger
a good pinch of dried red chili flakes (optional)
½ cup water
3-4 tablespoons cornstarch
500g boneless, skinless chicken breasts, cut into 1-inch cubes
1 tbsp olive oil
1 tsp sesame oil
6-8 spring onions chopped
toasted sesame seeds (optional).

Method :

If you are intending on using toasted sesame seeds as garnish, now is the time to toast them.  Heat up your wok or frying pan and place the seeds in dry.  Keep an eye on them, as once they start to toast it happens quickly!  Once nicely brown and toasty, decant into a ramekin to use later.

Next, mix the brown sugar, hoisin sauce, rice wine vinegar, tomato ketchup, soy sauce, ginger powder, chili flakes (if you're using them, which I recommend you do!) and water together in a bowl.  This is your sauce, so set aside - but within reach!

Dredge the chicken chunks in the cornstarch and shake off any excess.

Heat the pan again and add the olive oil.  Cook the chicken in the olive oil briskly on a high heat until golden brown on at least two sides.  Remove the chicken and retain in a warm place.

Add a little more olive oil if necessary, plus the sesame oil and green onions (and any other veggies you might have thought to include). Cook until softened, then add the sauce and quickly bring to a boil.

Allow the mix to boil gently for as long as it takes for it to thicken slightly, then add the chicken and coat with sauce.  Reduce the heat and simmer until the chicken is cooked through and the sauce has reduced to a glossy, syrupy consistency.

Serve with white rice, garnished with the toasted sesame seeds and some raw spring onion pieces.

Printable version

    20 July 2015

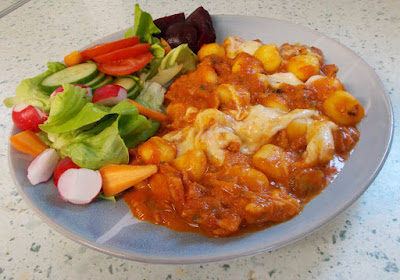
    Bacon & tomato gnocchi bake

    This unctuous, decadent and totally yummy dish is one of those "made it in the past, didn't get around to blogging it" meals that really should have been blogged long before now.

    I've only made it twice (so far) and I'm sure it will appear on the menu again before too very long.

    The first time, I added some veggies such as green and red pepper to the mix because I had them there and needed to use them up.  This time, I went with just the mushrooms and we all loved it on both occasions.

    I would point out that the dish isn't, strictly speaking, a "bake" but more of a "grill" as you simply grill the sliced mozzarella to melt it and give it a little colour.   However, it really is by the by - I just thought I'd clarify in case you were puzzled by it.


    I must be getting old, as the guilt over the calories involved (bacon, cream, cheese ... need I say more?) resulted in my serving it with a side salad instead of the garlic bread we had previously.  You know what?  I actually preferred it with the side salad.  At which all the men in the audience may now take a sharp intake of breath - salad being an anathema to the majority of man-kind, as I'm given to understand.  The majority of the laydeez may take this opportunity to nod wisely.


    It was the contrast in textures, though.  The richness and softness of the gnocchi beside the freshness and crunch of the salad ingredients, just worked beautifully for me.

    Not that it wasn't extremely good the first, garlic bread accompanied, time.  No, it was pretty darned horny (if you'll excuse the expression - borrowed from my husband, you understand) then, too.  In fact, I think it'd be fairly irresistible no matter how or when you served it.  I'd even give it a go for breakfast, it's that good.

    Plus - and this is a big plus - it is another from the age-old and much favoured school of "chop and peel, put into a pan in order and serve" cooking.  Perfect for when you've spent all day chauffeuring your progeny around from school to concert hall, or just plain worn yourself out doing some retail therapy.  Assuming, of course, that the gnocchi is either already made and in your freezer, or already made and in a bag in your fridge.  Don't tell anyone, but mine was made by Mr Asda.  Their fresh gnocchi is very acceptable indeed.

    If you've got any teenagers in the house, don't expect there to be any leftovers for lunch.  Even after a perfectly adequate serving with salad alongside, they will still find a corner for a little bit more.  I'm not sure, but I think son & heir may even have licked the plate.

    As for COOK'S TIPS, it really is so simple that there aren't many.

    Firstly, it is as well to use the best ingredients you can afford with this one.  The simplicity of the dish is such that if you use cheap tinned tomatoes (for instance), it's going to show.  For the sake of the few pence that's involved, go for the best you can afford.  It really is worthwhile.


    Lastly, don't be tempted to use double cream.  Not even if you've got some left over in your fridge without a home to go to.  Buy some peaches and use it on them, if you must.  Single cream won't leave you with the clagginess that double will, when used in this context.  It really is a very rich tomato sauce - and extra fat is neither required nor welcome.

    Either saladed or garlic breaded, this is a great one for a weekday dinner.  Your menfolk will thank you, either way.

    BACON & TOMATO GNOCCHI BAKE   (serves 3-4)

    Ingredients :

    1 tbsp olive oil
    340g back bacon, diced
    1 large shallot, diced
    2 cloves of garlic, finely chopped
    1 tsp paprika
    half a tsp smoked sweet paprika
    6 good sized chestnut mushrooms, sliced
    1 large tasty tomato, chopped
    400g can of chopped tomatoes
    1 tbsp tomato puree
    1 tbsp tomato ketchup
    150ml water
    1 tsp Worcestershire sauce
    1 tsp sugar
    half a tsp finely ground black pepper
    2-3 tbsp single cream
    1 tbsp finely chopped parsley
    500g fresh gnocchi
    2 balls of mozzarella cheese, sliced.

    Method :

    1.  Heat the oil in a large deep sided frying pan and once hot, add the bacon pieces.  Fry until the fat has begun to render and the pieces have begun to caramelise.  Do not allow to burn.

    2.  Add the shallot and garlic and continue to fry until the shallot has softened and turned transparent.

    3.  Add the two types of paprika and stir to combine.  Fry for another 30 seconds.

    4.  Place a large saucepan of slightly salted water on to boil.

    5.  Add the mushrooms and the tomatoes in all their guises, the Worcestershire sauce, water, sugar and black pepper.  Stir well, then allow to simmer for 15-20 minutes to allow the flavours to combine and the sauce to thicken and reduce.

    6.  Once the sauce has reduced to a thick, chunky texture, remove from the heat and add the cream and parsley.

    7.  Put the gnocchi into the boiling water.  Once they float to the surface (3 minutes, no more), they're done.  Remove from the water using a slotted spoon and add them to the tomato sauce.  Stir them in gently, making sure each gnocchi is coated with sauce.

    8.  Place the sliced mozzarella over the surface of the gnocchi/sauce mixture and place under a hot grill.  Once the mozzarella has melted and begun to colour, you're ready to serve.

    I served mine with garlic bread and on the second occasion, with a side salad.  The choice is yours!

    Printable version


    15 July 2015

    Roast Spiced Hedgehog of Pork with Gooseberry sauce

    Roasting a hedgehog?  Whatever next!  Oh, don't panic - I've not gone THAT exotic - my "Hedgehog" was a piece of hedgehog cut pork - i.e. hatch marks had been cut across the top surface of the piece of pork topside.

    Farmer's Choice (Free Range) Ltd  contacted me again and asked whether I would like to devise a recipe for them to use on their new Facebook page for the Dorset and Bournemouth area (Farmers Choice Bournemouth & Dorset).  Naturally, I said yes please!  After all, the produce from Farmer's Choice is so good, why would anyone in their right mind turn them down?

    Perfectly roasted and ready to carve
    I, pretty much straight away, knew what I was going to go for.  I had been playing about in an imaginary way, with a recipe for spiced roast pork with a gooseberry sauce.  I'd been hoping that our little gooseberry bush would come up with the goods, but regrettably the birdies got there first.

    Ready for the oven
    I had also been waiting for a suitable piece of pork to turn up in the supermarket for a reasonable price, but that hadn't happened either.  So immediately I went to the pork joint section of the Farmer's Choice website and my eye was caught by the Pork Topside Hedgehog.  As it turned out, I couldn't have asked for a better cut.  With absolutely no waste and as lean as they come, this joint was perfect for everyone in the family and with careful but easy roasting, resulted in a super tender and flavoursome roast which wasn't dry at all.

    My order, in the end, became the pork, some gooseberries, a bulb of fennel (also for the sauce) and a wild card entry of a bag of game meat for a game pie which I haven't made yet.  That's what happens when you give me the pick of a site full of produce, you see.  Personally, I think I was very restrained and I'm sure there are many who would have asked for a whole lot more.

    The pork recipe was really incredibly simple.  I just wanted something to flavour the outside of the meat with and give it a lovely colour, rather than something to marinate the joint in for hours and provide a more overall kind of flavour input.


    As such, the oil-based rub that I came up with - of olive oil, thyme, sweet smoked paprika, garlic, lemon juice and ye olde salt and pepper - was just perfect.  It was able to sink easily into the cut marks across the top of the pork and gave a beautiful colour once roasted.  The flavour was subtle but very much there, depending on how much of the outside of the pork you had on your fork.  Subtlety, folks, I'm all about the subtlety (and poetry, looking at that last sentence).  Well, where roast pork is concerned, anyway.


    The roasting was as easy as falling off a log (and I've fallen off a few in my younger days, so I know how easy that is).  For a 1155g piece, I gave it one and a half hours at 180degC (350degF/Gas 4), then gave it a baste and checked the internal temperature was in the range of 77degC - 80degC (meat thermometer - SO useful!) and as such was likely to be done, but still fairly firm.  I then covered the roasting dish with a good layer of aluminium foil and put it back at the much reduced temperature of 130degC for another hour.  Once the hour was up, the whole package was rested for 20 minutes in a warm (but not hot) place.  The meat wasn't fall-apart tender, but I don't much like that in a roast pork joint.  It held together, but you could easily cut it with just a fork.  It was perfect.

    You little beauties!
    The gooseberry sauce was just wonderful.  The sharpness of the gooseberries cut through the richness of the pork and refreshed the palate, ending on a soft note of fennel which left you ready for the next bite.  The sauce is a little more time-consuming to make, but if you tackle it ahead of time (which I recommend, to give it time to cool) it really doesn't impinge on your day much at all.

    The two recipes are really so simple that I don't even have any COOK'S TIPS for you, other than to recommend you keep hold of the fluffy tops and offcuts of your fennel to include in soup or stock, for which they are invaluable.

    The finished gooseberry sauce, hiding its zing behind a benign appearance
    Gooseberries and pork.  Mmmnnnn, our new favourite thing.  In fact, my hubby was so taken with the combination, he remarked that he hadn't ever had a better piece of roast pork in all his forty-mumble years.  Now that's quite a compliment.


    ROAST SPICED HEDGEHOG OF PORK with GOOSEBERRY SAUCE   (Serves 4-5)

    Ingredients :

    For the gooseberry sauce :
    1 tsp yellow mustard seeds
    1 tbsp olive oil
    1 bulb of fennel, sliced finely and tops discarded
    1 large banana shallot (or equivalent), diced finely
    small pinch of salt
    quarter of a tsp dried thyme
    quarter of a tsp finely ground black pepper
    quarter of a tsp vegetable stock powder
    1 tbsp & 50ml water
    125g dessert gooseberries, tops and tails removed
    25g granulated sugar.

    For the pork :
    1kg or thereabouts topside of pork, mine was hedgehog cut
    1 tbsp olive oil
    1 tsp sweet smoked paprika
    1 tsp dried thyme
    1 clove of garlic, grated
    2 tsp lemon juice
    pinch of sea salt
    half a tsp freshly ground black pepper.

    Method :

    1.  Begin, ahead of time, by making the gooseberry sauce.  Heat a small pan and once hot, add the mustard seeds to toast.  Once they start to pop, decant into a small bowl and reserve.

    2.  Heat the olive oil and add the fennel and shallot, plus the sea salt.  Cook gently until the shallot is transparent and the fennel has begun to soften.

    2.  Add the pepper, dried thyme, vegetable stock and water.  Bring to a simmer and cook until the fennel is tender.

    3.  Taking a stick blender, carefully blend until thoroughly combined, but still retaining texture.  Decant into a bowl and reserve.  Replace the pan onto the heat.

    4.  Add the gooseberries directly to the pan and add a tablespoonful of water.  Cover the pan and allow the gooseberries to heat through, giving the pan a little shake every now and then, to prevent them from sticking.  This should only take around 5 minutes if the gooseberries are ripe.

    5.  Once the berries are softened and their juice is beginning to escape, add the fennel mixture and mustard seeds and stir to combine.

    6.  Add the sugar and remaining 50ml of water.  Stir well, then bring to a simmer and cook until the sauce has reduced to a loose jammy consistency.  Taste for seasoning and adjust if necessary, likewise if you think the sauce needs more sugar, correct that too.  Be cautious with the sugar, as you want the sauce to stay tart and not become jam-like.

    7.  Once you are happy with the flavour and consistency, decant into a bowl and allow to cool.

    8.  Remove the pork from the fridge a good half hour ahead of time.

    9.  Place into a roasting tin and mix the seasoning ingredients (oil, paprika, thyme, garlic, lemon juice, salt and pepper) together.

    10.  Spoon the seasoning mix over the top of the pork and rub into all the cracks and crevices.

    11.  Put into a pre-heated oven at 180degC/350degF/Gas 4 for an hour and a half.

    12.  Remove the pork from the oven and baste it with the juices, then cover with tinfoil and return to the oven.

    13.  Turn the oven down to 130degC/250degF/Gas 2 and cook for another hour.

    14.  Remove the pork from the oven and baste it again, then replace the tinfoil and leave it in a warm place to rest for 30 minutes, before carving.

    Printable version


    13 July 2015

    Citrus & spice chicken

    I've been going through a whole heap of old paperwork recently - which included my many and various files and folders chock-a-block full of collected recipes.  In doing so, I have re-discovered several favourites from pre-Rhubarb & Ginger times, one of which being this citrus & spice chicken.

    The recipe has developed over the years (as recipes are wont to do) but I note from the paper recipe in my folder, that the original was adapted from the Good Food Magazine's "40 Best Chicken Recipes" booklet.  Well, it's been adapted yet again - and very much for the better.  The very first recipe was basically a traybake, my first version added several ingredients such as the honey and chilli powder.  This last incarnation has separated out the vegetables to be cooked on the hob instead of in the oven, which I much prefer.

    Marinate, my little lovelies!
    Oven cooking the vegetables inevitably led to burned ends and undercooked middles, as the sheer quantity of meat and vegetables in the tray didn't really allow for even cooking.  Plus, it is nice to have a small degree of char on the chicken, but not so nice on the peppers and mushrooms.

    This way, the chicken has plenty of air space around each piece and the cooking is much more even - particularly if you place the larger pieces to the outside and the smaller pieces to the inside of the tray.  The surface attains nice little charred corners, while the chicken itself stays moist and delicious.

    Cooking the vegetables in a frying pan enables much more degree of control.  Inevitably the leftover marinade isn't enough moisture to see them through the entirety of the cook, but adding a little water from time to time not only allows the vegetables to steam, but also keeps the marinade saucy.  This way, you have the relatively dry chicken, accompanied by the saucy vegetables - which provides a lovely balance and completely without burned ends.

    Ready for the oven - Bacofoil's non-stick aluminium foil is great for this!
    Another huge positive to this recipe - apart from the flavour which is really tasty - is its speed.  Provided you get the chicken on to marinade in advance, it is a really simple task to prepare a couple of salad veggies, cook some rice, put the chicken in the oven and pan cook the vegetables.  From taking the marinating chicken out of the fridge to dishing up, probably only took around 45 minutes in total.  I love that - especially when there's such a pay-off by way of flavour.


    So what's the flavour like?  The chicken flavour is there, no one flavour overrules it and because the curry past is used fairly sparingly and is very much tempered by the use of the yoghurt, it doesn't take precedence.  The honey gives a quiet sweetness and the garlic helps to savoury it all up nicely.  In fact, don't tell anyone, but if you add the yoghurt, then the lemon juice, then the honey, stir it all together and have a taste - mmmmn, it would make a smashing dessert!

    Once the curry paste, oil and garlic are added though, I wouldn't recommend tipping it on top of your strawberries.  The oven adds the last element of flavour to the chicken, in the small degree of charring as the tops of the chicken pieces catch in the oven.  It all amounts to an absolutely scrumptious whole.

    Now, as for Cook's Tips, I don't have many but there are a few worth mentioning.

    The recipe calls for the juice of half a lemon.  If, however, you don't have a lemon but do have a lime - then no worries, use that instead!  You will need the whole lime's juice and the flavour will be slightly different, but no less nice.  I have used both in the past and can't decide which one I like the best.

    Where the chilli powder is concerned, feel free to add as little or as much as you like.  However, if you're new to chilli powder and curry spice, I'd suggest you err on the side of caution to begin with - you can always add a little bit more the next time.


    You can certainly freewheel a bit where the accompaniments are concerned.  I think the chicken and vegetables would be lovely served in a soft Indian flatbread with some salad alongside.  On this occasion, I served the chicken with some basmati rice that I had cooked in chicken stock and turmeric, along with the cooling influence of avocado and cucumber.  For my son, who isn't keen on avocado, I served a sliced juicy tomato and cucumber.  The chicken is certainly flexible enough in flavour profile, that there are a whole host of accompaniments you could serve with it.


    Calories are in the range of 398 per portion, it is low in sodium and high in Vitamins B6 and C, so it could be worse!

    I am so happy to have rediscovered this recipe.  I think it is going to appear fairly regularly on the menu plan and I recommend it to you.  Without the chilli powder, it would be great for children, too.

    CITRUS & SPICE CHICKEN   (Serves 3)

    Ingredients:

    For the marinade :

    150ml natural yoghurt (I used Greek yoghurt)
    juice of half a lemon
    1 tsp runny honey
    1 tbsp vegetable oil (I used sunflower)
    2 generous tsp curry paste or powder
    1 garlic clove, crushed
    chilli powder to taste (I used 1 tsp Kashmiri chilli powder).

    Other ingredients :

    3 skinless, boneless chicken breasts cut into large chunks
    1 red pepper, deseeded and cut into large slices
    half a green pepper, deseeded and cut into large slices
    1 onion cut into large slices
    6 medium chestnut mushrooms , quartered
    1 tbsp olive oil.

    Method :

    1.  Mix together the marinade ingredients in a bowl.

    2.  Add chicken chunks to the marinade, stir to coat and set aside to marinate for as long as you've got - from 4 hours to 30 minutes.

    3.  Pre-heat your oven to 180degC/350degF/Gas 4.

    4.  Place the chicken chunks onto a baking tray, taking care to leave as much of the marinade in the bowl, but without scraping any off the chicken.

    5.  Bake the chicken for 30 minutes, remembering to turn the tray half way through to ensure even colouring.

    6.  Add the vegetables to the bowl and stir to coat them in the marinade.

    7.  Heat the olive oil in a large frying pan and add the vegetables, marinade and 200ml water.  Cook, covered, on a medium heat until the peppers are softened and onions are cooked through.  You may need to add more water, but only a little at a time.

    8.  Once the vegetables are cooked, remove the lid and allow the sauce to reduce and thicken, which will only take 2-3 minutes if you haven't added too much water.

    9.  The chicken is ready once the chunks are cooked through and they have gained a little bit of charred colour.

    Serve with steamed basmati rice, avocado and cucumber.

    Printable version
    Related Posts Plugin for WordPress, Blogger...