Showing posts with label cake baking. Show all posts

12 November 2012

Coffee & Walnut Loaf - a perfect tea-time cake

One dismal and dreary Saturday, when I was sitting here neatening up photographs for upcoming blog posts, I was made aware of some clatterings and drawer-scrufflings that were undoubtedly coming from the kitchen.

I could hear the baking larder door being opened and closed, the pyrex bowls being got out, the hand whisk's "whiskerators" (our name) being extracted from the mad puzzle that is the utensil drawer and the unmistakable sound of the oven buzzing into life.

All this meant just one thing - hubby had decided to bake a cake.

We had avidly watched the whole series of "Great British Bake Off", without either of us running keenly to the kitchen to follow up on inspiration gained.  We had even watched the Mary Berry/Paul Hollywood baking masterclass spin-off programmes without being moved to recreate any of the recipes.  (Although I do have a number of "would like to makes" on the back burner).

Hubby, however, had been harbouring a secret desire for a Coffee & Walnut cake for a while.

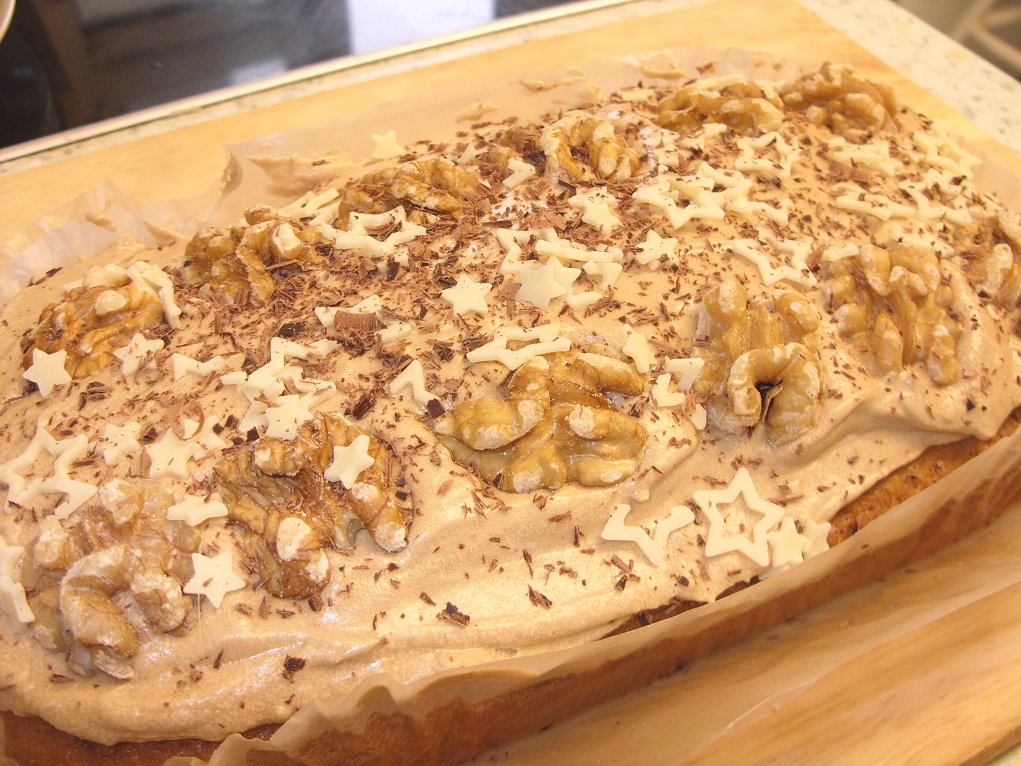
Too many decorations? Does not compute!

We do try to ride out these sorts of desires.  Wait to see whether it's a real yearning, or whether it's just a passing fancy.  For instance, I've been harbouring a want to make a fish curry for oh, probably some four to five months now.  It's just waiting for a time when the right fish is affordable and the dish will fit into the remainder of the week's menu.  I'll get there, one day!

This fancy quite obviously wasn't going to go away though - so he was acting upon it.

Now, how easy would it be, to go off to the local supermarket and buy a Coffee & Walnut cake, eh?  It would be the work of minutes as Sainsbury's is literally just down the road.  But no - there he was up to his neck in flour and walnuts, making the object of his desire.  You've got to admire him for that!

This was a very particular Coffee & Walnut cake though.  It wasn't to be one of your traditional round cake - oh no.  What he was hankering after was a loaf shaped version, filled with chopped walnuts and ripe with the flavour of coffee.  It was to have oodles of coffee buttercream on top, instead of sandwiched in between the two layers.  Oh - and loads of chocolate decoration.  Nothing else would do.


So, for those moments when you desire an outrageously decorated Coffee & Walnut Loaf that is light as a feather, deliciously nutty and rich with coffee flavours - here's hubby's recipe.


COFFEE & WALNUT LOAF

Ingredients :


150g of self raising flour

125ml full cream milk

110g caster sugar

75g unsalted butter cut into cubes

3 tsp instant
coffee granules
60g of crushed walnuts plus 16
walnut halves to decorate
1 beaten egg
.


Method
:
1.  Butter and line (I used a loaf tin liner) an 8 by 3 inch loaf tin.


2.  In a large saucepan, place the milk, butter and
coffee granules and warm until the butter is melted and the granules have dissolved.

3.  Remove the pan from the heat and then add the sugar and crushed walnuts.  Stir until the sugar has dissolved before folding in the beaten egg.

4.  Finally, add the flour in stages, stirring gently and continuously until all of the flour has been incorporated

5.  Pour the mixture into the loaf tin and then place into an oven, preheated to 325degF/160degC/gas3.  Bake for 45 minutes before testing with a skewer - which should come out clean, if the cake is done. 


6.  Remove the loaf tin from the oven and leave to cool for 5-10 minutes before carefully turning out onto a wire cooling rack.  Once fully cooled, decorate the cake with coffee frosting and halved walnuts.

For the Frosting


Ingredients
:

120g butter, room temperature

160g icing sugar
15ml (or more to taste) strong coffee
1 tsp vanilla extract.

7.  Whisk the butter until it becomes pale before incorporating the sugar in stages.  Whisk together until the mixture becomes light and fluffy.  Finally, whisk in the
coffee and vanilla until well incorporated.  If the mixture becomes too stiff, simply add a splash of milk.   For a bit of variation, other trusted coffee additions such as cinnamon or hazelnut syrup can be added.

All that remains is to make a cup of tea, get out your best crockery and indulge yourself!

Printable version

15 May 2012

Cakes - it's a mystical art!


Dad's 80th birthday cake
I’m not really that much of a cake baker.  Hubby is much more of a baker than ever I am or will be.  Even thinking back into my own personal history, I can remember making a Victoria Sandwich cake when at my Mum’s knee – and being congratulated on it by both parents when we all sampled it at cup of tea time, whether it warranted congratulations or not.  Well, that's what parents do, isn't it?  However, I was always more interested in how to cook a lamb chop, than how to bake a cake.

Now decorating a cake – well that was a different story.

Decorating a cake appealed to my artistic side, you see.  I was the sort of child who would spend ages drawing an intricate pencil sketch of an animal – see my leopard.  I drew him when I was around 13yrs old.  So the sort of cake decoration that appealed to me was the sort where you “drew” a picture by means of intricately placed, differently coloured Royal icing.  The big swirls of butter cream for cupcakes wasn’t for me, oh no.  Give me four days in which to create a Christmas cake decoration – that was the kind of thing I enjoyed.

My Mum first let me loose on our Christmas cake way back in the 1970’s.  She made the cake and I had plenty of time to ponder on what picture I would draw – and the whole thing was done in great secrecy.  Right up until the momentous reveal on Christmas Day, I worked in the tight security of my bedroom – with one or other of our cats on guard to make sure nobody tried to catch a peep at the design.

Now that's easy decoration!
The first design has unfortunately disappeared without any photographic evidence, but it took the form of Snoopy (who was all the rage then) lying on top of his doghouse, dreaming of Christmas presents.

I think it took me around five days to complete, as each colour had to be piped on, then allowed to dry before the next colour could be added.  I didn’t want any of the colours to bleed into each other because of over-hasty piping.

Mango cake - enhanced by icing sugar through a paper template!
I approached the whole thing rather like doing a “painting by numbers” picture.  I sketched it out on paper, then coloured it in with pencils and planned which colour I’d need for which area.

It is a shame that we didn’t keep a photograph of it.  However, the following year a colleague at work (having heard about our cake) asked me to produce one for her family.

This (rather fuzzy) and somewhat antique photograph will hopefully show the result – a beautiful Christmas bunny, sitting on a Yule log, beside his decorated tree.  I’m not sure how appropriate a bunny is for Christmas – but they seemed to like it!

I can remember the journey in to work on the handover day.  I’d completed the decoration the night before and the last few strokes of icing hadn’t set 100% - and I travelled to work on a motorbike.  Gulp.

However, I packed the cake into its tin so that it couldn’t slide around.  Then the tin was packed into my top box on the back of the bike and again, fixed so that it couldn’t slide around – and drove at around 15mph in to work.

Bunny didn’t make it in unscathed, but a bit of judicious primping and adjusting soon fixed the damage and the cake was received with what appeared to be a great deal of pleasure.  Well, there was a lot of showing it around to other colleagues, and I didn’t detect any “look at the hash she’s made of this!” about it – so I think it went well.

That was the beginning and end of my embryonic career as a cake decorator.

These days, I have tended to make cakes that didn’t require decoration, to the point where if a cake has a very intricate degree of decoration in the picture, I’ll actually shy away from making it.

Does it need any more decoration than that?
Having my son has forced me to face the cake decoration spectre again, as birthday cakes just aren’t birthday cakes without candles and decoration, now are they?

I can remember making a little vanilla sponge for his second birthday, with drizzled multicolour lemon icing over it that went down fairly well.  There were versions of that up until he discovered Dr Who cakes and Star Wars cakes when all thoughts of Mum providing a cake disappeared down the plughole that is the lure of the themed cake.


However, what goes around comes around – and in the last couple of years, he’s wanted a homemade cake.  The first was a vanilla sponge coated with chocolate, decorated with ready-made sugar caterpillars, monkeys and dinosaurs.

In the last year, my discovery of the superb Chocolate and Beetroot Cake resulted in my baking one for my son’s birthday (13 yrs old) and one for my Dad’s birthday (80 yrs old).  So it just goes to show, that chocolate cake spans the generation gap and knows no age boundaries.

Neither of these birthday cakes would ever win approval from Eric Lanlard, that I know.  However, their recipients were as pleased as punch with them – which is what birthday cake making is all about.  I can’t ever see my producing a “showstopper cake” or a wedding cake (not unless it’s made of cheese, perhaps), but then, there’s a first time for everything!

This blog was first produced for The Knight of The Round Table, as a guest blog.  Do pay him a visit - he's a lovely chap, who takes baking far more seriously than me!


27 March 2012

Dorset Apple Cake

Having FINALLY got around to baking the Dorset Apple Cake that I'd been threatening to bake for around a month, I'm really not too sure about the results.

You see, the photograph of the Dorset Apple Cake on the recipe (which was given to me by a friend and I've no idea where it originates from) didn't look even a tiny bit like the cake that I wound up with.

My cake batter appeared to be more of a shortbread biscuit type of mixture - very dry and almost crumbly.  The recipe states "don't worry if the mixture is a bit stiff, keep mixing and it will come together".  Well, I mixed and mixed and added a tiny bit more liquid and it stayed looking a bit like a damp shortbread mixture, so I shrugged my shoulders and used it.

For all that the end result didn't look like its picture, it looked interesting and indeed was very nice to eat.


However, I'd consider it more of a dessert than a "cake" as such.  The cake part of the thing was (not surprisingly) very dense, although with the apple pieces throughout and with apple slices on the top, it avoided being dry.  The lemon zest came through in the cake mixture with a lovely little tang and I saved a few calories by using 40/60 Splenda sugar substitute and caster sugar.  I guess that could be part of the reason why the cake mixture was so dry, as sugar would have dissolved into syrup whereas the Splenda just sort of fizzes.

When served, the slice was just begging for cream, or greek yoghurt, or ice cream or even custard - so we sidetracked a little of the cream meant for the following day's trifle. 

We did eat all but one slice (although not all at once, she hastens to add!) - which got overtaken by other events and when I finally got back to it with intentions of eating it up, discovered a neat little round of mould on one apple slice.  Harumph!  Rats!

Hence, if you're planning on making the cake, I'd recommend not trying to keep it beyond two days - just to be on the safe side.  Ordinarily, of course, we'd have eaten it all up within those two days, but Mother's Day got in the way!

DORSET APPLE CAKE    (serves min. of 8)

Ingredients :

225g self raising flour
25g cornflour
1 tsp baking powder
110g butter
110g caster sugar (or 60g sugar plus 2 tbsp Splenda)

zest of 1 lemon
225g peeled, cored and diced cooking apples (weight following preparation)
1 large egg
2 tbsp milk
1 cooking apple, peeled, cored and sliced thinly, soaked in lemon juice
2-3 tbsp soft brown sugar.

METHOD :

1.  Pre-heat your oven to 170degC/325degF/Gas 3.

2.  Butter and line an 8" round cake tin with removable base.

3.  Sift flour, cornflour and baking powder into a large mixing bowl.

4.  Cut the butter into small pieces and rub in, until the mixture resembles fine breadcrumbs.

5.  Stir in the caster sugar, diced apple and lemon zest.

6.  In a separate bowl whisk together the egg and milk.

7.  Bind the mixture together with the egg/milk mixture.  Don't worry if it is a bit stiff, keep on mixing and it will come together.

8.  Pour into the prepared baking tin and level the surface.

9.  Arrange the apple slices on top, then sprinkle the brown sugar all over to make a crusty glaze.

10.  Bake in the oven for around 35-40 minutes, or until a cocktail stick inserted in the middle of the cake comes out clean.

11.  Cool in the tin, then turn out onto a cake plate and serve with a dollop of cream.

.

31 January 2012

What to do with some ageing bananas? Why, Banana Bread, of course!

I'll tell you what, I reckon that for every banana I've ever bought, there have been at least one or two that have lingered on in the fruit bowl, until being heaved into the bin.

This is because of several factors.

The first is that, although I like bananas, I also know that son & heir and hubby also enjoy bananas - so I don't eat them because I can eat other things like oranges (which they don't enjoy so much).

The second is that as soon as a banana shows the slightest blemish on its skin, son & heir won't touch it as he's convinced the blemish goes right through to the fruit.  I don't know how many times we've demonstrated that this is not the case, but he still won't touch a banana that has even tiny black spots.

Lastly, hubby reckons that I'm hosting a retirement home for aged and infirm bananas, in which they can moulder away in peace.

Now bananas have taken on a new importance in our house since hubby has been diagnosed with diabetes.  They are a good "emergency breakfast" for him, in circumstances where true breakfast might be a few hours away.  Being portable, they are perfect for grabbing on the run and eating when on the move.

This is why they are now appearing with more regularity in the Rest Home (a.k.a. the fruit bowl).

I hate to lose a good banana, although I can't eat them when they are very old and winey as they have a habit of repeating on me for the remainder of the day.  This has then, of necessity, meant that I have needed to investigate ways of making use of our elderly yellow friends.

I mentioned making Banana Bread to hubby some months ago, but the bananas then deteriorated so rapidly that they had to be virtually poured into the bin.  This time, when two vaguely mangy-looking fruit appeared to be languishing in the fruit bowl, he struck - and made Banana Bread.

The recipe is his very own, in that he did some research beforehand and the end recipe is an amalgamation of little bits of other recipes.  You could say that he's taken other recipe authors' advice, and come up with a recipe of his own.

Either way, I've got to say that this Banana Bread was extremely yummy!  Quite fine textured, it has a lovely strong banana flavour that leaves you in no doubt as to its main ingredient.  The end result is almost as soft as a sponge cake, but is definitely robust enough to sustain a little butter being spread across it, or accompanying some custard as a dessert.

He'll have to watch out, or I'll be hiding bananas away with the intent of not eating them before planting them in the fruit bowl - all ready for conversion to Banana Bread!

Oh, and because all his best recipes he claims to have been "made with love", his recipe is written so that you, too, can make your Banana Bread for your family "with love".  I take no responsibility for the terms in which it is couched.  *chuckle*

BANANA BREAD 


Ingredients :
3 or 4 ripe bananas, smashed
75g melted butter
200g granulated sugar
1 egg, beaten
1 tsp vanilla extract
½ tsp ground mixed spice
1 tsp baking powder
a pinch of salt
200g of plain flour.

For dusting :

1 tsp Cinnamon powder mixed into 4 tsp caster sugar.

Method :

1.  In a large bowl, mingle the melted butter and the mashed bananas.

2.  Amalgamate the mixture with sugar, egg, mixed spice and vanilla extract before wafting in the baking soda and the salt.

3.  Finally, with a smile on your face, a contented sigh and using a wooden spoon, massage the sieved flour into the gloop before dolloping into a well buttered but neat little 8 by 4 inch loaf tin.

4.  Thrust into an oven, pre-heated to 350f (175c), and bake for one hour.

5.  Poof the top with the cinnamon sugar and leave to cool on a wire rack.
Demonstrating a very well poofed top.  Oh yes.
(I particularly enjoyed the "poofing" of the cinnamon sugar - Jenny E.)

.

19 January 2012

Oranges, almonds (and a whole heap of eggs!)

That James Martin's a clever old stick when it comes to anything sweet, don't you think?

Of course, he's quite probably a clever old stick when it comes to anything savoury, too - but the desserts and cakes are what I know him for.

I was lucky enough to receive a copy of his book "Desserts" from my brother's family for Christmas and I'm fairly sure I put on at least four pounds, just looking at the photographs.

However, I spotted this recipe for his Orange & Almond Cake in a magazine (I forget which, now!) and cut it out to keep.  Hence, when I found I had a number of oranges backing up in the fridge it occurred to me that here was a great way of using them.

Just out of the oven
It wasn't until I was getting the ingredients out of the cupboards, that I realised that this is a flourless cake - and it takes six eggs!  A quick count-up of the egg supplies showed that I did indeed have enough to cope, and so the plan continued.

I hadn't ever made a flourless cake before, so was suddenly a tad nervous - as this cake was intended to form part of a High Tea to be consumed that night.  High risk cakes tend not to be a good strategy - not when you're relying on them to feed the five thousand.

The preparation of the cake batter was simplicity itself, involving a saucepan and a food processor - and that was it.  The saucepan is required to poach the oranges (whole) until they are soft and the inherent bitterness of their skin has reduced.  Then, once cooled, they go into a food processor (chop them up a bit first, to remove the pips) and get blitzed until completely "mullered".  (What IS the origin of the term "mullered", I wonder?).

Love flaked almonds!
Next, add ground almonds, sugar and six eggs and blitz again - then hey presto, your cake batter has miraculously appeared.  Decant into a springform tin, sprinkle with flaked almonds and into the oven for 25mins, then another 25mins with a silver foil hat on to prevent the almonds burning.

There really couldn't be an easier way of making a cake.  Well, not unless someone has invented a cooker that you just throw all the naked ingredients into.

The resultant cake was light, frothy almost.  The orange was tempered by the cooking it had received and although full-bodied in flavour, was only slightly bitter.  That bitterness was enough to scare son & heir away, regrettably, but hubby and I both thought that the cake was gorgeous.

The original recipe included instructions for making a Basil cream, which although it sounded extremely likely as a lovely accompaniment, I didn't indulge in.  Well, it was just more cream - which none of our waistlines could do with.  If, however, you're interested in this, you can see the whole recipe here.

As a cake for someone who is attempting to reduce the occurrence of inflammation in their body, you really couldn't ask for better.  After all, oranges are mildly anti-inflammatory and almonds are moderately anti-inflammatory.  I suppose you do have to balance them against the inflammatory properties of the sugar and eggs - but I doubt you'd do better with many recipes!

Interestingly, with Mr Martin's emphasis being on desserts, we both thought that the cake was rather more a dessert and rather less a cake - but even so, I'd be happy to eat it at any time of the day!

ORANGE & ALMOND CAKE

Ingredients :
2 oranges
225g caster sugar 
6 free-range eggs 
250g ground almonds 
4 tbsp flaked almonds.

Method : 
 
1.  Preheat the oven to 180C/350F/Gas 4.  Line and butter a 23cm/9in springform cake tin.
 
2.  Simmer the orange in a saucepan of simmering water for 45-60 minutes, or until very soft.  Remove the pan from the heat and leave the oranges to cool in the water.
 
3.  Drain the oranges and roughly chop, discarding the pips.
 
4.  Blend 450g/1lb of chopped orange in a food processor to a purée.  Add the sugar, eggs and ground almonds and blend until smooth.  
 
5.  Pour the mixture into the cake tin and sprinkle over the flaked almonds.
 
6.  Bake in the oven for 25 minutes, then cover loosely with aluminium foil and bake for a further 25-35 minutes, or until cooked through (a skewer inserted in the middle should come out clean).
 
7.  Remove from the oven and set aside to cool.
 

16 November 2011

Avocado Pound Cake - score!

Avocado in a cake recipe.  Who knew it would be so good!

Well, to be honest, I had a sneaking suspicion that it would be good (as the Avocado Pie had been such a resounding success) - but not completely yummy.

I'd been tipped off about this cake by my contact at the Bournemouth Echo, who recommended it to me quite a while ago, having found it on the "Joy the Baker" blog site.  So, when I saw that Avocado Week was fast approaching, I sought it out with intentions of making it to coincide.  Regrettably, real life got in the way and we missed Avocado Week by a mile.  Can't be helped.

Now I really enjoyed making this cake - which doesn't happen with all cakes.  Some just seem to involve parading backwards and forwards across the kitchen floor on some never-ending quest for a lemon squeezer, or another teaspoon, or some cling film, or a tablespoonful of water.  This one, however, was simplicity itself.  Get your ingredients out, get a couple of bowls, a couple of spoons, a knife, your cup measures, a Kenwood Chef and a chair - and get cracking.

The entire cake was made in the Kenwood's bowl, with a slight deviation for sieving the dry ingredients into a separate bowl for inclusion later.  We can forgive the recipe that.

Ready for the oven - if I can just stop eating it!

As the cake mix began to grow (and change colour - it truly is amazing, how an avocado will turn your world green) the aromas just got better and better.  When it came to filling the loaf tins and I had a valid excuse for trying some of the uncooked mix, I was pleasantly surprised at just how yummy it was - which bode so very well for the finished article.

The baked cake is a lovely shade of golden, with interesting cracks in the crust that give a hint of the uranium-green of the contents.  I particularly liked this aspect of the cake, as so often you'll find the colour on the outside.  Like a marble cake, it hides its most distinguishing feature until you cut into it.  Mysterious!

Son & heir described the flavour of the cake as being similar to that of pancakes - and I can see where he was coming from with that.  I'd say that the cake has a flavour all of its own.  It truly is like nothing I'd ever tasted before.  The avocado is in evidence, but subtly.  The yellow cornmeal (polenta) gives the crumb an interesting texture.  The overall texture is that of a very light sponge that manages to be moist whilst holding its shape - and I am just so glad that the recipe makes two, as we've another in the freezer ready to be got out when this one is finished.

Click to enlarge & you'll be able to see the uranium-green peeping through!

This cake is perfect with a cup of tea, or I can imagine would be gorgeous served as a dessert with a sharp fruit compote and some sweet cream.

If your imagination has been caught, do give the cake a go - you'll be so pleased you did!

AVOCADO POUND CAKE (makes 2 loaves)

Ingredients :


3 cups self-raising flour
½ cup yellow cornmeal
½ tsp salt
1 tsp baking powder
1 tsp baking soda
¾ cup unsalted butter, softened
3 cups sugar
4 large eggs
2 teaspoons pure vanilla extract
¾ cup buttermilk
1½ ripe avocados, mashed.

Method :

1.  Preheat oven to 350deg F/180deg C/Gas 4.  Butter and flour two loaf pans and set aside.

2.  In a medium sized bowl, sift together flour, cornmeal, salt, baking powder and baking soda.  Set aside.  Set the four eggs out on the counter to come to room temperature while you beat the butter and sugar.

3.  In the bowl of a stand mixer, beat butter on medium speed until softened and pliable.  Add the sugar and beat until light and fluffy, about 4 minutes.  Add the avocado and beat another minute to incorporate.  Scrape down the sides of the bowl to ensure that everything is thoroughly mixed.

4.  Add the eggs one at a time, beating 1 minute after the addition of each egg.  Beat in vanilla extract.

5.  Reduce the mixer speed to low and add half of the flour mixture, all of the buttermilk, and then the rest of the flour mixture.  Beat just until combined.

6.  Divide the dough between the two loaf pans and place in the oven.  Turn the oven down to 325deg F/170deg C/Gas 3.   Bake for 40-45 minutes or until a skewer inserted in the center of the cakes comes out clean.  Let cool in the pan for 10 minutes, then invert onto a cooling rack to cool completely.


.

16 October 2011

Cinnamon Apple Cake - simply gorgeous!

Well, this cake would take care of three apples if you ever find yourself with three extra - although I wouldn't try to take care of a glut of apples by making successive Cinnamon Apple Cakes.  Not if you want to stay out of hospital, that is.

This cake is more of a dessert than a cake, strictly speaking, and is so completely and utterly divine and moreish, that you could easily overdose.  So be warned!

On our trip around the Blackmore Vale, we picked up a bag of mixed apples.  In it were the most gorgeous Russets, but also another apple - which I've since been told is a Blenheim Orange - that is rather like a Cox, but with a lighter flesh that is almost foamy.  They both taste like garden apples should, that immediate floral note swiftly followed by the sharpness that is then taken down by the sweetness.  The difference between these and supermarket apples is quite ridiculously marked.

So they've sat there, while we munch our way through the gorgeous Russets - our favourite apples - while I've been deciding what to do with them.

Somewhere in the fevered far reaches of my brain, a plan had started to form as regards an apple cake.  Built along the lines of a muffin mix (i.e. using vegetable oil instead of butter) and supported by ground almonds for texture and weight, plus cinnamon because well, cinnamon always goes well with apple and just in case the cooking chases all the flavour from these apples.

I was in two minds as to whether to grate the apples, or cube them.  I even contemplated grating and cubing, but was glad I settled for cubes.  The foamy texture of the apple flesh would have simply disintegrated had it have been grated.  As small cubes, it transformed into semi-dried apple which lent a lovely chewiness to the mix.

Just out of the oven

This is the kind of cake that just demands - because of its sweetness - to be served with, ideally, a blob of creme fraiche.  Purely by coincidence, I happened to have a tub of creme fraiche d'Isigny in the fridge, which was absolutely perfect.  I really don't think that cream would have gone as well.  To my mind, you need the slight sharpness of the creme fraiche as light relief from the sweetness.

As a dessert, or for a High Tea, or as part of an Afternoon Tea arrangement, I don't think you could beat this cake.  It is as easy to make as muffins are - with no requirement for blenders, mixers or food processors.  Just a whopping great big bowl and a spoon.  Can't say fairer than that!

The mixture uses the American cup as a measure.  If you don't have a cup measure, pick a small mug, or a tea cup, and use that.  So long as you use the same cup all the way through, you'll be fine.

Oh and by the way - could I be a bit cheeky and ask you, if you have a blogroll on your blog, to include Rhubarb & Ginger (if you like it, anyway!).  If you leave me a message to say you have, I'll reciprocate in kind and include you in my blogroll.  Thanks!

CINNAMON APPLE CAKE (serves 9-12 depending on slice size)

Ingredients :

3 cups of diced apples, cored and skinned
1½ cups sugar
1 cup vegetable oil
¾ cup ground almonds
2 eggs, lightly beaten
2 tsp vanilla extract
2 cups plain flour
2 tsp ground cinnamon
¾ tsp salt
1 rounded tsp baking powder
2-3 tbsp milk, if necessary.

Method :

1.  Pre-heat your oven to 180deg (fan)/350degF/Gas Mark 4.

2.  Mix all the dry ingredients into a large bowl.

3.  In a separate bowl, combine all the wet ingredients.

4.  Pour the wet into the dry, and stir to combine.  If you find the mix is terribly dry, add 2-3 tbsp milk until the mix is moving freely again. 

5.  Grease a non-stick 8" spring form tin and pour in the cake batter.

6.  Flatten the top, then place in the oven for 1 hour.  Take a look at it after 50 minutes and lay a piece of silver foil over the top, if it is very brown.

7.  A skewer will come out clean when the cake is done.  Immediately remove the ring of the spring form, then leave the cake for 10-15 minutes before detaching it from the base.

8.  Leave to cool - and it takes quite a while to cool, so this is best made in the morning if you're planning on eating it in the afternoon/evening.

.

28 September 2011

Chocolate and Beetroot Cake : deep, moist and truly delicious


All this sudden interest in beetroot requires some explanation, I think!

Well I was contacted by the "Love Beetroot" campaign and asked whether I would be interested in working with them to try and find some new delicious recipes for their beetroot.  I was immediately interested, as both hubby and I love beetroot and get through a fair amount of the stuff in salads - but usually just sliced by the side of a green salad.  Hence, I was especially interested in the "thinking outside the box" aspect of trying to include beetroot in unusual or quirky recipes.

I was sent - in the most gorgeous box with a sumptuous purple ribbon - three preparations of beetroot to try, a 250g pack of cooked beetroot in natural juice, a smaller pack of Sweetfire® baby beetroot (which is infused with a chilli, sugar and white wine vinegar marinade) and a pack of baby beetroot that had been dunked in vinegar.

It was an easy decision as to what to make with the natural cooked beetroot, as I'd been hankering after making a Chocolate & Beetroot cake for a while.

The Sweetfire® beetroot took a bit more thinking about.  However, I finally settled on their becoming an integral part of a couscous recipe - which we had for dinner last night.  It was just divine and I'll be blogging it very soon.

The beetroot in vinegar is going to be made into a zesty beetroot salad to accompany a Tenderstem Broccoli & Goat's Cheese tart - and I dare say I'll blog that one (provided it turns out to be as nice as it sounds!).

I will also admit to having bought another pack of natural cooked beetroot, in order that the beetroot fun doesn't need to stop when the supplies run out - so watch this space!

So - back to the cake.  I had been looking for a recipe for a while - since before I was contacted regarding the campaign - and had a Diana Henry recipe tucked up my sleeve.  The majority of the recipes I had seen had involved vegetable oil as the fat in the recipe.  However, I was interested in making a cake that involved butter.  I haven't a clue why, I just wanted butter and beetroot, rather than oil and beetroot.  Diana's recipe was the first one that fitted the bill - and seemed to be the one which matched up best to my mental picture of a chocolate & beetroot cake.

As ever (well, you wouldn't expect anything else, now would you?), I didn't prepare it exactly to the letter of the recipe, in that I wasn't interested in slathering it with a flavoured ganache-style chocolate mixture - I simply melted a pack of milk chocolate together with 10g of butter and smoothed that on top.  I was certainly very happy with the results, as was anyone who accepted a slice.

Most interesting was the reaction of Son & heir.  He'd told me that he wasn't going to touch a cake made with beetroot, as it sounded disgusting.  (Bear in mind, he doesn't like beetroot at the best of times).  He was certainly interested in how it smelled as it was cooking and was intrigued by the look of the thing.  I think the fact that the beetroot had just melted into the whole, helped.  I suspect he was thinking it would be covered in slices of beetroot!  His interest was also encouraged by the sight of a block of milk chocolate being used to ice the cake.

When it came to sampling a slice, he still wouldn't commit himself.  He said he'd have "a mouthful of someone else's slice" and decide after that.  Well, so far, he's eaten probably between a third to a half of the cake, on his own.  I think he likes it.

Just out of the oven!

Hubby was expecting to taste beetroot in the cake itself - I hadn't explained to him that its function was more as regards the texture and moistness of the cake, rather than the flavour.  However, once he got over the fact that he couldn't taste beetroot, he was utterly convinced.  Having had a slice when it was first cut, then another the day after and another the day after that, he reckons (and I agree) that the flavour just keeps getting better.  The cake doesn't dry out, either, as so many chocolate cakes are wont to do.

Look at all that lovely chocolate!
It's my Dad's 80th birthday in December and I'm seriously contemplating making him one of these cakes.  I know it would go down a storm - and it would stay as nice as the day it was made, thus enabling it to be made a wee bit ahead of time.

I can see this one becoming a very definite family favourite.


CHOCOLATE & BEETROOT CAKE  (serves 10-12)

Ingredients :

250g cooked beetroot, coarsely chopped
125g softened butter (I used salted, but use unsalted if you prefer)
75g dark chocolate, broken into pieces
300g soft dark brown sugar
3 large eggs at room temperature
225g self-raising flour, sifted
a quarter of a tsp salt
50g cocoa powder, sifted.


Method :


1.  Pre-heat the oven to 180degC/160degC fan/gas 4.  Line the bottom of a 23cm non-stick springform tin with baking parchment.  Grease the tin if yours isn't a non-stick one.


2.  Chop, or grate, or blitz in a food processor, the beetroot until coarsely chopped.  You are definitely not looking for a puree!  Set aside.


3.  Place a small saucepan on the heat with some water inside and place a bowl on top, so that the water doesn't touch the bottom of the bowl.  Put the chocolate pieces into the bowl and melt by allowing the water to simmer, which in turn will heat the bowl, causing the chocolate to melt.  Do not stir or otherwise tinker with the chocolate - leave it to melt.


4.  Into a larger bowl, place the butter, sugar and eggs and beat until light and pale.


5.  Mix in the melted chocolate, then fold in the flour, salt and cocoa powder with a large metal spoon.


6.  Finally, stir the beetroot gently into the mix.


7.  Transfer the mixture to the cake tin and make a slight dip in the centre with the back of your spoon.  Bake for 45-50 minutes, or until a skewer comes out with just a tiny bit of cake mix still attached.


8.  Leave the cake to cool for 10 minutes in the tin, then remove from the tin and place on a cake rack to cool completely.


9.  When the cake is cool, put the saucepan/water/bowl combination back together again and break a 100g block of milk chocolate into the bowl.  Add 10g of butter and leave to allow them both to melt.


10.  Once melted, mix together with a whisk and pour onto the top of the cake.  Encourage the chocolate out to the sides of the cake, then leave to cool.


Absolutely lovely when served with a dollop of Creme Fraiche d'Isigny.

~:~

Fun Beetroot Fact!

Beta cyanin, the pigment that gives beetroot its colour, is an antioxidant so the humble beetroot could be the key to beating your hangover! Beta cyanin speeds up detoxification in your liver, which enables your body to turn the alcohol into a less harmful substance that can be excreted quicker than normal.  


.

 
Related Posts Plugin for WordPress, Blogger...